

You will often run into circumstances in your application where you want to send some kind of alert to the user. You might want to let them know that they have lost their Internet connection, or that a post failed to upload, or that a photo has finished successfully uploading. In terms of the built-in Ionic components, you could use the AlertController to fulfill this role. However, it does require a little work to set up the alert, and you may not always want to use that style of overlay alert:
In this tutorial, we are going to create a flash message component and service that will allow us to trigger the following code anywhere in our application:
this.flashProvider.show('Base is under attack!', 2000);This will display a message at the top of the screen for 2000ms that will look like this:
It will be overlayed at the top of the application, so you don’t need to worry too much about integrating it into different types of layouts – it should just work everywhere. As you can tell from the GIF above, we are animating this overlay in and out, and we are using the Angular animations library to achieve that.
There are some pre-built libraries you could use to achieve this, but we are going to build our own for the sake of learning. I also think it is generally a good idea to roll your own solution if you just require something simple. Pre-made libraries are usually very extensive and cover a range of use cases you probably won’t need.
Before We Get Started
Last updated for Ionic 3.9.2
Before you go through this tutorial, you should have at least a basic understanding of Ionic concepts. You must also already have Ionic set up on your machine.
If you’re not familiar with Ionic already, I’d recommend reading my Ionic Beginners Guide first to get up and running and understand the basic concepts. If you want a much more detailed guide for learning Ionic, then take a look at Building Mobile Apps with Ionic.
1. Create a New Ionic Application
Let’s get started by generating a new Ionic application, and setting up the component and provider that we will need.
Generate a new Ionic application:
ionic start ionic-flash-message blankRun the following commands to generate the component and provider:
ionic g component Flashionic g provider FlashThe FlashComponent will be the component that is displayed on screen when we trigger a flash message, and the FlashProvider is what we will use to interact with that component anywhere in our application. The way in which we will do this is actually pretty cool and interesting.
In order to be able to use the Flash component throughout the application, we need to make sure to add the components module to the app.module.ts file, and we also need to set up the provider.
Modify src/app/app.module.ts to reflect the following:
import { BrowserModule } from '@angular/platform-browser';
import { ErrorHandler, NgModule } from '@angular/core';
import { IonicApp, IonicErrorHandler, IonicModule } from 'ionic-angular';
import { SplashScreen } from '@ionic-native/splash-screen';
import { StatusBar } from '@ionic-native/status-bar';
import { ComponentsModule } from '../components/components.module';

import { MyApp } from './app.component';
import { HomePage } from '../pages/home/home';
import { FlashProvider } from '../providers/flash/flash';

@NgModule({
  declarations: [MyApp, HomePage],
  imports: [BrowserModule, ComponentsModule, IonicModule.forRoot(MyApp)],
  bootstrap: [IonicApp],
  entryComponents: [MyApp, HomePage],
  providers: [
    StatusBar,
    SplashScreen,
    { provide: ErrorHandler, useClass: IonicErrorHandler },
    FlashProvider,
  ],
})
export class AppModule {}
If you are unfamiliar with how custom components work, I have a basic tutorial explaining custom components here. If you are interested in a much more advanced look at custom components, an entire module in the Elite Ionic course is dedicated to it.
2. Implement the Flash Messages Component
First, we are going to set up the component that we want to display. We will need to design the template, styling, and animations for the component, and we will also need to implement the methods to control the display and hiding of the component.
I’m not going to be covering how the Angular animations library works in-depth here, we are just going to quickly walk through the steps to set it up – I will assume that you are already somewhat familiar with it. If you would like some more background on Angular animations I would recommend checking out these tutorials: Add to Cart with the Web Animations API in Ionic & Animating from the Void: Enter and Exit Animations in Ionic.
Install the Angular Animations library:
npm install @angular/animations --saveInstall the Web Animations API polyfill:
npm install web-animations-js --saveModify src/app/main.ts to reflect the following:
import 'web-animations-js/web-animations.min';
import { platformBrowserDynamic } from '@angular/platform-browser-dynamic';

import { AppModule } from './app.module';

platformBrowserDynamic().bootstrapModule(AppModule);
Modify src/components/components.module.ts to reflect the following:
import { NgModule } from '@angular/core';
import { FlashComponent } from './flash/flash';
import { BrowserModule } from '@angular/platform-browser';
import { BrowserAnimationsModule } from '@angular/platform-browser/animations';

@NgModule({
  declarations: [FlashComponent],
  imports: [BrowserModule, BrowserAnimationsModule],
  exports: [FlashComponent],
})
export class ComponentsModule {}
With that set up, we can get to work on creating the component itself.
Modify src/components/flash/flash.html to reflect the following:
<div (click)="hide()" @messageState *ngIf="active" class="flash-container">
  <div class="message">{{message}}</div>
</div>
The template for this component is reasonably simple. We toggle the component in and out of the DOM by attaching the active class member to an *ngIf directive. This way, when we set active to true it will display, and when we set active to false it won’t. We have the @messageState animation trigger attached to the container as well, which we will use to set up the animation. We also have an event binding set up for hide() so that a user will also be able to tap on the message to dismiss it, rather than waiting for it to timeout.
Next, we are going to set up the class for the component. This will handle the logic for displaying and hiding the flash message, and it will also set up the entry and exit animations.
Modify src/components/flash/flash.ts to reflect the following:
import { Component } from '@angular/core';
import { FlashProvider } from '../../providers/flash/flash';
import { trigger, state, style, animate, transition } from '@angular/animations';

@Component({
    selector: 'flash',
    templateUrl: 'flash.html',
    animations: [
        trigger('messageState', [
            transition('void => *', [
                style({transform: 'translateY(-100%)'}),
                animate('200ms ease-out')
            ]),
            transition('* => void', [
                animate('200ms ease-in', style({opacity: '0'}))
            ])
        ])
    ]
})
export class FlashComponent {

    active: boolean = false;
    message: string = '';

    constructor(private flashProvider: FlashProvider) {
        this.flashProvider.show = this.show.bind(this);
        this.flashProvider.hide = this.hide.bind(this);
    }

    show(message, duration){

        this.message = message;
        this.active = true;

        setTimeout(() => {
            this.active = false;
        }, duration);

    }

    hide(){
        this.active = false;
    }

}
If the animations that we have set up above don’t make sense to you, make sure to check out the tutorial that I mentioned before.
The hide and show functions are reasonably straight-forward – these just handle setting the message and toggling the active status. The interesting part of this component is what we are doing in the constructor:
constructor(private flashProvider: FlashProvider) {
    this.flashProvider.show = this.show.bind(this);
    this.flashProvider.hide = this.hide.bind(this);
}
This is the same technique that this flash messages package uses, and I think it is a fantastic pattern. We are importing the FlashProvider (which we haven’t finished implementing yet) and then we are overriding its methods in the constructor. The flash provider will have the same show and hide functions, and we are binding those to the scope of our flash component. This might be a little confusing so let me walk through the concept a little more.
Our FlashProvider is a singleton service (meaning that there is one instance of it created for the entire application) that can be accessed from anywhere in the application. This is great for our requirements of a flash message because we could call a show method on it from anywhere in the application. However, providers don’t have an associated view/template, so that makes it a little more difficult for us to add the component to the DOM.
Our FlashComponent allows us to easily create the template for our component and interact with that component with various methods, but we can’t easily access the methods of this component anywhere in our application like we can with the provider.
What we are doing in this constructor is binding the show and hide methods in the provider, to the show and hide methods in the component. This means that whenever we call show in our provider, it will actually be calling show in the component. This is what allows us to trigger the showing and hiding of the flash message from anywhere in the application.
Finally, we just need to add a little styling to the component.
Modify src/components/flash/flash.scss to reflect the following:
flash {
  .flash-container {
    position: absolute;
    top: 0;
    width: 100%;
    height: 56px;
    color: #fff;
    background-color: #ff7675;
    border: 1px solid #d63031;
    z-index: 1;
    display: flex;
    align-items: center;
    justify-content: center;
  }
}
We are using absolute positioning at the top of the application so that we don’t really need to worry about how the element is going to interact with the rest of the layout.
3. Implement the Flash Messages Service
In the last section, we bound the methods of our provider to the methods in our component. We don’t actually need to do much to our FlashProvider but we do need to define the methods that we are calling.
Modify src/providers/flash/flash.ts to reflect the following:
import { Injectable } from '@angular/core';

@Injectable()
export class FlashProvider {
  constructor() {}

  show(message, duration) {}

  hide() {}
}
We don’t need to add any logic in here because it is the method in the component that is actually being called, but the functions do still need to be defined so that we can reference them.
4. Use the Flash Messages Service
Now that we have everything set up, we just need to use our new service. Before we can do that, we need to make sure to add the flash component into our root components template.
Modify src/app/app.html to reflect the following:
<flash></flash> <ion-nav [root]="rootPage"></ion-nav>Once you have made that change, you will be able to import the flash provider and trigger a flash message from anywhere. Let’s walk through a quick example.
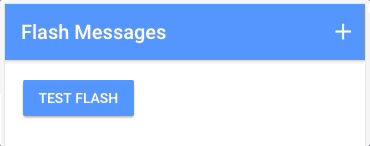
Modify src/pages/home/home.html to reflect the following:
<ion-header>
  <ion-navbar color="primary">
    <ion-title> Flash Messages </ion-title>
    <ion-buttons end>
      <button ion-button icon-only><ion-icon name="add"></ion-icon></button>
    </ion-buttons>
  </ion-navbar>
</ion-header>

<ion-content padding>
  <button ion-button (click)="testFlash()">Test Flash</button>
</ion-content>
Modify src/pages/home/home.ts to reflect the following:
import { Component } from '@angular/core';
import { NavController } from 'ionic-angular';
import { FlashProvider } from '../../providers/flash/flash';

@Component({
  selector: 'page-home',
  templateUrl: 'home.html'
})
export class HomePage {

    constructor(public navCtrl: NavController, private flashProvider: FlashProvider) {

    }

    ionViewDidLoad(){

    }

    testFlash(){
        this.flashProvider.show('Base is under attack!', 2000);
    }

}
You should now be able to click the test button and see a message that looks like this:
Summary
Now with just a couple lines of code, you can trigger a flash message from anywhere in your application. You could customise this component to look or function however you like. This is just a really simple example, but you might want to integrate some options for determining different types of messages (e.g. warning, success, info, and so on). Perhaps you may want to improve the UI a bit by adding a close button or an indicator of how long the message will remain displayed. You could even trigger additional actions when the message is tapped based on the kind of message that is being displayed.
There is a lot you could do with this component, but I think the basic structure of it is super cool as it is extremely easy to integrate into your application.
UPDATE: I released a Part 2 to this tutorial that implements these suggestions, you can check it out here.