
As well as looking cool, animations are best used in applications when they serve a purpose. Animations are great for conveying a range of concepts (direction, anticipation, emotions) and one particularly useful feature of animations is that they draw the attention of the user. Our eyes are naturally drawn to movement, and so animations are a great way to direct a users attention.
We are going to use this concept to improve the usability of an “Add to Cart” feature by adding an animation. We will use the animation to achieve two goals:
- Direct the user’s attention to the quantity indicator
- Conceptually connect the “Add to Cart” button to the “View Cart” button
This is what it will look like once we are done:
We will be using the Web Animations API through Angular’s animation library to build this. I’ve discussed using the Web Animations API in Ionic in quite a bit of depth in Using the Web Animations API in Ionic 2, so I won’t be spending too much time discussing the basics here.
Keep in mind that the Web Animations API is not supported by all browsers. For browsers that do not support it, you must install the polyfill.
Before We Get Started
Last updated for Ionic 3.6.0
Before you go through this tutorial, you should have at least a basic understanding of Ionic concepts. You must also already have Ionic set up on your machine.
If you’re not familiar with Ionic already, I’d recommend reading my Ionic Beginners Guide or watching my beginners series first to get up and running and understand the basic concepts. If you want a much more detailed guide for learning Ionic, then take a look at Building Mobile Apps with Ionic.
1. Getting Ready
We are going to start by generating a new Ionic application and then set up all of the dependencies that we need.
Generate a new Ionic application
ionic start add-to-cart blankInstall the Angular Animations Library
npm install @angular/animations@4.1.3 --save --save-exactIt is important to install this version of the library specifically as the latest version is not currently compatible with the current version of Ionic.
Install the Web Animations API Polyfill
npm install web-animations-js --saveAs I mentioned earlier, the polyfill is required to support the Web Animations API on browsers that do not support it natively.
Modify src/app/app.module.ts to reflect the following:
import { BrowserModule } from '@angular/platform-browser';
import { BrowserAnimationsModule } from '@angular/platform-browser/animations';
import { ErrorHandler, NgModule } from '@angular/core';
import { IonicApp, IonicErrorHandler, IonicModule } from 'ionic-angular';
import { SplashScreen } from '@ionic-native/splash-screen';
import { StatusBar } from '@ionic-native/status-bar';

import { MyApp } from './app.component';
import { HomePage } from '../pages/home/home';

@NgModule({
  declarations: [MyApp, HomePage],
  imports: [BrowserModule, BrowserAnimationsModule, IonicModule.forRoot(MyApp)],
  bootstrap: [IonicApp],
  entryComponents: [MyApp, HomePage],
  providers: [
    StatusBar,
    SplashScreen,
    { provide: ErrorHandler, useClass: IonicErrorHandler },
  ],
})
export class AppModule {}
This will allow you to use the Angular animations library throughout your application, but you will still need to import the various methods we will be using to define our animations wherever you want to use them.
Add the following imports to src/pages/home/home.ts:
import { Component, ChangeDetectorRef } from '@angular/core';
import { NavController } from 'ionic-angular';
import {
  trigger,
  state,
  style,
  animate,
  transition,
} from '@angular/animations';
Notice that we are also setting up an import for ChangeDetectorRef – this is unrelated to animations but I will discuss why we are importing this a little later.
Add the following import to src/app/main.ts
import 'web-animations-js/web-animations.min';2. Set up the Basic Template
Before we get started with implementing the animations, we are going to set up the basic template that we will be working on. This will just be a basic card layout where each card has a “Add to Cart” button.
Modify src/pages/home/home.ts to reflect the following:
import { Component, ChangeDetectorRef } from '@angular/core';
import { NavController } from 'ionic-angular';
import { trigger, state, style, animate, transition } from '@angular/animations';

@Component({
    selector: 'page-home',
    templateUrl: 'home.html'
})
export class HomePage {

    items: Object[] = []
    itemsInCart: Object[] = [];

    constructor(private navCtrl: NavController, private changeDetector: ChangeDetectorRef) {

        this.items = [
            {title: 'Something', quantityInCart: 0},
            {title: 'Something', quantityInCart: 0},
            {title: 'Something', quantityInCart: 0},
            {title: 'Something', quantityInCart: 0}
        ];

    }

    addToCart(item){

        item.quantityInCart += 1;
        this.itemsInCart.push(item);

    }

}
Modify src/pages/home/home.html to reflect the following:
<ion-header no-border>
<ion-navbar color="primary">
<ion-title> Cart Example </ion-title>
<ion-buttons right>
<button ion-button icon-only>
<ion-badge *ngIf="itemsInCart.length">{{itemsInCart.length}}</ion-badge>
<ion-icon name="cart"></ion-icon>
</button>
</ion-buttons>
</ion-navbar>
</ion-header>
<ion-content>
<ion-card *ngFor="let item of items">
<ion-item>
<ion-avatar item-start>
<img src="http://avatars.io/facebook/joshua.morony" />
</ion-avatar>
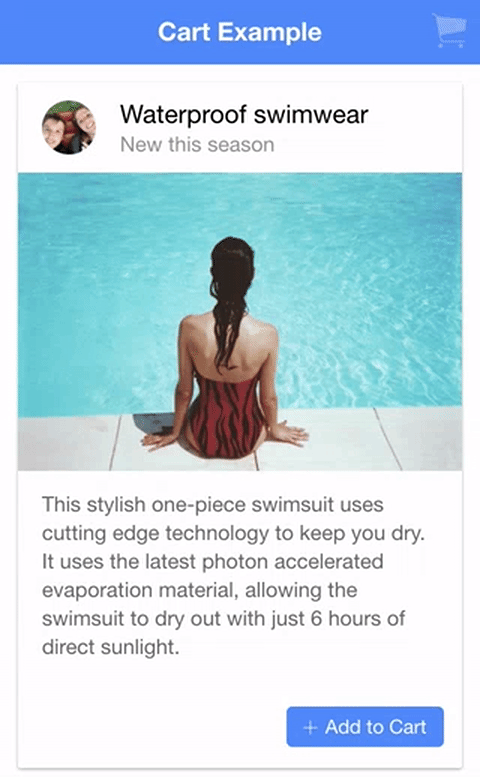
<h2>Waterproof swimwear</h2>
<p>New this season</p>
</ion-item>
<img
src="https://images.unsplash.com/photo-1440756427076-7480f7eab5bd?dpr=2&auto=format&fit=crop&w=1080&h=725&q=80&cs=tinysrgb&crop="
/>
<ion-card-content>
<p>
This stylish one-piece swimsuit uses cutting edge technology to keep you
dry. It uses the latest photon accelerated evaporation material,
allowing the swimsuit to dry out with just 6 hours of direct sunlight.
</p>
</ion-card-content>
<div class="cart-buttons">
<button *ngIf="item.quantityInCart" color="light" ion-button small>
{{item.quantityInCart}}
</button>
<button (click)="addToCart(item)" ion-button icon-left small>
<ion-icon name="add"></ion-icon>
Add to Cart
</button>
</div>
</ion-card>
</ion-content>Modify src/pages/home/home.scss to reflect the following:
page-home {
  .cart-buttons {
    margin: 10px;
    float: right;
  }
}
At this point, we will have the basic layout minus the animations. You can add an item to the cart and the indicator will be updated appropriately, but it will not be animated.
3. Create the Animation Triggers
Now that we have our application set up, we can start implementing the animations we need. When using the Web Animations API in Ionic, we need to define the animations that we want to use in the @Component metadata. Let’s define these animations first and then we will talk through them.
Modify the
@Componentmetadata in src/pages/home/home.ts to reflect the following:
@Component({
    selector: 'page-home',
    templateUrl: 'home.html',
    animations: [
        trigger('cartBadge', [
            state('idle', style({
                opacity: '0.3',
                transform: 'scale(1)'
            })),
            state('adding', style({
                opacity: '1',
                transform: 'scale(1.3)'
            })),
            transition('idle <=> adding', animate('300ms linear')),
            transition('void => *', [
                style({transform: 'translateX(200%)'}),
                animate('300ms ease-in-out')
            ])
        ]),
        trigger('addButton', [
            state('idle', style({
                opacity: '0.3'
            })),
            state('adding', style({
                opacity: '1',
                fontWeight: 'bold'
            })),
            transition('idle <=> adding', animate('300ms linear')),
            transition('void => *', [
                style({transform: 'translateX(200%)'}),
                animate('300ms ease-in-out')
            ])
        ])
    ]
})
To define our animations, we have added an animations array to the metadata. We define two triggers here, each of those triggers has animations defined for two different states. We can then define a transition that defines how one state should transition into another. Let’s examine the cartBadge trigger a little more closely.
The cartBadge trigger is the trigger that we will attach to the cart button and quantity indicator in the navbar. What we want to happen is that when the animation is triggered, it will animate in a way that will draw attention to it.
We define an idle state for this trigger, which will be the default state, giving it a low opacity and it will be scaled to its natural size. We also define an adding state that will give it full opacity and it will scale it to 130% of its natural size.
Then we add a transition to define how we want to animate between these two states. We define a transition for idle <=> adding which means we want to use this transition when the state transitions from idle to adding, and also when the state transitions from adding to idle. With this transition, any time the state changes, the properties we specified will be animated over 300ms with a linear easing.
We also define another transition that looks like this:
'void => *';Unlike our previous transition, this is a one-way transition, so it will only occur when the state changes from void to * (not the other way around). These are both special states. The void state indicates that the element is not yet attached to the view (for example, it may be removed because of an *ngIf), and the * is a wildcard state that will match all states. So, this transition will occur when the element changes from not existing to any state. For this transition, we define the styles that we want to animate directly in the transition itself. In this case, we are using translateX to move the element off screen to the right so that when the element is added to the view, it will animate in from the right to its normal position (over 300ms).
We define very similar states and transitions for the addButton trigger.
4. Attach the Animations to Elements
Now that we have our animations defined, we need a way to apply them to particular elements, and we also need a way to indicate what “state” that element is in so that the appropriate animation is applied when that state changes.
To start, we are going to create some variables to keep track of the state of the view cart button, and of the add to cart button.
Modify src/pages/home/home.ts to reflect the following:
import { Component, ChangeDetectorRef } from '@angular/core';
import { NavController } from 'ionic-angular';
import { trigger, state, style, animate, transition } from '@angular/animations';

@Component({
    selector: 'page-home',
    templateUrl: 'home.html',
    animations: [
        trigger('cartBadge', [
            state('idle', style({
                opacity: '0.3',
                transform: 'scale(1)'
            })),
            state('adding', style({
                opacity: '1',
                transform: 'scale(1.3)'
            })),
            transition('idle <=> adding', animate('300ms linear')),
            transition('void => *', [
                style({transform: 'translateX(200%)'}),
                animate('300ms ease-in-out')
            ])
        ]),
        trigger('addButton', [
            state('idle', style({
                opacity: '0.3'
            })),
            state('adding', style({
                opacity: '1',
                fontWeight: 'bold'
            })),
            transition('idle <=> adding', animate('300ms linear')),
            transition('void => *', [
                style({transform: 'translateX(200%)'}),
                animate('300ms ease-in-out')
            ])
        ])
    ]
})
export class HomePage {

    items: Object[] = []
    itemsInCart: Object[] = [];
    cartBadgeState: string = 'idle';

    constructor(private navCtrl: NavController, private changeDetector: ChangeDetectorRef) {

        this.items = [
            {title: 'Something', quantityInCart: 0, addButtonState: 'idle'},
            {title: 'Something', quantityInCart: 0, addButtonState: 'idle'},
            {title: 'Something', quantityInCart: 0, addButtonState: 'idle'},
            {title: 'Something', quantityInCart: 0, addButtonState: 'idle'}
        ];

    }

    addToCart(item){

        item.quantityInCart += 1;
        this.itemsInCart.push(item);

        item.addButtonState = 'adding';
        this.cartBadgeState = 'adding';
        this.changeDetector.detectChanges();

    }

    addToCartFinished(item){
        this.cartBadgeState = 'idle';
        item.addButtonState = 'idle';
    }

}
We have added a cartBadgeState class member that we will use to keep track of the state the view cart button is in, and then we have added a addButtonState property to each item individually (since we only want the animation to apply to a single button at a time, not all of them at once).
We’ve extended the addToCart function to change the states of both the specific add to cart button and the view cart button to adding. Since we have changed the state from idle to adding our idle <=> adding transition is going to be triggered, and so the animation will play.
We are also doing something weird here:
this.changeDetector.detectChanges();This is why we needed to import the ChangeDetectorRef. Without manually calling detectChanges() here the following error can be triggered:
Expression has changed after it was checked. Previous value: 'adding'. Current value: 'idle'.I am not entirely sure what the cause of this issue is, or whether it is a bug or not, but manually triggering detectChanges after modifying the state solves the issue.
We have also added an additional addToCartFinished function that will reset the states for us back to idle (which will trigger our idle <=> adding transition again).
Now we just need to add the animations to the template.
Modify src/pages/home/home.html to reflect the following:
<ion-header no-border>
  <ion-navbar color="primary">
    <ion-title> Cart Example </ion-title>
    <ion-buttons right>
      <button ion-button icon-only>
        <ion-badge *ngIf="itemsInCart.length" [@cartBadge]="cartBadgeState"
          >{{itemsInCart.length}}</ion-badge
        >
        <ion-icon [@cartBadge]="cartBadgeState" name="cart"></ion-icon>
      </button>
    </ion-buttons>
  </ion-navbar>
</ion-header>

<ion-content>
  <ion-card *ngFor="let item of items">
    <ion-item>
      <ion-avatar item-start>
        <img src="http://avatars.io/facebook/joshua.morony" />
      </ion-avatar>
      <h2>Waterproof swimwear</h2>
      <p>New this season</p>
    </ion-item>

    <img
      src="https://images.unsplash.com/photo-1440756427076-7480f7eab5bd?dpr=2&auto=format&fit=crop&w=1080&h=725&q=80&cs=tinysrgb&crop="
    />

    <ion-card-content>
      <p>
        This stylish one-piece swimsuit uses cutting edge technology to keep you
        dry. It uses the latest photon accelerated evaporation material,
        allowing the swimsuit to dry out with just 6 hours of direct sunlight.
      </p>
    </ion-card-content>

    <div class="cart-buttons">
      <button
        *ngIf="item.quantityInCart"
        [@addButton]="item.addButtonState"
        (@addButton.done)="addToCartFinished(item)"
        color="light"
        ion-button
        small
      >
        {{item.quantityInCart}}
      </button>
      <button (click)="addToCart(item)" ion-button icon-left small>
        <ion-icon name="add"></ion-icon>
        Add to Cart
      </button>
    </div>
  </ion-card>
</ion-content>
We attach the animations to a particular element by setting up a property binding in the following format:
[@addButton]="item.addButtonState"This binds the state of the addButton trigger to whatever the value of item.addButtonState is. This way, in order to change the state all we need to do, is change the value of item.addButtonState.
We can also detect when the animation has completed, which we are doing here:
(@addButton.done)="addToCartFinished(item)to trigger our function that handles resetting our states for us. If you run the application now, you should be able to click the add to cart button to trigger the animations!
Summary
This is not a complete add to cart implementation, as we have mostly just focused on the add to cart animation rather than the overall functionality (we are missing remove from cart functionality, for example). However, this should serve as a good example of how to use the Web Animations API in Ionic in a realistic and useful way.