

A while ago I wrote a bit of a summary of the different physics system in Phaser, which covered a little bit about how they work and I also followed that up a little later with a more in-depth tutorial on using the Ninja physics system.
To save you having to read the entire article, the three physics systems are: Arcade, Ninja and P2. Arcade is the most commonly used and has support for basic physics and collisions (gravity, velocity, acceleration), P2 is much more advanced and supports complex physics and collisions (springs, joints and so on). Ninja is sort of this awkward in between system that I don’t think is really being supported.
I use the Arcade system for just about every game I create, but the biggest downfall is that it only supports AABB or rectangle vs rectangle collisions. What this basically means is that the hit areas for your sprites have to be boxes, they can’t be circles or triangles or anything else.
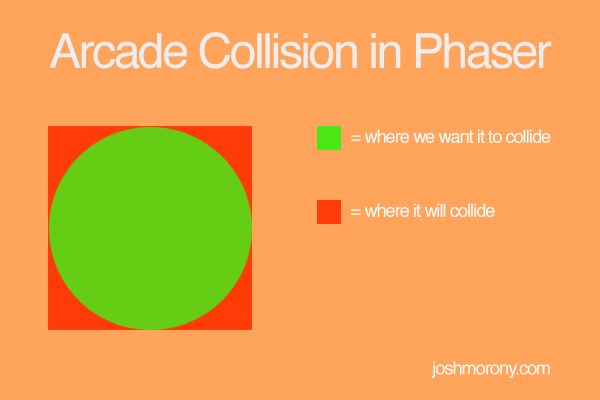
As the image above shows, this doesn’t mean that you can’t use different shaped sprites, but the hit detection for them is going to be a bit off. In some games this is fine and barely noticeable, but in some games it makes the arcade system unusable. One example of this is a game that uses sloped surfaces:
This type of game would not be possible with the default Arcade physics system in Phaser.
Introducing the Arcade Slopes Plugin
I love the arcade physics system, and I really don’t like using the Ninja physics system, so when I came across the Arcade Slopes plugin by Hexus I was pretty happy. Basically, the plugin allows you to use the same sloped surfaces Ninja physics supports when using the Arcade physics system. You can have a play around with the demo Hexus created to see what it looks like:
Phaser can’t automagically work out what the shape of a tile is based on transparency, instead you need to map your tile to one of the supported tile shapes. Take a look at this sprite sheet for example:
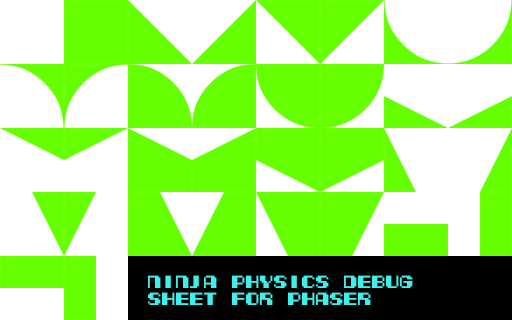
This sheet contains 34 different tiles, and represents every tile shape that is supported by this plugin. You can use whatever sprites you like as your tiles, but in the end the collision area will reflect these shapes so it’s best to make sure the general shape is pretty similar.
In this tutorial we are going to make use of the Arcade Slopes Plugin to create our own little game demo with sloped surfaces while using the Arcade physics system.
Before we Get Started
We won’t be starting off from scratch in this tutorial, instead we’ll be using the code from a previous tutorial on building a parallax background effect in Phaser but that’s just to add a litte decoration. There’s no need to complete that tutorial first, but I won’t be explaining the portions of the code that are used to create the background in this tutorial.
This tutorial will also use the ECMAScript 6 template from this tutorial.
Building a Simple Game with the Arcade Slopes Plugin
I’ve been going on and on lately about how much I like the game Alto, and have created some tutorials on how to recreate some parts of that game in Phaser. To carry on that trend, we’re also going to be going for a bit of an Alto theme with this example by making some slopes surfaces for our player to “snowboard” on. Admittedly, our example is going to look quite a bit worse than Alto does, but if you were to use some nicer sprites you could get something pretty close.
I will be using the following sprite sheet, which is just a whited out version of the debug sprite sheet I showed you above:

I know it just looks likes a big empty space, but there are some sprites there so go ahead and save it to your computer (or just download all of the resources by entering your email address above).
1. Create a Tile Map with Tiled
First we will need to create a tile map. Basically we have various tiles that we want to be part of our level (maybe a square grass tile, sloped grass tile, half tile and so on), and a tile map is a chunk of JSON that tells Phaser where we want these tiles to display.
You can use Tiled, which is a free tile map editor, to create these JSON files. It comes with a GUI editor so that you can easily design your levels:
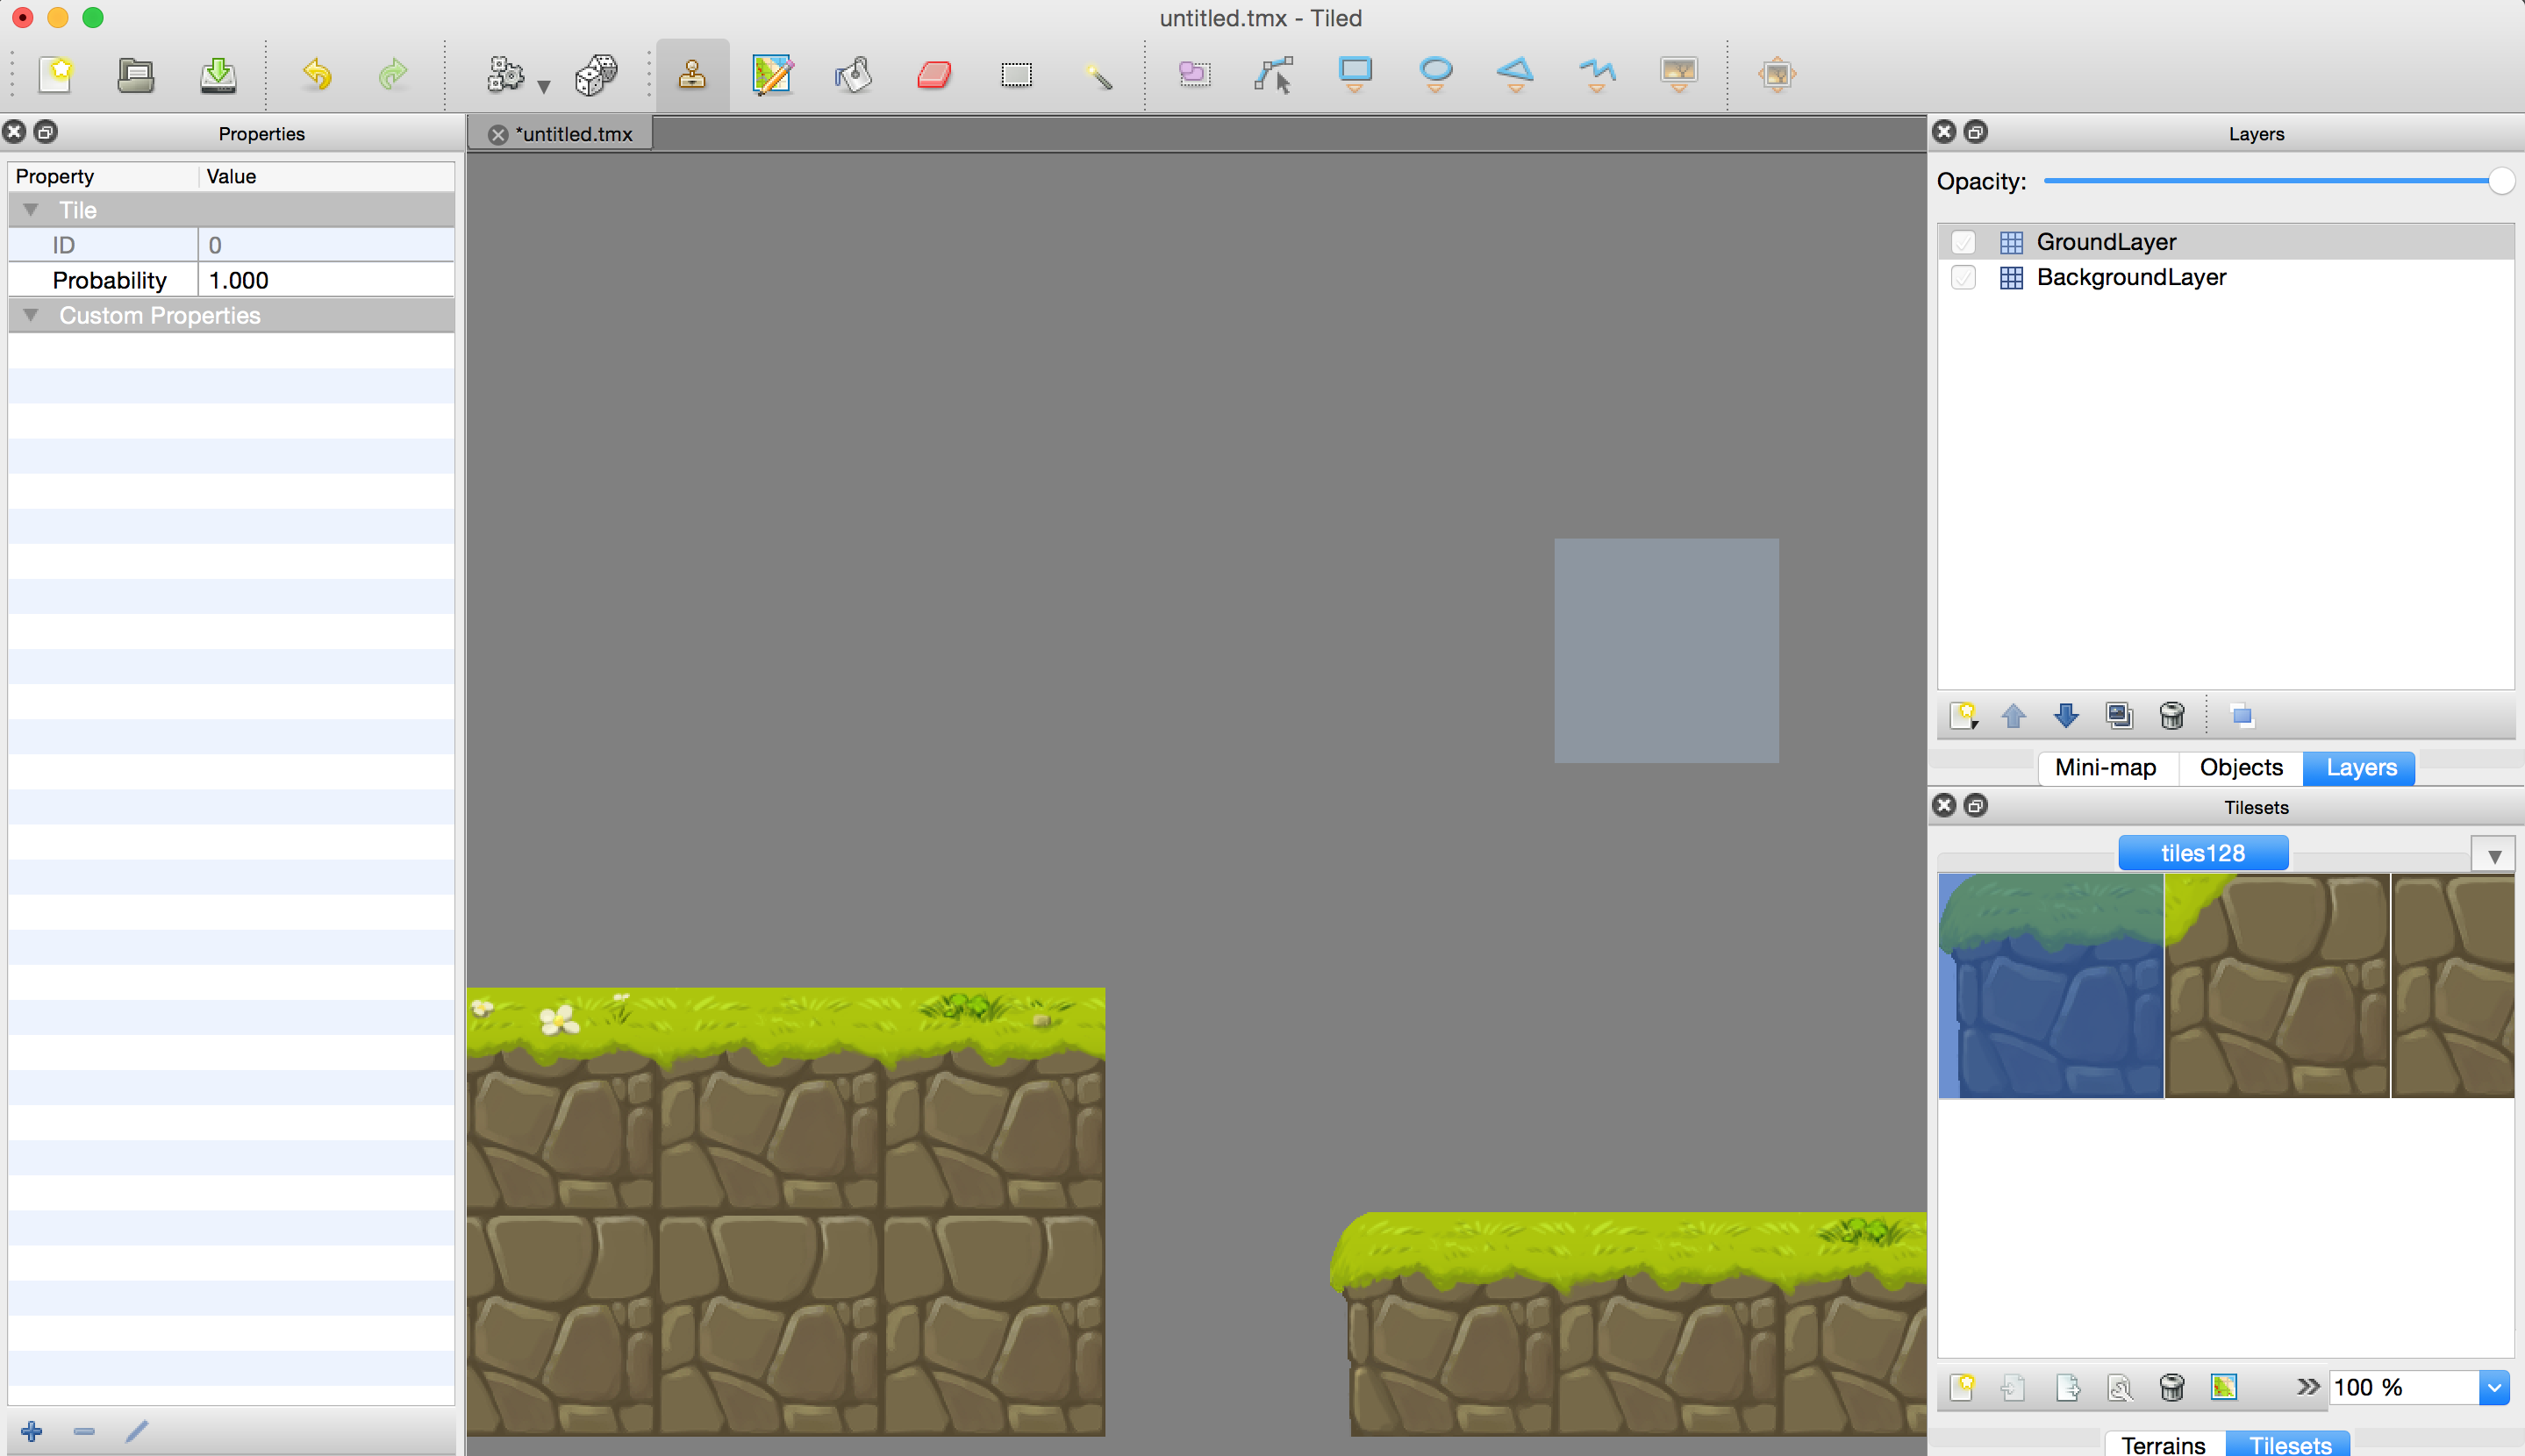
For more information on how to create a tile map, take a look at this tutorial. We only require a single layer for this tutorial, and take note of the name of that layer. By default it is called “Tile Layer 1”, if you change the name it is important to note, because you will need to supply this name to Phaser later.
Once you have created your tilemap, save it in your assets folder. You will also need to save a copy of the spritesheet you imported into Tiled in the assets folder as well.
If you want to use the same tile map that I am using you can grab it from the download pack for this tutorial.
2. Preload Assets
We are going to preload the new assets we need now, which includes the tilemap you would have just created (or you can just use the one provided), the tile sheet that the tile map uses (e.g. the whited out tiles above), as well as a simple sprite that will be used as our player.
Modify the
preloadmethod in the Preload state to reflect the following:
preload() {
		this.game.load.image('mountains-back', 'assets/mountains-back.png');
		this.game.load.image('mountains-mid1', 'assets/mountains-mid1.png');
		this.game.load.image('mountains-mid2', 'assets/mountains-mid2.png');
	    this.game.load.tilemap('tilemap', 'assets/tiles.json', null, Phaser.Tilemap.TILED_JSON);
	    this.game.load.spritesheet('tiles', 'assets/ninja-tiles64.png', 64, 64);
		this.game.load.image('player', 'assets/player.png');
	}
Make sure that you place all of these assets inside of your assets folder.
3. Include the Arcade Slopes Plugin
To include the Arcade slopes plugin in the game, we will need to include its Javascript file. You can find a copy of the plugin here.
Copy the phaser-arcade-slopes.min.js file to static/js/phaser-arcade-slopes.min.js (note: you will have to create the js folder)
Add the following script to your index.html file to include it
<script src="js/phaser-arcade-slopes.min.js"></script>and you will also need to initialise it. You can do that by adding the following code to the create method in the Main state:
this.game.plugins.add(Phaser.Plugin.ArcadeSlopes);3. Add the Tilemap
We’ve got all the resources we need loaded in and ready to go now, so let’s kick things off by adding our tilemap to the game.
Modify the
createmethod in the Main state to include the following:
this.map = this.game.add.tilemap('tilemap');
this.map.addTilesetImage('ninja-tiles', 'tiles');

this.ground = this.map.createLayer('collision');
this.ground.resizeWorld();

this.game.slopes.convertTilemapLayer(this.ground, {
  2: 'FULL',
  3: 'HALF_BOTTOM_LEFT',
  4: 'HALF_BOTTOM_RIGHT',
  6: 'HALF_TOP_LEFT',
  5: 'HALF_TOP_RIGHT',
  15: 'QUARTER_BOTTOM_LEFT_LOW',
  16: 'QUARTER_BOTTOM_RIGHT_LOW',
  17: 'QUARTER_TOP_RIGHT_LOW',
  18: 'QUARTER_TOP_LEFT_LOW',
  19: 'QUARTER_BOTTOM_LEFT_HIGH',
  20: 'QUARTER_BOTTOM_RIGHT_HIGH',
  21: 'QUARTER_TOP_RIGHT_HIGH',
  22: 'QUARTER_TOP_LEFT_HIGH',
  23: 'QUARTER_LEFT_BOTTOM_HIGH',
  24: 'QUARTER_RIGHT_BOTTOM_HIGH',
  25: 'QUARTER_RIGHT_TOP_LOW',
  26: 'QUARTER_LEFT_TOP_LOW',
  27: 'QUARTER_LEFT_BOTTOM_LOW',
  28: 'QUARTER_RIGHT_BOTTOM_LOW',
  29: 'QUARTER_RIGHT_TOP_HIGH',
  30: 'QUARTER_LEFT_TOP_HIGH',
  31: 'HALF_BOTTOM',
  32: 'HALF_RIGHT',
  33: 'HALF_TOP',
  34: 'HALF_LEFT',
});

this.map.setCollisionBetween(2, 34, true, 'collision');
The first thing we do here is create a new tilemap using the JSON tilemap we just preloaded. Then we add the tileset we used (the whited out tiles from before).
Notice that when using addTilesetImage I am supplying a parameter of ninja-tiles. This is because that is what I called the tile set when importing it into the Tiled program. The other paramaters is the key you gave the tileset when loading it in the preload method.
Next we add a new tilemap layer. Our tilemap only has one layer, which in this case is called ‘collision’. You need to make sure that you change this to whatever your layer name was in Tiled, by default it is “Tile Layer 1” so you may need to change it to that. The resizeWorld call following that resizes the game world to fit the tilemap layer we just added.
Next we map the tiles contained in our layer to the supported tile types by using the convertTilemapLayer function. Finally, we call the setCollisionBetween function to set which tiles will cause a collision (the first tile in the tilesheet is just a blank space, so we don’t want that to cause a collision).
If you take a look at the game now it should look something like this:
the bottom part of the tilemap is cut off but we’ll fix that in a moment.
4. Add the Player
Now let’s add our player to the game, which is pretty much just going to be a blue rectangle:
![]()
(this is actually just a sprite I created for rain drops in another tutorial, so it’s getting a bit of a promotion)
Add the following code to the
createmethod in the Main state:
this.player = this.game.add.sprite(100, 50, 'player');
this.game.physics.arcade.enable(this.player);
this.player.body.gravity.y = 2000;

this.game.slopes.enable(this.player);
this.game.camera.follow(this.player);
Here we add the player to the game, enable physics on it and give it some gravity. We also enable the slopes plugin on the player by calling the enable method, and we set the camera to follow the player.
We also need to make sure the player collides with the tilemap, so we will need to add a little more code.
Add the following code to the
updatemethod in the Main state:
this.game.physics.arcade.collide(this.player, this.ground);If you take a look at the game now it should look like this:

5. Adding Controls
Adding slopes to our game isn’t much fun if we can’t use them, so we’re going to map some controls that will allow us to move the player around the screen.
Add the following code to the
createmethod in the Main state:
this.controls = this.input.keyboard.addKeys({
  up: Phaser.KeyCode.W,
  left: Phaser.KeyCode.A,
  right: Phaser.KeyCode.D,
});
Add the following code to the
updatemethod in the Main state:
if (this.controls.left.isDown) {
  this.player.body.velocity.x -= 20;
}

if (this.controls.right.isDown) {
  this.player.body.velocity.x += 20;
}

if (this.controls.up.isDown) {
  this.player.body.velocity.y -= 100;
}
Now you will be able to use the ‘W’, ‘A’, and ‘D’ keys on your keyboard to control the player, like this:
Summary
The arcade physics system is great to use for mobile games since we have less processing power and this plugin really opens up a whole new range of possibilities for the Arcade physics system in Phaser, so a huge thanks to Hexus for creating it!