

As I’ve stressed before, atmosphere is an extremely important element in a game that can turn a fun game into a masterpiece. One great way to add some atmosphere to your game is to add a day and night cycle (imagine how much less fun Minecraft would be with no night).
This tutorial, and the one before it, is inspired by the mobile game Alto which I think absolutely nails the atmosphere in the game. Like in Alto, the “night” in your game doesn’t necessarily need to have anything other than a visual effect on the game, but you could also quite easily modify the gameplay to tie into the time of day in the game (e.g. spawn night time monsters, change the music and so on).
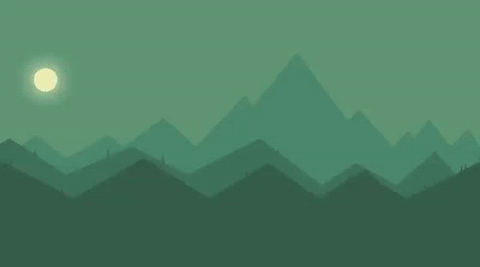
Here’s what we will be creating:
There’s going to be two main things we need to implement here. We will need sprites for the sun and the moon, and we will need to tween them in our game so that the sun rises and sets and so does the moon.
As you will have hopefully noticed in real life, when the sun goes down it has a bit of an effect on the world around us… mainly that it gets pretty dark. Phaser doesn’t have a lighting system by default, and although you can create some pretty cool lighting effects with HTML5 it’s not going to be the best idea to implement something complex like this in Phaser if we want it to run well on mobile.
Instead we will be simulating lighting by tweening the colour of our background sprites. As the sun goes down, we will slowly transition their colour to go from the original, to something much darker, and back again when the sun comes back up.
Before we Get Started
This tutorial uses the ES6 template described in this tutorial. It is not necessary to read that tutorial before attempting this tutorial, but it may help give some context – especially if you are not familiar with ES6 and how to structure a Phaser game with ES6. You will need to have both Git and Node installed to complete this tutorial.
We will also be building on top of a previous tutorial, where we create a parallax background. It’s also not necessary to complete this tutorial first, but if you want to follow along step by step it will make it a lot easier as that is what I will be referencing.
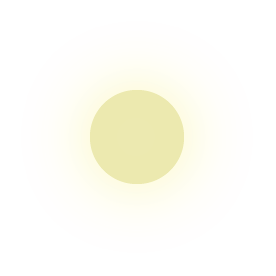
For the most part we already have all the assets we need for this tutorial included, but we’ll be introducing two more sprites, our sun:
and moon:
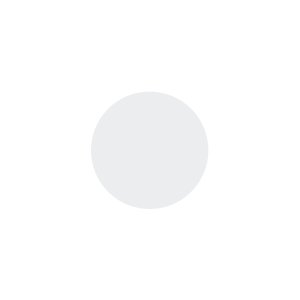
if you haven’t already downloaded the source code for the tutorial, you should add both of these to your static/assets folder. These aren’t exactly the most amazing assets in the world, but they do look sunnny and moony, and I created them so you can feel free to use them in whatever projects you like.
If you missed it in the last tutorial I also created the background graphics, but they were copied almost exactly from the game Alto so please just use those graphics for this tutorial, not your own projects.
Update the Preload State
Since we have added some new sprites to our game we will need to load them in the preload state as well.
Modify Preload.js to reflect the following:
class Preload extends Phaser.State {
  preload() {
    this.game.load.image('mountains-back', 'assets/mountains-back.png');
    this.game.load.image('mountains-mid1', 'assets/mountains-mid1.png');
    this.game.load.image('mountains-mid2', 'assets/mountains-mid2.png');
    this.game.load.image('sun', 'assets/sun.png');
    this.game.load.image('moon', 'assets/moon.png');
  }

  create() {
    this.game.state.start('Main');
  }
}

export default Preload;
Creating a Day Cycle Plugin
We’re going to do something a bit different in this tutorial. Rather than adding the code to make our day cycle happen directly to our main state, we are going to create a separate “plugin” or “object” that we can use to handle it instead.
It might look a little more complicated to do it this way, but it has the benefit of keeping our code much more organised, and allows us to easily reuse the plugin in other games as well.
IMPORTANT: The structure used in this tutorial requires the use of ES6. I will be using the Phaser game template discussed in this tutorial.
If you are using the template I’ve linked above, then you may notice that there is a file called ExampleObject.js in the objects folder, and in the main state we are importing that object which makes it available for us to use. We will be using the same structure to build our DayCycle object.
Create a new file in the objects folder called DayCycle.js and add the following code:
class DayCycle {
  constructor(game, dayLength) {
    this.game = game;
    this.dayLength = dayLength;
    this.shading = false;
    this.sunSprite = false;
    this.moonSprite = false;
  }

  initSun(sprite) {
    this.sunSprite = sprite;
    this.sunset(sprite);
  }

  initMoon(sprite) {
    this.moonSprite = sprite;
    this.moonrise(sprite);
  }

  initShading(sprites) {
    this.shading = sprites;
  }

  sunrise(sprite) {
    //TODO: Implement
  }

  sunset(sprite) {
    //TODO: Implement
  }

  moonrise(sprite) {
    //TODO: Implement
  }

  moonset(sprite) {
    //TODO: Implement
  }

  tweenTint(spriteToTween, startColor, endColor, duration) {
    let colorBlend = { step: 0 };

    this.game.add
      .tween(colorBlend)
      .to({ step: 100 }, duration, Phaser.Easing.Default, false)
      .onUpdateCallback(() => {
        spriteToTween.tint = Phaser.Color.interpolateColor(
          startColor,
          endColor,
          100,
          colorBlend.step,
          1
        );
      })
      .start();
  }
}

export default DayCycle;
We have a partially finished class here, so let’s talk about the stuff we have so far and then we will work through implementing the more interesting functions that are missing.
First, our constructor handles setting up a few member variables that our class will use. We pass in a reference to our game object so that we can interact with it, and we also pass in a dayLength so that we can control how long the day and night cycle should be (from comically quick, to realistically slow).
The initSun, initMoon and initShading functions allow us to pass in the sprites we want to use for various parts of this process and in the case of initShading the sprites we pass in will actually be objects that contain both the sprite, and the “from” and “to” colours for each sprite. The “from” colour will be the tint that the sprite starts with, and the “to” colour is the tint the sprite will transition to at night time. The tinting is handled by the tweenTint function which will handle animating the sprite from one colour to another over the course of the day.
Now let’s implement the functions that we’ve left blank.
Modify the
sunrisefunction to reflect the following:
sunrise(sprite){

        sprite.position.x = this.game.width - (this.game.width / 4);

        this.sunTween = this.game.add.tween(sprite).to( { y: -250 }, this.dayLength, null, true);
        this.sunTween.onComplete.add(this.sunset, this);

        if(this.shading){
            this.shading.forEach((sprite) => {
                this.tweenTint(sprite.sprite, sprite.from, sprite.to, this.dayLength);
            });
        }

    }
This function will be passed in the sprite for our sun. It then sets the x position of the sun to be a little bit off from the right side of the game (one quarter of the game width off from the right side of the screen to be exact). Then we add a “tween” which will animate the sun sprites y position all the way off the top of the screen – the total time for this tween is set to dayLength which is the time of our day.
The important thing here is that we add an onComplete listener to tween, so that when the sun has finished rising we can then trigger the sunset function. In that function we will do the same and trigger the sunrise function once that finished. This creates an endless loops of sunrises and sunsets.
Let’s take a look at the sunset function now.
Modify the
sunsetfunction to reflect the following:
sunset(sprite){

        sprite.position.x = 50;

        this.sunTween = this.game.add.tween(sprite).to( { y: this.game.world.height }, this.dayLength, null, true);
        this.sunTween.onComplete.add(this.sunrise, this);

        if(this.shading){
            this.shading.forEach((sprite) => {
                this.tweenTint(sprite.sprite, sprite.to, sprite.from, this.dayLength);
            });
        }

    }
As you can probably tell, it’s basically the exact same thing just reversed. This time we put the sun sprite on the left side of the screen, and we are animating it to the bottom of the screen instead.
Now that we’ve done that, we can quite easily do the same for the moon.
Modify the
moonriseandmoonsetfunctions to reflect the following:
moonrise(sprite){

        sprite.position.x = this.game.width - (this.game.width / 4);

        this.moonTween = this.game.add.tween(sprite).to( { y: -350 }, this.dayLength, null, true);
        this.moonTween.onComplete.add(this.moonset, this);
    }

    moonset(sprite){

        sprite.position.x = 50;

        this.moonTween = this.game.add.tween(sprite).to( { y: this.game.world.height }, this.dayLength, null, true);
        this.moonTween.onComplete.add(this.moonrise, this);
    }
The only difference here is that the positions are reversed, and that we are not calling the tweenTint function because the sunrise and sunset functions already handle that.
That’s it! Our day cycle plugin is now officially created, all we have to do now is use it in our game.
Use the DayCycle Plugin
We’ve done most of the heavy lifting already, so implementing the DayCycle into our main state is going to be pretty easy.
Modify Main.js to reflect the following:
import DayCycle from 'objects/DayCycle';

class Main extends Phaser.State {
  create() {
    this.game.physics.startSystem(Phaser.Physics.ARCADE);
    this.game.stage.backgroundColor = '#000';

    this.dayCycle = new DayCycle(this.game, 5000);

    let bgBitMap = this.game.add.bitmapData(this.game.width, this.game.height);

    bgBitMap.ctx.rect(0, 0, this.game.width, this.game.height);
    bgBitMap.ctx.fillStyle = '#b2ddc8';
    bgBitMap.ctx.fill();

    this.backgroundSprite = this.game.add.sprite(0, 0, bgBitMap);

    this.sunSprite = this.game.add.sprite(50, -250, 'sun');
    this.moonSprite = this.game.add.sprite(
      this.game.width - this.game.width / 4,
      this.game.height + 500,
      'moon'
    );

    this.mountainsBack = this.game.add.tileSprite(
      0,
      this.game.height - this.game.cache.getImage('mountains-back').height,
      this.game.width,
      this.game.cache.getImage('mountains-back').height,
      'mountains-back'
    );

    this.mountainsMid1 = this.game.add.tileSprite(
      0,
      this.game.height - this.game.cache.getImage('mountains-mid1').height,
      this.game.width,
      this.game.cache.getImage('mountains-mid1').height,
      'mountains-mid1'
    );

    this.mountainsMid2 = this.game.add.tileSprite(
      0,
      this.game.height - this.game.cache.getImage('mountains-mid2').height,
      this.game.width,
      this.game.cache.getImage('mountains-mid2').height,
      'mountains-mid2'
    );

    let backgroundSprites = [
      { sprite: this.backgroundSprite, from: 0x1f2a27, to: 0xb2ddc8 },
      { sprite: this.mountainsBack, from: 0x2f403b, to: 0x96ccbb },
      { sprite: this.mountainsMid1, from: 0x283632, to: 0x8bbcac },
      { sprite: this.mountainsMid2, from: 0x202b28, to: 0x82ad9d },
    ];

    this.dayCycle.initShading(backgroundSprites);
    this.dayCycle.initSun(this.sunSprite);
    this.dayCycle.initMoon(this.moonSprite);
  }

  update() {
    this.mountainsBack.tilePosition.x -= 0.05;
    this.mountainsMid1.tilePosition.x -= 0.3;
    this.mountainsMid2.tilePosition.x -= 0.75;
  }
}

export default Main;
If you’ve followed along from the previous tutorial, you will notice there isn’t actually many changes here. First of all, we are importing our DayCycle plugin at the top of the file and then we create a new instance of it, starting with a dayLength of 5000, or 5 seconds. Obviously this is super quick, but you don’t want to wait around for 10 minutes to see if your code is working or not. You will probably want to bump this length up quite a bit.
Also notice that we are creating the background sprite with bitmap data. Since we are tweening the tint of sprites to simulate light levels, we can’t just have a normal background colour like this:
this.game.stage.backgroundColor = '#b2ddc8';
it needs to be a sprite. So we create a sprite that automatically takes up the full height and width of the game space, this saves us loading a giant sprite and it also means the game can be resized easily to any size.
We of course add our sun and moon sprites, but the most important bit of code here is the following:
let backgroundSprites = [
  { sprite: this.backgroundSprite, from: 0x1f2a27, to: 0xb2ddc8 },
  { sprite: this.mountainsBack, from: 0x2f403b, to: 0x96ccbb },
  { sprite: this.mountainsMid1, from: 0x283632, to: 0x8bbcac },
  { sprite: this.mountainsMid2, from: 0x202b28, to: 0x82ad9d },
];

this.dayCycle.initShading(backgroundSprites);
this.dayCycle.initSun(this.sunSprite);
this.dayCycle.initMoon(this.moonSprite);
This is where we intialise the DayCycle plugin by passing it the sprites we want to use. We also create an array for the background sprites which defines what tint we want to transition from and to.
With that done, the game should now look something like this:
Summary
It wasn’t too much effort to create a pretty cool visual effect, and hopefully this tutorial has highlighted how useful it can be to separate functionality like this out into its own little class or plugin. The more modular your code is, the more easily you can reuse components, and now we could very easily drop that DayCycle object into a different game (or even a different state in the same game) and all we would have to do is initialise it in whatever state it is being used in.