

Many mobile games are 2D, and when building Phaser games for mobile 3D games are not really an option. To keep our games from looking boring and flat there are some techniques we can use to give them more of a three dimensional feel, while still actually being in two dimensions.
One of these techniques are parallax backgrounds. If you consider walking down a street in real life, the “background” you are walking by will have terrain and objects that are of varying lengths away from you. Let’s take a look at this photograph for example:
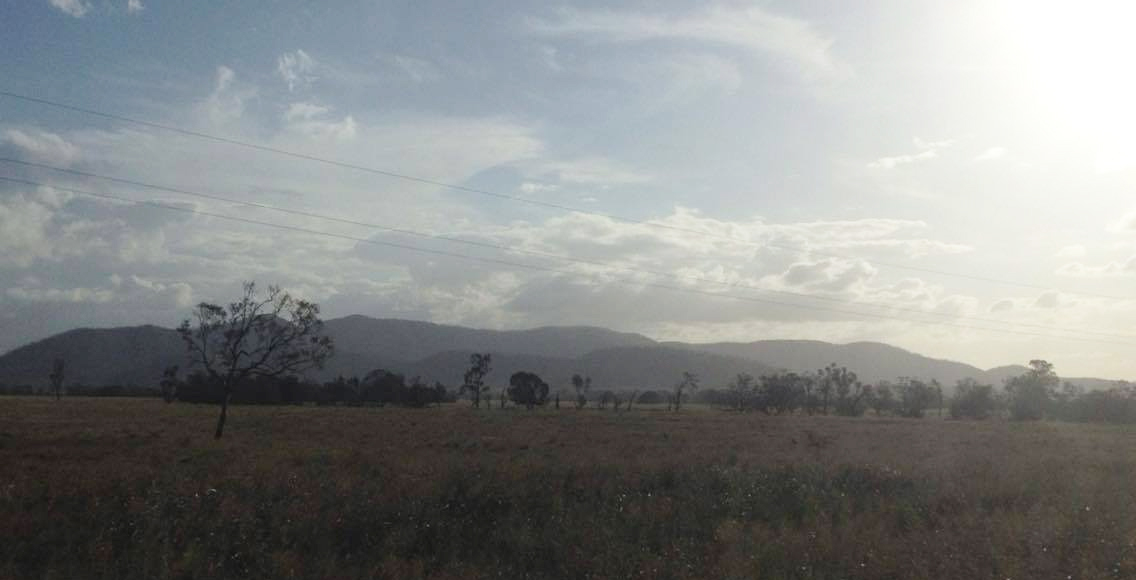
There is the grass in the foreground, a tree line somewhere in the distance, and some hills off on the horizon. As I drive past this scene, the grass will appear to move past me very quickly because it is so close, the trees will appear to move a little slower than the grass, and the hills in the distant will barely appear to be moving.
We can apply this same concept in games by having a layered background, where different sections of the background move at different speeds. This will help give a more three dimensional feeling to the game, rather than just having a single flat image as the background. In this tutorial I will be showing you how to create a background with a parallax effect in Phaser, here’s what we will be building:
Before we Get Started
This tutorial uses the ES6 template described in this tutorial. It is not necessary to read that tutorial before attempting this tutorial, but it may help give some context – especially if you are not familiar with ES6 and how to structure a Phaser game with ES6. You will need to have both Git and Node installed to complete this tutorial.
1. Generate a new Phaser Game
We will start off by generating a new Phaser game based on the ES6 template with the following command:
git clone git clone https://github.com/joshuamorony/phaser-es6-boilerplate phaser-parallax
Once that has finished downloading you should make that game your current working directory:
cd phaser-parallax
and then install all of the dependencies with the following command:
npm install
to view your game at any time you can run the following command:
npm start
and then go to the following address in your browser:
http://localhost:3000
2. Add the Background Assets
In order to create the scrolling parallax effect, we are going to need some assets for the different “layers” in our background. I absolutely love the atmosphere the game Alto creates:

so I’ve mocked up some background layers that are based on that. You can use these backgrounds for the purpose of this tutorial but please do not use them in your own games as they are almost a direct copy of Alto.
You can either provide your own three layers for the background, or grab the assets I created from the download pack that is available above.
Add the background images to the static/assets folder
These are the three background layers we will be using in this example:


3. Preload the Assets
Before we can use these assets in our game, we need to make sure that they are loaded.
Modify the
preloadmethod in the Preload.js state to reflect the following:
preload() {
		this.game.load.image('mountains-back', 'assets/mountains-back.png');
		this.game.load.image('mountains-mid1', 'assets/mountains-mid1.png');
		this.game.load.image('mountains-mid2', 'assets/mountains-mid2.png');
	}
If you are using the assets I provided then you can leave this code as is. If you are using your own then make sure to modify the paths so that they correctly link to the assets you provided.
4. Add the Assets to the Main State
Next we will need to add the backgrounds as tile sprites to the game. This will allow us to repeat the sprite over and over again, making it seem as though the background is infinite. If you’re designing your own background then make sure that the end of the background image links up with the start, otherwise when the image repeats there will be a very obvious line.
Modify the
createmethod in the Main.js state to reflect the following:
create() {

        //Enable Arcade Physics
        this.game.physics.startSystem(Phaser.Physics.ARCADE);

        //Set the games background colour
        this.game.stage.backgroundColor = '#697e96';

        this.mountainsBack = this.game.add.tileSprite(0,
            this.game.height - this.game.cache.getImage('mountains-back').height,
            this.game.width,
            this.game.cache.getImage('mountains-back').height,
            'mountains-back'
        );

        this.mountainsMid1 = this.game.add.tileSprite(0,
            this.game.height - this.game.cache.getImage('mountains-mid1').height,
            this.game.width,
            this.game.cache.getImage('mountains-mid1').height,
            'mountains-mid1'
        );

        this.mountainsMid2 = this.game.add.tileSprite(0,
            this.game.height - this.game.cache.getImage('mountains-mid2').height,
            this.game.width,
            this.game.cache.getImage('mountains-mid2').height,
            'mountains-mid2'
        );
    }
This takes care of adding the sprites to the game, as well as setting a background colour. When we add the images we do a bit of trickery with the y coordinate (which is the second parameter) so that the background always aligns to the bottom of the game. Since our sky is just a solid colour, this means we can resize the game to any size and it will still work.
5. Scroll the Backgrounds
The backgrounds are in the game now but they don’t move, so we don’t really get any kind of 3D effect. To make them move we are going to add some code to the update method, which continually loops as the game runs.
Modify the
updatemethod in the Main.js state to reflect the following:
update() {
        this.mountainsBack.tilePosition.x -= 0.05;
        this.mountainsMid1.tilePosition.x -= 0.3;
        this.mountainsMid2.tilePosition.x -= 0.75;
    }
Now we are constantly modifying the position of the background sprites, and we are doing it to varying degrees so that the back layer moves slower and the front layer moves fastest.
If you take a look at the game now, it should look like this:
Summary
Atmosphere is a huge part of creating a fun and immersive game, and creating a parallax background like this is a great way to work around the limitations of developing a 2D game. You could even extend this further to include a foreground layer, which could include things like trees or buildings, that would display in front of the player sprite.
In a future tutorial, I will be expanding this example even further to include a day and night cycle with some cool lighting effects!