If you’ve taken a look at Ionic 2, then you know it looks pretty different to Ionic 1. Should you want to migrate to Ionic 2, this might leave you wondering how to convert your existing Ionic 1 app into a working Ionic 2 app. In this tutorial I’m going to walk through an example of taking an existing Ionic 1 application and converting it into an Ionic 2 application – it’s actually reasonably straightforward and mostly just copying and pasting with a little tweaking.
DISCLAIMER: At the time of writing this, Ionic 2 is still in Alpha and things may change. If you find that the code in this tutorial no longer works, let me know and I’ll do my best to update it. Also note that Ionic 2 should NOT be used for production applications yet.
In general, an Ionic 1 app is made up of a bunch of controllers, services and templates, so the process of converting an Ionic 1 application into an Ionic 2 application goes something like this (assuming you have a reasonably well structured Ionic 1 application):
- Generate a new Ionic 2 application
- Create a component for each feature your application has
- Copy the relevant code from your Ionic 1 controllers and services into the class definition for each component. Some syntax changes are required here but the end result looks pretty similar to a controller.
- Copy over the templates and update the syntax. Again, there are some changes in the syntax but your templates will end up looking pretty similar.
That’s a pretty big over simplification, there are other changes required outside of just copy and pasting (some things are just fundamentally different, like navigation) – but once you get the hang of it and become more familiar with Ionic 2 it’s pretty easy.
Depending on how closely your Ionic 1 project reflects the Ionic 2 structure, this process could be easier or harder for you. Ideally, the folder structure of your Ionic 1 project should be organised by feature and have all of the code required for a specific function separated out into its own folder (so the controller and template for a “Login” feature is in its own “Login” folder) – this will make the conversion process a lot easier.
Take a look at this image that highlights the difference:
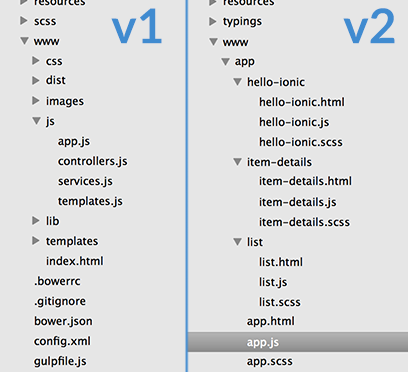
The structure on the left is more common in Ionic 1 applications – you’ll find all of the controllers in one folder, all of the services in one folder, and all of the templates in one folder. The Ionic 2 structure is more like that on the right, with each folder being an individual feature and that folder containing all the code necessary for that feature. This makes the code a lot more modular, allowing you to create components that can be dropped into projects pretty easily – components are a core concept of Ionic 2 and Angular 2. If you want to make it easier to make the switch to Ionic 2, you can start structuring your Ionic 1 applications in this way. If you’ve got a bunch of different features combined into one controller, it’ll make the conversion process a bit harder.
This should all become a lot clearer when we walk through an example of converting an Ionic 1 application into an Ionic 2 application, so let’s jump into that.
Before We Get Started
Before you go through this tutorial, you should have at least a basic understanding of Ionic 2 concepts and the differences to Ionic 1 (otherwise this tutorial might be a little more confusing than it needs to be). If you’re not familiar with Ionic 2 already, the following articles should get you reasonable up to speed:
- Ionic 2 First Look Series: New Angular 2 Concepts & Syntax
- Ionic 2 First Look Series: Your First Ionic 2 App Explained
- Build a Todo App from Scratch with Ionic 2
Introduction
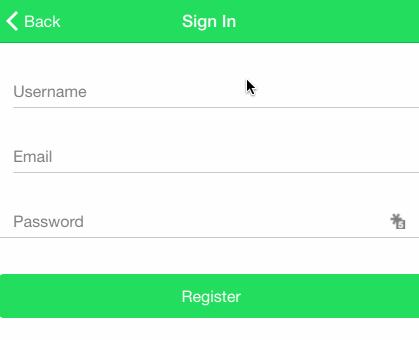
The application we are going to be converting is this Parse authentication application from a previous tutorial of mine. Here’s what it will look like when it’s done:
I’m not going to go through the Parse set up since I’ve already covered that in the last tutorial, so make sure you get an account and app set up on Parse by following the instructions here and when you get to the coding parts you can jump back here (or just complete the whole Ionic 1 tutorial as well, it might help give context to this tutorial).
I’ll follow the same steps I went through for the Ionic 1 tutorial and compare them side by side with Ionic 2.
1. Generate a new Ionic 2 project
First, let’s get a new Ionic 2 project set up (this assumes you’ve already got the Ionic 2 CLI installed, if you haven’t yet, make sure to read the articles I linked above).
Run the following command to generate a new Ionic 2 project:
ionic start ionic2-parse-login --v2
We’re going to make a few modifications to the default template to give ourselves a bit more of a clean slate to work from (rather than the tabs application that is auto generated).
Delete the page1, page2 and page3 folders from the project
Replace the contents of app.html with the following code:
<ion-nav [root]="root"></ion-nav>Modify app.js to reflect the following
import { App, Platform } from 'ionic/ionic';
import './app.scss';

@App({
  templateUrl: 'app/app.html',
})
export class MyApp {
  constructor(platform: Platform) {
    platform.ready().then(() => {
      // Do any necessary cordova or native calls here now that the platform is ready
    });
  }
}
Your app won’t be in a working state now since we have no root page defined, but we will build off of this.
2. Include the Parse Library
Nothing exciting happens here, we are just going to include the Parse library just like we would in Ionic 1 in the index.html file.
Add the following reference to your index.html file:
<script src="http://www.parsecdn.com/js/parse-1.4.2.min.js"></script>Now we need to initialise the Parse library, just like in Ionic 1 we are going to do that in the app.js file but it’s going to look a little different now.
Modify app.js to reflect the following:
platform.ready().then(() => {
  // Do any necessary cordova or native calls here now that the platform is ready
  Parse.initialize('YOUR APP ID', 'JAVASCRIPT KEY');
});
vs Ionic 1
.run(function($ionicPlatform) {
  $ionicPlatform.ready(function() {
    Parse.initialize("YOUR APP ID", "JAVASCRIPT KEY");
  });
});
NOTE: Don’t add the ‘vs Ionic 1’ sections to your code. This is just so you can compare the equivalent Ionic 1 code easily
You will have obtained your App ID and Javascript Key from the Parse set up in the previous tutorial. The concept here is the same, we want to run some code once we know that the app has finished loading, the syntax is just a little different between Ionic 1 and Ionic 2.
3. Create a Login Component
Now we’re getting into some interesting stuff, we’re going to create our first Ionic 2 component which will be a login page. This login page will be our root page and it will allow the user to choose either to Sign in or Sign Up, which will each be their own components.
To create a new component, we can use a handy new feature in the Ionic CLI. Creating a new component means we need to create a new folder, create several files within that folder, and set up all the boilerplate code. Instead of doing all that, you can just use the ionic generate command, e.g:
ionic generate page MyPage
for a full list of what you can generate with this command, run:
ionic generate --list
Let’s use that to create our login component now.
Run the following command to generate the login component:
ionic generate page Login
If you take a look at www/app/login now you will see that it contains a login.js that holds the class definition, a login.html to hold the template, and a login.scss to hold styles for this component.
Now we’re going to modify those to achieve the functionality we want.
Modify login.html to reflect the following:
<ion-navbar secondary *navbar>
  <ion-title> Login </ion-title>
</ion-navbar>

<ion-content>
  <button primary style="width: 100%; padding: 20px;" (click)="signUp()">
    Sign Up
  </button>

  <button secondary style="width: 100%; padding: 20px;" (click)="signIn()">
    Sign In
  </button>
</ion-content>
vs Ionic 1:
<ion-view title="Welcome!">
  <ion-content>
    <a
      href="#/signup"
      class="button button-positive"
      style="width: 100%; margin: 20px 0;"
    >
      Sign Up
    </a>

    <a
      href="#/signin"
      class="button button-positive"
      style="width: 100%; margin: 20px 0;"
    >
      Sign In
    </a>
  </ion-content>
</ion-view>
As you can see, we no longer use <ion-view> and instead use <ion-navbar> to configure our navigation bar. The way in which we specify the styling for an element has changed and we use a slightly different syntax for assigning a click handler (previously we would use ng-click).
In fact, in the Ionic 1 example here we weren’t even using a click handler to begin with, we were using the routing system to link to a new view. We no longer need to do this in Ionic 2, as the primary way to navigate between views is to push and pop them – you will see an example of this shortly.
Now let’s look at creating the class definition for our Login component.
Modify login.js to reflect the following:
import { Page, NavController } from 'ionic/ionic';
import { SigninPage } from '../signin/signin';
import { SignupPage } from '../signup/signup';

@Page({
  templateUrl: 'app/login/login.html',
})
export class LoginPage {
  constructor(nav: NavController) {
    this.nav = nav;

    //This will hold data from our form
    this.data = null;
  }

  signUp() {
    this.nav.push(SignupPage);
  }

  signIn() {
    this.nav.push(SigninPage);
  }
}
It’s hard to provide the equivalent in Ionic 1 here because this is where the two frameworks are fundamentally different. Although it might not be completley accurate to say, you can basically consider components which are made up of classes (like your login.js file here) in Ionic 2 as the replacement for controllers in Ionic 1. The class definition is where you will be able to create data that your template can use and modify with two way data binding (i.e ng-model), functions your template can call and other things we would have used a controller for in Ionic 1.
So in essence, this is replacing the LoginCtrl controller in the Ionic 1 tutorial (except we will be breaking our login controller into three completely separate components). We also use the @Page decorator to specify meta data like the templateUrl for this component (the login.html file we just created) which removes the need to specify it in the routing information like we would have done in Ionic 1, e.g:
.config(function($stateProvider, $urlRouterProvider) {

  $stateProvider
  .state('login', {
    url: '/',
    templateUrl: 'templates/login.html',
    controller: 'LoginCtrl'
  })
  .state('signup', {
    url: '/signup',
    templateUrl: 'templates/signup.html',
    controller: 'LoginCtrl'
  });

  $urlRouterProvider.otherwise("/");

})
Another important difference to note here is how we are importing all the services and components we want to use. The NavController for example allows us to push and pop pages, and to use this we need to first import it and then inject it into our constructor. This isn’t too dissimilar to how you would inject services into controllers in Ionic 1.
If you’re unfamiliar with the push and pop style of navigation, try to think of it like this: Imagine you have a piece of paper, that is your root page. You can push a new piece of paper to the top of the stack and that will become the piece of paper you are looking at. Push another one and you have a stack of there pieces of paper, and you will be looking at the last one you pushed on top. You can then pop the stack of papers, by removing the piece of paper from the top. You are now looking at the second page again. Pop the stack once more and you are back to your root page.
We are also importing the SigninPage and SignupPage components, which will be the other pages in our application, but we haven’t created them yet so this isn’t going to work now.
One final thing to notice is the use of this. Although they’re not really the same thing, you can consider this (which is just plain JavaScript) as the replacement for $scope. Keep in mind that this will refer to whatever the current scope is, so if you reference this within a callback for example, the scope will be different than if you called it from somewhere else. If you have a background in JavaScript you should be pretty familiar with this, but if not this might be worth a read.
4. Create a Signup Component
Next we are going to create a Signup component that will allow the user to register a new account. Again, this will be made up of a class definition and a template.
Run the following command to generate a Signup component:
ionic generate page Signup
Modify signup.html to reflect the following:
<ion-navbar secondary *navbar>
  <ion-title> Sign In </ion-title>
</ion-navbar>

<ion-content>
  <ion-list>
    <ion-input floating-label>
      <ion-label>Username</ion-label>
      <input type="text" value="" [(ng-model)]="username" />
    </ion-input>

    <ion-input floating-label>
      <ion-label>Email</ion-label>
      <input type="text" value="" [(ng-model)]="email" />
    </ion-input>

    <ion-input floating-label>
      <ion-label>Password</ion-label>
      <input type="password" value="" [(ng-model)]="password" />
    </ion-input>
  </ion-list>

  <button secondary (click)="signupEmail()" style="width:100%;">
    Register
  </button>
</ion-content>
vs Ionic 1:
<ion-view title="Sign Up">
    <ion-content padding="true" class="has-header">
        <form>
            <ion-list>
                <label class="item item-input">
                    <span class="input-label">Username</span>
                    <input type="text" placeholder="enter username..." ng-model="data.username">
                </label>
                <label class="item item-input">
                    <span class="input-label">Email</span>
                    <input type="email" placeholder="you@domain.com" ng-model="data.email">
                </label>
                <label class="item item-input">
                    <span class="input-label">Password</span>
                    <input type="password" placeholder="At least 6 characters" ng-model="data.password">
                </label>
            </ion-list>
            <button class="button button-stable button-block" ng-click="signupEmail()">Done</button>
        </form>
    </ion-content>
</ion-view>
There’s nothing too crazy going on here that we haven’t seen before. We are now using the <ion-input> input directive for user input, and the most important thing to note is the change in syntax for ng-model. The Angular 2 implementation of ng-model looks quite different, but we can use the [(ng-model)] shorthand to achieve the same two way data binding that we would have in Ionic 1 with ng-model. When the values in the input are modified, this will be reflected and available to us immediately in the signup.js file as you will see in the next step.
Let’s create that class definition now.
Modify signup.js to reflect the following:
import { Page } from 'ionic/ionic';

@Page({
  templateUrl: 'app/signup/signup.html',
})
export class SignupPage {
  constructor() {
    //This will hold data from our form
    this.username = null;
    this.password = null;
    this.email = null;
  }

  signupEmail() {
    //Create a new user on Parse
    var user = new Parse.User();
    user.set('username', this.username);
    user.set('password', this.password);
    user.set('email', this.email);

    // other fields can be set just like with Parse.Object
    user.set('somethingelse', 'like this!');

    user.signUp(null, {
      success: function (user) {
        // Hooray! Let them use the app now.
        alert('success!');
      },
      error: function (user, error) {
        // Show the error message somewhere and let the user try again.
        alert('Error: ' + error.code + ' ' + error.message);
      },
    });
  }
}
You can see above that we are accessing the ng-model data in our template through this.username, this.password and this.email. The rest is just the same Parse functionality that we implemented in the Ionic 1 application.
Again, it’s a bit hard to post the equivalent code for Ionic 1 so I’m not going to post that here but essentially we’ve taken the code relevant to this component from the LoginCtrl controller and added it here (with a few syntax tweaks), and we’ve replaced the routing with the @Page decorator.
5. Create a Sign In Component
We’re going to create our last component now which will allow the user to sign in with an account that they have already created – this is going to look pretty similar to the last step.
Create a Signin component by running the following command:
ionic generate page Signin
Modify signin.html to reflect the following:
<ion-navbar secondary *navbar>
  <ion-title> Sign In </ion-title>
</ion-navbar>

<ion-content>
  <ion-list>
    <ion-input floating-label>
      <ion-label>Username</ion-label>
      <input type="text" value="" [(ng-model)]="username" />
    </ion-input>

    <ion-input floating-label>
      <ion-label>Password</ion-label>
      <input type="password" value="" [(ng-model)]="password" />
    </ion-input>
  </ion-list>

  <button secondary (click)="loginEmail()" style="width:100%;">Login</button>
</ion-content>
vs Ionic 1:
<ion-view title="Sign In">
  <ion-content padding="true" class="has-header">
    <form>
      <ion-list>
        <label class="item item-input">
          <span class="input-label">Username</span>
          <input
            type="text"
            placeholder="enter your username..."
            ng-model="data.username"
          />
        </label>
        <label class="item item-input">
          <span class="input-label">Password</span>
          <input
            type="password"
            placeholder="enter your password..."
            ng-model="data.password"
          />
        </label>
      </ion-list>
      <button class="button button-stable button-block" ng-click="loginEmail()">
        Done
      </button>
    </form>
  </ion-content>
</ion-view>
There’s nothing new here that we haven’t already covered previously, we’ve just changed the syntax for the click handler, ng-model and we’ve also switched to using <ion-input>.
Modify singin.js to reflect the following:
import { Page } from 'ionic/ionic';

@Page({
  templateUrl: 'app/signin/signin.html',
})
export class SigninPage {
  constructor() {
    //This will hold data from our form
    this.username = null;
    this.password = null;
  }

  loginEmail() {
    Parse.User.logIn(this.username, this.password, {
      success: function (user) {
        // Do stuff after successful login.
        console.log(user);
        alert('success!');
      },
      error: function (user, error) {
        // The login failed. Check error to see why.
        alert('error!');
      },
    });
  }
}
and once again, this is almost exactly the same as the last step, we’re just calling a different Parse function to log the user in instead. If you run the applicaiton now you should be able to successfully create an account and log into it, and it should look something like this:
Summary
There’s a lot of new stuff in Ionic 2 (ES6, Webpack, TypeScript, Classes, Syntax changes) but the good thing is that you can use Ionic 2 without having to understand how all these things work. I think it’s important to understand how things work behind the scenes eventually, but you should be able to convert simple applications like this without having to learn too much.
The most noteable differences between the Ionic 1 version of this application and the Ionic 2 application is that the Ionic 2 version:
- Uses decorators and push and pop to handle navigation, instead of using URLs for routing
- Uses classes instead of controllers
- Has slightly different template syntax
- Is more modularised, with each component serving a single purpose rather than having a controller which handles multiple different features
There’s obviously going to be use cases where the conversion isn’t as simple as the one in this tutorial, but for basic functionality and navigation it should hopefully be pretty straightforward. If you get stuck with a particular feature, make sure you reference the documentation first, but otherwise feel free to ask for help on the forum or join the Ionic 2 Slack channel.