

In the first post in this series we looked at some of the new Angular 2 syntax and concepts, and now we are going to look at how that new syntax applies to an Ionic 2 application.
Before We Get Started
Before you go through this tutorial, you should have at least a basic understanding of Ionic 2 concepts. You must also already have Ionic 2 set up on your machine.
If you’re not familiar with Ionic 2 already, I’d recommend reading my Ionic 2 Beginners Guide first to get up and running and understand the basic concepts. If you want a much more detailed guide for learning Ionic 2, then take a look at Building Mobile Apps with Ionic 2.
1. Generate a New Ionic 2 Application
We’re going to use the tutorial template created by the Ionic team, which is used in the official documentation, to create our application. To do this, you will need to run the following command:
ionic start ionic2-tutorial tutorial --v2and your application will begin setting itself up. You should then make it your current working directory by running the following command:
cd ionic2-tutorialTo take a look at the application simply run the serve command:
ionic serve
from within the project directory.
2. Folder Structure
If you take a look at the files and folders generated, it all looks pretty similar to an Ionic 1 application initially. We have a pretty typical Cordova style project structure.
If you look in the src folder though (which is where most of your development will occur), things start looking a little bit different:
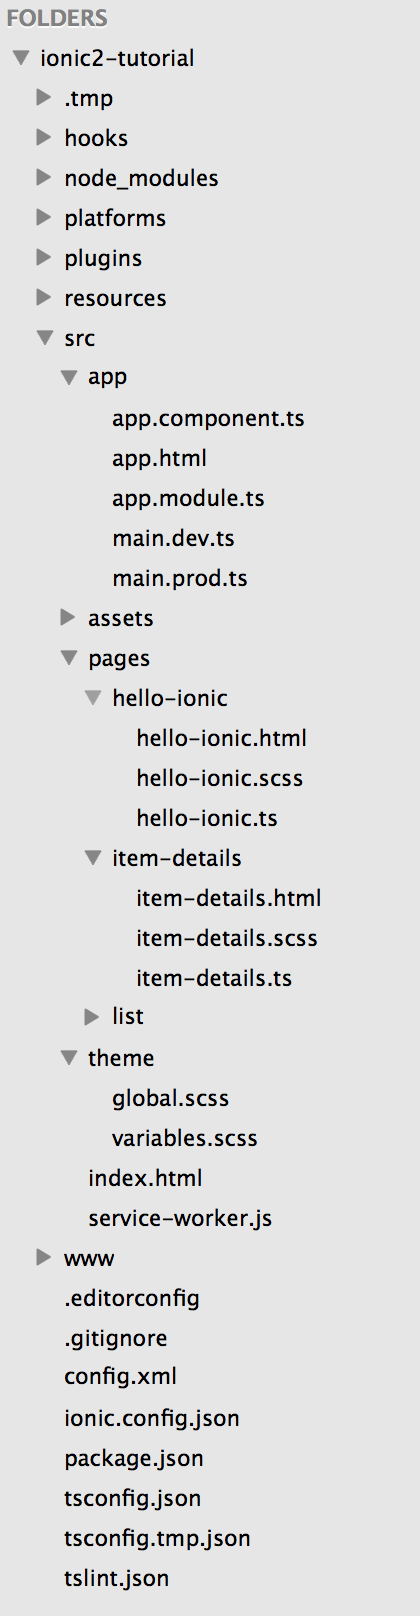
Usually in an Ionic 1 application, people would have all of their Javascript files (controllers, services, etc.) in one folder, all of the templates in another folder, and all of the styling information would usually be contained in a single app.scss file.
The default structure for an Ionic 2 application organises by functionality, so you have all of the logic, templates and styling for a particular component (in the example above we have a basic page component, a list component, and an item details component) in the one spot. This plays in well with the Angular 2 methodology of having everything be standalone components that can easily be reused in other places or projects. If you wanted to reuse a particular feature, or have lots of people working on the same project, the old Ionic 1 approach can become quite troublesome.
The idea of organising code by feature is not specific to Angular 2 & Ionic 2, in fact people were using and advocating for the feature based approach in Ionic 1 applications, it’s just that most people were doing it the other way (trends are hard to break). With the way Angular 2 works though, using the feature based structure is the default and it’s pretty hard not to use that structure.
index.html
As is always the case, the first thing that gets opened by the browser is the index.html file. So let’s take a look at how that looks in Ionic 2:
<!DOCTYPE html>
<html lang="en" dir="ltr">
  <head>
    <meta charset="UTF-8" />
    <title>Ionic App</title>
    <meta
      name="viewport"
      content="width=device-width, initial-scale=1.0, minimum-scale=1.0, maximum-scale=1.0, user-scalable=no"
    />
    <meta name="format-detection" content="telephone=no" />
    <meta name="msapplication-tap-highlight" content="no" />

    <link rel="icon" type="image/x-icon" href="assets/icon/favicon.ico" />
    <link rel="manifest" href="assets/manifest.json" />
    <meta name="theme-color" content="#4e8ef7" />

    <!-- un-comment this code to enable service worker
  <script>
    if ('serviceWorker' in navigator) {
      navigator.serviceWorker.register('service-worker.js')
        .then(() => console.log('service worker installed'))
        .catch(err => console.log('Error', err));
    }
  </script>-->

    <link href="build/main.css" rel="stylesheet" />
  </head>
  <body>
    <!-- Ionic's root component and where the app will load -->
    <ion-app></ion-app>

    <!-- cordova.js required for cordova apps -->
    <script src="cordova.js"></script>

    <!-- The polyfills js is generated during the build process -->
    <script src="build/polyfills.js"></script>

    <!-- The bundle js is generated during the build process -->
    <script src="build/main.js"></script>
  </body>
</html>
This all looks pretty clean and simple, and not too different to an Ionic 1 application. The big difference here is that rather than attaching ng-app to the body tag (which would let Ionic know that’s where we want our app to live), we now use:
<ion-app></ion-app>This is where the root component will be created, and essentially where your entire app will be injected. The reference to cordova.js allows us to use Cordova to build the application (this is what wraps the app up into a native package, and allows us to submit it to app stores), the polyfill.js essentially “patches” browsers that don’t support certain functionality, and main.js is the bundled code for our application.
Basically, it looks like a pretty normal web page.
assets
The assets folder can be used to store any static files you want to include in your project like images, or JSON data files. Anything in this folder will be copied over to your build folder each time the application is built.
theme
The theme folder contains the global.scss and variables.scss files for your applications. Most of the styling in your application will be done by using each components own .scss file, but you can use the global.scss file to define any custom styles, and you can modify the SASS variables in the variables.scss file to modify the style of your application in various ways.
app
All Ionic 2 apps will have a root component. This is not all that different to all the other components in your application, one obvious difference you will notice though is that it is in its own app folder, and is named app.component.ts.
If you’re a little unsure what a component is exactly, basically wherever we define:
@Component({
  templateUrl: 'my-component.html',
})
export class Something {
  // ...snip
}
that’s a component, and it does something (as Tim points out below, technically a component has an associated view, so some classes would be better thought of as services. Whether it is a component or a service though they are all created this way and can be imported throughout your application).
The root component will be the first one called upon (i.e. when we add the <ion-app> tags to the index.html file) and will be responsible for setting up and controlling the rest of the application, just like the app.js file did in Ionic 1.
Let’s take a look at how this root component is defined and how it works. Here’s what the entire file looks like, and then we’ll break it down (I’ve simplified this to make it a bit easier to digest):
import { Component, ViewChild } from '@angular/core';
import { Platform, MenuController, Nav } from 'ionic-angular';
import { StatusBar } from 'ionic-native';
import { HelloIonicPage } from '../pages/hello-ionic/hello-ionic';
import { ListPage } from '../pages/list/list';

@Component({
  templateUrl: 'app.html'
})
export class MyApp {
  @ViewChild(Nav) nav: Nav;

  // make HelloIonicPage the root (or first) page
  rootPage: any = HelloIonicPage;
  pages: Array<{title: string, component: any}>;

  constructor(
    public platform: Platform,
    public menu: MenuController
  ) {
    this.initializeApp();

    // set our app's pages
    this.pages = [
      { title: 'Hello Ionic', component: HelloIonicPage },
      { title: 'My First List', component: ListPage }
    ];
  }

  initializeApp() {
    this.platform.ready().then(() => {
      // Okay, so the platform is ready and our plugins are available.
      // Here you can do any higher level native things you might need.
      StatusBar.styleDefault();
    });
  }

  openPage(page) {
    // close the menu when clicking a link from the menu
    this.menu.close();
    // navigate to the new page if it is not the current page
    this.nav.setRoot(page.component);
  }
}
1. Imports
import { Component, ViewChild } from '@angular/core';
import { Platform, MenuController, Nav } from 'ionic-angular';
import { StatusBar } from 'ionic-native';
import { HelloIonicPage } from '../pages/hello-ionic/hello-ionic';
import { ListPage } from '../pages/list/list';
First, there are some imports defined. This is what we use to load other components or services into this component. In all of the components, except the root component, you will see they have their classes defined like this:
export class Something {}so basically, we export components that we want to import somewhere else. In this example, we are importing the Platform, Nav, and MenuController services from the Ionic library. Platform provides us with information about the platform that the application is running on, Nav gives us a reference to the navigation component in the application, and MenuController allows us to control the side menu.
We import Component and ViewChild from the Angular 2 library. Component is imported pretty much everywhere, since it is required to create a component, and ViewChild can be used to grab a reference to an element in the component.
We are also importing the HelloIonicPage and ListPage components that we have created ourselves (or rather, that the Ionic CLI has auto generated for us in this case). You will find both of these components defined in src/pages/hello-ionic/hello-ionic.ts and src/pages/list/list.ts (which reflect the path supplied in the import statement). Notice that we don’t include src in the path for the imports, this is because the path is relative to the current file, and we are already in the src folder. This file is also in a sub-folder called app though, so we go up one folder first by using ../.
Also notice that we are importing StatusBar from ionic-native. Since we use Cordova with Ionic 2 we can access native functionality, like controlling the status bar. Ionic Native is a service provided by Ionic that makes using these Cordova plugins easier, but you don’t need to use Ionic Native in order to include native functionality, you can just use Cordova plugins directly (although I would recommend using Ionic Native wherever possible). For more information on Ionic Native, take a look at this post.
2. Decorator
Decorators, like @Component and @Directive, allow us to add metadata (extra information) to our components, and are supplied just above the class definition. Take a look at the example in our root component:
@Component({
  templateUrl: 'app.html'
})
Here we supply a templateUrl so that the component knows which file to use for its view (you can also define the template inline by using template instead of templateUrl).
3. The Class Definition
Everything above this point doesn’t really do much, it’s just setting everything up. This is the part where we actually start defining the behaviour of our application. Let’s take a look:
export class MyApp {
  @ViewChild(Nav) nav: Nav;

  // make HelloIonicPage the root (or first) page
  rootPage: any = HelloIonicPage;
  pages: Array<{title: string, component: any}>;

  constructor(public platform: Platform, public menu: MenuController) {
    this.initializeApp();

    // set our app's pages
    this.pages = [
      { title: 'Hello Ionic', component: HelloIonicPage },
      { title: 'My First List', component: ListPage }
    ];
  }

  initializeApp() {
    this.platform.ready().then(() => {
      // Okay, so the platform is ready and our plugins are available.
      // Here you can do any higher level native things you might need.
      StatusBar.styleDefault();
    });
  }

  openPage(page) {
    // close the menu when clicking a link from the menu
    this.menu.close();
    // navigate to the new page if it is not the current page
    this.nav.setRoot(page.component);
  }
}
First we define a new class called MyApp, classes are a new ES6 feature which we obviously weren’t using in Ionic 1 – you can read my previous post for more information on classes in Javascript.
We pass some parameters into the constructor: platform and menu and give them types of Platform and MenuController. This allows us to inject these services into our constructor (i.e. the MenuController service will be available as menu in our constructor) and we also make them available throughout the entire class by using the public keyword. This means that we will be able to access them from anywhere within the class using this.menu or this.platform.
The Platform service provides information about the platform that the app is running on (e.g. width, height, landscape, portrait etc.), in this case we’re using it to detect when the app is ready.
The MenuController service allows us to create and manage a sliding menu.
We also define some member variables just above the constructor which we use to store the rootPage and the pages available in our class. By declaring them above the constructor they will also be available throughout the class by using this.rootPage or this.pages.
We define the rootPage as the HelloIonicPage component which will be the first page that is displayed (you could quite easily switch this to use the ListPage component instead).
Outside of the constructor, we define a function called openPage that takes in a page as a parameter, and will set that as the current page by using the setRoot function. Notice that we grab the reference to this.nav in a bit of a weird way. Usually, we would just import NavController in the same way we did the MenuController and Platform and then call setRoot on that, but you can not do this from the root component. Instead, we have to grab a reference to it by using @ViewChild which is provided by Angular 2.
One thing beginners might find especially confusing is stuff like this:
rootPage: any = HelloIonicPage;
  pages: Array<{title: string, component: any}>;
As I mentioned, these create member variables, but you might wonder what the heck Array<{title: string, component: any}> is. As you may be aware, Ionic 2 uses TypeScript, and these are types. A type basically says “this variable should only contain this type of data”. In this case we are saying that the rootPage can contain any type of data, and that pages can only contain arrays, and those arrays can only contain an object made up of a title (which must be a string) and a component (which can be any type of data). That is a pretty complex type, you could just as easily do the following:
rootPage: any = HelloIonicPage;
pages: any;
or even leave the types off completely. The benefit of using types is that it adds some error checking and a basic level of testing into your application – if your pages array somehow ended up getting passed a number it would break your application, and that’s something that would be handy to know about straight away.
If you would like more information on types in TypeScript, you should read Ionic 2: TypeScript vs ECMAScript 6.
The Root Components Template
When creating the root component we supplied a template for that component, which is what will actually be rendered out onto the screen (just like templates from Ionic 1). Here’s what our root component looks like when run through the browser:

Now let’s take a look at the templates HTML in a little more detail
<ion-menu [content]="content">
  <ion-header>
    <ion-toolbar>
      <ion-title>Pages</ion-title>
    </ion-toolbar>
  </ion-header>

  <ion-content>
    <ion-list>
      <button ion-item *ngFor="let p of pages" (click)="openPage(p)">
        {{p.title}}
      </button>
    </ion-list>
  </ion-content>
</ion-menu>

<ion-nav [root]="rootPage" #content swipeBackEnabled="false"></ion-nav>
A lot of this looks pretty similar to Ionic 1, but there are some pretty big differences as well. Take the first line for example:
<ion-menu [content]="content"></ion-menu>Here we are setting the content property of the menu to content. Keep in mind that “content” here is an expression, not a string. We’re not setting the content property to a string “content” we are setting it to the variable “content”. If you skip down to the bottom of the file you will see this:
<ion-nav
  id="nav"
  [root]="rootPage"
  #content
  swipe-back-enabled="false"
></ion-nav>
By adding #content above, we are creating a local variable called content which references this component, which is then used as the content property for the menu. So the menu will use <ion-nav> as its main content. We’re also setting the root property here to rootPage which we have defined in the class definition (app.ts).
The next interesting thing we have is this:
<button ion-item *ngFor="let p of pages" (click)="openPage(p)">
        {{p.title}}
      </button>
There’s a surprising amount of Angular 2 syntax crammed into this little block of code. This will create a button for each page we defined in the constructor earlier (like ng-repeat in Angular 1), the * syntax means it will create an embedded template for each of the pages (it won’t render out the exact code we have above to the DOM, instead it will use the templates created), and by using let p we are able to keep a reference to a specific page, which we pass into the openPage function (defined in our root component) when the button is clicked. If you go back and take a look at the openPage function again, you will see that it takes this reference and uses it to set the rootPage:
this.nav.setRoot(page.component);The App Module
We’ve covered the root component in quite a lot of detail, but there’s another mysterious file inside of the app folder called app.module.ts.
In order to use these pages and services throughout our application, we need to add them to our app.module.ts file. All of the pages we create need to be added to both the declarations array and the entryComponents array, all of the providers we create need to be added to the providers array, and any custom components or pipes only need to be added to the declarations array.
You will also notice main.dev.ts and main.prod.ts files in the same folder. Only one of these files will be used (depending on whether you are doing a development or a production build), and essentially it is responsible for kicking off your application (it’s kind of like the index.html file in that sense). It will import the app module and bootstrap the application.
pages
The root component is a bit of a special case, so let’s take a look at the ListPage component to see how we might add a normal view to an Ionic 2 application. You can see this page by selecting ‘My First List’ from the menu in the application:
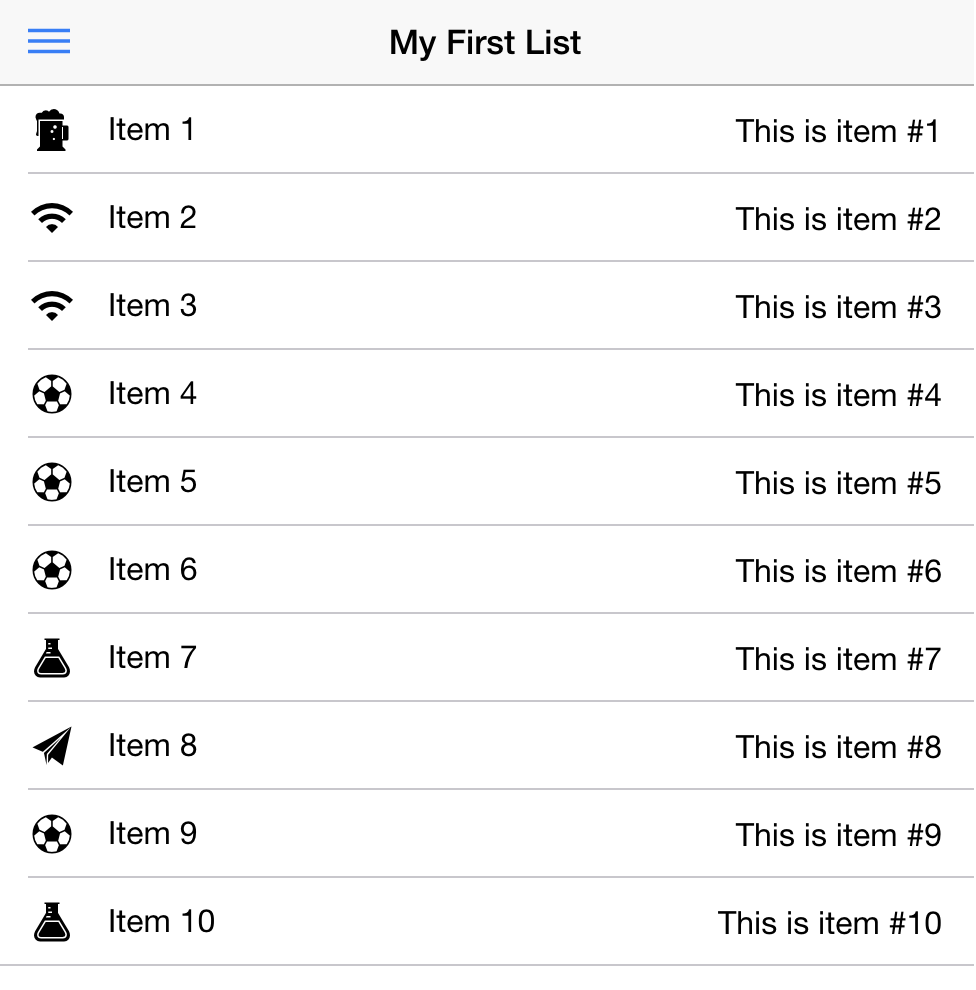
and here’s what the code looks like:
import { Component } from '@angular/core';
import { NavController, NavParams } from 'ionic-angular';
import { ItemDetailsPage } from '../item-details/item-details';

@Component({
  templateUrl: 'list.html'
})
export class ListPage {
  selectedItem: any;
  icons: string[];
  items: Array<{title: string, note: string, icon: string}>;

  constructor(public navCtrl: NavController, public navParams: NavParams) {
    // If we navigated to this page, we will have an item available as a nav param
    this.selectedItem = navParams.get('item');

    this.icons = ['flask', 'wifi', 'beer', 'football', 'basketball', 'paper-plane',
    'american-football', 'boat', 'bluetooth', 'build'];

    this.items = [];
    for(let i = 1; i < 11; i++) {
      this.items.push({
        title: 'Item ' + i,
        note: 'This is item #' + i,
        icon: this.icons[Math.floor(Math.random() * this.icons.length)]
      });
    }
  }

  itemTapped(event, item) {
    this.navCtrl.push(ItemDetailsPage, {
      item: item
    });
  }
}
We have some more import statements much like we did with the root component, and we also have the @Component decorator:
@Component({
  templateUrl: 'list.html'
})
Next we have:
export class ListPage {}Here we prefix the class with export which we did not do with our root component. This will allow our page component to be imported elsewhere.
This view introduces a new component called NavParams which is added through the constructor. This will allow you to return the details of a view that has been navigated to, in this case, if we were to check the value of:
this.selectedItem = navParams.get('item');It would be undefined because we haven’t navigated to this page using the navigation stack, this page was set as the rootPage when we navigated to it (by the openPage function in the root component).
In Ionic 2, if you want to add a new view, but still maintain the page “history” so that you can navigate back, you push it onto the navigation stack, and if you want to remove it you pop it. I have another tutorial if you would like a more in depth explanation of navigation in Ionic 2.
In the ListPage component, we push the ItemDetailsPage with the itemTapped function (which is triggered from the ListPage template, and takes in a particular item that was tapped):
itemTapped(event, item) {
    this.navCtrl.push(ItemDetailsPage, {
      item: item
    });
  }
This will push the ItemDetailsPage component onto the navigation stack, making it the active view, and it passes in the details of the item that was clicked.
Now we’re not going to look at the ItemDetailsPage component in detail, but we could use NavParams to get the details of the item that is being passed in like this (since we are pushing something onto the navigation stack):
this.selectedItem = navParams.get('item');
console.log(this.selectedItem);
This is basically how you would create a master-detail pattern in Ionic 2, rather than using routes like we would have in Ionic 1.
Also, keep in mind that you can easily create your own new pages by running the following command:
ionic g page MyPageThis will set up all the files you need automatically.
Summary
There’s no question Ionic 2 and Angular 2 are making huge steps in the right direction in terms of organisation and performance, but they look a lot more intimidating now. Even though it initially seems like a lot to learn and very confusing, I think it makes a lot of sense. If you know how to use Ionic 1, and you throw some hours at really trying to understand what’s going on with the new syntax and how it works, it all starts to feel familiar pretty quickly.
This tutorial very much throws you in the deep end and briefly covers a lot of different concepts, which deserve to be explained in more detail. I highly recommend you take a look at some of my other Ionic 2 tutorials as well.