

If you’ve been reading my beginner series of tutorials then you’ve probably seen a few example applications and had a bit of a play with Ionic.
When building an app from scratch though it’s a bit more intimidating, and you’ll probably run into a few roadblocks along the way. What I wanted to do in this tutorial was to come up with a concept for an application, and then build it from scratch using Ionic’s “blank” template.
So, to that end, we will be building a todo application that will allow a user to:
- View a list of todo’s
- Add new todo’s
- View details of a specific todo (we will be setting up a Master / Detail pattern in Ionic)
- Save the todo’s to permanent storage
Before We Get Started
Last updated for Ionic 3.6.1
Before you go through this tutorial, you should have at least a basic understanding of Ionic concepts. You must also already have Ionic installed on your machine.
If you’re not familiar with Ionic already, I’d recommend reading my Ionic Beginners Guide first to get up and running and understand the basic concepts. If you want a much more detailed guide for learning Ionic, then take a look at Building Mobile Apps with Ionic.
1. Generate a New Ionic Project
We’re going to start off by generating a new project based on the “blank” template. This is mostly an empty skeleton project, but there is a bit of example code in there that we will get rid of.
Run the following command to generate a new Ionic application
ionic start ionic-todo blankOnce the code is generated, open up the project in your text editor. I explain the structure of an Ionic application in this post so take a look at that if you’d like some more background information about the code the Ionic CLI generates.
Basically, all of the components (our application will be made up of a bunch of different components) for our application will be in the src folder (including the root component in the app folder, and all of our page components in the pages folder). A component will consist of a template (.html file), class definition (.ts file) and maybe some styling (.scss file). As well as components, you might also create things like services here (like the data service we will create later) as well, which don’t have a template or styling, but are similar in structure to a normal component. These services are also refered to as “providers” and will be placed in a providers folder.
Right now, there is just a single HomePage component that sets up a dummy view. We are going to modify this to display a list of all the todo items in our application.
I want to start off by taking a look at the src/app/app.component.ts file that is auto generated:
import { Component } from '@angular/core';
import { Platform } from 'ionic-angular';

import { HomePage } from '../pages/home/home';

@Component({
  templateUrl: 'app.html',
})
export class MyApp {
  rootPage: any = HomePage;

  constructor(platform: Platform) {
    platform.ready().then(() => {});
  }
}
The app.component.ts file defines our root component. This component is special when compared to the rest of the components because it is the first component that will be added to the application, and from there we can display more components, which can then add even more components and so on. Basically, our application structure is like a tree with the root component at the root of that tree.
So, it’s important that our root component knows where to find our HomePage as it will need to set it as the root page. Notice that we are importing the HomePage at the top of this file, and then setting it as the root page with the following code:
rootPage: any = HomePage;We are able to declare variables above the constructor to make them member variables or class members, meaning they will be accessible throughout the entire class by referencing this.myVar and it will also be available to your templates. In this case, we are creating a class member called rootPage that we will be able to access throughout this class, and in the template. If we take a look at the associated template that is in app.html we would see:
<ion-nav [root]="rootPage"></ion-nav>The template is accessing that class member that is stored in the TypeScript file to configure the <ion-nav> component.
The : any part of the variable declaration is just a TypeScript thing, which says that rootPage can be any type. TypeScript also allows you to enforce more specific types, rather than just using any. If you’re not comfortable with TypeScript yet and are confused by this, don’t worry about it – you can leave types out and your application will still work fine. I won’t be using types in this tutorial, except for dependency injection where it is required (which we will get to later). If you would like to know more about using types and TypeScript in Ionic, you should read Ionic: TypeScript vs ECMAScript 6.
The root page is the first page that will be displayed in your application, and then you can navigate to other pages from there. To change views in an Ionic application you can either change this root page, or push and pop views on top of that page. Pushing a view will change to that view, and popping it will remove it and go back to the previous view. For a more detailed explanation of navigation in Ionic, I recommend taking a look at A Simple Guide to Navigation in Ionic.
2. Setting up the Home Page
Now that we’ve got our basic application set up, let’s start making things happen. First, let’s set up our todo lists template.
Creating the Template
Modify src/pages/home/home.html to reflect the following:
<ion-header>
  <ion-navbar color="secondary">
    <ion-title> Todos! </ion-title>
    <ion-buttons end>
      <button ion-button icon-only (click)="addItem()">
        <ion-icon name="add-circle"></ion-icon>
      </button>
    </ion-buttons>
  </ion-navbar>
</ion-header>

<ion-content>
  <ion-list>
    <ion-item *ngFor="let item of items" (click)="viewItem(item)"
      >{{item.title}}</ion-item
    >
  </ion-list>
</ion-content>
Take notice of the * syntax used here for the *ngFor in the list, this is shorthand for creating an embedded template. So rather than literally rendering out:
<ion-item *ngFor="let item of items" (click)="viewItem(item)"
  >{{item.title}}</ion-item
>
to the DOM (Document Object Model), an embedded template will be created for each items specific data. So, if our items array (which will be defined later in the class definition) had 4 items in it, then the <ion-item> would be rendered out 4 times. Also notice that we are using let item, which assigns a single element from the items array to item as we loop through the array. This allows us to reference its properties, and also pass it into the viewItem function.
We are also setting the title to Todos! and we are supplying a button using <ion-buttons>. Since we have supplied the end attribute, the button will be placed in the “end” position. Different attributes may behave differently depending on what platform they are running on, but on iOS for example, “end” will place the button to the right of the nav bar. Also note that on the button itself we give it an attribute of ion-button which will give the button the Ionic styling, as well as icon-only which styles buttons that only contain an icon and no text.
We are using (click) to attach a click listener to this element, which will call the addItem() function in home.ts (which doesn’t exist yet).
Creating the Class Definition
Now that we have our template sorted, we need to create the functions we are referencing in our HomePage class, and we also need to supply the items data (we will just set up some dummy data initially).
Modify src/pages/home/home.ts to reflect the following:
import { Component } from '@angular/core';
import { NavController } from 'ionic-angular';

@Component({
  selector: 'page-home',
  templateUrl: 'home.html'
})
export class HomePage {

  public items;

  constructor(public navCtrl: NavController) {

  }

  ionViewDidLoad(){

    this.items = [
      {title: 'hi1', description: "'test1'},"
      {title: 'hi2', description: "'test2'},"
      {title: 'hi3', description: "'test3'}"
    ];

  }

  addItem(){

  }

  viewItem(){

  }

}
Remember before how we assigned a type of any to the homePage variable? Now we are assigning a type of NavController to the navCtrl parameter in the constructor. This is how dependency injection works in Ionic, and is basically a way of telling the application “we want navCtrl to be a reference to NavController”. By adding the public keyword in front of it, it automatically creates a member variable for us. This means that we can now reference the NavController anywhere in this class by using this.navCtrl.
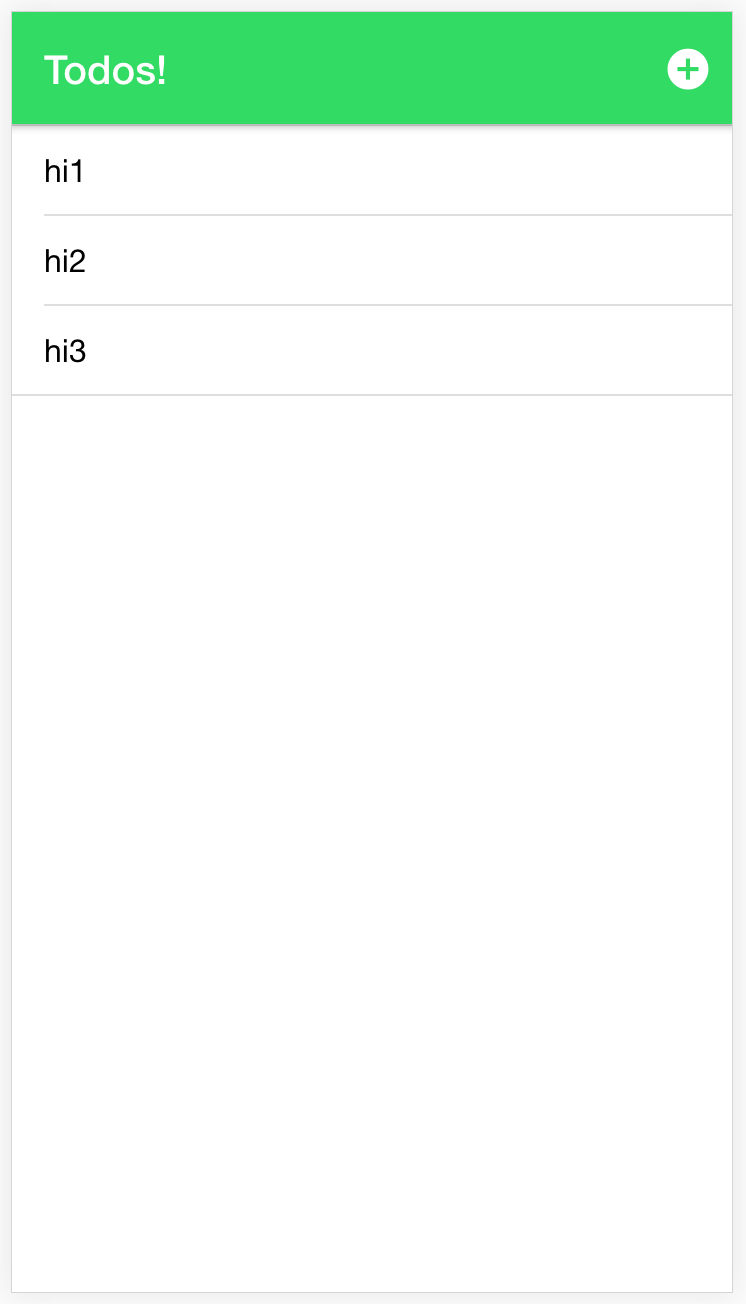
Now that we’ve set up some dummy data (we use the ionViewDidLoad lifecycle hook to do this, which is triggered as soon as the page is loaded), you should be able to see it rendered in your list:
when you run ionic serve. Since we have imported the NavController service, we will be able to push and pop views from this component by using:
this.navCtrl.push(SOME_PAGE);and
this.navCtrl.pop();We’ve created functions for adding items and viewing items, but before we can take this any further we are going to have to create a AddItemPage and ItemDetailPage component.
Adding Items
We’re going to create a new component now that will allow us to add new todo’s. This will be a simple form where we supply a title and description to create a new todo.
Run the following command to generate a new add-item page:
ionic g page AddItemIMPORTANT: When pages are generated in Ionic, something called “lazy loading” is set up by default. To keep things simple, we will not be covering that in this tutorial. To make sure you do not run into any issues, you should delete the add-item.module.ts file that is generated. The @IonicPage() decorator should also be removed from the add-item.ts file.
Whenever we create a new page, we need to ensure that it is imported into our app.module.ts, and declared in the declarations and entryComponents arrays.
Modify src/app/app.module.ts to reflect the following:
import { BrowserModule } from '@angular/platform-browser';
import { NgModule, ErrorHandler } from '@angular/core';
import { IonicApp, IonicModule, IonicErrorHandler } from 'ionic-angular';
import { MyApp } from './app.component';
import { HomePage } from '../pages/home/home';
import { AddItemPage } from '../pages/add-item/add-item';

@NgModule({
  declarations: [MyApp, HomePage, AddItemPage],
  imports: [BrowserModule, IonicModule.forRoot(MyApp)],
  bootstrap: [IonicApp],
  entryComponents: [MyApp, HomePage, AddItemPage],
  providers: [{ provide: ErrorHandler, useClass: IonicErrorHandler }],
})
export class AppModule {}
Just like last time, let’s create our template for the component first.
Setting up the Add Item Template
Modify src/pages/add-item/add-item.html to reflect the following:
<ion-header>
  <ion-toolbar color="secondary">
    <ion-title> Add Item </ion-title>
    <ion-buttons end>
      <button ion-button icon-only (click)="close()">
        <ion-icon name="close"></ion-icon>
      </button>
    </ion-buttons>
  </ion-toolbar>
</ion-header>

<ion-content>
  <ion-list>
    <ion-item>
      <ion-label floating>Title</ion-label>
      <ion-input type="text" [(ngModel)]="title"></ion-input>
    </ion-item>

    <ion-item>
      <ion-label floating>Description</ion-label>
      <ion-input type="text" [(ngModel)]="description"></ion-input>
    </ion-item>
  </ion-list>

  <button full ion-button color="secondary" (click)="saveItem()">Save</button>
</ion-content>
There’s nothing too crazy going on here to start off with. We have another button defined, this time calling a saveItem function that we will define in add-item.ts shortly. We also have a button that references a close function – since we will eventually launch this page as a Modal we want the ability to dismiss the page, so we will also be defining this function in add-item.ts.
Then we have some inputs, and on them, we have [(ngModel)], which sets up two-way data binding for us. Any change we make to the title field will be immediately reflected on the this.title member variable in add-item.ts (which we will also add shortly). The same goes in reverse, any change we make to this.title in add-item.ts will also be immediately reflected in the template.
Also notice that on our save button we use the full attribute, this is a handy little attribute that will make the button full width for us.
Setting up the Add Item Class
Now we are going to set up the class for our Add Item component.
Modify add-item.ts to reflect the following:
import { Component } from '@angular/core';
import { NavController, ViewController } from 'ionic-angular';

@Component({
  selector: 'page-add-item',
  templateUrl: 'add-item.html'
})
export class AddItemPage {

  title: string;
  description: "string;"

  constructor(public navCtrl: NavController, public view: ViewController) {

  }

  saveItem(){

    let newItem = {
      title: this.title,
      description: "this.description"
    };

    this.view.dismiss(newItem);

  }

  close(){
    this.view.dismiss();
  }

}
We’re importing a weird new service here called ViewController which can be used with Modals to dismiss (close) them.
Apart from that, we are just creating the saveItem function which sets up a newItem object, which will use the current values of title and description (i.e. whatever the user puts in the input fields we set up two-way data binding on). We then dismiss the view, but we also pass in that new item to the dismiss function. This will allow us to set up a listener back on our home page (which will launch this page) to grab that item. In this way, we can pass data from one page to another (however, keep in mind that a modal isn’t required to pass data between pages).
Saving Items in the Home Page
As I just mentioned, we are sending some data back to the HomePage component to be saved, so we are going to have to set that up. We are also going to import our new AddItemPage component into the HomePage so that we can create that view when the user clicks Add Item.
Modify src/pages/home/home.ts to reflect the following:
import { Component } from '@angular/core';
import { ModalController, NavController } from 'ionic-angular';
import { AddItemPage } from '../add-item/add-item'

@Component({
  selector: 'page-home',
  templateUrl: 'home.html'
})
export class HomePage {

  public items = [];

  constructor(public navCtrl: NavController, public modalCtrl: ModalController) {

  }

  ionViewDidLoad(){

  }

  addItem(){

    let addModal = this.modalCtrl.create(AddItemPage);

    addModal.onDidDismiss((item) => {

          if(item){
            this.saveItem(item);
          }

    });

    addModal.present();

  }

  saveItem(item){
    this.items.push(item);
  }

  viewItem(item){

  }

}
If you look at the top of this file, you can see that we are now importing the AddItemPage component. This will allow us to create a Modal using that page, as we are doing in the addItem function. Notice that we also set up the onDidDismiss listener here, which will grab that item that is being passed back and then save it using the saveItem function. For now we just save an item by pushing it into the items array, but eventually we will save it into storage.
We’ve also removed the dummy data, because now when a user enters in a new item it will be added to this.items through the saveItem function. We also set items to be an empty array initially.
Viewing Items
Now we want to add the ability to click on a specific todo list item, and then view the details of that item (i.e. the description). To do this, we are going to create another new component.
Run the following command to create an item-detail page:
ionic g page ItemDetailand once again, we will need to set it up in our app.module.ts file:
Modify src/app/app.module.ts to reflect the following:
import { BrowserModule } from '@angular/platform-browser';
import { NgModule, ErrorHandler } from '@angular/core';
import { IonicApp, IonicModule, IonicErrorHandler } from 'ionic-angular';
import { MyApp } from './app.component';
import { HomePage } from '../pages/home/home';
import { AddItemPage } from '../pages/add-item/add-item';
import { ItemDetailPage } from '../pages/item-detail/item-detail';

@NgModule({
  declarations: [MyApp, HomePage, AddItemPage, ItemDetailPage],
  imports: [BrowserModule, IonicModule.forRoot(MyApp)],
  bootstrap: [IonicApp],
  entryComponents: [MyApp, HomePage, AddItemPage, ItemDetailPage],
  providers: [{ provide: ErrorHandler, useClass: IonicErrorHandler }],
})
export class AppModule {}
Now let’s set up our new components template.
Modify src/pages/item-detail/item-detail.html to reflect the following
<ion-header>
  <ion-navbar color="secondary">
    <ion-title> {{title}} </ion-title>
  </ion-navbar>
</ion-header>

<ion-content>
  <ion-card>
    <ion-card-content> {{description}} </ion-card-content>
  </ion-card>
</ion-content>
Compared to the rest of the templates, this one is pretty straight forward. We’re just using the <ion-card> directive to fancy it up a bit, and outputting the values of title and description which will be defined in item-detail.ts.
Modify src/pages/item-detail/item-detail.ts to reflect the following:
import { Component } from '@angular/core';
import { NavParams } from 'ionic-angular';

@Component({
  selector: 'page-item-detail',
  templateUrl: 'item-detail.html'
})
export class ItemDetailPage {

  title;
  description;

  constructor(public navParams: NavParams){

  }

  ionViewDidLoad() {
    this.title = this.navParams.get('item').title;
    this.description = this.navParams.get('item').description;
  }

}
When we push this page we will pass in the data of the item that was clicked, and then we just set the title and description to that of the item using NavParams.
Now all we have to do is set up the viewItem function in home.ts and import the new detail page.
Modify the viewItem function in src/pages/home/home.ts to reflect the following:
viewItem(item){
    this.navCtrl.push(ItemDetailPage, {
      item: item
    });
  }
Add the following line to the top of src/pages/home/home.ts:
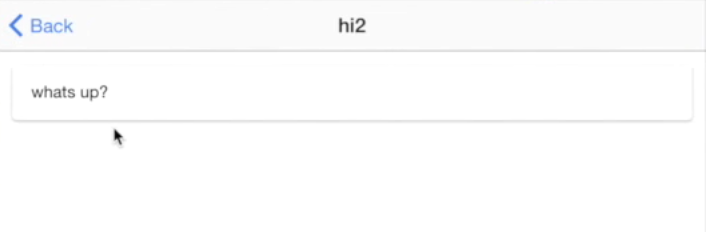
import { ItemDetailPage } from '../item-detail/item-detail';This will push the item detail page, and pass in the item in the list that was clicked. If you try clicking on an item in the list now, you should see something like this:
Saving Data Permanently with Storage
The todo application will basically work now, but the data isn’t being stored anywhere so as soon as you refresh the application you will lose all of your data (not ideal).
What we’re going to do now is create a service called Data that will handle storing and retrieving data for us. We will use the Storage service Ionic provides to help us do this. Storage is Ionic’s generic storage service, and it handles storing data in the best way possible whilst providing a consistent API for us to use.
This means that if you are running on a device and have the SQLite plugin installed, then it will use a native SQLite database for storage, otherwise, it will fall back to using browser based storage (which can be wiped by the operating system).
Click here to learn more about the different storage options for HTML5 mobile applications.
Run the following command to generate a Data service:
ionic g provider Data
Modify data.ts to reflect the following:
import { Storage } from '@ionic/storage';
import { Injectable } from '@angular/core';

@Injectable()
export class Data {

  constructor(public storage: Storage){

  }

  getData() {
    return this.storage.get('todos');
  }

  save(data){
    this.storage.set('todos', data);
  }

}
This one is a little bit different to the rest of the components we have been creating (and it would be more appropriate to consider it a service). Instead of using the @Component decorator, we are instead declaring this class as an @Injectable.
In our constructor, we set up a reference to the Storage service.
Our save function simply takes in the array of all of the items and saves it to storage, whenever the items change we will call this function.
We will also need to set up the Storage service (which requires us to include a new import in the @NgModule), as well as the Data provider, in our app.module.ts file.
Modify src/app/app.module.ts to reflect the following:
import { BrowserModule } from '@angular/platform-browser';
import { NgModule, ErrorHandler } from '@angular/core';
import { IonicApp, IonicModule, IonicErrorHandler } from 'ionic-angular';
import { IonicStorageModule } from '@ionic/storage';
import { MyApp } from './app.component';
import { HomePage } from '../pages/home/home';
import { AddItemPage } from '../pages/add-item/add-item';
import { ItemDetailPage } from '../pages/item-detail/item-detail';
import { Data } from '../providers/data';

@NgModule({
  declarations: [MyApp, HomePage, AddItemPage, ItemDetailPage],
  imports: [
    BrowserModule,
    IonicModule.forRoot(MyApp),
    IonicStorageModule.forRoot(),
  ],
  bootstrap: [IonicApp],
  entryComponents: [MyApp, HomePage, AddItemPage, ItemDetailPage],
  providers: [Data, { provide: ErrorHandler, useClass: IonicErrorHandler }],
})
export class AppModule {}
Notice that we have declared these services in the providers array, rather than in the declarations or entryComponents arrays.
Now we need to update home.ts to make use of this new service.
Modify src/pages/home/home.ts to reflect the following:
import { Component } from '@angular/core';
import { ModalController, NavController } from 'ionic-angular';
import { AddItemPage } from '../add-item/add-item'
import { ItemDetailPage } from '../item-detail/item-detail';
import { Data } from '../../providers/data';

@Component({
  selector: 'page-home',
  templateUrl: 'home.html'
})
export class HomePage {

  public items = [];

  constructor(public navCtrl: NavController, public modalCtrl: ModalController, public dataService: Data) {

    this.dataService.getData().then((todos) => {

      if(todos){
        this.items = todos;
      }

    });

  }

  ionViewDidLoad(){

  }

  addItem(){

    let addModal = this.modalCtrl.create(AddItemPage);

    addModal.onDidDismiss((item) => {

          if(item){
            this.saveItem(item);
          }

    });

    addModal.present();

  }

  saveItem(item){
    this.items.push(item);
    this.dataService.save(this.items);
  }

  viewItem(item){
    this.navCtrl.push(ItemDetailPage, {
      item: item
    });
  }

}
So here’s our final bit of code. Again, we’re importing the data service and passing it through to our constructor. We are still setting the items to be empty to start off with, and fetching the data using the data service. If there are any items returned it will set items to that, but if there is not it will just set it to an empty array again.
It’s important to note here that getData returns a promise not the data itself. Fetching data from storage is asynchronous which means our application will continue to run while the data loads. A promise allows us to perform some action whenever that data has finished loading, without having to pause the whole application.
For more information on promises, check out Andrew McGivery’s post on the subject (keep in mind though that the promise syntax is different in Ionic).
Finally, we also add a call to the save function in the data service when a new item is being added. So now this function will update our items array with the new data straight away, but it will also save a copy to the data service so that it is available next time we come back to the application.
Summary
In this tutorial, we have covered how to implement a lot of common functionality in an Ionic app like:
- Creating views
- Listening for and handling events
- Navigating between views
- Passing data between views
- Setting up two-way data binding
- Saving data
Obviously, there’s a lot more we could do with this application like making it prettier, adding the ability to delete and edit notes and so on. However, for now, hopefully that should have given you a pretty decent introduction to creating apps with Ionic.