

Part 2: Project Structure and Syntax
Part 3: Rendering Layout (this tutorial)
Part 4: Routing and Forms
Part 5: Storage and Services
In Part 3 of this series on building a Progressive Web Application with Ionic and Stencil, we will be finally be getting into the practical side of things. We will generate a new application using the Ionic PWA Toolkit, and we will focus on creating the basic layout for our application.
The application that we will be building is going to be a clone of the cryptoPWA application that I created a few weeks ago as a PWA using Ionic/Angular. This was also a multi-part tutorial series, you can check it out here if you like. Again, this series is tailored to people who are already familiar with Ionic/Angular. So, by recreating the same application it should serve as a good learning experience, as we will be able to make comparisons between the two.
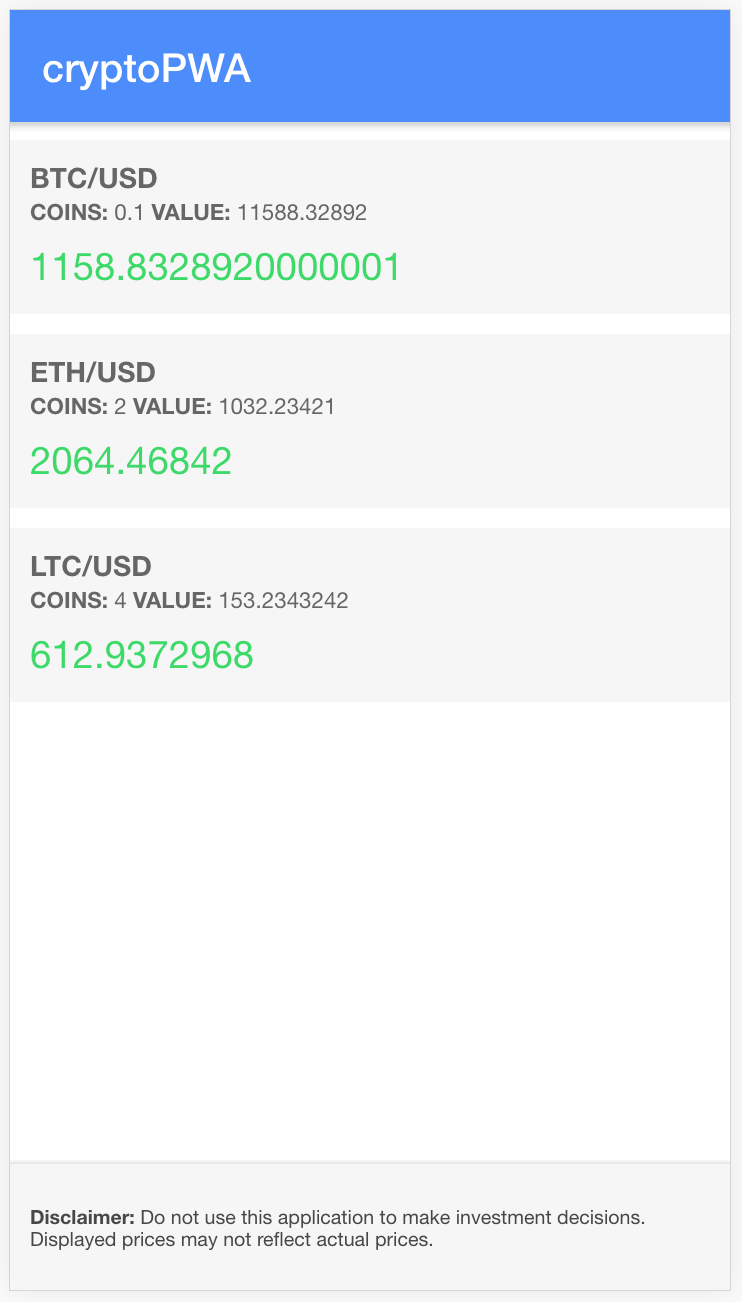
At the end of this tutorial, our layout will look like this:
Generating a PWA with the Ionic PWA Toolkit
To get started, we are going to generate a new Stencil project using the Ionic PWA Toolkit. If you haven’t read the previous tutorials, the PWA Toolkit is available through one of the StencilJS starter templates and has a bunch of useful features for creating a PWA with Ionic included.
Generate a new StencilJS project and choose the
ionic-pwaoption:
npm init stencilMake the new project your working directory:
cd crypto-pwaRun the project in the browser:
npm startYou should now be able to see the default application in your browser, and anytime you make a change to the code it will be refreshed in the browser.
Rendering a Basic Layout with Stencil
We are going to be working entirely on the app-home component in this tutorial. You will find it in src/components/app-home, and it will contain three files:
- app-home.css
- app-home.e2e.ts
- app-home.spec.ts
- app-home.tsx
This is more or less the same as an Angular component, except that the app-home.tsx file contains both the exported class and the template so we don’t have any .html file.
We will start by setting up a very basic layout, and we will add to it throughout this tutorial. If we take a look at the app-home.tsx file now, it will look like this:
import { Component, h } from '@stencil/core';

@Component({
  tag: 'app-home',
  styleUrl: 'app-home.css',
})
export class AppHome {
  render() {
    return [
      <ion-header>
        <ion-toolbar color="primary">
          <ion-title>Home</ion-title>
        </ion-toolbar>
      </ion-header>,

      <ion-content class="ion-padding">
        <p>
          Welcome to the PWA Toolkit. You can use this starter to build entire
          apps with web components using Stencil and ionic/core! Check out the
          README for everything that comes in this starter out of the box and
          check out our docs on
          <a href="https://stenciljs.com">stenciljs.com</a> to get started.
        </p>

        <ion-button href="/profile/ionic" expand="block">
          Profile page
        </ion-button>
      </ion-content>,
    ];
  }
}
We’ve already discussed most of what is going on here in the previous tutorial. The render() function returns the template that will be displayed to the user using JSX. In this case, the Ionic web components are being used to create the page. There are some small differences, but this otherwise looks quite similar to any Ionic/Angular page you would normally create.
An important thing to note about the render function is that it can only return one “root” or “top-level” node/element. You may notice in the example above that we are actually returning an array, and then we have our two “root” nodes that are being returned (<ion-header> and <ion-content>) separated by a comma - indicating that they are two separate elements in this array. If we were to do this instead:
  render() {
    return (
      <ion-header>
        <ion-toolbar color="primary">
          <ion-title>Home</ion-title>
        </ion-toolbar>
      </ion-header>

      <ion-content class="ion-padding">
        <p>
          Welcome to the PWA Toolkit. You can use this starter to build entire
          apps with web components using Stencil and ionic/core! Check out the
          README for everything that comes in this starter out of the box and
          check out our docs on <a href="https://stenciljs.com">stenciljs.com</a> to get started.
        </p>

        <ion-button href="/profile/ionic" expand="block">Profile page</ion-button>
      </ion-content>
    );
  }
It will not work because two top-level elements are being returned: <ion-header> and <ion-content>. If you do run into a situation where you want to return more than one top-level element, make sure that you return an array return [ ] instead of the standard return ():
render() { return [

<div>
  <p>First</p>
</div>
,

<div>
  <p>Second</p>
</div>
,

<div>
  <p>Third</p>
</div>

); }
Now, let’s modify the app-home component with our own template.
Modify src/components/app-home/app-home.tsx to reflect the following:
import { Component, h } from '@stencil/core';

@Component({
  tag: 'app-home',
  styleUrl: 'app-home.css',
})
export class AppHome {
  render() {
    return [
      <ion-header>
        <ion-toolbar color="primary">
          <ion-title>cryptoPWA</ion-title>
        </ion-toolbar>
      </ion-header>,

      <ion-content>
        <ion-list lines="none"></ion-list>
      </ion-content>,

      <ion-footer>
        <p>
          <strong>Disclaimer:</strong> Do not use this application to make
          investment decisions. Displayed prices may not reflect actual prices.
        </p>
      </ion-footer>,
    ];
  }
}
We will be adding more as we go, but this is our basic layout. We just have a simple header and footer, with a (currently empty) list in the content area.
Adding Data
Eventually, we want to loop through all of the cryptocurrency holdings we have set up and display them in the list. We also want to display a conditional message on the screen if the user currently does not have any holdings added.
Before we do that, we need some data to work with. We aren’t going to worry about allowing users to add holdings through a form and then saving that data just yet, for now, we just want some dummy data to work with. We are going to set up some holdings data with @State because this data will change over time (and we need our template to update when it does).
NOTE: For simplicity, I am defining the interface directly in the component, but it would be better to export the interface from a dedicated file and import it into this component.
Modify src/components/app-home/app-home.tsx to reflect the following:
import { Component, State, h } from '@stencil/core';

interface Holding {
  crypto: string;
  currency: string;
  amount: number;
  value?: number;
}

@Component({
  tag: 'app-home',
  styleUrl: 'app-home.css',
})
export class AppHome {
  @State() holdings: Holding[] = [];

  componentWillLoad() {
    // just set up some dummy data for now
    this.holdings = [
      {
        crypto: 'BTC',
        currency: 'USD',
        amount: 0.1,
        value: 11588.32892,
      },
      {
        crypto: 'ETH',
        currency: 'USD',
        amount: 2,
        value: 1032.23421,
      },
      {
        crypto: 'LTC',
        currency: 'USD',
        amount: 4,
        value: 153.2343242,
      },
    ];
  }

  render() {
    return [
      <ion-header>
        <ion-toolbar color="primary">
          <ion-title>cryptoPWA</ion-title>
        </ion-toolbar>
      </ion-header>,

      <ion-content>
        <ion-list lines="none"></ion-list>
      </ion-content>,

      <ion-footer>
        <p>
          <strong>Disclaimer:</strong> Do not use this application to make
          investment decisions. Displayed prices may not reflect actual prices.
        </p>
      </ion-footer>,
    ];
  }
}
Notice that we are now importing State from @stencil/core, we need to do this in order to use @State. We then have our holdings set up as follows:
@State() holdings: Holding[] = [];We define holdings and we give it a type of Holding[]. This means that holdings will expect an array of items that are of type Holding. We define this type in an interface above:
interface Holding {
  crypto: string;
  currency: string;
  amount: number;
  value?: number;
}
Adding interfaces/types isn’t necessary, but it does help improve the quality of your code – we can be sure now that the holdings array will definitely contain the type of data we are expecting.
Finally, we use the componentWillLoad lifecycle hook to set up the data before the template is rendered:
componentWillLoad(){

    // just set up some dummy data for now
    this.holdings = [
      {
        crypto: 'BTC',
        currency: 'USD',
        amount: 0.1,
        value: 11588.32892
      },
      {
        crypto: 'ETH',
        currency: 'USD',
        amount: 2,
        value: 1032.23421
      },
      {
        crypto: 'LTC',
        currency: 'USD',
        amount: 4,
        value: 153.2343242
      }
    ]

  }
Although this data is static for now, we have something to work with for the rest of the tutorial.
Displaying Parts of a Template Conditionally
In the previous tutorial, we discussed how we can easily return different templates based on a condition, e.g:
render() {
  if (this.name) {
    return ( <div>Hello {this.name}</div> )
  } else {
    return ( <div>Hello, World</div> )
  }
}
But on a more complex scale, this method doesn’t work all that well. If we have a big template with lots of conditions, we don’t want to supply 10 variations of the same template.
What we can do is offload sections of the template to other functions. For example, we could instead do something like this:
render(){

    return (
        <div>Hello, {this.getName()}</div>
    );

}
We are going to use this method to conditionally render our message on the screen that should only display when no holdings are in the holdings array.
Modify src/components/app-home/app-home.tsx to reflect the following:
import { Component, State, h } from '@stencil/core';

interface Holding {
  crypto: string;
  currency: string;
  amount: number;
  value?: number;
}

@Component({
  tag: 'app-home',
  styleUrl: 'app-home.css',
})
export class AppHome {
  @State() holdings: Holding[] = [];

  componentWillLoad() {
    // just set up some dummy data for now
    this.holdings = [
      {
        crypto: 'BTC',
        currency: 'USD',
        amount: 0.1,
        value: 11588.32892,
      },
      {
        crypto: 'ETH',
        currency: 'USD',
        amount: 2,
        value: 1032.23421,
      },
      {
        crypto: 'LTC',
        currency: 'USD',
        amount: 4,
        value: 153.2343242,
      },
    ];
  }

  renderWelcomeMessage() {
    return (
      <div>
        {!this.holdings.length ? (
          <div class="message">
            <p>
              <strong>cryptoPWA</strong> is a <strong>P</strong>rogressive
              <strong>W</strong>eb <strong>A</strong>pplication that allows you
              to keep track of the approximate worth of your cryptocurency
              portfolio.
            </p>

            <p>
              A PWA is like a normal application from the app store, but you can
              access it directly through the web. You may also add this page to
              your home screen to launch it like your other applications.
            </p>

            <p>
              No account required, just hit the button below to start tracking
              your coins in whatever currency you wish!
            </p>

            <ion-button href="/add-holding" color="primary">
              Add Coins
            </ion-button>
          </div>
        ) : null}
      </div>
    );
  }

  render() {
    return [
      <ion-header>
        <ion-toolbar color="primary">
          <ion-title>cryptoPWA</ion-title>
        </ion-toolbar>
      </ion-header>,

      <ion-content>
        {this.renderWelcomeMessage()}
        <ion-list lines="none"></ion-list>
      </ion-content>,

      <ion-footer>
        <p>
          <strong>Disclaimer:</strong> Do not use this application to make
          investment decisions. Displayed prices may not reflect actual prices.
        </p>
      </ion-footer>,
    ];
  }
}
We are now calling this.renderWelcomeMessage() from within our render function. The renderWelcomeMessage function checks the length of the this.holdings array, and if it is empty it will include the message, otherwise it will just be empty. We are using the ternary operator here, which is just shorthand for if/else:
conditionToCheck ? doThisIfTrue : doThisIfFalse;We won’t see the effects of this whilst there is holdings in the holdings array, but if you temporarily comment them out you will be able to see the message displayed.
NOTE: The message we added above is linking to another page. This won’t work yet as we haven’t set up that route – we will be getting to this in the next tutorial.
Looping Over Data
The final concept we are going to cover in this tutorial is looping over data in the template like we would with *ngFor in Angular. As with everything else we are doing, we are not relying on any framework specific syntax. So, to loop over our data we will just be using standard JavaScript.
To loop over data in the template, we can just use a map function on the array:
{
  this.holdings.map((holding) => <div>{holding.crypto}</div>);
}
By using a map, we are looping through each item in the array, and then returning the template we want for each of those items. Now let’s implement that in our application.
Modify src/components/app-home/app-home.tsx to reflect the following:
import { Component, State, h } from '@stencil/core';

interface Holding {
  crypto: string;
  currency: string;
  amount: number;
  value?: number;
}

@Component({
  tag: 'app-home',
  styleUrl: 'app-home.css',
})
export class AppHome {
  @State() holdings: Holding[] = [];

  componentWillLoad() {
    // just set up some dummy data for now
    this.holdings = [
      {
        crypto: 'BTC',
        currency: 'USD',
        amount: 0.1,
        value: 11588.32892,
      },
      {
        crypto: 'ETH',
        currency: 'USD',
        amount: 2,
        value: 1032.23421,
      },
      {
        crypto: 'LTC',
        currency: 'USD',
        amount: 4,
        value: 153.2343242,
      },
    ];
  }

  renderWelcomeMessage() {
    return (
      <div>
        {!this.holdings.length ? (
          <div class="message">
            <p>
              <strong>cryptoPWA</strong> is a <strong>P</strong>rogressive
              <strong>W</strong>eb <strong>A</strong>pplication that allows you
              to keep track of the approximate worth of your cryptocurency
              portfolio.
            </p>

            <p>
              A PWA is like a normal application from the app store, but you can
              access it directly through the web. You may also add this page to
              your home screen to launch it like your other applications.
            </p>

            <p>
              No account required, just hit the button below to start tracking
              your coins in whatever currency you wish!
            </p>

            <ion-button href="/add-holding" color="primary">
              Add Coins
            </ion-button>
          </div>
        ) : null}
      </div>
    );
  }

  render() {
    return [
      <ion-header>
        <ion-toolbar color="primary">
          <ion-title>cryptoPWA</ion-title>
        </ion-toolbar>
      </ion-header>,

      <ion-content>
        {this.renderWelcomeMessage()}
        <ion-list lines="none">
          {this.holdings.map((holding) => (
            <ion-item-sliding>
              <ion-item class="holding">
                <ion-label>
                  <p>
                    <strong>
                      {holding.crypto}/{holding.currency}
                    </strong>
                  </p>
                  <p class="amount">
                    <strong>Coins:</strong> {holding.amount}
                    <strong>Value:</strong> {holding.value}
                  </p>
                  <p class="value">{holding.amount * holding.value}</p>
                </ion-label>
              </ion-item>

              <ion-item-options>
                <ion-item-option color="danger">
                  <ion-icon slot="icon-only" name="trash"></ion-icon>
                </ion-item-option>
              </ion-item-options>
            </ion-item-sliding>
          ))}
        </ion-list>
      </ion-content>,

      <ion-footer>
        <p>
          <strong>Disclaimer:</strong> Do not use this application to make
          investment decisions. Displayed prices may not reflect actual prices.
        </p>
      </ion-footer>,
    ];
  }
}
Apart from the syntax difference to Ionic/Angular, we mostly just use the same approach.
Adding Styles
There isn’t really anything special about adding styles to the application, we just add them to the .css file like we would in an Ionic/Angular application. To make our application look a little nicer, let’s add some styles.
Modify src/components/app-home/app-home.css to reflect the following:
ion-footer {
  padding: 10px;
  font-size: 0.7em;
  color: #474747;
  background-color: #f6f6f6;
}

ion-item-sliding {
  margin-top: 10px;
}

ion-item {
  background-color: #f6f6f6;
  text-transform: uppercase;
  padding: 10px;
}

.amount {
  font-size: 0.7em;
}

.value {
  margin-top: 10px;
  font-size: 1.2em;
  color: #32db64;
}
After making that change, you should have something that looks like this:
Summary
With the use of Ionic web components, our pages mostly look the same as they ever did using Ionic/Angular. The main thing that will take a bit more getting used to is the switch to the JSX style templates. If you need more context around JSX, make sure to read: Understanding JSX for StencilJS Applications.
Part 2: Project Structure and Syntax
Part 3: Rendering Layout (this tutorial)
Part 4: Routing and Forms
Part 5: Storage and Services