

Part 2: Project Structure and Syntax (this tutorial)
Part 3: Rendering Layouts
Part 4: Routing and Forms
Part 5: Storage and Services
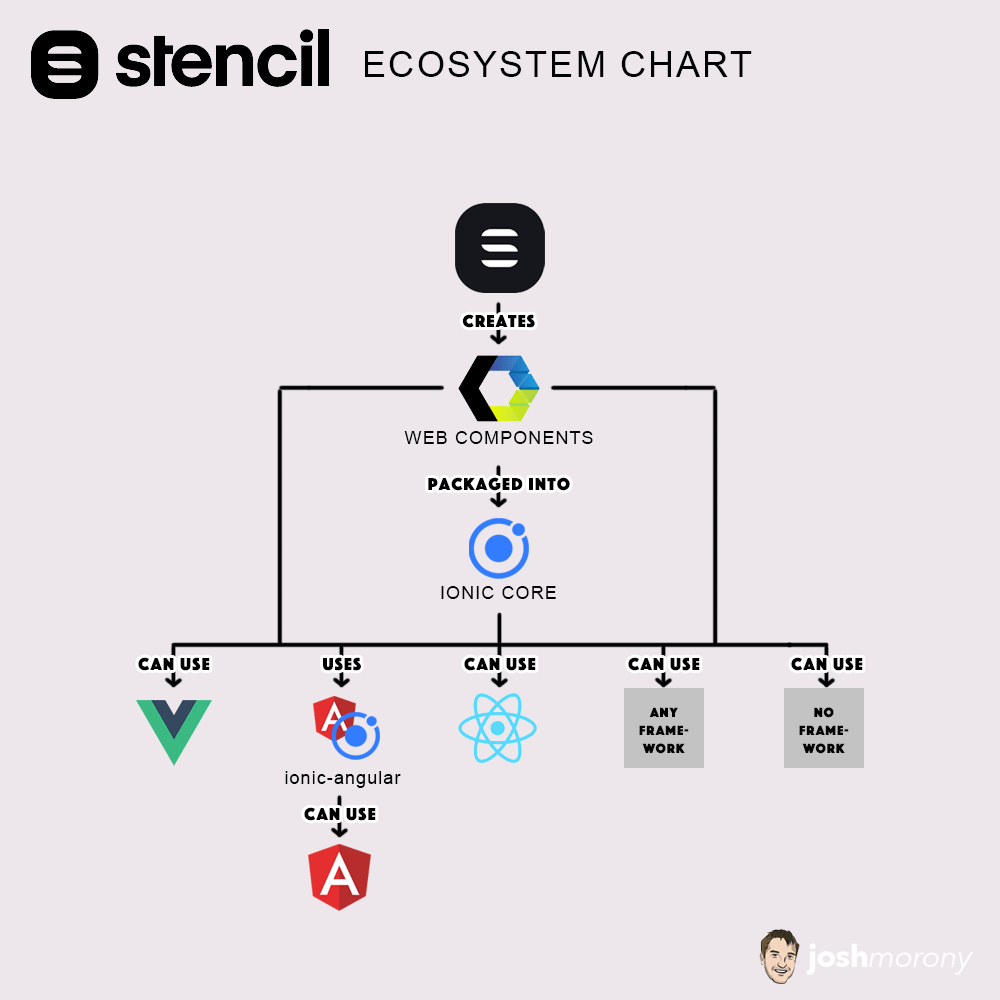
This article is Part 2 in a new tutorial series on building a Progressive Web Application using Stencil and the new Ionic PWA Toolkit. In the first tutorial, we focused on discussing what exactly Stencil is and how it fits into the Ionic ecosystem:
In this tutorial, we are going to start getting a little more practical and examine the structure and syntax of Stencil projects. As I mentioned in the last article, I am introducing Stencil in the context of developers who are familiar with Ionic/Angular. If you have not previously used Ionic or Angular, you will still likely be able to follow along with this – some of my comparisons just won’t be of much use to you. Although we will be making use of Ionic within our Stencil project later in this series, there is no need to know either Ionic or Angular at all in order to use Stencil.
Starting a StencilJS Project with the Ionic PWA Toolkit
To help get our heads around how Stencil works, we are going to generate our own Stencil project. We will discuss the general structure of the project in terms of what the various files and folders are for, as well as the syntax being used.
We are going to be using the Ionic PWA Toolkit in this series, which is essentially a Stencil project with a bunch of useful stuff for PWAs included by default. However, you should keep in mind that Stencil is not just for PWAs. It is a generic web component compiler, so for projects other than a PWA, you would typically use one of the other “starters”.
However, to begin with, we are just going to use the standard StencilJS starter that does not include the Ionic web components. This will allow us to gain a basic understanding of StencilJS in general, before we start incorporating Ionic specific things.
To set up a new StencilJS project, you can just run this command (you will need to have the LTS version of Node.js installed):
npm init stencilyou will then be prompted to pick one of the starter templates:
? Pick a starter › - Use arrow-keys. Return to submit.

   ionic-pwa     Everything you need to build fast, production ready PWAs
❯  app           Minimal starter for building a Stencil app or website
   component     Collection of web components that can be used anywhere
You would likely typically pick the ionic-pwa option if you are developing Ionic applications, but for this example we are going to use the app starter which will just create a generic StencilJS project. The app option is used to build a full “application” with StencilJS, as opposed to the component starter which is intended for building standalone web components that can be deployed elsewhere.
IMPORTANT: Make sure you choose the app starter for now. We will be using the ionic-pwa starter in the next part of this series, when we start building a real application.
Once you have named your project and it has been generated, you can run it in the browser with the following command:
npm startYour project should then launch in the browser at localhost:3333 and you should see something like this if you used the generic starter:
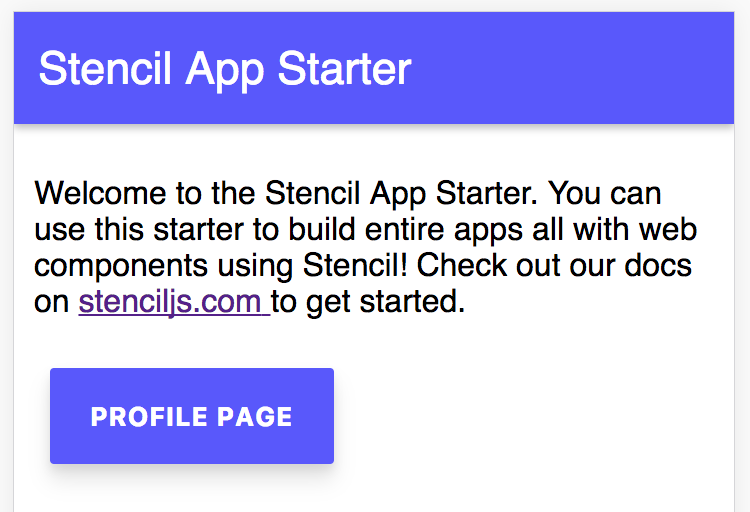
This looks pretty similar to a normal Ionic application. Although the Ionic web components being introduced in Ionic 4 can be used easily in any Stencil project, by default it is not included in a “standard” StencilJS project if we don’t specifically choose the ionic-pwa option. We will be looking at incorporating actual Ionic components into a Stencil project later in this series when we use the PWA toolkit.
Although we will generally use npm start to serve our application in the browser during development, you can also create a production build of your application with this command:
npm run buildYou will then find the built application inside of the www folder. Remember, at this point, the final build is not really a “Stencil project” anymore – it’s just vanilla web components that were compiled with Stencil. These web components work directly in modern browsers, they don’t require any kind of included framework library to run.
Stencil Application Structure
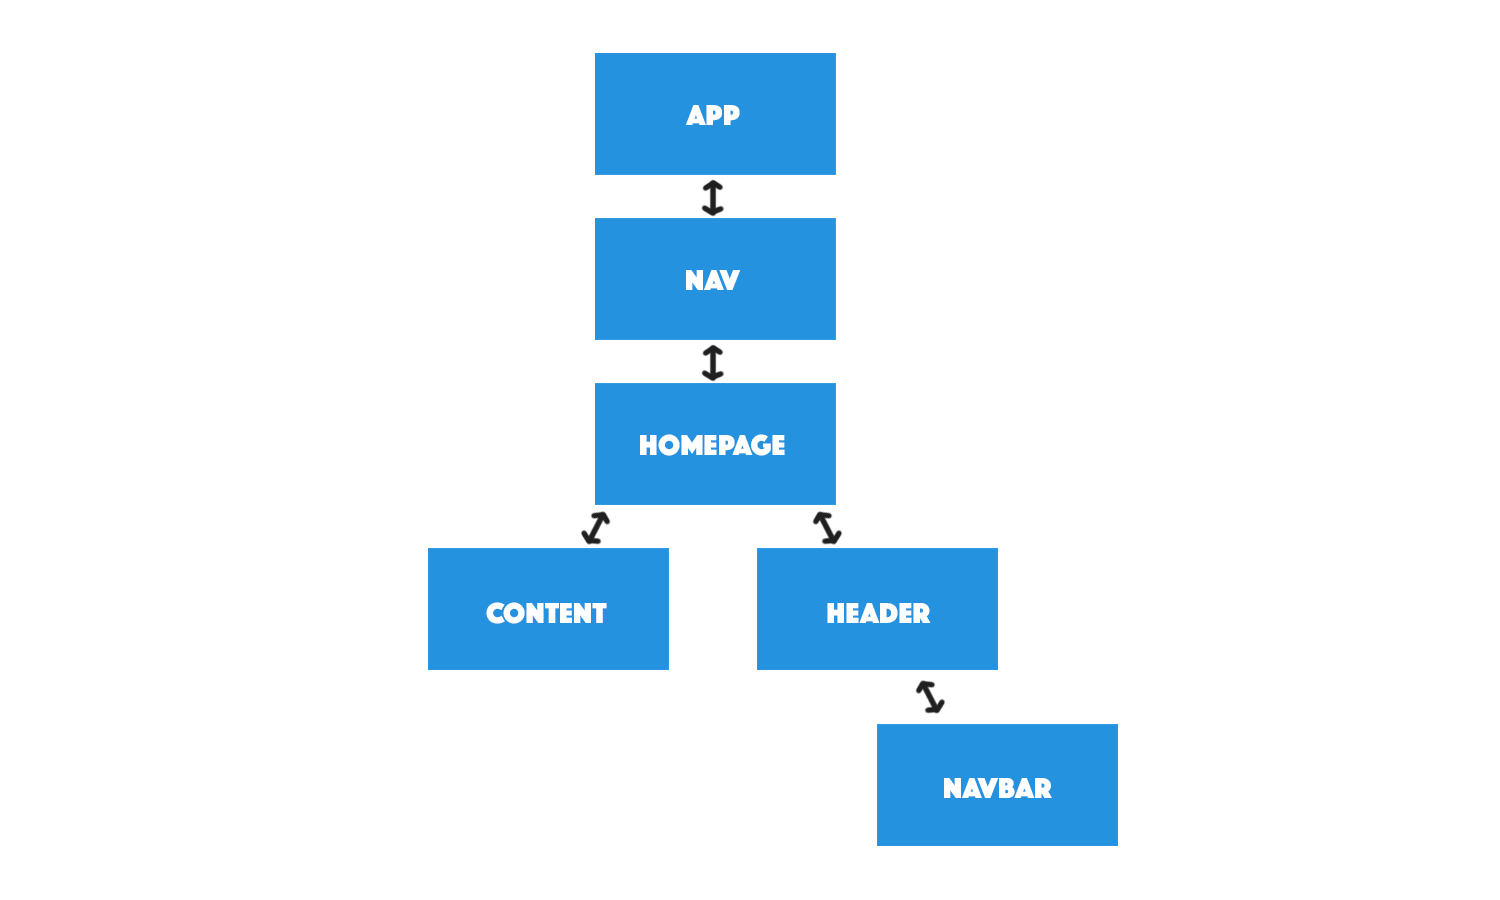
At a high level, the structure of an application built using Angular and an application built using Stencil web components are quite similar. In both, we create components or use existing ones, and the application structure is essentially components within components within components. In a typical Ionic/Angular application, the component structure might look like this:
When translated to simplified code, the above would look like this:
<ion-app>
  <ion-nav>
    <page-home>
      <ion-header>
        <ion-navbar></ion-navbar>
      </ion-header>
      <ion-content> </ion-content>
    </page-home>
  </ion-nav>
</ion-app>
Each tag above is a custom component. We have an <ion-app> component that has a <ion-nav> component inside of it, which has a <page-home> component inside of it, which has even more components inside of it.
We would take the same approach when using Stencil. For example, the structure of the default Ionic PWA toolkit application would look something like this:
<my-app>
  <stencil-router>
    <stencil-route>
      <app-home>
        <ion-header>
          <ion-navbar> </ion-navbar>
        </ion-header>
        <ion-content></ion-content>
      </app-home>
    </stencil-route>
  </stencil-router>
</my-app>
I’ve removed some code to make the example more clear. This is a simplified/naive example that is intended to demonstrate the general component structure of the application, it is not intended to demonstrate how the router actually workers (which has a similar role to <ion-nav> but it works quite differently). I’ve also added in some example Ionic components so that the examples more closely resemble each other.
In the Stencil example, we have the root <my-app> component, and inside of that we have the <stencil-router>, and inside of that we have the <app-home> component, and so on.
The good news for those of you already familiar with Ionic or Angular, and who are interested in learning Stencil, is that it doesn’t really require much of a mental leap. It’s the same basic concept, except that instead of using “Angular” components that require the Angular framework, we are using generic “Web Components” that run in the browser without a framework.
Stencil Files & Folders
If we are to take a look at the folder structure in the Stencil project we just set up, we will see that it is quite similar to a normal Ionic/Angular application:
We have a src folder where most of the coding takes place, and it also contains an assets folder for static assets. We have the index.html file which contains the basic website structure along with the root <my-app> component for the application. We also have a www folder that contains the built code for the project.
We have the usual config files like package.json, tsconfig.json, and so on. We also have a stencil.config.js file. This file is used by the compiler to determine how the project should be compiled, and whether any external components need to be pulled in (no need to worry about this just yet).
There isn’t all that much here to worry about right now, you will be doing almost all of your work within the components folder (either creating new components, or editing existing ones).
Stencil Syntax
A lot of the syntax for Stencil projects is very similar to what you would be used to if you are familiar with Angular. The biggest difference is the use of TSX (which is JSX with the addition of TypeScript) – we will talk about that first, and then move on to other syntax differences.
NOTE: I have a full article on JSX syntax available here as well: Understanding JSX for StencilJS Applications.
JSX/TSX
JSX (JavaScript XML) adds the ability to use XML syntax inside of JavaScript. TSX is the same thing, except that it allows for the use of TypeScript and XML. This is something that the React developers among us would be familiar with.
What this allows us to do is use the same syntax that we would use for HTML, except we can add it directly into our JavaScript/TypeScript code. If we wanted to define some kind of template inside of JavaScript, usually we would do something like this:
let myTemplate = '<div><p>Hello</p></div>';We can’t write HTML syntax inside of JavaScript because it isn’t valid JavaScript syntax. Instead, we would create a string like in the example above to hold it. However, with JSX/TSX, we can add XML syntax directly to JavaScript:
let myTemplate = (
  <div>
    <p>Hello</p>
  </div>
);
This syntax should set off alarm bells in your head, and it will probably freak out your code editor if you have your syntax set to JavaScript. However, this is perfectly valid syntax when using JSX/TSX. Just like TypeScript syntax is transpiled into something acceptable to browsers so, too, is JSX.
You will mostly be making use of this in Stencil through the render function that you will find inside of your components:
render() {

    if (this.match && this.match.params.name) {
      return (
        <div>
          <p>
            Hello! My name is {this.match.params.name}.
            My name was passed in through a route param!
          </p>
        </div>
      );
    }

  }
You can probably gather by the name of the render function and the code above what it is responsible for. The render function will determine what is displayed on the screen (your template, basically). You will find a render function in each of the example components in the Ionic PWA Toolkit.
I’ve used the example above (which you can find in app-profile.tsx in the default StencilJS starter) to highlight a particularly cool aspect of JSX/TSX. As I mentioned, JSX/TSX just adds the ability to use XML syntax inside of JavaScript. That means you can use basic JavaScript logic like if/else to control how your template is rendered. In this case, the message is only rendered if the if condition is met.
Here is another example from the Stencil documentation:
render() {
  if (this.name) {
    return ( <div>Hello {this.name}</div> )
  } else {
    return ( <div>Hello, World</div> )
  }
}
In this example, a message will be rendered either way. However, if this.name is available it will be displayed instead of World.
If you’re familiar at any level with JavaScript, then this would likely be pretty intuitive, as opposed to structural directives in Angular like *ngIf that require a bit of explanation first.
Basic Component Structure
Now let’s consider the general structure of a component in Stencil. Overall, it is quite similar to an Angular component:
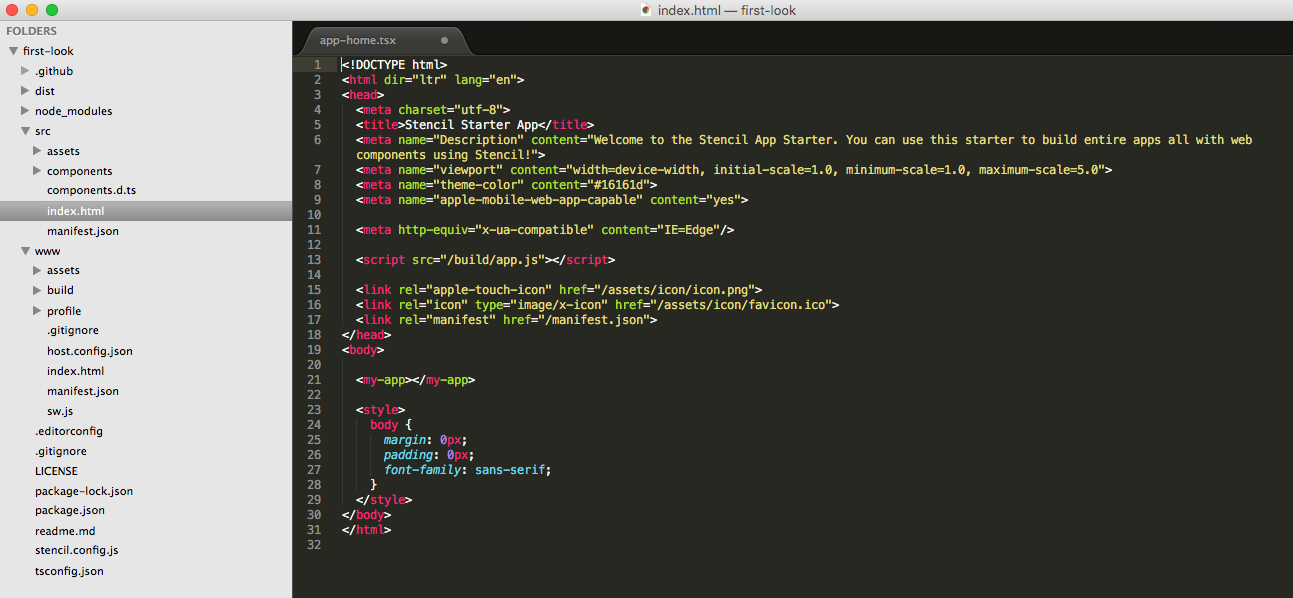
import { Component, h } from '@stencil/core';

@Component({
  tag: 'app-home',
  styleUrl: 'app-home.scss',
})
export class AppHome {
  componentDidLoad() {
    console.log('The component has been rendered');
  }

  someCustomFunction() {
    console.log('Watch out!... Radioactive man');
  }

  render() {
    return (
      <div>
        <p>
          Welcome to the Stencil App Starter. You can use this starter to build
          entire apps all with web components using Stencil! Check out our docs
          on <a href="https://stenciljs.com">stenciljs.com</a> to get started.
        </p>

        <stencil-route-link url="/profile/stencil">
          <button>Profile page</button>
        </stencil-route-link>
      </div>
    );
  }
}
This is the .tsx file for the app-home component that is in the StencilJS starter. I have added a couple of extra things to this for the sake of demonstration.
The general structure looks almost identical to Ionic/Angular. We import Component from the @stencil/core library, and then we use the @Component decorator to define some metadata for the component. We supply a tag property that defines the tag for the element, e.g. <app-home>, and a styleUrl that defines the SCSS file that this component will use for styling.
We also export a class that defines the component. Most importantly, this class contains the render function that determines what will be displayed to the user. However, we can also define our own custom functions just like we can in Ionic/Angular, and we even have similar lifecycle hooks (e.g. componentDidLoad instead of ngOnInit).
There is more syntax to walk through, but hopefully, it should be comforting to know (for those of you familiar with Angular at least) that a lot of the general concepts are quite similar.
Interpolations
Now we are going to quickly walk through some common syntax that we will need to use and how it compares to Ionic/Angular. We will just be going over the basics for now. First up: Interpolations.
In Angular, an interpolation is when we calculate something and render its value on the screen. We would render interpolations like this:
{
  {
    name;
  }
}
To render a class member of this.name to the screen. Or, if we wanted to perform some calculation we could do this:
{
  {
    2 + 2;
  }
}
which would render 4. This concept is almost identical in Stencil, except that we just use a single curly brace, and we need to include the reference to this:
{
  this.name;
}
@Prop and @State
Defining a @Prop allows us to pass input into a component. If we were to set up the following @Prop:
import { Component, Prop, h } from '@stencil/core';

@Component({
  tag: 'my-first-component',
  styleUrl: 'my-first-component.scss',
})
export class MyComponent {
  // Indicate that name should be a public property on the component
  @Prop() name: string;

  render() {
    return <p>My name is {this.name}</p>;
  }
}
We would then be able to pass in a name to the component when we use it, like this:
<my-first-component name="Max"></my-first-component>We can then access that value inside of our component using this.name. This is identical in concept to Angular’s @Input. @State is similar, except we use it to define values that are going to change inside of our component. Using another example from the documentation:
export class TodoList {
  @State() completedTodos: Todo[];

  // ...snip
}
This component needs to keep track of completedTodos, which will change over time. Rather than just defining it as a class member like we would in Ionic/Angular:
export class TodoList {

  public completedTodos: Todo[];

  // ...snip

}
We prepend it with @State so that Stencil knows this value will change. Any time a state or a @Prop or @State is updated, the render function will run and update what the user sees on the screen.
@Event and @Listen
We can define an @Event with an EventEmitter to trigger an event:
import { Event, EventEmitter } from '@stencil/core';

// ...snip

export class TodoList {
  @Event() todoCompleted: EventEmitter;
  todoCompletedHandler(todo: Todo) {
    this.todoCompleted.emit(todo);
  }
}
Again, this is exactly the same as what we would do in an Ionic/Angular application (except that we would use @Output instead of @Event). We create todoCompleted with @Event() and then we can trigger that event by calling this.todoCompleted.emit().
In order to listen for that event in a parent component, we use @Listen:
export class TodoApp {

  @Listen('todoCompleted');
  todoCompletedHandler(event: CustomEvent) {
    console.log('Received the custom todoCompleted event');
  }

}
This is somewhat unlike what we would do in Ionic/Angular, because we would usually set up an event binding in the template like this:
<todo-list (todoCompleted)="someFunction()"></todo-list>and we would set up the corresponding someFunction() to handle the event.
Summary
Although there are some differences, a lot of the Stencil concepts are completely analogous to what happens in Ionic/Angular. We use @Prop instead of @Input. We declare changing values using @State instead of just defining them as class members. The EventEmitter behaves in pretty much the same way, except that we use @Event instead of @Output, and we listen for those events using @Listen, instead of <my-component (theEvent)="doSomething()">
As we continue on in the series, we will start to deviate from an Angular style application more and more. Although a lot of the syntax is similar, Angular is a fully featured framework that comes with a lot of features built-in. It has pretty strong opinions about how the application should be structured – depending on your perspective and circumstance, this can either be a benefit or a disadvantage. Stencil, on the other hand, is not a framework in the same sense as Angular, it is a tool for building web components, and the rest of the infrastructure is going to be left up to you to decide (again, this is neither a good or bad thing).
Part 2: Project Structure and Syntax (this tutorial)
Part 3: Rendering Layouts
Part 4: Routing and Forms
Part 5: Storage and Services