

A difficult part of the beginner’s journey to learning Ionic is the step between understanding some of the basics and actually building a fully working application for the first time. Concepts explained in isolation can make sense, but it may be difficult to understand when to use them in the context of building an application. Even after spending some time learning about Ionic, you might find yourself starting a new project with no idea where to begin.
The aim of this tutorial is to provide a complete walkthrough of building a simple (but not too simple) Ionic application from start to finish. I have attempted to strike a balance between optimised/best-practice code, and something that is just straight-forward and easy enough for beginners to understand. Sometimes the “best” way to do things can look a lot more complex and intimidating, and doesn’t serve much of a purpose for beginners. You can always introduce more advanced concepts to your code as you continue to learn.
I will be making it a point to take longer to explain smaller concepts in this tutorial, more so than others, since it is targeted at people right at the beginning of their Ionic journey. However, I will not be able to cover everything in the level of depth required. I will mostly be including just enough to introduce you to the concept in this tutorial, and I will link out to further resources to explain those concepts in more depth.
What will we be building?
The example we will be building needs to be simple enough such that it won’t take too much effort to build, but it also needs to be complex enough to be a realistic representation of a real application.
I decided on building a notepad application for this example, as it will allow us to cover many of the core concepts such as:
- Navigation/Routing
- Templates
- Two-way data binding
- Interpolations
- Event binding
- Types and Interfaces
- Services
- Data Input
- Data Storage
- Styling
As well as covering important concepts, it is also a reasonably simple and fun application to build. In the end, we will have something that looks like this:
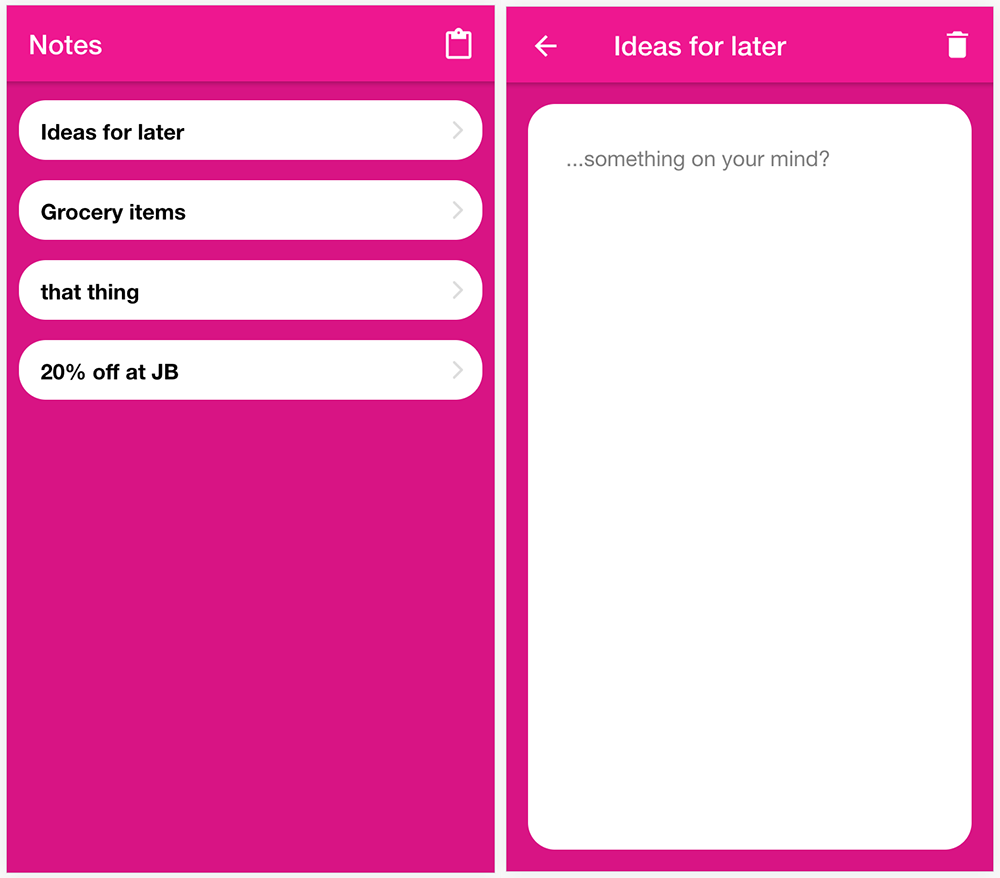
We will have an application that allows us to:
- Create, delete, and edit notes
- Save and load those notes from storage
- View a list of notes
- View note details
Before We Get Started
This tutorial will assume that you have read at least some introductory content about Ionic, have a general understanding of what it is, and that you have Ionic set up on your machine. You will also need to have a basic understanding of HTML, CSS, and JavaScript.
If you do not already have Ionic set up on your machine, or you don’t have a basic understanding of the structure of an Ionic project, take a look at the additional resource below for a video walkthrough.
Additional resources:
1. Generate a New Ionic Project
Time to get started! To begin, we will need to generate a new Ionic application. We can do that with the following command:
ionic start ionic-angular-notepad blank --type=angularWe are naming our application ionic-angular-notepad and we are using the blank template from Ionic (which will just give us a bare-bones starter template). By supplying the --type flag we are indicating we want to create an Ionic/Angular project (which will generate an Ionic 4 application for us).
You will be prompted to set up the Ionic Appflow SDK during this process, you can just say no to this for now. Once the application has finished generating, make it your working directory by running:
cd ionic-angular-notepad2. Create the Required Pages/Services
This application will have two pages:
- Home (a list of all notes)
- Detail (the details of a particular note)
and we will also be making use of a service/provider:
- NotesService
which is going to be responsible for handling most of the logic around creating, updating, and deleting notes. We are going to create these now by using Ionic’s generate command. Since there is already a “Home” page by default, we won’t need to create that.
Run the following command to generate the detail page:
ionic g page DetailRun the following commands to generate the service:
ionic g service services/NotesThe reason we use services/Notes instead of just Notes is that we want all of our services to be within a services folder (by default, they will just be created in the project root directory).
3. Setting up Navigation/Routing
Now we move on to our first real bit of work – setting up the routes for the application. Most of this is handled automatically for us when we generate the pages, but we are going to make a couple of changes.
Modify src/app/app-routing.module.ts to reflect the following:
import { NgModule } from '@angular/core';
import { PreloadAllModules, Routes, RouterModule } from '@angular/router';

const routes: Routes = [
  { path: '', redirectTo: 'notes', pathMatch: 'full' },
  { path: 'notes', loadChildren: './home/home.module#HomePageModule' },
  {
    path: 'notes/:id',
    loadChildren: './detail/detail.module#DetailPageModule',
  },
];

@NgModule({
  imports: [
    RouterModule.forRoot(routes, { preloadingStrategy: PreloadAllModules }),
  ],
  exports: [RouterModule],
})
export class AppRoutingModule {}
We’ve renamed our home path to notes just because I think it makes more sense for the URL to say notes - this is purely a cosmetic change. We have also changed the path for our Detail page to:
notes/:idThis is not just a cosmetic change. By adding :id to the path, which is prefixed by a colon : we are creating a route that will accept parameters which we will be able to grab later. That means that if a user goes to the following URL:
http://localhost:8100/notesThey will be taken to the Home page. However, if they go to:
http://localhost:8100/notes/12They will be taken to the Detail page, and from that page, we will be able to grab the :id value of 12. We will make use of that id to display the appropriate note to the user later.
Additional resources:
4. Starting the Notes/Home Page
The Home page, which will display a list of all of the notes the user has added, will be the default screen that user sees. We are going to start implementing the template for this page now. We don’t have everything in place that we need to complete it, so we will just be focusing on getting the basic template set up.
Modify src/app/home/home.page.html to reflect the following:
<ion-header>
  <ion-toolbar color="primary">
    <ion-title> Notes </ion-title>
    <ion-buttons slot="end">
      <ion-button>
        <ion-icon slot="icon-only" name="clipboard"></ion-icon>
      </ion-button>
    </ion-buttons>
  </ion-toolbar>
</ion-header>

<ion-content>
  <ion-list>
    <ion-item button detail>
      <ion-label>Title goes here</ion-label>
    </ion-item>
  </ion-list>
</ion-content>
This template is entirely made up of Ionic’s web components. We have the <ion-header> which contains the title for our page, and we have <ion-buttons> set up inside of the <ion-toolbar> which will allow us to place a set of buttons either to the left or the right of the toolbar. In this case, we just have a single button in the end slot which we are using as the button to trigger adding a new note. By giving our icon a slot of icon-only it will style the icon so that it is larger (since it doesn’t have text accompanying it).
Then we have our <ion-content> section which provides the main scrolling content section of the page. This contains an <ion-list> with a single <ion-item>. Later, we will modify this list to create multiple items – one for each of the notes that are currently stored in the application.
There will be more information available about all of this, including “slots”, in the additional resources at the end of this section.
Although we will not be making any major changes to the class for our Home page just yet, let’s change a few minor things and talk through the code that is there already.
Modify src/app/home/home.page.ts to reflect the following:
import { Component, OnInit } from '@angular/core';
import { AlertController, NavController } from '@ionic/angular';

@Component({
  selector: 'app-home',
  templateUrl: 'home.page.html',
  styleUrls: ['home.page.scss'],
})
export class HomePage implements OnInit {

  constructor(private alertCtrl: AlertController, private navCtrl: NavController){

  }

  ngOnInit(){

  }

}
At the top, we have our imports – these are the dependencies that we will need to make use of in this page. We import Component and OnInit from the @angular/core library, and we import AlertController and NavController from the @ionic/angular library.
- Component allows us to create a component using the
@Componentdecorator and specifies the metadata for the page including the URL of its template and.scssfile (required for all components/pages) - OnInit allows us to implement the
ngOnInitmethod which will be triggered as soon as the page is initialised - AlertController will allow us to create alert prompts
- NavController will allow us to control navigation using Ionic’s navigation methods
It isn’t enough to just import some of these dependencies, we also may need to set them up in our class using dependency injection. We need to “inject” these dependencies through the constructor in the class. Take a look at the following code:
constructor(private alertCtrl: AlertController, private navCtrl: NavController){

}
What this is doing is setting up class members, which will be references to the injected dependency, that will be accessible through the class. In the case of the AlertController we are basically saying:
“Create a class member variable called alertCtrl which will be an instance of the AlertController service”
By prefixing this with private we are saying that we want this variable to be accessible anywhere inside of this class (but not outside of the class). We could also use public which would make the variable accessible anywhere inside or outside of the class.
This means that anywhere in this class we will be able to reference this.alertCtrl or this.navCtrl to access the methods that they each provide.
It’s going to be hard for us to go much further than this without starting to work on our Notes service, as this is what is going to allow us to add, update, and delete notes. Without it, we don’t have anything to display!
Additional resources:
5. Creating an Interface
Before we implement our Notes service, we are going to define exactly “what” a note is by creating our own custom type with an interface.
Angular uses TypeScript, which is basically JavaScript with “types”. A type gives us a way to enforce that data is what we expect it to be, and you will often see variables, methods, and parameters followed by a colon : and then a type. For example:
let myName: string = 'Josh';Since we have added : string after the variable we defined, it will enforce that myName can only be a string. If we tried to assign a number to myName it wouldn’t allow us to do it. I don’t want to dive too deep into types and interfaces here, so I will link to another tutorial in the additional resources section.
Create a folder and file at src/app/interfaces/note.ts and add the following:
export interface Note {
  id: string;
  title: string;
  content: string;
}
This will allow us to import a Note type elsewhere in our application, which will allow us to force our notes to follow the format defined above. Each note must have an id that is a string, a title that is a string, and content that is a string.
Additional resources:
6. Implement the Notices Service
The pages in our application are responsible for displaying views/templates on the screen to the user. Although they are able to implement logic of their own in their associates *.page.ts files, the majority of the complex logic performed in our applications should be done in services.
A service does not display anything to the user, it is just a “helper” that is used by components/pages in our application to perform logic/data operations. Our pages can then call the methods of this service to do work for it. This way, we can keep the code for our pages light, and we can also share the data and methods available through services with multiple pages in our application (whereas, if we define methods in our pages they are only accessible to that one page). Services are the primary way that we are able to share data between different pages.
Our Notes service will implement various methods which will allow it to:
- Create a note and add it to an array in the data service
- Delete notes from that array
- Find and return a specific note by its
id - Save the array of notes to storage
- Load the array of notes from storage
Let’s implement the code, and then talk through it. I’ve added comments to various parts of the code itself, but we will also talk through it below.
Modify src/services/notes.service.ts to reflect the following:
import { Injectable } from '@angular/core';
import { Storage } from '@ionic/storage';

import { Note } from '../interfaces/note';

@Injectable({
  providedIn: 'root'
})
export class NotesService {

  public notes: Note[] = [];
  public loaded: boolean = false;

  constructor(private storage: Storage) {

  }

  load(): Promise<boolean> {

    // Return a promise so that we know when this operation has completed
    return new Promise((resolve) => {

      // Get the notes that were saved into storage
      this.storage.get('notes').then((notes) => {

        // Only set this.notes to the returned value if there were values stored
        if(notes != null){
          this.notes = notes;
        }

        // This allows us to check if the data has been loaded in or not
        this.loaded = true;
        resolve(true);

      });

    });

  }

  save(): void {
    // Save the current array of notes to storage
    this.storage.set('notes', this.notes);
  }

  getNote(id): Note {
    // Return the note that has an id matching the id passed in
    return this.notes.find(note => note.id === id);
  }

  createNote(title): void {

    // Create a unique id that is one larger than the current largest id
    let id = Math.max(...this.notes.map(note => parseInt(note.id)), 0) + 1;

    this.notes.push({
      id: id.toString(),
      title: title,
      content: ''
    });

    this.save();

  }

  deleteNote(note): void {

    // Get the index in the array of the note that was passed in
    let index = this.notes.indexOf(note);

    // Delete that element of the array and resave the data
    if(index > -1){
      this.notes.splice(index, 1);
      this.save();
    }

  }

}
Once again, we have our imports at the top of the file. Rather than Component we use Injectable this time, which provides the @Injectable decorator we use with all of our services/providers. This allows us to define where the service is providedIn which in this case (and in most cases) is root, meaning that a single instance of this service will be available for use throughout our entire application.
We also import Storage which we inject through the constructor as we will be making use of it to save and load data throughout the service, and we also import our Note interface that we just created.
We set up two class members above our constructor:
noteswhich will be an array of notes (theNote[]type means it will be an array of ourNotetype we created)loadedwhich is a boolean (true or false) which will indicate whether or not the data has been loaded in from storage
Like the dependencies we inject through the constructor, variables declared above the constructor will be accessible throughout the entire class using this.notes or this.loaded.
IMPORTANT: We will be making use of this.storage throughout this class, but it won’t work until we complete the next step. There are additional dependencies that need to be installed for storage.
Our load function is responsible for loading data in from storage (if it exists) and then setting it up on the this.notes array. We surround this entire method with a Promise that resolves when the operation is complete, as we will need a way to detect when the operation has finished later. This is asynchronous behaviour, and it is critically important to understand the difference between asynchronous and synchronous code – I’ve linked to further information on this in the additional resources at the end of this section.
The way in which we are loading data in this application I would describe as a “beginner friendly” approach. There are “better” ways to do this using observables, but this is a perfectly acceptable approach.
The save function simply sets our notes array on the notes key in storage so that it can be retrieved later – we will call this whenever there is a change in data.
The getNote function will accept an id, it will then search through the notes array and return the note that matches the id passed in. We will make use of this in our detail page later.
The createNote function handles creating a new note and pushing it into the notes array. We do have an odd bit of code here:
let id = Math.max(...this.notes.map((note) => parseInt(note.id)), 0) + 1;We need each of our notes to have a unique id so that we can grab them appropriately through the URL. To keep things simple, we are using a simple numeric id (an id could be anything, as long as it is unique). To ensure that we always get a unique id, we use this code to find the note with the largest id that is currently in the array, and then we just add 1 to that.
Finally, the deleteNote method simply takes in a note and then removes that note from the array.
Additional resources:
- Asynchronous vs Synchronous: Understanding the Difference
- Navigation Basics & Passing Data Between Pages in Ionic & Angular
- When & How to Use Services/Providers in Ionic
7. Setting up Data Storage
Ionic provides a useful Storage API that will automatically handle storing data using the best mechanism available. However, it is not installed by default. To set up Ionic Storage, you will first need to install the following package:
npm install @ionic/storage --saveYou will also need to make a change to your root module file.
Modify src/app/app.module.ts to reflect the following:
import { NgModule } from '@angular/core';
import { BrowserModule } from '@angular/platform-browser';
import { RouteReuseStrategy } from '@angular/router';
import { IonicStorageModule } from '@ionic/storage';

import { IonicModule, IonicRouteStrategy } from '@ionic/angular';
import { SplashScreen } from '@ionic-native/splash-screen/ngx';
import { StatusBar } from '@ionic-native/status-bar/ngx';

import { AppComponent } from './app.component';
import { AppRoutingModule } from './app-routing.module';

@NgModule({
  declarations: [AppComponent],
  entryComponents: [],
  imports: [
    BrowserModule,
    IonicModule.forRoot(),
    AppRoutingModule,
    IonicStorageModule.forRoot(),
  ],
  providers: [
    StatusBar,
    SplashScreen,
    { provide: RouteReuseStrategy, useClass: IonicRouteStrategy },
  ],
  bootstrap: [AppComponent],
})
export class AppModule {}
Notice that we have imported IonicStorageModule from @ionic/storage and we have added IonicStorageModule.forRoot() to the imports for the module.
Additional resources:
8. Finishing the Notes Page
With our notes service in place, we can now finish off our Home page. We will need to make some modifications to both the class and the template.
Modify src/app/home/home.page.ts to reflect the following:
import { Component, OnInit } from '@angular/core';
import { AlertController, NavController } from '@ionic/angular';
import { NotesService } from '../services/notes.service';

@Component({
  selector: 'app-home',
  templateUrl: 'home.page.html',
  styleUrls: ['home.page.scss'],
})
export class HomePage implements OnInit {

  constructor(public notesService: NotesService, private alertCtrl: AlertController, private navCtrl: NavController){

  }

  ngOnInit(){
    this.notesService.load();
  }

  addNote(){

    this.alertCtrl.create({
      header: 'New Note',
      message: 'What should the title of this note be?',
      inputs: [
        {
          type: 'text',
          name: 'title'
        }
      ],
      buttons: [
        {
          text: 'Cancel'
        },
        {
          text: 'Save',
          handler: (data) => {
            this.notesService.createNote(data.title);
          }
        }
      ]
    }).then((alert) => {
      alert.present();
    });

  }

}
We have added one additional import which is the NotesService. Just like the services we import from the Ionic library, we also need to inject our own service through the constructor to make it available to use throughout this component.
We have added a call to the load method of the Notes service, which will handle loading in the data from storage as soon as the application is started.
We have also added an addNote() method which will allow the user to add a new note. We will create an event binding in the template later to tie a button click to this method, which will launch an Alert on screen. This prompt will allow the user to enter a title for their new note, and when they click Save the new note will be added.
Now we just need to finish off the template.
Modify src/app/home/home.page.html to reflect the following:
<ion-header>
  <ion-toolbar color="primary">
    <ion-title> Notes </ion-title>
    <ion-buttons slot="end">
      <ion-button (click)="addNote()">
        <ion-icon slot="icon-only" name="clipboard"></ion-icon>
      </ion-button>
    </ion-buttons>
  </ion-toolbar>
</ion-header>

<ion-content>
  <ion-list>
    <ion-item
      button
      detail
      *ngFor="let note of notesService.notes"
      [routerLink]="'/notes/' + note.id"
      routerDirection="forward"
    >
      <ion-label>{{ note.title }}</ion-label>
    </ion-item>
  </ion-list>
</ion-content>
We have modified our button in the header section to include a click event binding that is linked to the addNote() method. This will trigger the addNote() method we just created whenever the user clicks on the button.
We have also modified our notes list:
<ion-list>
  <ion-item
    button
    detail
    *ngFor="let note of notesService.notes"
    [routerLink]="'/notes/' + note.id"
    routerDirection="forward"
  >
    <ion-label>{{ note.title }}</ion-label>
  </ion-item>
</ion-list>
Rather than just having a single item, we are now using *ngFor which will loop over each note in our notes array in the notes service (which is why we reference notesService.notes).
Take notice of the * syntax used here for the *ngFor in the list, this is shorthand for creating an embedded template. Rather than literally rendering out:
<ion-item button detail *ngFor="let note of notesService.notes"></ion-item>to the DOM (Document Object Model), an embedded template will be created for each items specific data. So, if our notes array had 4 notes in it, then the <ion-item> would be rendered out 4 times. Also notice that we are using let note, which assigns a single element from the notes array to note as we loop through the array. This allows us to reference its properties, which we are using to access an individual notes id and title here.
Since we want to view the details of an individual note by clicking on it, we set up the following routerLink value:
[routerLink]="'/notes/' + note.id"Using the square brackets around routerLink means that we are binding an expression to routerLink, rather than a literal value. In this case, we want to first evaluate the expression '/notes' + note.id to something like '/notes/12' before assigning it to the routerLink, we don’t want the value to literally be '/notes' + note.id. We also supply a routerDirection of forward so that Ionic knows the “direction” of the page transition, which will make sure that it animates that transition correctly (there are different page transition animations for a forward and backward transition).
Finally, we use an “interpolation” to render out a specific notes title value inside of the <ion-label>. Just like with the square brackets, and interpolation indicated by the double curly braces is just a way to evaluate an expression before rendering it out on the screen. Therefore, this will display the title of whatever note is currently being looped over in our *ngFor.
Additional resources:
- AlertController API
- An Introduction to Structural Directives: *ngIf & *ngFor
- Component and Template Interaction in Ionic
- Navigation Basics & Passing Data Between Pages in Ionic & Angular
9. Implement the Notes Detail Page
We just have one more page to implement to finish off the functionality in the application! We want our Detail page to allow the user to:
- View the details of a note
- Edit the content of a note
- Delete a note
Let’s start off with the class, and then we will implement the template.
Modify src/app/detail/detail.page.ts
import { Component, OnInit } from '@angular/core';
import { NavController } from '@ionic/angular';
import { ActivatedRoute } from '@angular/router';
import { NotesService } from '../services/notes.service';
import { Note } from '../interfaces/note';

@Component({
  selector: 'app-detail',
  templateUrl: './detail.page.html',
  styleUrls: ['./detail.page.scss'],
})
export class DetailPage implements OnInit {

  public note: Note;

  constructor(private route: ActivatedRoute, private notesService: NotesService, private navCtrl: NavController) {

    // Initialise a placeholder note until the actual note can be loaded in
    this.note = {
      id: '',
      title: '',
      content: ''
    };

  }

  ngOnInit() {

    // Get the id of the note from the URL
    let noteId = this.route.snapshot.paramMap.get('id');

    // Check that the data is loaded before getting the note
    // This handles the case where the detail page is loaded directly via the URL
    if(this.notesService.loaded){
      this.note = this.notesService.getNote(noteId)
    } else {
      this.notesService.load().then(() => {
        this.note = this.notesService.getNote(noteId)
      });
    }

  }

  noteChanged(){
    this.notesService.save();
  }

  deleteNote(){
    this.notesService.deleteNote(this.note);
    this.navCtrl.navigateBack('/notes');
  }

}
This is very similar to our Home page, but there are a few differences. We are using a new import here called ActivatedRoute. This will allow us to get information about the currently active route, and we want to do that because we need to access the id of the note that is supplied through the route, e.g:
http://localhost:8100/notes/12In our ngOnInit function, we get this id value using the ActivatedRoute that we injected through the constructor. We then use that id to grab the specific note from the notes service. However, we first have to check if the data has been loaded yet since it is possible to load this page directly through the URL (rather than going through the home page first). If the data has not already been loaded in yet, then we load the data before attempting to grab the note using getNote(). The note is then assigned to the this.note class member.
Since the note is not immediately available to the template, we intialise an empty note in the constructor so that our template won’t complain about data that does not exist. Once the note has been successfully fetched, the data in the template will automatically update.
We have a noteChanged method set up, which will be called every time the data for the note changes. This will ensure that any changes are immediately saved.
We also have a deleteNote function that will handle deleting the current note. Once the note has been deleted, we automatically navigate back to the Home page by using the navigateBack method of the NavController.
Modidfy src/app/detail/detail.page.html to reflect the following:
<ion-header>
  <ion-toolbar color="primary">
    <ion-buttons slot="start">
      <ion-back-button defaultHref="/notes"></ion-back-button>
    </ion-buttons>
    <ion-title>{{ note.title }}</ion-title>
    <ion-buttons slot="end">
      <ion-button (click)="deleteNote()">
        <ion-icon slot="icon-only" name="trash"></ion-icon>
      </ion-button>
    </ion-buttons>
  </ion-toolbar>
</ion-header>

<ion-content class="ion-padding">
  <ion-textarea
    (input)="noteChanged()"
    [(ngModel)]="note.content"
    placeholder="...something on your mind?"
  ></ion-textarea>
</ion-content>
Again, this template is not too dissimilar to our Home page. Since we have our note set up as a class member variable, we can access it inside of <ion-title> to display the title of the current note in this position.
We have our delete button set up in the header which is bound to the deleteNote method we defined, but we also have an additional button this time called <ion-back-button>. This is an Ionic component that simply displays a button that will handle allowing the user to navigate backward. Since it is possible to load the Detail page directly through the URL, and we still want the user to be able to navigate “back” to the Home page in this instance, we supply the back button with a defaultHref of /notes which will cause it to navigate to the /notes route by default if no navigation history is available.
Inside of our content area, we just have a single <ion-textarea> component for the user to write in. We use an ngModel which allows us to set up two-way data binding. This means that if the user changes the value in the <ion-textarea> it will automatically update the content property of our note to reflect this change. However, it also works in reverse. If we were to change the content property of our note, then this change would also be reflected inside of the <ion-textarea>. We generally use ngModel for simple data/forms input – but for more advanced forms there are better ways to do this.
We also set up an event binding for input on this component, which will trigger every time the user inputs anything. This will cause any changes to the note to be saved to storage since we are triggering the save() method every time noteChanged() is called.
Additional resources:
- Implementing a Master Detail Pattern in Ionic 4 with Angular Routing
- Advanced Forms & Validation in Ionic
10. Styling the Application
The functionality of our application is complete now. But we are going to take it one step further and make it look a little nicer. You may have noticed in the templates that we reference color="primary" in the toolbars. Ionic has a default set of colours defined that we can use, including:
- primary
- secondary
- tertiary
- light
- danger
- dark
We can use these default colours, or we can define our own in the src/theme/variables.scss file. You will find a bunch of CSS4 variables in this file that can be modified (if you aren’t familiar with CSS4 variables, I would recommend checking out the additional resources section). You can just modify these manually, but it is a better idea to use Ionic’s Color Generator to generate all of the necessary values for you, you just pick the colours that you want:
You can create your own colour scheme, or use the one I have created below.
Modify src/theme.variables.scss to reflect the following:
// Ionic Variables and Theming. For more info, please see:
// http://ionicframework.com/docs/theming/

/** Ionic CSS Variables **/
:root {
  --ion-color-primary: #f10090;
  --ion-color-primary-rgb: 241, 0, 144;
  --ion-color-primary-contrast: #ffffff;
  --ion-color-primary-contrast-rgb: 255, 255, 255;
  --ion-color-primary-shade: #d4007f;
  --ion-color-primary-tint: #f21a9b;

  --ion-color-secondary: #da0184;
  --ion-color-secondary-rgb: 218, 1, 132;
  --ion-color-secondary-contrast: #ffffff;
  --ion-color-secondary-contrast-rgb: 255, 255, 255;
  --ion-color-secondary-shade: #c00174;
  --ion-color-secondary-tint: #de1a90;

  --ion-color-tertiary: #7044ff;
  --ion-color-tertiary-rgb: 112, 68, 255;
  --ion-color-tertiary-contrast: #ffffff;
  --ion-color-tertiary-contrast-rgb: 255, 255, 255;
  --ion-color-tertiary-shade: #633ce0;
  --ion-color-tertiary-tint: #7e57ff;

  --ion-color-success: #10dc60;
  --ion-color-success-rgb: 16, 220, 96;
  --ion-color-success-contrast: #ffffff;
  --ion-color-success-contrast-rgb: 255, 255, 255;
  --ion-color-success-shade: #0ec254;
  --ion-color-success-tint: #28e070;

  --ion-color-warning: #ffce00;
  --ion-color-warning-rgb: 255, 206, 0;
  --ion-color-warning-contrast: #ffffff;
  --ion-color-warning-contrast-rgb: 255, 255, 255;
  --ion-color-warning-shade: #e0b500;
  --ion-color-warning-tint: #ffd31a;

  --ion-color-danger: #f04141;
  --ion-color-danger-rgb: 245, 61, 61;
  --ion-color-danger-contrast: #ffffff;
  --ion-color-danger-contrast-rgb: 255, 255, 255;
  --ion-color-danger-shade: #d33939;
  --ion-color-danger-tint: #f25454;

  --ion-color-dark: #222428;
  --ion-color-dark-rgb: 34, 34, 34;
  --ion-color-dark-contrast: #ffffff;
  --ion-color-dark-contrast-rgb: 255, 255, 255;
  --ion-color-dark-shade: #1e2023;
  --ion-color-dark-tint: #383a3e;

  --ion-color-medium: #989aa2;
  --ion-color-medium-rgb: 152, 154, 162;
  --ion-color-medium-contrast: #ffffff;
  --ion-color-medium-contrast-rgb: 255, 255, 255;
  --ion-color-medium-shade: #86888f;
  --ion-color-medium-tint: #a2a4ab;

  --ion-color-light: #f4f5f8;
  --ion-color-light-rgb: 244, 244, 244;
  --ion-color-light-contrast: #000000;
  --ion-color-light-contrast-rgb: 0, 0, 0;
  --ion-color-light-shade: #d7d8da;
  --ion-color-light-tint: #f5f6f9;
}
By supplying these variables to the :root selector, these variable changes will take affect application wide (although they can still be overwritten by more specific selectors).
This is a good way to add some basic styling to the application, but we might want to get a little more specific. Let’s say we want to change the background colour of all of our <ion-content> sections. We can do that too.
Add the following style to the top of src/theme.variables.scss:
ion-content {
  --ion-background-color: var(--ion-color-secondary);
}
Unlike the :root selector which defines variables everywhere, this will only overwrite the --ion-background-color variable inside of any <ion-content> tags. We set the background colour to whatever the --ion-color-secondary value is, but we could also just use a normal colour value here instead of a variable if we wanted to.
We can also add styles just to specific pages if we want. Let’s make some changes to the Home page and Detail page.
Modify src/app/home/home.page.scss to reflect the following:
ion-item {
  --ion-background-color: #fff;
  width: 95%;
  margin: 15px auto;
  font-weight: bold;
  border-radius: 20px;
  --border-radius: 20px;
}
This adds a bit of extra styling to our <ion-item>. We want it to have a rounded border so we supply the border-radius property, but notice we are kind of doing this twice. Inside of the <ion-item> there is a ripple effect component that applies a little animation when the item is clicked. We need the border of this effect to be rounded as well as the item itself. Since the ripple effect is inside of a Shadow DOM, we can only change its style by modifying the --border-radius CSS variable. I realise this probably sounds very confusing, so I would highly recommend checking out the additional resources on Shadow DOM as this is a big part of styling in Ionic 4.
Modify src/app/detail/detail.page.scss to reflect the following:
ion-textarea {
  --background: #fff;
  border-radius: 20px;
  padding: 20px;
  height: 100%;
}
This just adds some simple styling to the textarea, and with that, we’re done!
Additional resources:
- A Primer on CSS 4 Variables for Ionic 4
- Shadow DOM Usage in Ionic Web Components
- Styling a Shadow DOM in Ionic 4
Summary
Although this application is reasonably simple, we have covered a lot of different concepts. If you are still just getting started with Ionic, and even if you’ve been at it for a while, there are more than likely a few concepts that we have covered that might not make complete sense yet. After completing the application, I would recommend going back to the additional resources in each section to read further on any concepts you are struggling with.