

Recently, I published a tutorial on using ThreeJS with Ionic to embed virtual reality content into a mobile application using WebVR. This tutorial is going to be somewhat similar, we will still be making use of ThreeJS and WebGL, but we will be creating an augmented reality experience in an Ionic/Angular application.
If you are unfamiliar with technologies like WebGL (which uses the GPU of a device to render 3D graphics on the web) and ThreeJS (a framework that makes using WebGL easier) it might be beneficial to read the previous article about WebVR first.
Introduction to Augmented Reality
Put simply, augmented reality uses technology to “virtually” change a real physical space. Unlike virtual reality which throws you into a fully artificial/simulated world, augmented reality adds to an existing space. Although an augmented reality experience isn’t limited to just the use of a camera, most AR projects available today involve using your device’s camera to view a physical space, and additional objects will be added to that space on the screen – your device acts as a “window” into the augmented space.
This technology is still in its infancy, and I don’t think this is something people are really using in their day-to-day lives, but there are a few interesting examples out there already. Many people would have seen the use of augmented reality to add Pokémon to a real physical space in Pokémon GO which is a bit of fun, but then there are also projects like Google Lens which allows you find out more information about particular objects by using your device’s camera.
Web vs Native Augmented Reality
Apple are working on developing ARKit for native iOS applications, and Google are working on ARCore for native Android applications which will allow developers to provide augmented reality experiences in iOS and Android applications.
If you are building your Ionic applications with Cordova or Capacitor, then you can still access these Native APIs. Although comparisons are often framed as “native or hybrid”, it is important to note that when you build an Ionic application for iOS or Android it is a native application like any other – the difference is that “hybrid” applications use an embedded browser to display the web-powered user interface for the application. An application built with Ionic still has all the native tools that any other application has access to available to it, and that includes the ability to launch native views that use ARKit or ARCore.
We are talking about embedding dynamic 3D objects into a physical space in real-time here, so for experiences on the higher end of the spectrum, you are probably going to want to use these Native APIs. However, it is still entirely possible to create an augmented reality experience purely using web tech (just good old HTML, CSS, and JavaScript) – that includes integration with the camera and the rendering of 3D objects.
A downside of using Native APIs to provide an augmented reality experience is that it is platform specific. One of the big draws of Ionic and the web is that you can code an application once that will work everywhere. When you deviate away from the web and into platform-specific native integrations, you lose some of that portability.
The other benefit to using a web-based AR approach is that if you want to integrate the experience into the interface of an Ionic application, as opposed to just launching a full-screen native view, you will more easily be able to integrate a web-based AR approach with Ionic’s web-based UI. It is possible to mix native views with web UI, but unless it is just an overlay it can get messy (which is why I generally favour the web-based Google Maps JavaScript SDK over the Native SDK).
Whilst you’re probably not going to be building something like this using Web AR:
(although to be fair, this could be possible with WebAR for all I know)
There are still uses cases for a fully web-based AR experience, and since this tech is still in its infancy this is sure to grow in the future.
Building an Augmented Reality Experience in Ionic
In this tutorial, we are going to walk through an example of projecting a 3D ThreeJS scene built with A-Frame right into real life through your device’s camera. This will run completely through the web. We will be able to deploy this application as a PWA (Progressive Web Application) and access it directly through a devices web browser to activate the augmented reality functionality (assuming the device has a camera, of course).
We will be using a package called AR.js which was created by Jerome Etienne, which makes it absurdly easy to get an augmented reality experience up and running. You can literally just dump this 10 line example from the documentation into a web page:
<!DOCTYPE html>
<html>
  <script src="https://aframe.io/releases/0.6.1/aframe.min.js"></script>
  <script src="https://cdn.rawgit.com/jeromeetienne/AR.js/1.5.0/aframe/build/aframe-ar.js"></script>
  <body style="margin : 0px; overflow: hidden;">
    <a-scene embedded arjs>
      <a-marker preset="hiro">
        <a-box position="0 0.5 0" material="color: black;"></a-box>
      </a-marker>
      <a-entity camera></a-entity>
    </a-scene>
  </body>
</html>
and you have a working demo. This demo (and the example we will be building) relies on using a marker image like this. You simply point your camera at the marker image and the 3D object or objects will be projected there. You can just display the image on your computer, phone, or you could print it out on paper if you like.
What we will be focusing on in this tutorial is how to get a similar example working well in an Ionic/Angular environment. When we are done, we will have something that looks like this:
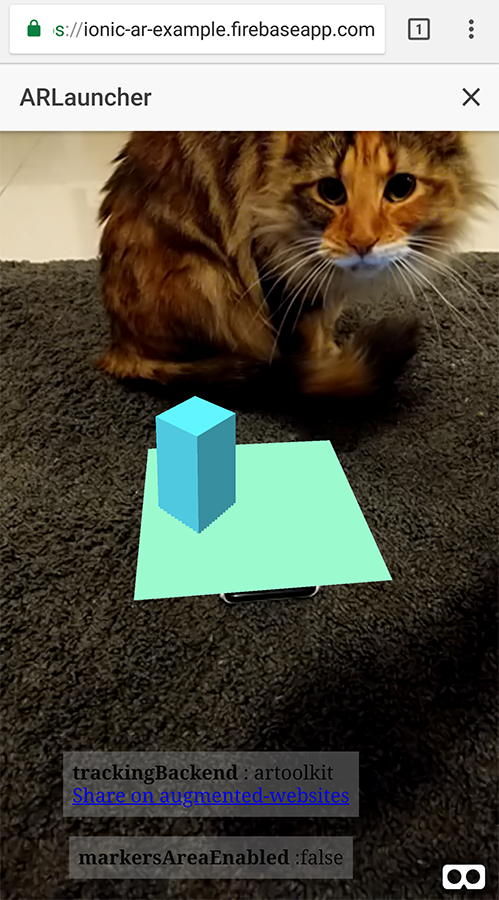
You can view this demo directly yourself by clicking here. You don’t even need to be on your phone, if your computer has a webcam then it should run through that as well.
Create the 3D Scene
We can create the 3D scene that we want to display in augmented reality using A-Frame – which is basically a framework that makes using ThreeJS easier (which is a framework that makes using WebGL easier). A-Frame allows us to use simple HTML syntax to embed 3D objects into a scene. I will likely post a more in-depth tutorial about A-Frame in the future, but for now, we are just going to use it for a simple example.
We can trigger the behaviour of AR.js by adding the arjs attribute to the A-Frame scene, but it is important to note that it will attach its functionality to the <body> tag of the page. This makes it a little difficult to just add an A-Frame scene to one of the page’s templates in our Ionic/Angular application because it isn’t going to play nicely with the rest of the application.
This makes using an <iframe> an attractive option because we can just load our scene directly into the <iframe> and we can embed the frame wherever we need it in the application. We can just create a standard HTML file and save it as a local asset for the application, then we can just load that directly into the IFrame. We are going to create an example that is almost identical to the demo code – we are just going to tweak a couple of things so we have some more interesting objects.
Save the following file as aframe-ar.html in your assets folder
<!DOCTYPE html>
<html>
  <script src="https://aframe.io/releases/0.6.1/aframe.min.js"></script>
  <script src="https://cdn.rawgit.com/jeromeetienne/AR.js/1.5.0/aframe/build/aframe-ar.js"></script>
  <body style="margin : 0px; overflow: hidden;">
    <a-scene embedded arjs>
      <a-marker preset="hiro">
        <a-box position="-1 0.5 0" rotation="0 45 0" color="#4CC3D9"></a-box>
        <a-plane
          position="0 0 0"
          rotation="-90 0 0"
          width="4"
          height="4"
          color="#7BC8A4"
        ></a-plane>
      </a-marker>
      <a-entity camera></a-entity>
    </a-scene>
  </body>
</html>
This will create a simple 3D scene with a plane positioned at the bottom, and a box that is sitting on top of it. The AR functionality is completely self-contained in this frame, so there is no need to install or make any modifications to the Ionic/Angular application. All we will need to do is embed the IFrame somewhere.
Add the IFrame
You can embed the IFrame anywhere you like in your Ionic/Angular application (just make sure that you supply your static .html file from the assets folder as the src for the IFrame), but you will probably want to add a few styles to make it display more nicely (just add this to whatever component you are displaying the frame in):
iframe {
  position: absolute;
  width: 100%;
  height: 100%;
  border: none;
}
For the example application, I created an ARLauncherPage that I launched as a modal to trigger the AR functionality:
ar-launcher.page.html
<ion-header>
  <ion-toolbar>
    <ion-title>ARLauncher</ion-title>
    <ion-buttons slot="end">
      <ion-button (click)="close()"
        ><ion-icon name="close" slot="icon-only"></ion-icon
      ></ion-button>
    </ion-buttons>
  </ion-toolbar>
</ion-header>

<ion-content>
  <iframe src="/assets/aframe-ar.html"></iframe>
</ion-content>
ar-launcher.page.ts
import { Component, OnInit, ViewEncapsulation } from '@angular/core';
import { ModalController } from '@ionic/angular';

@Component({
  selector: 'app-ar-launcher',
  templateUrl: './ar-launcher.page.html',
  styleUrls: ['./ar-launcher.page.scss'],
  encapsulation: ViewEncapsulation.None
})
export class ARLauncherPage implements OnInit {

  constructor(private modalCtrl: ModalController) { }

  ngOnInit() {

  }

  close(){
    this.modalCtrl.dismiss();
  }

}
Deploy to the Web
The cool thing about AR.js is that it runs entirely with web tech, there is absolutely no native integration required which means we can just run it directly on the web (you could also deploy it as a native application if you wanted to).
If you would like to set the application up as a PWA (you don’t have to) you can follow the steps in this tutorial. Once you are ready to host it on the web, you can follow this tutorial to get it set up with Firebase Hosting (or you could host it wherever you prefer).
Summary
With your application hosted, all you need to do is go to the URL, launch the page that contains the AR functionality, and point your camera at the marker image.
Whilst AR.js – and augmented reality on the web in general – is still under development, it is exciting to see the kinds of things we are already able to do with the web today.