

I’ve become absolutely fascinated with WebVR recently. The fact that you can access an immersive virtual reality experience powered by a web browser on your mobile phone just blows my mind. I picked up a Google Pixel 2 XL and a Google Daydream headset to experience and develop for WebVR, which provides a nice and comfortable experience, but you can also get started way cheaper by using something like Google Cardboard and a lower end mobile device.
In this tutorial, we are going to walk through building an Angular component to be used in an Ionic application that allows us to display a 3D scene rendered with ThreeJS:
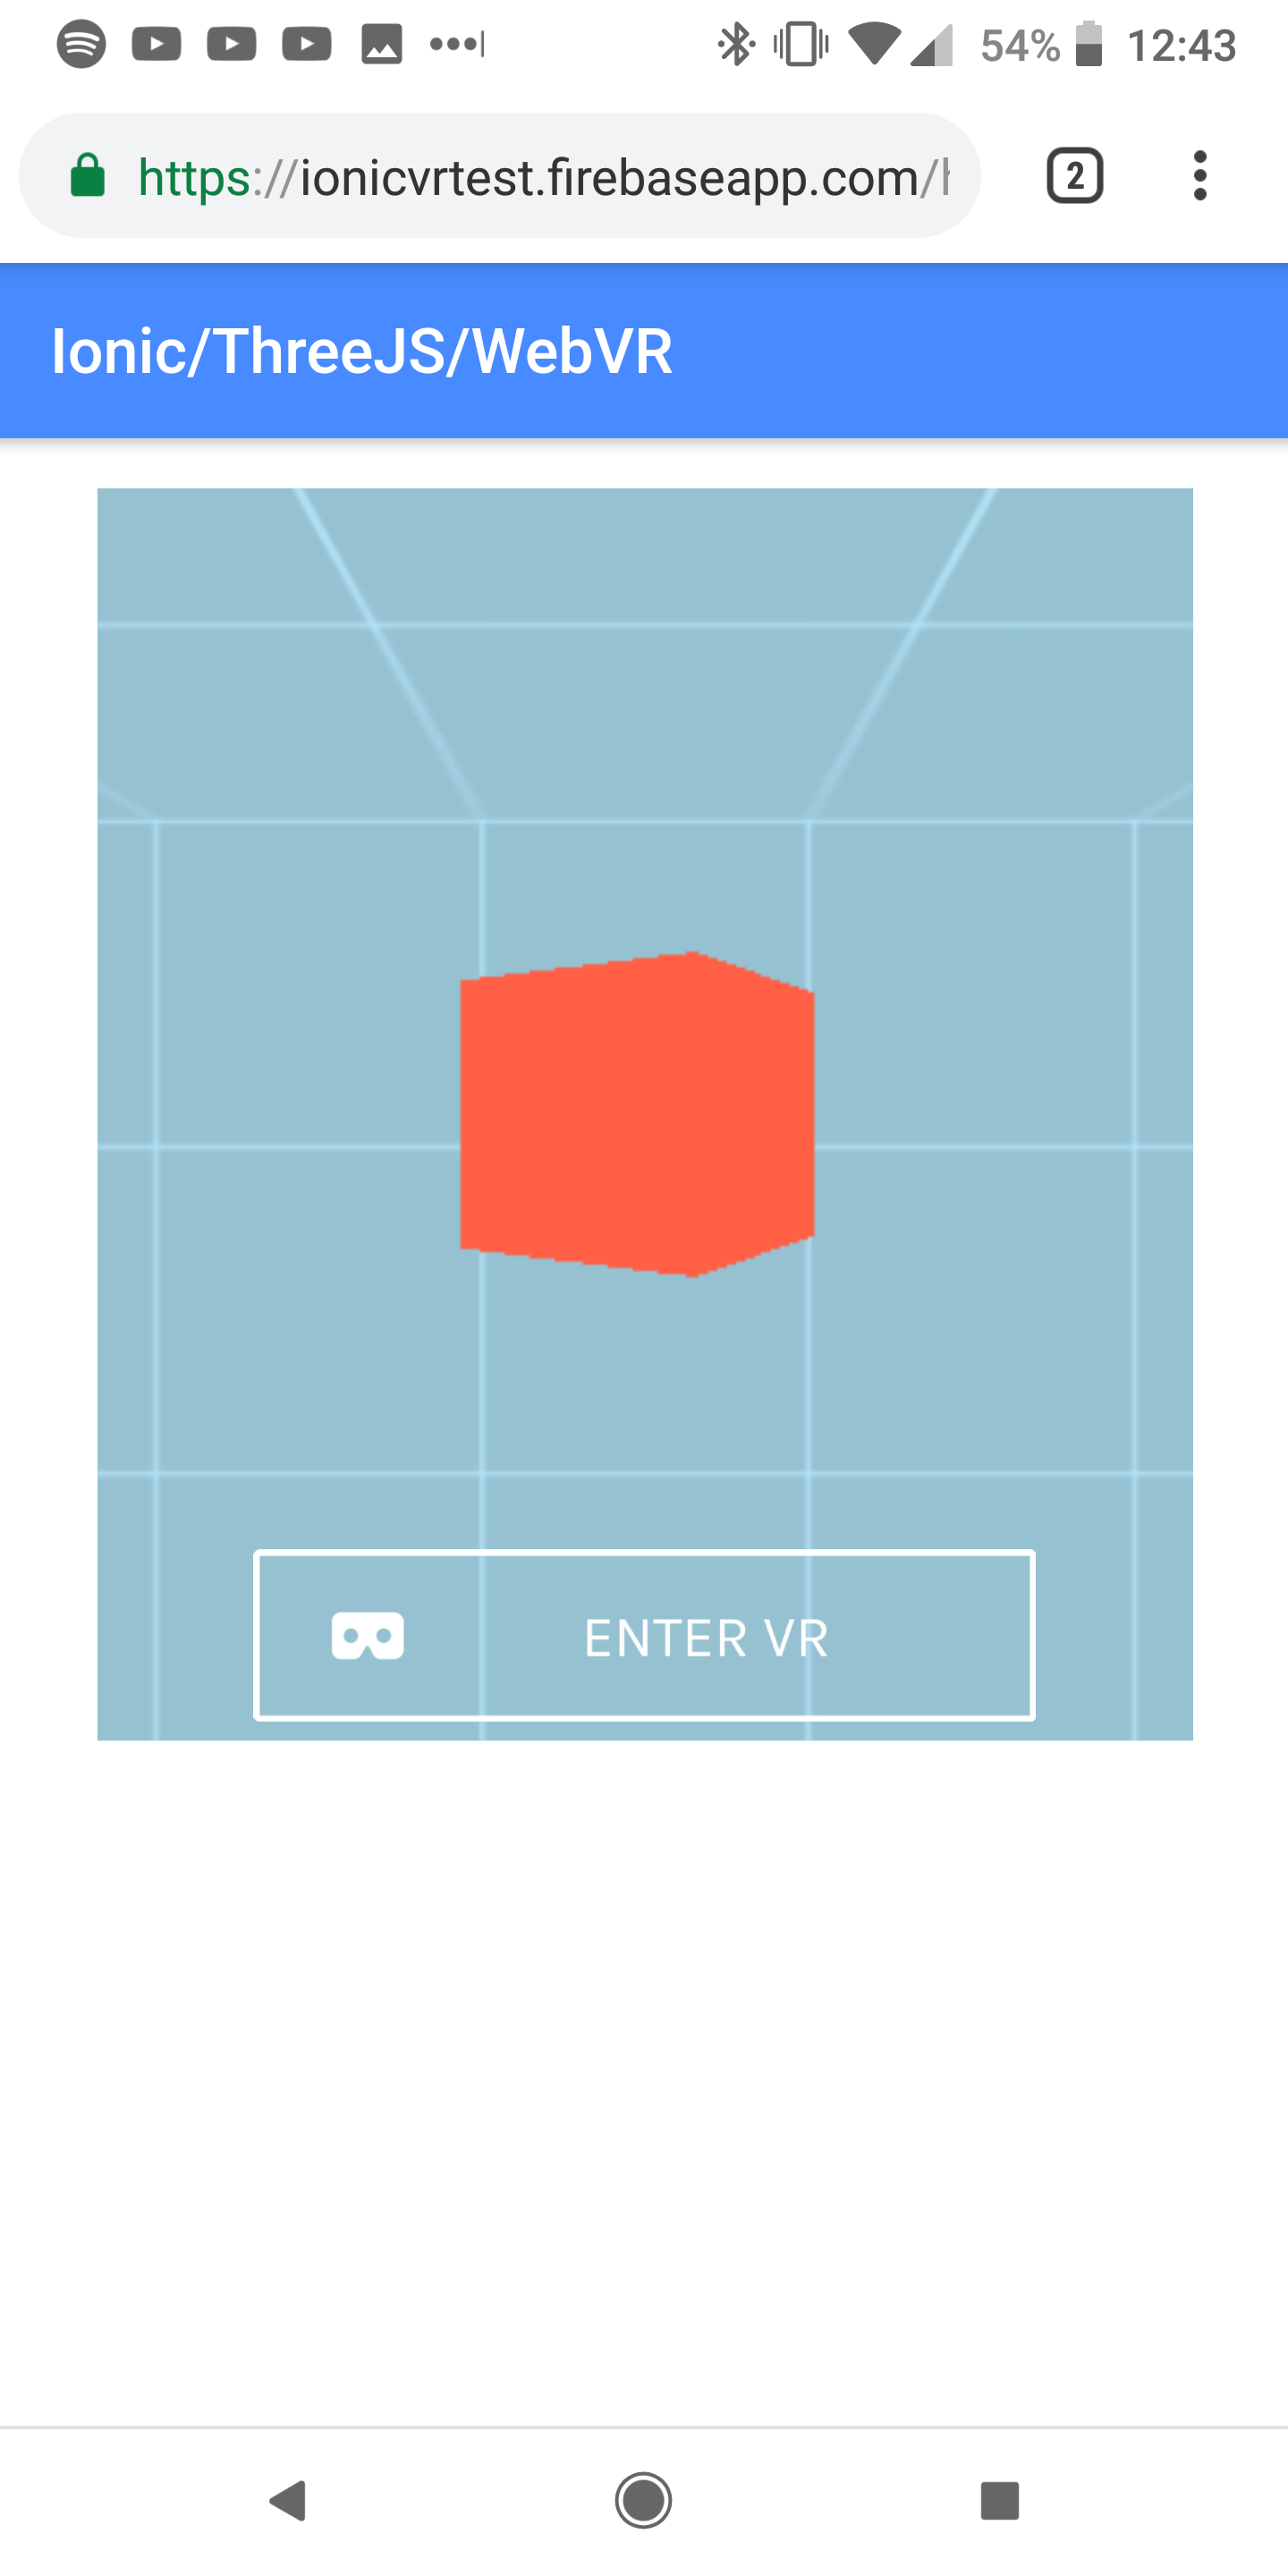
We will then be able to click the Enter VR button to launch that scene into a fully immersive 360-degree experience compatible with virtual reality headsets like Google Cardboard, Google Daydream, or Samsung Gear VR:
All of what we build will be deployable as a PWA, and anybody with a compatible phone/headset will just need to visit the application in their browser to experience your 3D scene in virtual reality. You can check out the example I created for this tutorial at: https://ionicvrtest.firebaseapp.com.
Before we get into building the example, we are going to briefly cover the concepts that enable us to build WebVR experiences (like the ThreeJS framework).
NOTE: This tutorial will not be covering the basics of ThreeJS and how it works. We will be using some example ThreeJS code to create a 3D scene to view using WebVR, but I won’t be going through it in detail. The main focus of this tutorial is to walk through the steps for enabling a WebVR experience in an Ionic/Angular application.
WebVR, WebGL, and ThreeJS
When it comes to building a virtual reality experience on the web, there are a few key pieces of technology that we will need to be aware of. In this example, we will need to have a basic understanding of WebVR, WebGL, and ThreeJS. You won’t need to have a thorough understanding of these technologies in order to complete the example, but you should try to grasp the basic role that these technologies are fulfilling.
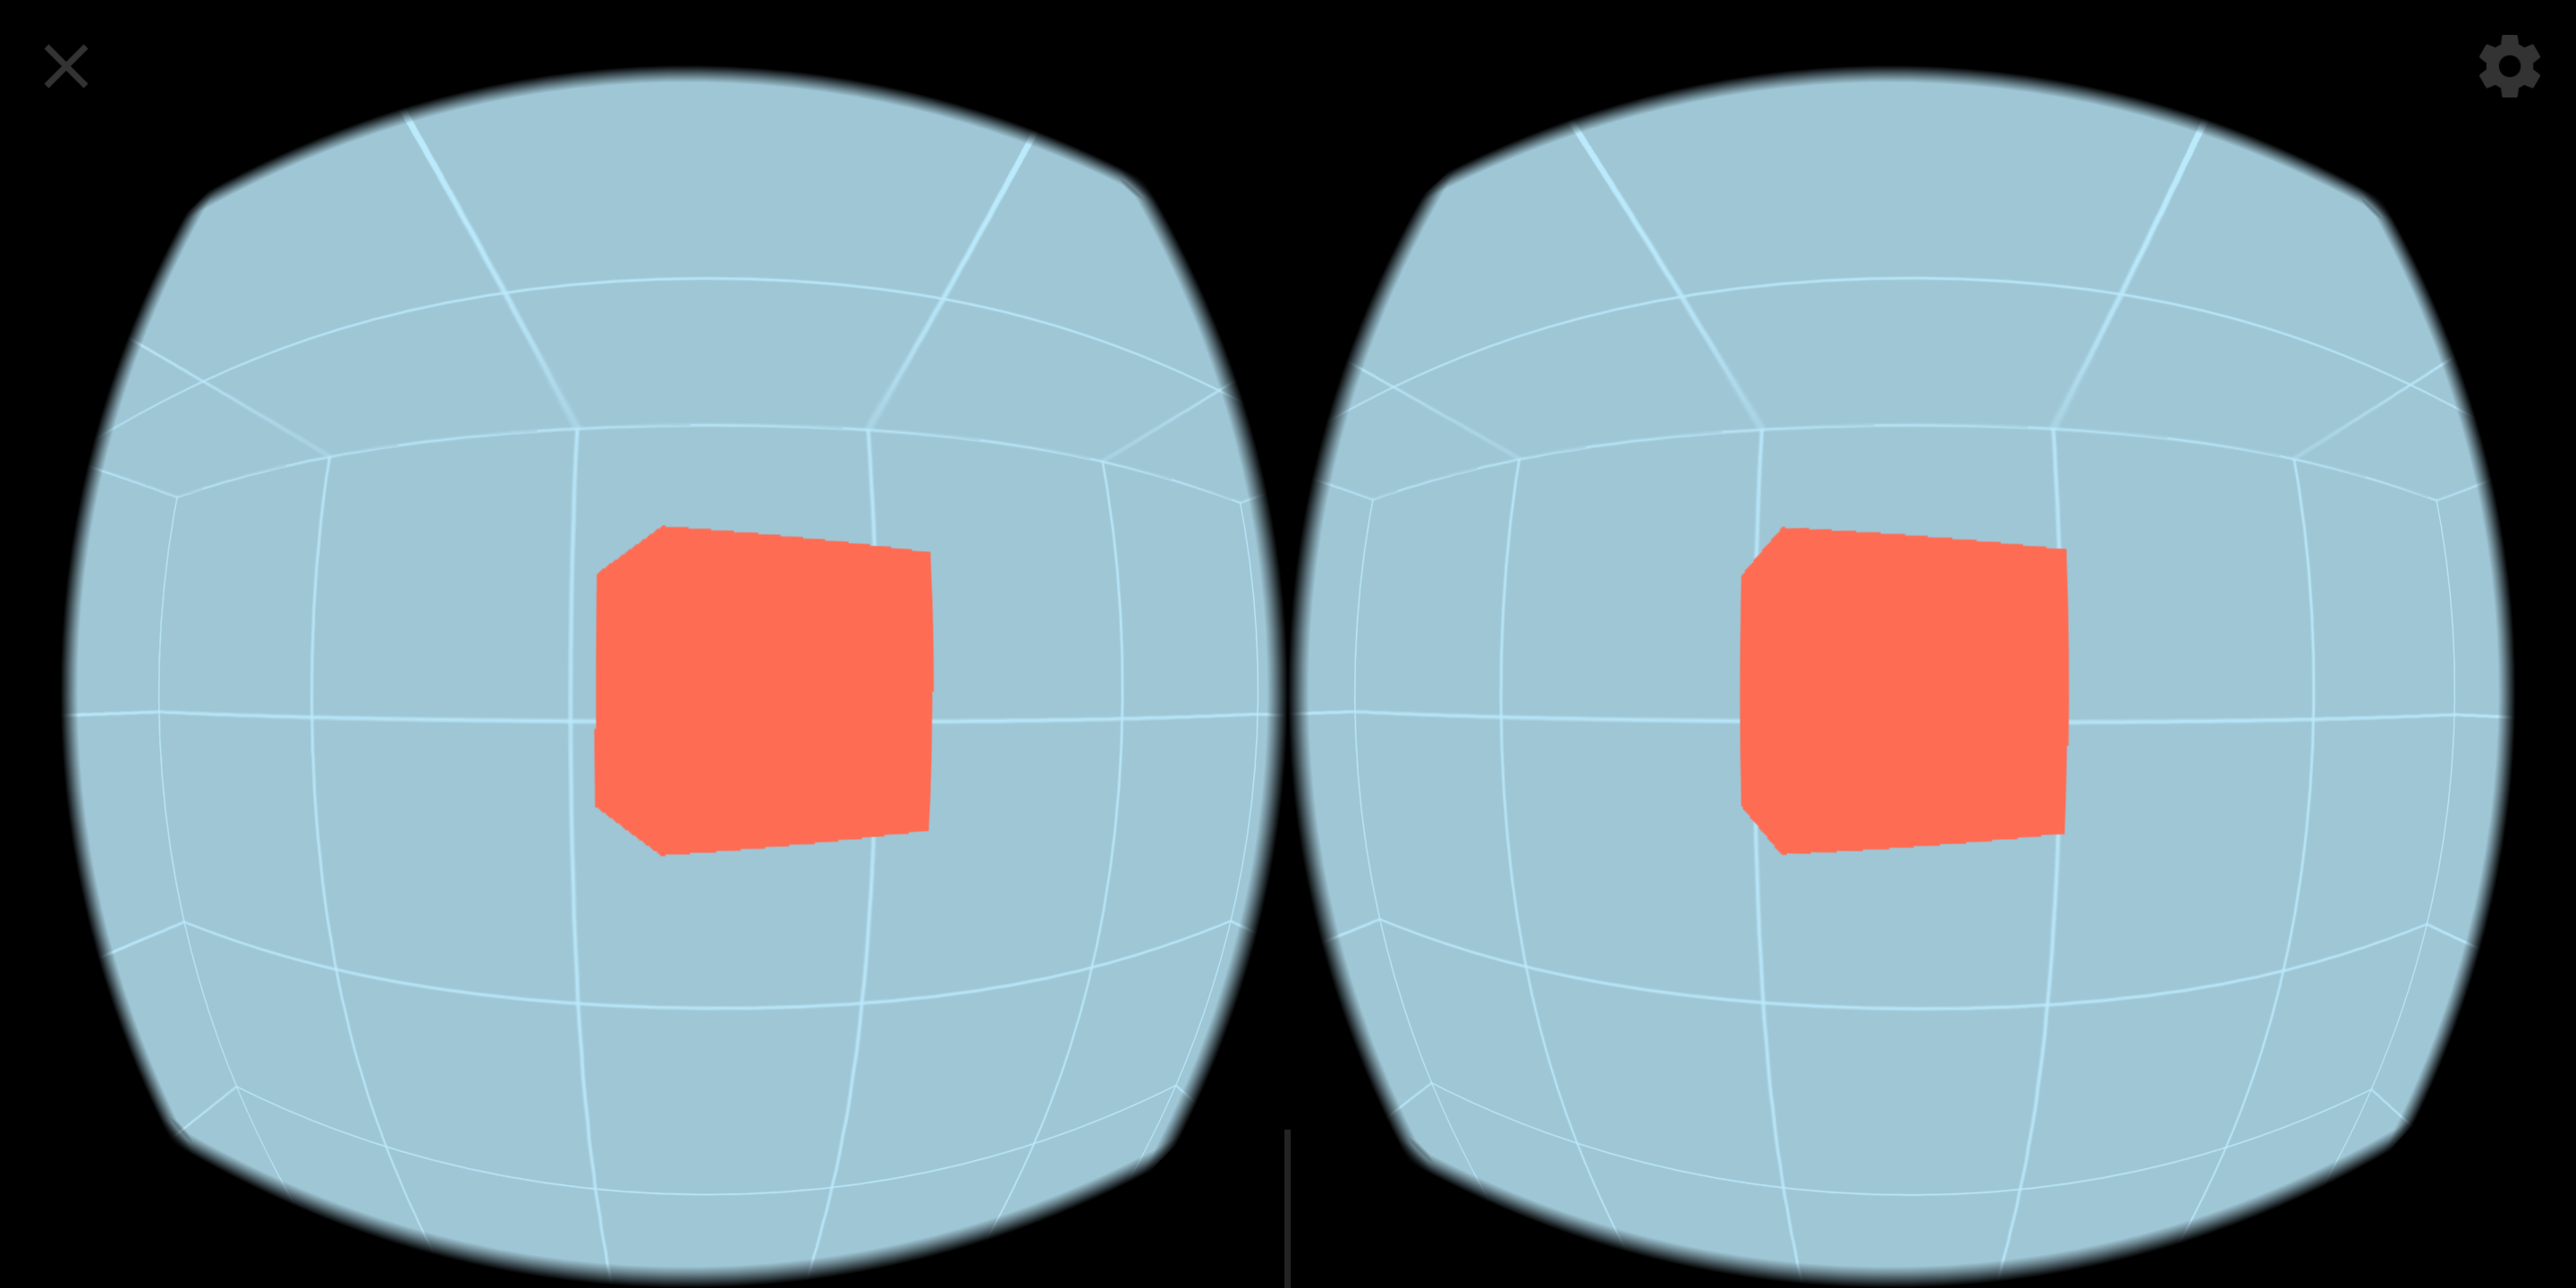
WebVR is what powers virtual reality experiences on the web. You can use your phone to navigate to a website that provides a WebVR experience (as long as you are using a browser that supports WebVR), place your phone into a VR headset that supports it (i.e. Google Cardboard, Google Daydream, Samsung Gear VR), and experience an immersive 3D world through the web:
The basic idea behind WebVR is getting the stuff we build in the browser to communicate effectively with VR HMDs (Head-mounted Displays). We need to display content in a way that works well with the VR headsets (i.e. the multi-view stereoscopic image you can see above, where the screen is split into two views to be viewed by the lens in the HMD), we also need to be able to communicate with the sensors in the device to orient the display correctly, and maybe we even need to listen for input from a controller as well. A lot of the APIs available for WebVR today are still experimental and are being actively developed by the likes of Google and Mozilla.
WebGL (Web Graphics Library) is a Javascript API that allows us to display interactive graphics rendered by the devices GPU (Graphics Processing Unit) on a web page in a browser. Using the GPU of the device is important because we need quite a lot of processing power to render 3D scenes/objects. WebGL is low-level and can be difficult to use, so that is where our last technology comes in…
ThreeJS is a Javascript framework that makes it easier to create 3D graphics and animations using WebGL. Rather than using WebGL directly, we can use the APIs that ThreeJS provides.
Using WebVR in an Ionic/Angular Application
Providing a WebVR experience in an Ionic/Angular environment isn’t really a large leap. Ionic/Angular applications are built with web tech and run through a browser, so using WebVR isn’t going to be a problem. The difficulty comes from getting ThreeJS and the associated WebVR dependencies to work in a TypeScript/Webpack/Module environment – most of the examples and documentation you will come across use vanilla ES5 Javascript.
Once everything is in place, it’s almost just a case of dropping what you would usually do with ThreeJS into its own into an Angular component, with a few tweaks to conform to Angular patterns (e.g. interacting with the DOM). After getting this technology working in a TypeScript environment, we can of course also make use of all the features that TypeScript makes available (i.e. ES6 Javascript and typing).
With that bit of theory out of the way, let’s get into implementing the example.
1. Install Dependencies
In order to display the scene we want to create with ThreeJS, and allow users to launch the scene in their virtual reality headset, we will need to set up a few dependencies in the project.
Install the following packages in your project:
npm install three --saveThis package will install the ThreeJS framework.
npm install three-vrcontrols-module --saveThis package (and the following package) were created by halvves. It is based on the default examples for VRControls and VREffect, but both have been modularised so that they play nicely in a webpack environment. VRControls will allow us to get information about the user’s position.
npm install three-vreffect-module --saveVREffect will allow us to create the stereoscopic view necessary to support a virtual reality headset.
npm install webvr-polyfill --saveThis package is a simply a polyfill which will allow your WebVR implementations to work on browsers that don’t currently support WebVR.
npm install webvr-ui --saveThis package will allow us to automatically create a button (the ‘Enter VR’ button you can see in the example) that will handle launching the ThreeJS scene into a WebVR experience for us. It will also display the appropriate messaging if WebVR is not supported, or if there are no VR displays available.
2. Create the Component
We are going to create a component to hold the functionality we are going to implement. In the end, this will allow us to just drop:
<app-spinning-cube></app-spinning-cube>wherever we want, and the ThreeJS scene will be rendered wherever we place it (along with the button to launch the VR experience).
Create the SpinningCubeComponent by running the following command:
ionic g component SpinningCubeor
ng generate component components/SpinningCubeNow that we have the component generated, let’s start off by implementing the template. All we really need is a canvas that we can attach our ThreeJS functionality to.
Modify spinning-cube.component.html to reflect the following:
<div id="canvas-container">
  <canvas #cubeCanvas id="spinning-cube-canvas"></canvas>
</div>
Then the bulk of our functionality is going to be our TypeScript file.
Modify spinning-cube.component.ts to reflect the following:
import { Component, OnInit, ViewChild, ElementRef, Renderer2, ViewEncapsulation } from '@angular/core';

import * as THREE from 'three';
import * as webvrui from 'webvr-ui';
import VRControls from 'three-vrcontrols-module';
import VREffect from 'three-vreffect-module';

@Component({
  selector: 'app-spinning-cube',
  templateUrl: './spinning-cube.component.html',
  styleUrls: ['./spinning-cube.component.css'],
  encapsulation: ViewEncapsulation.None
})
export class SpinningCubeComponent implements OnInit {

    @ViewChild('cubeCanvas') cubeCanvas;

    private width: number = 350;
    private height: number = 400;

    private scene: THREE.Scene = new THREE.Scene();
    private camera: THREE.PerspectiveCamera = new THREE.PerspectiveCamera(75, this.width/this.height, 0.1, 1000);
    private renderer: THREE.WebGLRenderer;

    private controls: VRControls;
    private effect: VREffect;

    private cube: THREE.Mesh;
    private animationDisplay;
    private enterVR;

    constructor(private element: ElementRef, private ngRenderer: Renderer2) {

    }

    ngOnInit() {

        this.renderer = new THREE.WebGLRenderer({antialias: false, canvas: this.cubeCanvas.nativeElement});
        this.controls = new VRControls(this.camera);
        this.effect = new VREffect(this.renderer);

        this.renderer.vr.enabled = true;
        this.renderer.setSize(this.width, this.height);
        this.renderer.setPixelRatio(window.devicePixelRatio);

        this.cube = this.createCube(0.25, new THREE.Color('rgb(255,96,70)'));
        this.cube.position.set(0, this.controls.userHeight, -0.8);
        this.scene.add(this.cube);

        this.controls.standing = true;
        this.camera.position.y = this.controls.userHeight;

        this.effect.setSize(this.width, this.height);

        let loader: THREE.TextureLoader = new THREE.TextureLoader();

        loader.load('assets/textures/box.png', (texture) => {
            this.initScene(texture);
        });

        window.addEventListener('resize', () => {
            this.onResize();
        });

        window.addEventListener('vrdisplaypresentchange', () => {
            this.onResize();
        });

    }

    initScene(texture): void {

        let skybox = this.createSky(5, texture);
        this.scene.add(skybox);

        let vrButtonOptions = {
            color: 'white',
            background: false,
            corners: 'square'
        };

        this.enterVR = new webvrui.EnterVRButton(this.renderer.domElement, vrButtonOptions);
        this.ngRenderer.appendChild(this.element.nativeElement, this.enterVR.domElement);

        this.enterVR.getVRDisplay().then((display) => {

            this.animationDisplay = display;
            display.requestAnimationFrame(() => {
                this.update();
            });

        })
        .catch(() => {

            this.animationDisplay = window;
            window.requestAnimationFrame(() => {
                this.update();
            });

        });

    }

    update(): void {

        this.cube.rotateY(0.03);

        if(this.enterVR.isPresenting()){
            this.controls.update();
            this.renderer.render(this.scene, this.camera);
            this.effect.render(this.scene, this.camera);
        } else {
            this.renderer.render(this.scene, this.camera);
        }

        this.animationDisplay.requestAnimationFrame(() => {
            this.update();
        });

    }

    onResize(): void {
        this.effect.setSize(this.width, this.height);
        this.camera.aspect = this.width / this.height;
        this.camera.updateProjectionMatrix();
    }

    createSky(size, texture): THREE.Mesh {

        texture.wrapS = THREE.RepeatWrapping;
        texture.wrapT = THREE.RepeatWrapping;
        texture.repeat.set(size, size);

        let geometry = new THREE.BoxGeometry(size, size, size);
        let material = new THREE.MeshBasicMaterial({
            color: 0xb5e8fc,
            map: texture,
            side: THREE.BackSide,
        });

        return new THREE.Mesh(geometry, material);

    }

    createCube(size, color): THREE.Mesh {

        let geometry = new THREE.BoxGeometry(size, size, size);
        let material = new THREE.MeshBasicMaterial({color});

        return new THREE.Mesh(geometry, material);

    }

}
As I mentioned at the beginning, I’m not going to step through how all of the ThreeJS code works, but I do want to give a broad overview of what is happening. The basic idea of the code above is:
- The
ngOnInitfunction handles the initial set up like creating a new renderer on the canvas element, setting up the camera, and setting up the scene by adding a cube and skybox (to give us the sense of a room rather than just an empty void). - After setting up the scene, we create the ‘VR Button’ using the
EnterVRButtonmethod ofwebvrui. - We then use that same button to grab a reference to the available VR Displays, and kick off the
updateloop withrequestAnimationFrame(usingrequestionAnimationFrameensures that your code is executed at the most opportune time, i.e. before the nextpaintoccurs). - The
updatefunction handles updating the scene, which in this case just involves rotating the cube. This function then calls itself recursively, again usingrequestAnimationFrame, so that theupdatemethod is constantly running. ThengOnInitfunction does the initial set up, and thenupdatewill be able to perform tasks like animating objects, checking for conditions, and so on.
Since we are using a PNG image for the skybox texture, you will need to add that to your project:

All that is left to do now is add a bit of styling so that the Enter VR button displays properly.
Modify spinning-cube.component.css to reflect the following:
app-spinning-cube {
  position: relative;
}

button.webvr-ui-button {
  position: absolute;
  width: 250px;
  bottom: 10px;
  left: 50px;
}
3. Use the Component
All we need to do now is make use of the component. You will need to make sure to set it up properly (i.e. by importing/declaring it on the module file for the component you are using it in) and then just drop this code into the template:
<app-spinning-cube></app-spinning-cube>Summary
Creating 3D VR content is obviously a huge field, and we’ve barely scratched the surface of ThreeJS here. My main goal with this tutorial was to demonstrate how to launch a VR experience from an Ionic/Angular application.
If you are interested in seeing more standalone ThreeJS content (with a focus on learning ThreeJS for mobile experiences, not just using it in Ionic/Angular) leave a comment and let me know. I’ve become super interested in this tech, but am undecided on whether or not I should add content to the blog about it.