I have written several articles on the topic of Progressive Web Applications (PWA) in Ionic before, including this one which provides a basic overview of the concept of PWAs and how to create one with Ionic. I would recommend reading that article if you need a little more background on what PWAs and service workers are.
The method that the tutorial I linked discusses for implementing a service worker to create a PWA in Ionic is no longer available in Ionic 4. Previously, Ionic/Angular applications included a service worker by default that you could simply uncomment to activate. This is not present in Ionic 4 applications, which I believe is because the recommended approach would be to use Angular Service Workers now.
Angular provides a package and command line tooling that makes it extremely easy to add PWA support to your Ionic/Angular applications with service workers, and it also provides additional features like auto-creating required icons for you. It also handles “cache busting” functionality by default, which we will discuss a little later.
In this tutorial, we are going to step through setting up an existing Ionic 4 applications as a PWA by using Angular Service Workers.
1. Add the Service Worker
Adding the service worker is as simple as running the following command in your existing Ionic 4 project:
ng add @angular/pwa --project appThe app at the end of this command is the name of your project as defined in the angular.json file. By default, this will be app but if your project has a different name make sure to change that here.
Once you run this command, you will see various files being created and updated:
Installed packages for tooling via npm.
CREATE ngsw-config.json (392 bytes)
CREATE src/assets/icons/icon-128x128.png (1253 bytes)
CREATE src/assets/icons/icon-144x144.png (1394 bytes)
CREATE src/assets/icons/icon-152x152.png (1427 bytes)
CREATE src/assets/icons/icon-192x192.png (1790 bytes)
CREATE src/assets/icons/icon-384x384.png (3557 bytes)
CREATE src/assets/icons/icon-512x512.png (5008 bytes)
CREATE src/assets/icons/icon-72x72.png (792 bytes)
CREATE src/assets/icons/icon-96x96.png (958 bytes)
CREATE src/manifest.json (1063 bytes)
UPDATE angular.json (4093 bytes)
UPDATE package.json (1760 bytes)
UPDATE src/app/app.module.ts (993 bytes)
UPDATE src/index.html (759 bytes)
The command automatically does the following for you:
- Creates the configuration file for the service worker
- Creates the various icons that are required for the home screen
- Updates the angular.json file to enable service worker support
- Updates the package.json file to include the
@angular/pwapackage - Imports the service worker functionality into the root module file
- Adds the required meta tags to the index.html file
If you take a look at the ngsw-config.json file, you will see something like this:
{
  "index": "/index.html",
  "assetGroups": [{
    "name": "app",
    "installMode": "prefetch",
    "resources": {
      "files": [
        "/favicon.ico",
        "/index.html",
        "/*.css",
        "/*.js"
      ]
    }
  }, {
    "name": "assets",
    "installMode": "lazy",
    "updateMode": "prefetch",
    "resources": {
      "files": [
        "/assets/**"
      ]
    }
  }]
}
This defines the behaviour of the service worker and includes all of the files that we want to be cached (which is what will enable the application to be accessed even while offline). All of the code we would need for a standard Ionic application is already being included here.
If you take a look at the app.module.ts file, you will see the following new import:
imports: [
    ...
    ServiceWorkerModule.register('/ngsw-worker.js', { enabled: environment.production })
  ],
This is what handles registering the service worker, and enables it for production builds.
2. Creating a Production Build
To create a production build of your Ionic PWA, you can just run the following command:
ionic build --prodThis will run the build process, and output the result to your www folder. The contents of this folder is your completed PWA (but remember, if you serve your application again or create another build the contents of this folder will be overwritten). You could upload these files to a web server somewhere, or perhaps you want to host these files with Firebase – it’s basically just a standard website (but cooler) at this point, and you can host the files in any way you would a normal website. The only difference is that the files do need to be hosted on a web server, you can’t serve these files over the filesystem (i.e. just by opening up the index.html file in your browser).
A good way to test these builds is to use a utility like serve. This is kind of the same concept as ionic serve except that it lets you create a local web server to serve the contents of any directory on your computer. If you have this installed, you can then just navigate to the www folder of your project:
cd wwwand then serve the contents of that folder:
serve -p 8080You could then go to:
http://localhost:8080In your browser to view your PWA. You can also easily test offline behaviour by going to the Network tab in the debugging tools and checking the Offline box to simulate an offline state. If you refresh the application, you would see something like this:
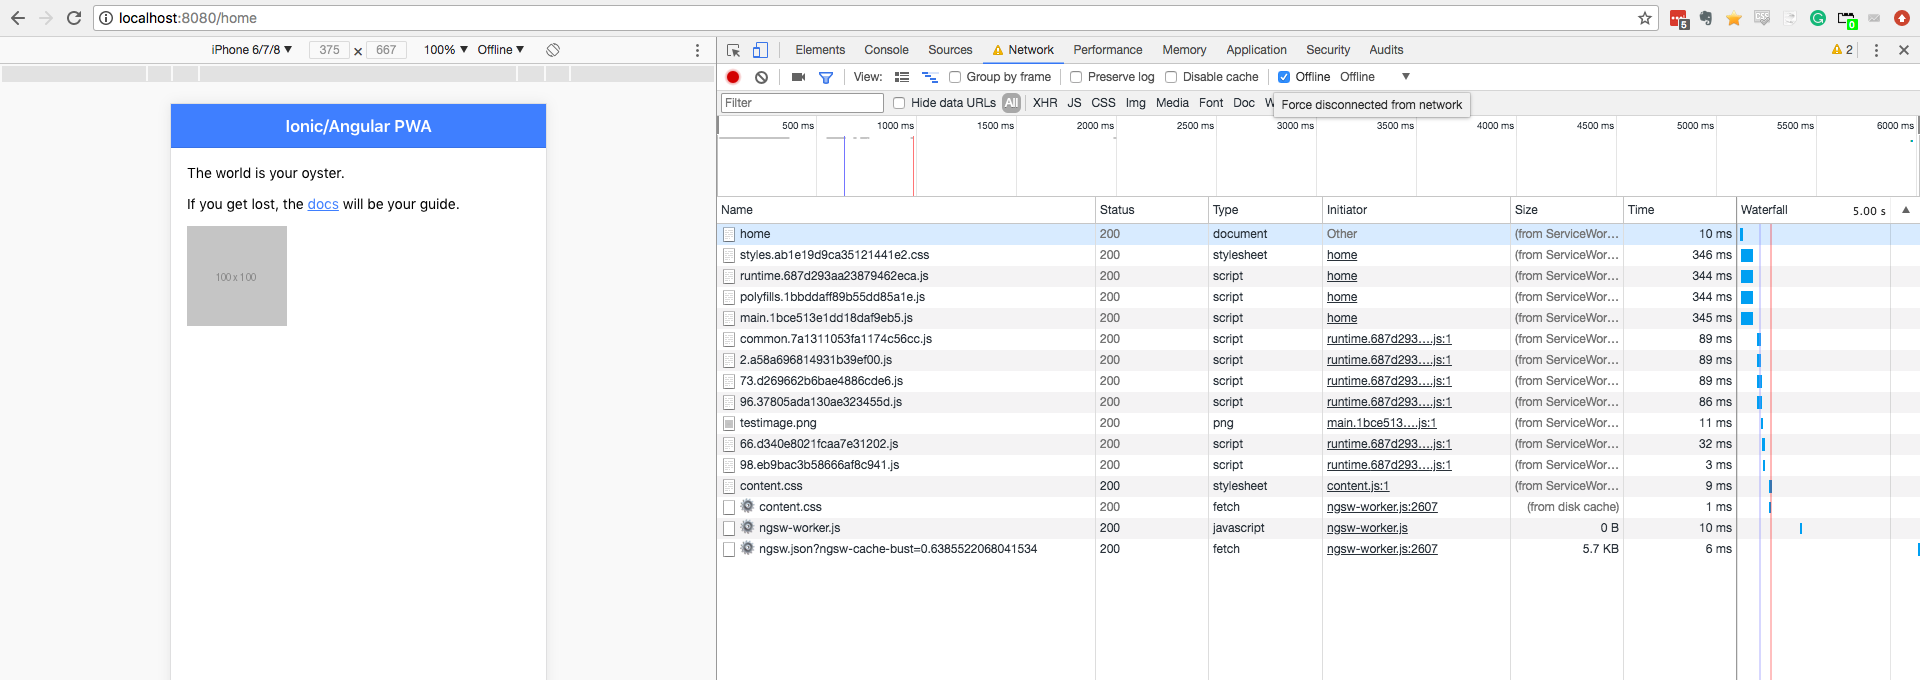
You can see that all of the requests are being fulfilled by the service worker (the size column says “from service worker”). Your content will be served from the service worker even when you are online which can greatly improve loading speeds, but this is also what allows the application to continue to function even when offline.
3. Updating the Application
One of the tricky aspects of serving cached content from service workers is handling updates to the application. If the content had not changed then we want it served from the service worker, but if the content has changed then we would want to pull in those updates from the network.
Fortunately, Angular handles this for us. Whenever the application is loaded it will check for changes to the app by inspecting the ngsw.json file. If there are changes, then the new content will be downloaded and cached. The downside to this is that this happens after the application has loaded, and the user won’t see the new content until they refresh the application. This may not even be a problem, but if it is, you can listen for updates using the SwUpdate service and prompt the user to refresh the application when an update is found.
Summary
Although I have done quite a bit of explaining in this article, setting up a service worker this way is pretty much as easy as running:
ng add @angular/pwa --project appand then creating a production build:
ionic build --prodThe default behaviour we get is also an improvement over what we have had in previous versions of Ionic.