

Angular 2 without Ionic 2 is… just Angular 2. So what’s the point of this post? There’s plenty of getting started with Angular 2 tutorials out there, including this simple one on the Angular website. However, I wanted to create a small series of tutorials on using Angular 2 without Ionic for Ionic developers.
Many Ionic developers (myself included) will have started using Ionic before learning Angular in general, so the lines between what parts are Angular and what parts are Ionic become blurred. I don’t think it’s a bad idea to learn Ionic before learning Angular, but it is important to learn the fundamentals of the technology you are building on at some point. To pull out my favourite quote from Elon Musk:
So to truly have a grasp of the technology stack you are using as an Ionic developer you need to understand both Angular and plain old Javascript. It’s the difference between knowing how to use something, and really understanding how it works. When you have a greater understanding of how something works then you are better able to use it.
In this series of tutorials we are going to take a look at how to build an Angular 2 website similar to the Ionic 2 Todo application we have built previously. The functionality won’t be identical but I will keep it as similar as possible so it’s easier to spot the differences between Ionic 2 and just plain Angular 2.
The Difference Between Angular 2 and Ionic 2
Before we get started, let’s really quickly cover off on the difference between Angular 2 and Ionic 2. In general, Angular 2 is a Javascript framework that makes it easier to create web applications. Ionic 2 is a framework that makes it easier to create mobile applications with Angular 2.
Getting Started with Angular 2
In the first part of this tutorial series we are going to focus on getting up an running with Angular 2, “hello world” style. If you’ve already used Ionic then you would know that the Ionic CLI can auto generate an application for you and get everything set up very quickly. Angular 2 has a similar tool called Angular CLI
The Angular CLI is great and extremely similar to the Ionic CLI so you should feel right at home. The applications it auto generates follows best practices (even including end to end tests), which is great, but it’s quite complex and overwhelming for a beginner. We will be ignoring more of the complexity for now and just focusing on the app.
To get the Angular CLI set up on your machine (assuming you already have Node installed) all you have to do is run:
npm install -g angular-cli
Now let’s jump into creating our first Angular 2 website.
1. Generate a new Angular 2 Project
You can generate a new Angular 2 project by running the following command:
ng new todo
Once that has finished generating you can run it through your browser with the following command:
ng serve
If you then navigate to http://localhost:4200 in your browser you will be able to see your application, and any changes you make will be live reloaded.
2. The Structure of an Angular 2 Project
Now that we have our Angular 2 project generated, let’s see how it compares to an Ionic 2 project. Take a look at the difference in project structure below:
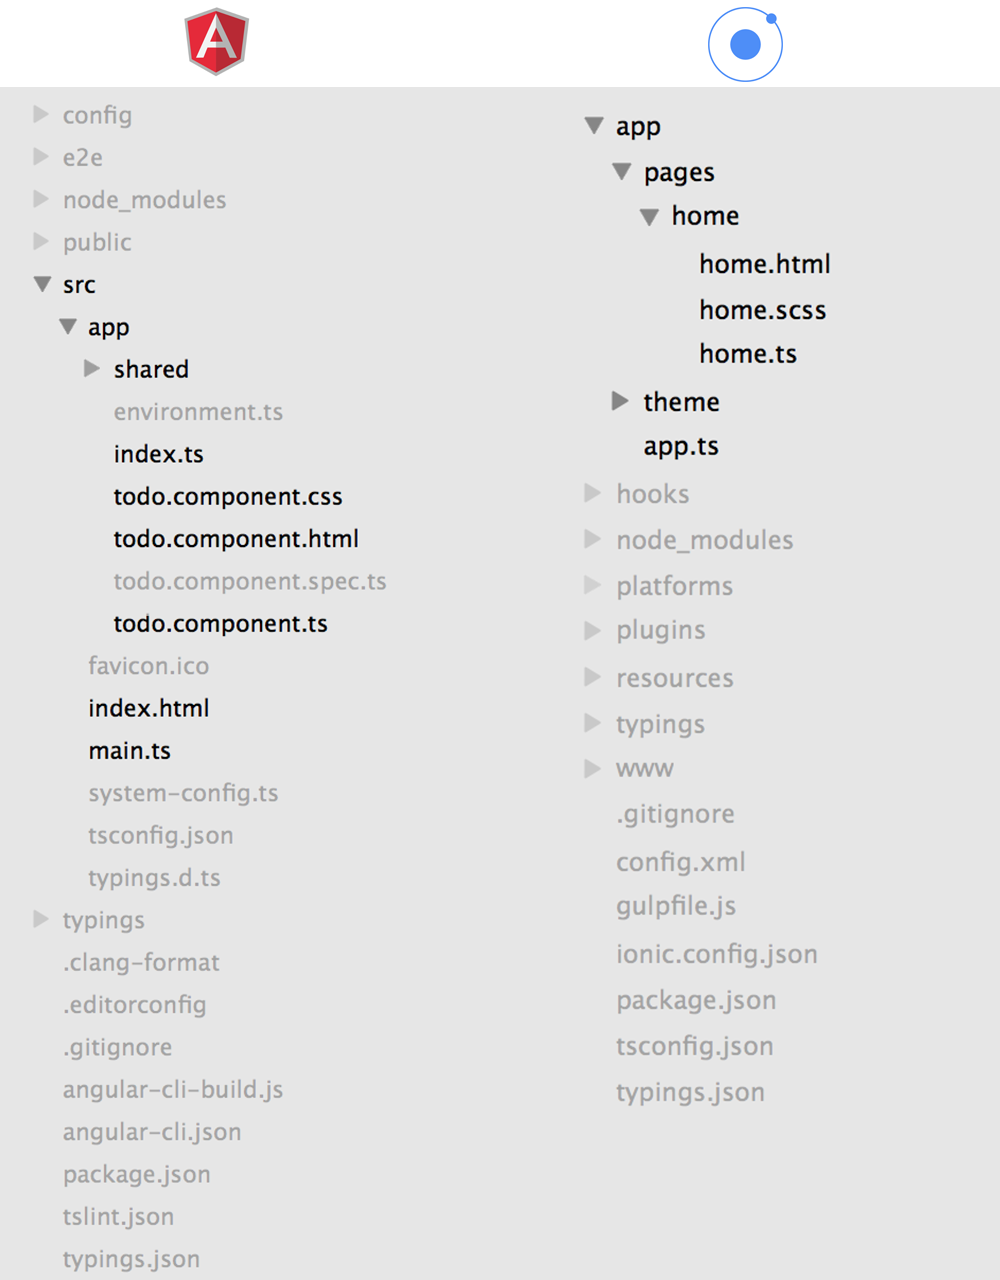
In the image above I have greyed out all of the files and folders that, although they are important, won’t be of much use to us immediately. These are all mostly configuration files that you don’t need to touch. To quickly cover off on some of the differences though, in the Angular 2 project there are a few different configuration files that Ionic does not have and the project also includes a folder for end to end tests and a spec file for testing individual components. The Ionic project has some additional folders related to Cordova which are used to build the mobile app like the platforms and hooks folder.
At this stage, you really don’t need to worry about that though. We’re just going to focus on the files and folders that we will actually be regularly working with to build an application.
Once you get rid of all the configuration stuff, the two projects start looking quite similar. We have an app folder and components that have .ts, .html, .css files (although in the case of Ionic .scss is used).
Let’s compare the default todo.component.ts file in the Angular project to the default home.ts file in the Ionic project.
Angular
import { Component } from '@angular/core';

@Component({
  moduleId: module.id,
  selector: 'todo-app',
  templateUrl: 'todo.component.html',
  styleUrls: ['todo.component.css'],
})
export class TodoAppComponent {
  title = 'todo works!';
}
Ionic
import { Page } from 'ionic-angular';

@Page({
  templateUrl: 'build/pages/home/home.html',
})
export class HomePage {
  constructor() {}
}
These files are both pretty similar, except that the Angular version is using an @Component decorator and the Ionic version is using a @Page decorator. The Angular component provides a selector of todo-app meaning that:
<todo-app></todo-app>which you will find in the index.html file is where this TodoAppComponent will be inserted. The @Page Ionic uses is actually just a special type of component that Ionic provides. We don’t provide selectors for our pages in Ionic because we [push and pop views onto the navigation stack] using the NavController. The @Page decorator also handles automatically importing things we need to build pages in Ionic.
NOTE: I think that Page is being deprecated in the near future, and Ionic 2 apps will just use @Component directly
Whilst those two files look pretty similar, let’s compare Angular’s main.ts file to Ionic’2 app.ts file:
Angular
import { bootstrap } from '@angular/platform-browser-dynamic';
import { enableProdMode } from '@angular/core';
import { TodoAppComponent, environment } from './app/';

if (environment.production) {
  enableProdMode();
}

bootstrap(TodoAppComponent);
Ionic
import { App, Platform } from 'ionic-angular';
import { StatusBar } from 'ionic-native';
import { HomePage } from './pages/home/home';

@App({
  template: '<ion-nav [root]="rootPage"></ion-nav>',
  config: {},
})
export class MyApp {
  rootPage: any = HomePage;

  constructor(platform: Platform) {
    platform.ready().then(() => {
      StatusBar.styleDefault();
    });
  }
}
Now things are looking a little different. An Angular 2 app needs to be “bootstrapped”, which essentially just instantiates an application with a root component. An Ionic 2 app doesn’t escape this requirement, it still needs to be bootstrapped, but Ionic has another special decorator called @App which defines the root component of the application and handles bootstrapping for us.
There’s probably a lot more to discuss here, but we’ve covered the basic differences in project structure between Angular 2 and Ionic 2 so let’s get started on building our Angular 2 app.
3. Create the Routes
While Ionic 2 uses a more mobile centric approach to navigation with pushing and popping views on a navigation stack, Angular 2 uses routes which you may be more familiar with if you have a background with Ionic 1.
A route is somewhat analogous to a page in Ionic 2. A route is essentially a component that can be navigated to. We are going to generate routes for our home page which will contain a list of todos, and a detail page which will contain the details for a specific todo.
Run the following commands to generate the routes
ng g route home
ng g route detail
Just like the Ionic CLI, the Angular CLI also allows you to automatically generate routes (as well as components and directives) automatically. After running these two commands you will notice two new component folders in your project: +home and +detail. These folders will contain all the normal component files (.ts, .html, .css). Routes have a ’+’ sign in front of the folder name by convention, but they are no different to any other normal component.
If you take a look at the todo.component.ts file now you will also see that the routes have been automatically defined for both of these components:
@Routes([
  {path: '/home', component: HomeComponent},
  {path: '/detail', component: DetailComponent}
])
The path here maps the URL to a component. So if you go to http://localhost:4200/detail it will take you to the DetailComponent. Let’s also add in a “catch all” path here so that any undefined route will go to our home component.
Modify the @Routes in todo.component.ts to reflect the following:
@Routes([
  {path: '/home', component: HomeComponent},
  {path: '/detail', component: DetailComponent},
  {path: '/', component: HomeComponent},
  {path: '*', component: HomeComponent}
])
You will also need to make sure to include the ROUTER_PROVIDERS as well when bootstrapping the application.
Modify main.ts to reflect the following:
import { bootstrap } from '@angular/platform-browser-dynamic';
import { enableProdMode } from '@angular/core';
import { TodoAppComponent, environment } from './app/';
import { ROUTER_PROVIDERS } from '@angular/router';

if (environment.production) {
  enableProdMode();
}

bootstrap(TodoAppComponent, [ROUTER_PROVIDERS]);
and finally we are going to add some links to our root component so that we can switch between the two views.
Modify todo.component.html to reflect the following:
<h1>{{title}}</h1>

<a [routerLink]="['/home']">home</a>
<a [routerLink]="['/detail']">detail</a>

<router-outlet></router-outlet>
The <router-outlet> is where the component for the current route will be injected, and using routerLink allows us to switch between the routes.
If you take a look at your website now you should see this:

and you should be able to switch between the two different views.
Summary
We haven’t done anything too exciting in this tutorial, but we have covered off on a lot of the basics and some important differences between using Ionic 2 with Angular 2, and just using plain Angular 2. In the next tutorial we will start building the functionality of the Todo application.