Part 2: Preparing a Progressive Web Application for Production (this tutorial)
Part 3: Hosting a Progressive Web Application with Firebase Hosting
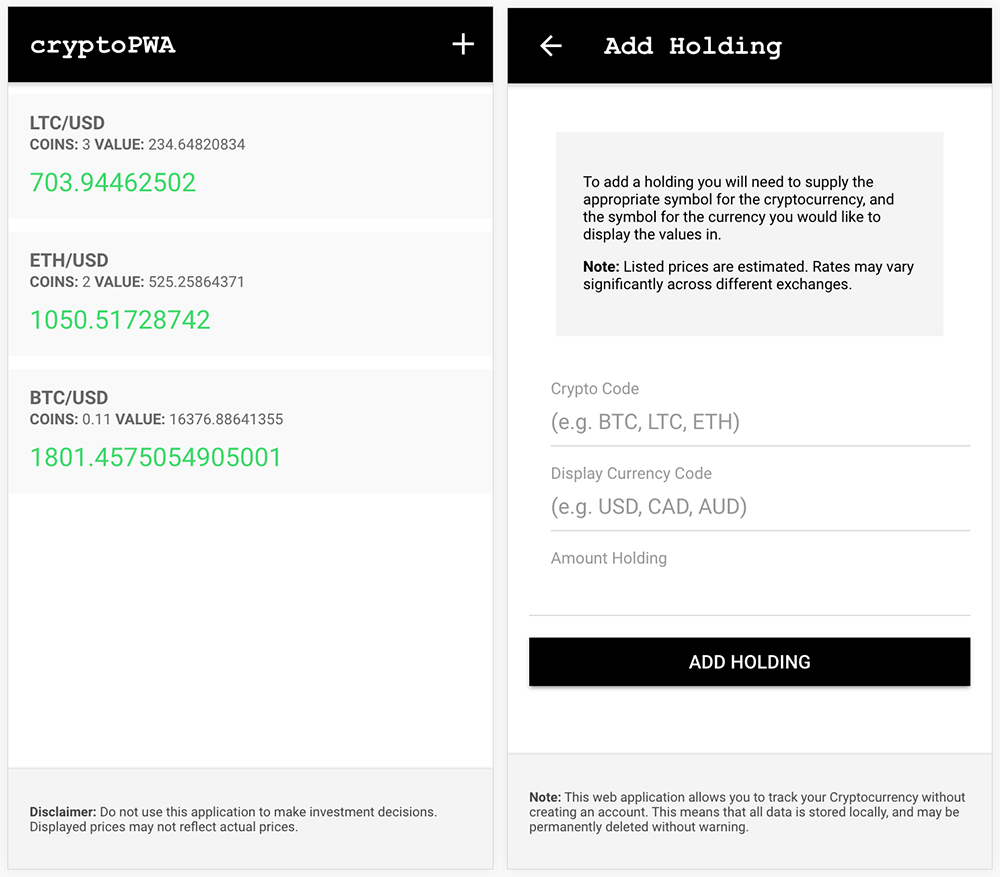
In the previous tutorial, we walked through building a simple cryptocurrency tracker application using Ionic. The purpose of this tutorial series is to build and host a progressive web application built with Ionic, but so far all we have done is build a standard Ionic application. This is what it looks like so far:
In this tutorial, we will be taking the necessary steps to turn the Ionic application we have built into one that would be considered a progressive web application. We will be taking steps to add in all of the basics components of a PWA like a service worker and a manifest.json file, but we will also be improving the general usability of the application to take advantage of the benefits of a PWA.
The live example appplication can be viewed here: [cryptoPWA](cryptoPWA](https://cryptopwa.com/)
If you are completely new to the concept of a progressive web application, then it may be worthwhile to read The Bare Necessities: Progressive Web Apps in Ionic first to give you an understanding of the bare minimum tasks one would need to perform to create a PWA in Ionic.
What differentiates a PWA from a standard application is its conformance to these features. Your application does not need to satisfy everything on that list to be considered a PWA, the key elements of a PWA are that it can be added to the Home Screen and that it works offline.
Before We Get Started
This tutorial continues on from Building a Cryptocurrency Price Tracker PWA in Ionic, so if you would like to follow along you should read that tutorial first. If you are only interested in the steps taken to convert a normal Ionic application to a progressive web application, then you don’t need to read the previous tutorial.
Adding a Service Worker
The crucial part of transforming your application into a PWA is the addition of a service worker. A service worker is a special script that runs separately from your application – it has no access to the DOM, so you could not use it to hide or show a <div>, for example, but it can be used to handle network requests and caching.
In our case, we need our service worker to cache the content that we want to be available offline to our users (so that they can load the resources locally, rather than requiring Internet access). Service workers can be quite complex little critters, but Ionic already has most of the work done for us. The only thing you need to do to enable a service worker that will handle this caching for you is to uncomment the following lines in src/index.html:
<script>
  if ('serviceWorker' in navigator) {
    navigator.serviceWorker
      .register('service-worker.js')
      .then(() => console.log('service worker installed'))
      .catch((err) => console.error('Error', err));
  }
</script>
This will register the service-worker.js service worker that Ionic provides by default. Simply by doing this, our users will be able to access and load the application whilst they are offline. However, there is more that we need to consider and we will be getting into that shortly.
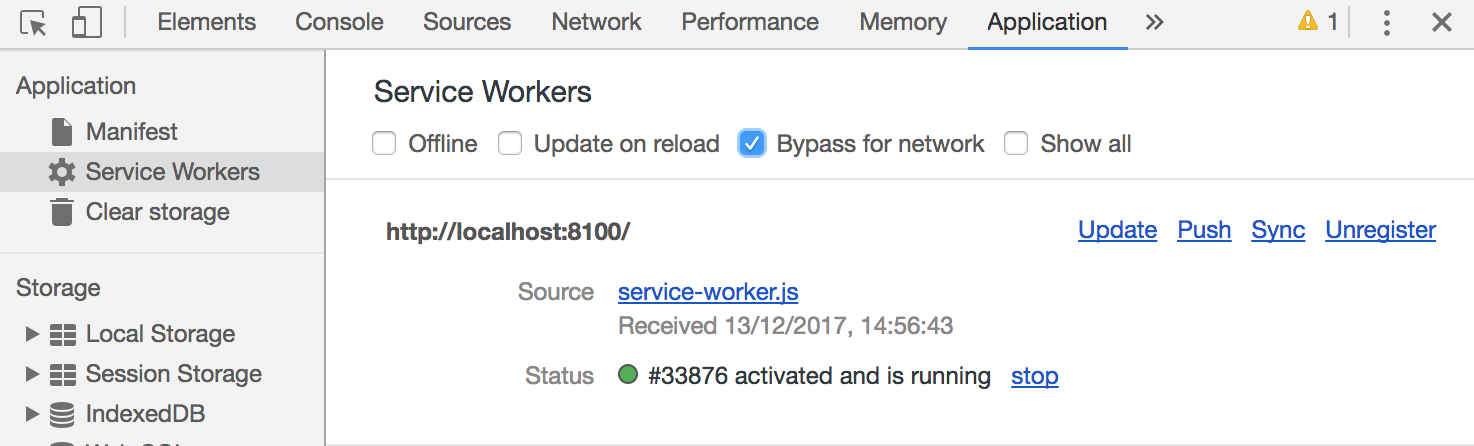
NOTE: Developing with a service worker active can be a real pain, as you will be receiving a cached version of your application rather than the current version. This leads to head-scratching errors. If you do have this line uncommented during development, make sure to tick the ‘Update on reload’ or ‘Bypass for network’ options in the Application > Service Workers section of Chrome DevTools. You can also manually stop/unregister service workers from here as well.
Whilst we are modifying the src/index.html file, we should also remove the following line at the same time:
<!-- cordova.js required for cordova apps (remove if not needed) -->
<script src="cordova.js"></script>
We will not be using Cordova, so this line is not required.
Adding a manifest.json File
The second big part of a PWA is the manifest.json file. This is a simple JSON file that explains to the browser how we would like our application to be treated. The default file that you can find at src/manifest.json looks like this:
{
  "name": "Ionic",
  "short_name": "Ionic",
  "start_url": "index.html",
  "display": "standalone",
  "icons": [{
    "src": "assets/imgs/logo.png",
    "sizes": "512x512",
    "type": "image/png"
  }],
  "background_color": "#4e8ef7",
  "theme_color": "#4e8ef7"
}
This defines the name of the application, and a short_name that will be used when added to the home screen. We also have the display style we want to use, by setting it to standalone the application will display like a full-screen native application when opened (you won’t be able to see the URL bar). We define the icons to use when the application is added to the home screen, and the colors that should be used to style the application (e.g. on Chrome the background colour can be changed so that the application blends in better with the browser).
The file above is about all we need, but we are going to use a slightly expanded version to define a few extra icons, and we are also going to lock in the orientation to “portrait”. An easy way to generate the manifest file you need and the associated icons is to use Web App Manifest Generator which has a nice interface for filling out the appropriate fields, and you can upload a single icon and it will generate the rest for you. Once you have downloaded the resulting file, make sure to place the images into the appropriate folder in your application (usually src/assets/imgs/) and to update your manifest.json file.
This is what the manifest file for the cryptoPWA application looks like.
{
  "name": "cryptoPWA",
  "short_name": "cryptoPWA",
  "start_url": "index.html",
  "display": "standalone",
  "description": "Simple wealth tracker for cryptocurrencies.",
  "icons": [
    {
      "src": "assets/imgs/icon-72x72.png",
      "sizes": "72x72",
      "type": "image/png"
    },
    {
      "src": "assets/imgs/icon-96x96.png",
      "sizes": "96x96",
      "type": "image/png"
    },
    {
      "src": "assets/imgs/icon-128x128.png",
      "sizes": "128x128",
      "type": "image/png"
    },
    {
      "src": "assets/imgs/icon-144x144.png",
      "sizes": "144x144",
      "type": "assets/imgs/image/png"
    },
    {
      "src": "assets/imgs/icon-152x152.png",
      "sizes": "152x152",
      "type": "image/png"
    },
    {
      "src": "assets/imgs/icon-192x192.png",
      "sizes": "192x192",
      "type": "image/png"
    },
    {
      "src": "assets/imgs/icon-384x384.png",
      "sizes": "384x384",
      "type": "image/png"
    },
    {
      "src": "assets/imgs/icon-512x512.png",
      "sizes": "512x512",
      "type": "image/png"
    }
  ],
  "orientation": "portrait",
  "splash_pages": null,
  "background_color": "#000000",
  "theme_color": "#000000"
}
One more thing we need to consider is the status bar on iOS. This will be displayed at the top of your application, and if it is a different colour to the rest of your application then it can look a little wonky. We have three options when dealing with the iOS status bar in progressive web applications:
- Make the status bar black (black)
- Make the status bar white (default)
- Make the status bar translucent and overlap the content area (black-translucent)
To switch between these options, you just need to update the following line in src/index.html:
<meta name="apple-mobile-web-app-status-bar-style" content="black" />to reflect the style that you want (black/default/black-translucent). Since the example we are using is black anyway, we can just leave the status bar as “black”.
Handling the Offline State
We’ve handled most of the PWA specific issues, but we still have some usability concerns to consider. Just by setting up the service worker our application will already work offline, but it’s not enough to just flip a switch and call it a day. We need to consider how our application behaves whilst offline.
Since we are fetching the price data from an online API, we can not fetch that data whilst the user is offline – so what happens when the application tries to load those prices? Although we can’t fetch prices from the API if the user does not have an Internet connection, we can make the application fail gracefully for the user rather than being stuck endlessly loading or not providing the user with any feedback as to what is going on.
There are two changes we are going to make to the application:
- We are going to add a timeout to the HTTP requests so that they automatically fail gracefully after a set amount of time
- We are going to display an appropriate error message to explain what is happening when no Internet connection is available.
Let’s update our Holdings provider to help implement these changes.
Modify src/providers/holdings/holdings.ts to reflect the following:
import { HttpClient } from '@angular/common/http';
import { Injectable } from '@angular/core';
import { Storage } from '@ionic/storage';
import { Observable } from 'rxjs/Observable';
import { forkJoin } from 'rxjs/observable/forkJoin';
import { timeoutWith } from 'rxjs/operators';
import 'rxjs/add/observable/throw';

interface Holding {
    crypto: string,
    currency: string,
    amount: number,
    value?: number
}

@Injectable()
export class HoldingsProvider {

    public holdings: Holding[] = [];
    public pricesUnavailable: boolean = false;

    constructor(private http: HttpClient, private storage: Storage) {

    }

    addHolding(holding: Holding): void {

        this.holdings.push(holding);
        this.fetchPrices();
        this.saveHoldings();

    }

    removeHolding(holding): void {

        this.holdings.splice(this.holdings.indexOf(holding), 1);
        this.fetchPrices();
        this.saveHoldings();

    }

    saveHoldings(): void {
        this.storage.set('cryptoHoldings', this.holdings);
    }

    loadHoldings(): void {

        this.storage.get('cryptoHoldings').then(holdings => {

            if(holdings !== null){
                this.holdings = holdings;
                this.fetchPrices();
            }
        });

    }

    verifyHolding(holding): Observable<any> {
        return this.http.get('https://api.cryptonator.com/api/ticker/' + holding.crypto + '-' + holding.currency).pipe(
            timeoutWith(5000, Observable.throw(new Error('Failed to verify holding.')))
        );
    }

    fetchPrices(refresher?): void {

        this.pricesUnavailable = false;
        let requests = [];

        for(let holding of this.holdings){

            let request = this.http.get('https://api.cryptonator.com/api/ticker/' + holding.crypto + '-' + holding.currency);

            requests.push(request);

        }

        forkJoin(requests).pipe(
            timeoutWith(5000, Observable.throw(new Error('Failed to fetch prices.')))
        ).subscribe(results => {

            results.forEach((result: any, index) => {

                this.holdings[index].value = result.ticker.price;

            });

            if(typeof(refresher) !== 'undefined'){
                refresher.complete();
            }

            this.saveHoldings();

        }, err => {

            this.pricesUnavailable = true;

            if(typeof(refresher) !== 'undefined'){
                refresher.complete();
            }

        });

    }

}
The provider is mostly the same but there are a few key differences. We’ve added some imports:
import { timeoutWith } from 'rxjs/operators';
import 'rxjs/add/observable/throw';
These will allow us to specify a “timeout” for our HTTP requests to the API, and then throw an error if the request fails. We then make use of this concept in both of your calls to the API, for example:
verifyHolding(holding): Observable<any> {
    return this.http.get('https://api.cryptonator.com/api/ticker/' + holding.crypto + '-' + holding.currency).pipe(
        timeoutWith(5000, Observable.throw(new Error('Failed to verify holding.')))
    );
}
Rather than just returning the observable that is created when we run this.http.get(), we use the pipe method to modify that observable. This pipe method is the new way to chain onto observables in Angular 5 (e.g. if you wanted to map your observable), so if you are unfamiliar with this I would recommend reading: Using Observables in Ionic 3.9.x and Angular 5.
We use timeoutWith to timeout the observable if it does not emit its data within 5 seconds. If the observable timesout, then the error “Failed to verify holding” will be thrown. We will make use of this on our Add Holding page shortly.
In our fetchPrices method, we are handling the error for the observable directly in the provider. In this case, we set the pricesUnavailable class member to true, which will allow us to notify the user that the prices could not be fetched from the API. Let’s handle that now.
Add the following line above the
<ion-list>in src/pages/home/home.html:
<p class="message" *ngIf="holdingsProvider.pricesUnavailable">
  Could not fetch rates. Make sure you are connected to the Internet or try
  again later.
</p>
Now whenever the pricesUnavailable flag is set, a message will be displayed to the user. Now we just need to handle displaying a message to the user when they attempt to add a new holding whilst offline (which isn’t possible because we need to verify the holding with the API before adding it).
Modify src/pages/add-holding/add-holding.ts to reflect the following:
import { Component } from '@angular/core';
import { IonicPage, NavController } from 'ionic-angular';
import { HoldingsProvider } from '../../providers/holdings/holdings';

@IonicPage({
    defaultHistory: ['HomePage']
})
@Component({
    selector: 'page-add-holding',
    templateUrl: 'add-holding.html'
})
export class AddHoldingPage {

    private cryptoUnavailable: boolean = false;
    private checkingValidity: boolean = false;
    private noConnection: boolean = false;
    private cryptoCode: string;
    private displayCurrency: string;
    private amountHolding;

    constructor(private navCtrl: NavController, private holdingsProvider: HoldingsProvider) {

    }

    addHolding(){

        this.cryptoUnavailable = false;
        this.noConnection = false;
        this.checkingValidity = true;

        let holding = {
            crypto: this.cryptoCode,
            currency: this.displayCurrency,
            amount: this.amountHolding || 0
        };

        this.holdingsProvider.verifyHolding(holding).subscribe((result) => {

            this.checkingValidity = false;

            if(result.success){
                this.holdingsProvider.addHolding(holding);
                this.navCtrl.pop();
            } else {
                this.cryptoUnavailable = true;
            }

        }, (err) => {

            this.noConnection = true;
            this.checkingValidity = false;

        });

    }

}
We’ve added a noConnection flag that will be set whenever the observable that verifyHolding returns emits an error (i.e. when our timeout is triggered). Now we can just add a message to the template for that.
Modify src/pages/add-holding/add-holding.html to include the connection error message below the unavailable error message:
<p class="error-message" *ngIf="cryptoUnavailable">
  Sorry, that combination is not currently available. Make sure to only include
  a single code.
</p>

<p class="error-message" *ngIf="noConnection">
  Sorry, you need to be online to add new holdings.
</p>
Remember in the previous tutorial how I said managing errors this way can get messy? That should be starting to become clear now. Handling just these two cases isn’t that much of a big deal, but if we are dealing with many different potential error messages, this method of displaying error messages becomes unmaintainable. For more scalable error message handling, consider using something like this.
With these changes, the application should now behave in a more usable manner whilst offline, and we won’t be leaving the user confused and frustrated.
Summary
The application as it is now will be able to be added to users home screens and used offline, just like a native application, but we can circumvent the entire app store process.
Whilst having the ability to easily add offline support almost at the flick of a switch, it’s important to consider how the overall design of the application can affect its usefulness whilst offline. We save each holding to local storage, and we fetch prices from the Cryptonator API. When we retrieve those prices, we also save the last price that was fetched to storage. This will allow users to view the last price even if they are offline.
If we didn’t save those prices back to local storage, when the user tries to access the application whilst offline they would only be able to see how much they have of each cryptocurrency, not the worth of their holdings. This would not be nearly as useful. It’s a simple design change, with no real extra cost, but it makes the application a lot more useable whilst offline. There is not much point in having an offline-capable application if the application can not provide any use to the user whilst it is offline.
In the following tutorial, we will be walking through how to get this application hosted (for free) using Firebase Hosting.