One of the great things about using a framework like Ionic is that best practice user interface elements are baked in as defaults, which means you will be able to design better apps without having a strong user experience background and it makes it much easier to implement these patterns.
In this tutorial I’m going to show you how you can use Ionic 2 to add a simple delete button to your lists which is revealed when the user swipes to the left. This pattern is quite often used for handling the deletion of data from lists, and that’s what I’ll be covering in this tutorial, but you can create a button that is revealed when sliding to do anything you want.
We’ll start off by creating a new project, but if you haven’t already got Ionic 2 set up I’d recommend taking a look at this post first for more information.
DISCLAIMER: At the time of writing this, Ionic 2 is still in Alpha and things may change. If you find that the code in this tutorial no longer works, let me know and I’ll do my best to update it.
1. Generate a New Ionic 2 Application
Generate a new Ionic application by running the following command:
ionic start ionic2-delete blank --v2
Keep in mind that I’m using he –v2 flag here, which tells the Ionic CLI to build the project with Ionic 2. This may change in the future.
2. Set up the List Data
We’re going to want some data to manipulate, so let’s add some dummy data to the application. The blank template we used to create our project already has a default Home component set up. For this tutorial we are just going to modify that.
Since Ionic 2 is still pretty new, I’m going to walkthrough these steps in a little more detail than I usually would. If you take a look at the app/home/home.js file you will see the following:
import { Page } from 'ionic/ionic';

@Page({
  templateUrl: 'app/home/home.html',
})
export class HomePage {
  constructor() {}
}
This class definition fills a similar role to what a controller in Ionic 1 would have. The constructor function is run when this component is created, so we can set up our dummy data there. You will notice we are also specifying the template that this component uses (again, not too unlike Ionic 1) and in just a moment I’ll show you how to make use of the data we are adding here in your template.
Modify home.js to reflect the following:
import { Page } from 'ionic/ionic';

@Page({
  templateUrl: 'app/home/home.html',
})
export class HomePage {
  constructor() {
    this.items = [
      { title: 'item1' },
      { title: 'item2' },
      { title: 'item3' },
      { title: 'item4' },
      { title: 'item5' },
      { title: 'item6' },
    ];
  }
}
Now we have some data that we will be able to delete.
3. Modify the Home Template
Next we are going to set up the template by editing home.html. Right now this template should contain some code for creating an <ion-card>, but we are going to replace that with an <ion-list>:
Modify home.html to reflect the following:
<ion-navbar *navbar>
  <ion-title>
    Home
  </ion-title>
</ion-navbar>

<ion-content>
  <ion-list>

    <ion-item>
        I'm just a plain old item in a list...
    </ion-item>

  </ion-list>
</ion-content>
For those of you who are familiar with Ionic 1, this will look pretty familiar so far. This just sets up a list with a single item. Next, we are going to add in the sliding element.
Modify home.html to reflect the following:
<ion-navbar *navbar>
  <ion-title>
    Home
  </ion-title>
</ion-navbar>

<ion-content>
  <ion-list>

   <ion-item-sliding>

    <ion-item>
    Swipe me to the left
    </ion-item>

    <ion-item-options>
      <button danger (click)="removeItem()"><icon trash></icon> Delete</button>
    </ion-item-options>
  </ion-item-sliding>

  </ion-list>
</ion-content>
You can see that we have replaced ion-item with ion-item-sliding. Adding this allows us to create an ion-item-options section that can be revealed when the user swipes a list element.
This code also adds a delete button to be revealed in the ion-item-options section that will call removeItem in our class definition when clicked (we still need to add this). We want more than just one item though, so let’s create a sliding item for every entry we have in the data array we created before by using ng-for.
Modify home.html to reflect the following:
<ion-navbar *navbar>
  <ion-title>
    Home
  </ion-title>
</ion-navbar>

<ion-content>
  <ion-list>

  <ion-item-sliding *ng-for="#item of items">

    <ion-item>
    {{item.title}}
    </ion-item>

    <ion-item-options>
      <button danger (click)="removeItem(item)"><icon trash></icon> Delete</button>
    </ion-item-options>
  </ion-item-sliding>

  </ion-list>
</ion-content>
Now we are looping through every item in our items array that is defined in the class definition, and creating an ion-item-sliding directive for each of them. Notice that we have #item not just item. This will create a local reference to the specific item that is being iterated over, this allows us to output the title using {{item.title}} and it also allows us to pass a reference to the item through to our removeItem function.
If you want a little more detail on why exactly we need the * syntax, have a listen to my podcast where Mike Hartington from the Ionic team explains why we need it.
We should now have a list containing all of our data that the user can slide to the right to reveal a delete button. Now all that is left to do is make it do something when it is clicked. So we’re going to set up a simple listener that will call a function to delete the item from the dummy data we created earlier.
4. Create a Function to Remove the Data
Now we’re going to head over to our home.js file and write the function to handle deleting the data. Currently we are calling removeItem and passing in a reference to item when the Delete button is clicked. Remember, you can quite easily use this button for functions other than deletion of data (as I will show you in a second), such as editing, sharing, playing an animation – whatever you want.
Modify your home.js file to reflect the following:
import { Page } from 'ionic/ionic';
@Page({
templateUrl: 'app/home/home.html',
})
export class HomePage {
constructor() {
this.items = [
{ title: 'item1' },
{ title: 'item2' },
{ title: 'item3' },
{ title: 'item4' },
{ title: 'item5' },
{ title: 'item6' },
];
}
removeItem(item) {
for (i = 0; i < this.items.length; i++) {
if (this.items[i] == item) {
this.items.splice(i, 1);
}
}
}
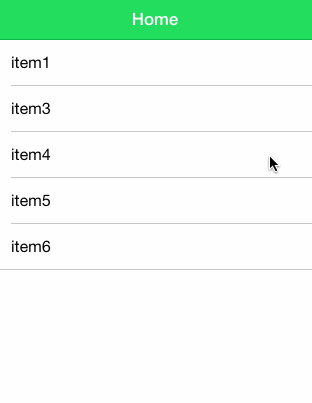
}Now if you slide any of the list items to the left and click the delete button, it will remove it from the list. It’ll look a little something like this:
5. Adding an Edit Button
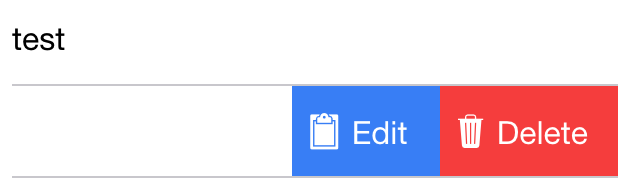
I’m not going to walk you through the entire process of creating an Edit button, but to demonstrate how easily you can extend these sliding options try adding an extra edit button like this:
<ion-item-options>
      <button primary>Edit</button>
      <button danger (click)="removeItem(item)"><icon trash></icon> Delete</button>
    </ion-item-options>
Now you’ll have two buttons side by side like this:
and you can hook up the Edit button with another click handler to do whatever you want.
Summary
Ionic 1 already made it pretty easy to create a delete button for lists that toggles, but I think Ionic 2 does a great job in generalising this feature. Rather than having a feature specific for deleting, we can now easily create these buttons to do whatever we want.
It’s also just a really pretty UI element that saves the screen from being cluttered but keep in mind it won’t be immediately obvious to your users that they can swipe to reveal more options.