

In a few of my projects I’ve been using a pretty simple timer, the general idea was I’d start off with some variable to hold the total time of the game and then create a timer loop to decrement that value.
I would visually represent that somewhere on the screen (usually a bar that gradually decreased in width) and detect when the value reached 0 to trigger a game over.
I implemented this same timer in the latest game I’ve been working on (a word game which I will hopefully be releasing soon!) and it seemed to work really well. That was until my partner suggested that maybe the game took a little too long… seemed about right to me, 2 minutes isn’t that long? But she was racking up pretty massive scores, something was definitely fishy.
Now I’m not sure on the exact cause of this still, but I assume it was because she was using a slower device. I’m using an iPhone 5S and she was using a really old iPhone 4. Perhaps the timer functions were firing more slowly on her device causing the game time to go down slower – whatever was happening I needed a more accurate way to measure how much time had elapsed in the game.
I decided on a more traditional style of timer (a digital clock style display), and to use Javascript Dates (which includes time) to calculate how much time had passed. I simply create a new Date object when the game first starts, and then continually create new Date object to find the difference between the start time and the current time. This way it doesn’t matter how fast or how often the time is calculated, it should always work out the same.
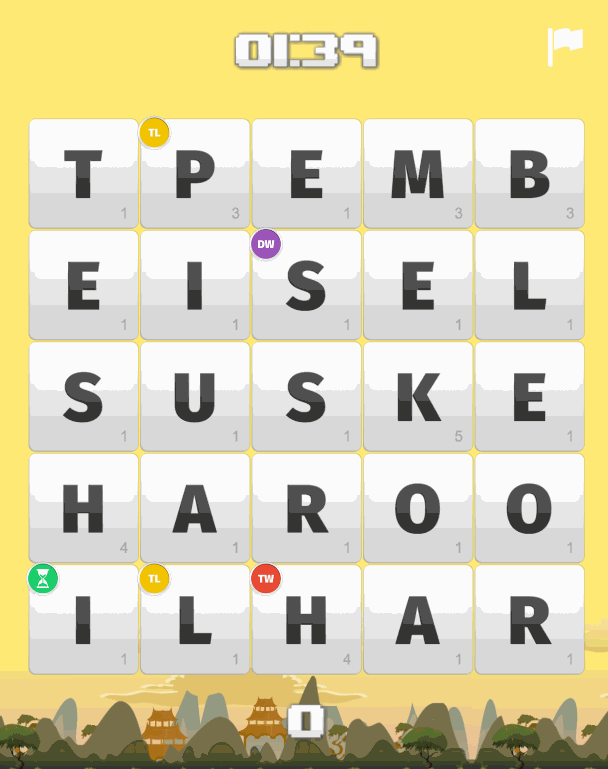
Here’s what it looks like:
This has the added benefit of not allowing the player to unfocus the game to cheat. When a Phaser game is running through the browser but the window is not focused, or if the game is running on a device in the background, the game logic essentially pauses. When using dates like this, even if the code in the game stops executing completley, when the user comes back to the game time will still have passed and it will be reflected in the newly created Date object – they will just see a big drop in time all at once.
Let’s get into how to make it!
Before We Get Started
If you don’t already know how to get a Phaser project set up you can check out the free preview lesson from my Mobile Development for Web Developers course which covers how to get started with Phaser.
I’m also not going to cover how to structure a Phaser application in this tutorial, but if you would like to use the same structure I am using in the tutorial you can download a skeleton template for a mobile game in Phaser which scales to any screen size below:
Creating an Accurate Timer in Phaser
Creating this timer is reasonably easy, and once you’ve done it once you can easily just copy and paste it into other games. Let’s go through it step by step.
1. Set Up
First we are going to create some variables to hold the current state of the timer, which will allow us to calculate how much time has passed and also set how much time is available. We are also calling a method that will handle setting up the timer display and creating a loop that will run every 100ms to check the time. It doesn’t matter how often this update function runs, the time will still be calculated accurately.
Add the following code to the create method:
create: function(){

	var me = this;

	me.startTime = new Date();
	me.totalTime = 120;
	me.timeElapsed = 0;

	me.createTimer();

	me.gameTimer = game.time.events.loop(100, function(){
		me.updateTimer();
	});

}
We are calling createTimer and updateTimer here but we will still need to create those functions first, right now you will just get an error if you run the game.
2. Create the Timer Display
We’re going to define the createTimer function now, which will handle setting up the text label for the timer on the screen.
Add the following function to your state:
createTimer: function(){

        var me = this;

        me.timeLabel = me.game.add.text(me.game.world.centerX, 100, "00:00", {font: "100px Arial", fill: "#fff"});
        me.timeLabel.anchor.setTo(0.5, 0);
        me.timeLabel.align = 'center';

    },
This will set up a timer with a default font, but in the example showed above I was using a custom font. If you want to learn how to use your own custom font, take a look at this tutorial.
3. Calculate Time Remaining
This is where the meat of this solution is, we will be adding the updateTimer function. Let’s take a look at the code first and then talk through it.
Add the following function to your state:
updateTimer: function(){

        var me = this;

        var currentTime = new Date();
        var timeDifference = me.startTime.getTime() - currentTime.getTime();

        //Time elapsed in seconds
        me.timeElapsed = Math.abs(timeDifference / 1000);

        //Time remaining in seconds
        var timeRemaining = me.totalTime - me.timeElapsed;

        //Convert seconds into minutes and seconds
        var minutes = Math.floor(timeRemaining / 60);
        var seconds = Math.floor(timeRemaining) - (60 * minutes);

        //Display minutes, add a 0 to the start if less than 10
        var result = (minutes < 10) ? "0" + minutes : minutes;

        //Display seconds, add a 0 to the start if less than 10
        result += (seconds < 10) ? ":0" + seconds : ":" + seconds;

        me.timeLabel.text = result;

    }
First we get the current time by creating a new Date object, and then we compare it to the one we created when the game first started to work out how much time has passed since the game started. We convert it into seconds to make it easier to work with.
To work out the time remaining, we subtract the time that has elapsed from the total time we defined earlier – you can set the total time to be whatever you like in the create method.
Then all we have left to do is convert the time remaining in seconds into a digital clock format, i.e MM:SS, so we need to divide the seconds by 60 to work out how many minutes have passed, and then use the remaining seconds to display in the seconds position. Once we’ve done that and created the string to represent it, we just updated the text label we created earlier.
This particular timer starts at a set time and counts down, but you could just as easily have the timer count up instead. You would just replace the following line:
var timeRemaining = me.totalTime - me.timeElapsed;with this:
var timeRemaining = me.timeElapsed;That’s a quick change, but it would make more sense to just get rid of this variable completely, and pass timeElapsed directly into the minutes and seconds calculations:
var minutes = Math.floor(me.timeElapsed / 60);
var seconds = Math.floor(me.timeElapsed) - 60 * minutes;
Also note that there is a limitation on just minutes and seconds here, so the highest this timer could go is 59:59. You can quite easily support times higher than this though. Just follow the same logic, but also add in an ‘hours’ variable that calculates how many hours have passed in seconds, and also make sure to subtract the amount of hours multiplied by 60 from the minutes (just like we did with seconds).
4. Detecting When Time Has Run Out
The timer itself is completed now, but in most cases you’ll probably want to detect when the timer has reached zero. That’s as simple as adding the following code to your update loop:
if (me.timeElapsed >= me.totalTime) {
  //Do what you need to do
}
Summary
The above method is a pretty simple way to create a reasonably accurate timer in Phaser, and can easily be used in just about any game. It’s pretty adaptable too, say if you wanted to give the player some bonus time all you have to do is add it to the me.totalTime variable and the timer will go up by the amount you specified. There’s probably plenty more you could do too, maybe as a homework task you could try making it go down in slow motion for a set period of time.