

In the first post in this series I wrote about how to create E2E (End-to-End) tests for Ionic applications. This was a very basic introduction that focused on the general concept and getting a bare bones example up and running.
I intend to create a few more tutorials that will go a little more in-depth into E2E testing and discuss how to better integrate them into your testing strategy. In this tutorial, I will be discussing how you can use page objects in your E2E tests to make them more maintainable and easier to write.
We will discuss what a page object actually is in a little more depth soon, but in short, a page object is a class that represents a page of your application. It adds a level of abstraction between your tests and the specific implementation of a page. If that explanation doesn’t make any sense at all, don’t worry, it’s much more easily demonstrated with an example.
Why Page Objects?
When creating E2E tests we will often grab an element by referring to it by a CSS selector. That might be a class name like profile-information or perhaps it will be through a CSS combinator like ion-list button to select any <button> elements inside of an <ion-list>. This might look something like this:
element(by.css('.profile-information'));Let’s suppose you’ve got your tests set up, and everything is working fine, but then you need to make a change to the structure of your template. Perhaps you have renamed some classes or you have changed the level of nesting of an element. Now the CSS selector you are using for your E2E test is incorrect and all of the tests related to that will be broken. You will need to find every instance of that selector in the tests and update it.
This is one issue that page objects can solve for us, another is that of navigation.
Protractor is designed to work well with the browser and provides methods for navigating about an application through the URL. Although an Ionic application is technically a website that runs through a browser, it doesn’t behave like one – it behaves more like a native mobile application and so does its navigation. Rather than relying on routes in the URL to determine the page, Ionic 2 follows a push/pop style of navigation.
UPDATE: This post has been updated since initially being published, and the current version of Ionic/Angular uses Angular routing by default rather than push/pop navigation. This means that the way you structure your tests may be a little different, but we are going to stick with the push/pop example in this tutorial to help illustrate the benefit of page objects.
This push/pop style navigation complicates our E2E tests a bit. Generally, the first thing you would do in an E2E test is to point the browser to wherever it needs to go to start the test, e.g:
browser.get('');which would direct the browser to the index page of the application (which isn’t an issue for Ionic), or something like this:
browser.get('/products');to direct the browser to the products page. This is an issue for an Ionic application relying on push/pop because, as I just mentioned, this method of navigation does not rely on a URL being provided to the browser to navigate to a specific page.
In order to navigate to the page that we need to test with Protractor when using push/pop navigation, we need to direct the browser to the index page, and then trigger a series of clicks to navigate to the page that we want to start our test on. Although using a page object does not entirely provide a solution to this problem, it does make it easier to manage.
Using a Page Object
In order to demonstrate how a page object can help deal with the issues I talked about above, I am going to use an example from an application that I was building when I first published this tutorial. We will take a look at an E2E test that I have written, we will see what it looks like without using page objects, then we will see what it looks like using page objects.
Before Using a Page Object
Here’s what the E2E test would look like without using page objects:
import { browser, element, by } from 'protractor';

describe('Module Tests', () => {
  beforeEach(() => {
    browser.get('');

    element(by.css('.module-list button')).click();

    browser.driver.sleep(500);
  });

  it('a user can select a lesson from a module and view the lesson content', () => {
    let lessonToTest = element.all(by.css('.lesson-list button')).get(2);

    // Trigger a click to navigate to module
    lessonToTest.click();

    // Wait
    browser.driver.sleep(500);

    // Check if there is content
    expect(element(by.css('.lesson-content')).getText()).toBeTruthy();
  });
});
On the surface, this E2E test looks pretty sane. We set the test up by first navigating to the relevant page by triggering a click on the module list, and then we test whether or not a user is able to view lesson content by entering into a lesson and checking the content.
This test will perform the test that is required of it well, but it has some serious maintainability issues. Let’s consider a couple of scenarios:
- The location of the page changes. Right now the page can be accessed by pointing the browser to the root of the application and performing one click. But what if the application becomes more complex than that? Perhaps a login page is added, or there may even be several pages added before the user can arrive at this one. This is going to make the
beforeEachsetup for each test quite messy. - The CSS selectors change. We are grabbing references to elements using CSS selectors, but it’s not too hard to imagine that at some point those selectors may be changed (especially if we rely on combinators) - this would mean that we need to change our E2E tests to reflect those changes. That wouldn’t be too much of an issue for this simple example, but if you are referring to the same element in multiple different tests, you are going to have to go an update every single reference to it every time you make a change.
If you use page objects, this won’t be as much of an issue.
Creating a Page Object
Now let’s take a look at how to create a page object. The general approach is to create the page object as a separate file, and then import it wherever you need it. This is the structure that I am using:
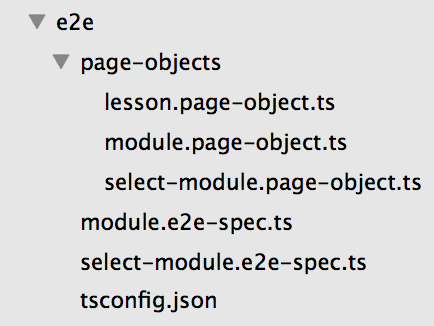
UPDATE: You will now find that page objects are included in the default E2E tests generated with an Ionic/Angular application (e.g. app.po.ts). You may wish to follow this default structure, but you can set your files and folders up however you like.
I have a folder specifically for page objects, and name them [page-name].page-object.ts. You can use whatever structure you prefer. Let’s take a look at what one of the page objects actually looks like.
module.page-objects.ts
import { browser, element, by } from 'protractor';
import { SelectModulePageObject } from './select-module.page-object';

export class ModulePageObject {
  selectPage: SelectModulePageObject = new SelectModulePageObject();

  getLessonList() {
    return element.all(by.css('.lesson-list button'));
  }

  browseToPage() {
    browser.get('');

    this.selectPage.getModuleElement().click();

    browser.driver.sleep(500);
  }
}
This page object is just a simple class that performs a couple of tasks. Instead of referring to:
element.all(by.css('.lesson-list button'));in our tests, we create a function in the page object to access it instead, then our tests will reference the function instead. This way, we are only ever referencing the CSS selector in one place. If we ever need to update the CSS selector later, then that means we will only need to make a single update to this page object, rather than multiple updates across different tests.
I have also added a browseToPage method. The purpose of this method is to specify the steps to navigate to the page that the page object represents. This way we can just call the browseToPage method in our tests whenever we need to navigate to this page.
Also, notice that in this page object I am importing another page object. To navigate to this page we need to click an element from another page, so again, instead of manually referencing it here (which may need to be updated later) we just grab the element from that pages page object instead.
After Using a Page Object
Now let’s take a look at what the E2E test looks like after using page objects:
import { browser } from 'protractor';
import { ModulePageObject } from './page-objects/module.page-object';
import { LessonPageObject } from './page-objects/lesson.page-object';

describe('Module Tests', () => {
  let modulePage: ModulePageObject;
  let lessonPage: LessonPageObject;

  beforeEach(() => {
    modulePage = new ModulePageObject();
    lessonPage = new LessonPageObject();

    modulePage.browseToPage();
  });

  it('a user can select a lesson from a module and view the lesson content', () => {
    let lessonToTest = modulePage.getLessonList().get(2);

    // Trigger a click to navigate to module
    lessonToTest.click();

    // Wait
    browser.driver.sleep(500);

    // Check if there is content
    expect(lessonPage.getContentArea().getText()).toBeTruthy();
  });
});
The test looks pretty much the same, but it’s a little neater and simpler now, and won’t suffer from those maintainability issues we discussed earlier.
Summary
This was a pretty basic example, the benefits of using page objects may be more obvious on a more complex test suite, but I think that this example shows why page objects can be useful to help structure your tests.
In the next part of this tutorial series, we will go into a little more depth about what kinds of E2E tests you should write and when you should write them.