

In Part 1 of this tutorial series, we built a Node & Express server which uses MongoDB to store location data. We created a route that we could make a POST request to, and through supplying some data with that request it will return to us only locations that are within a certain proximity to the point we specify.
The purpose of this server is so that we can dynamically load in markers to our Google Map, such that only the markers that would currently be on screen are loaded – rather than loading and adding them all at once (which would lead to poor performance, and is unrealistic at large scales).
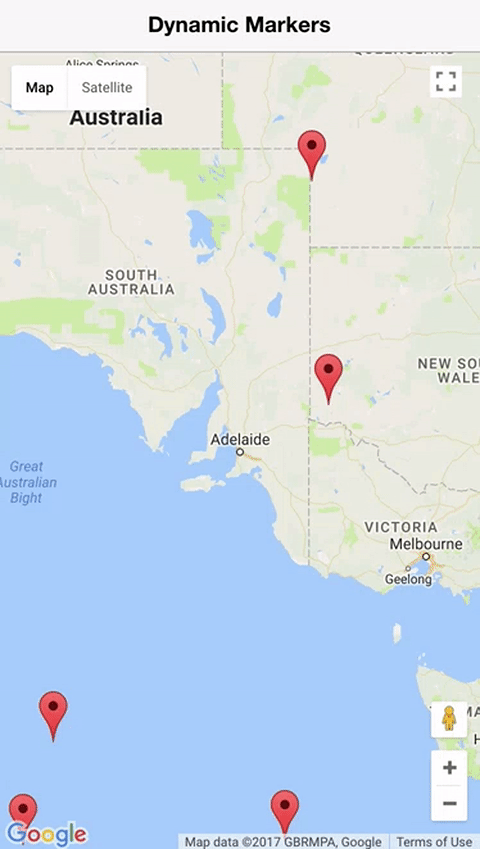
In this tutorial, we will be implementing the front end for the application in Ionic 2 that will make use of this simple API we have set up. Once we are done with this part, the application will be finished:
Before We Get Started
This tutorial assumes that you have already completed Dynamically Loading Markers with MongoDB and Ionic 2 – Part 1. This part will make use of the server we created in Part 1, so if you have not already completed that tutorial then you will not be able to complete this one.
1. Generate a New Ionic 2 Application
First, make sure that you are currently in the root folder for your project, not the server folder. Then create a new Ionic 2 application with the following command:
ionic start ionic2-dynamic-markers blank --v2Once the application has finished generating, you may wish to rename the generated project folder from ionic2-dynamic-markers to client, however, that is not required.
You should now make the new Ionic 2 project your working directory, as we will need to create a provider.
Run the following command to create a GoogleMaps provider:
ionic g provider GoogleMapsThis provider will eventually contain all of the logic for setting up our Google Map and interacting with the server we have created. But first, we will need to set this provider up in our app.module.ts so that we are able to use it throughout the application.
Modify src/app/app.module.ts to reflect the following:
import { NgModule, ErrorHandler } from '@angular/core';
import { IonicApp, IonicModule, IonicErrorHandler } from 'ionic-angular';
import { MyApp } from './app.component';
import { HomePage } from '../pages/home/home';
import { GoogleMaps } from '../providers/google-maps';

@NgModule({
  declarations: [MyApp, HomePage],
  imports: [IonicModule.forRoot(MyApp)],
  bootstrap: [IonicApp],
  entryComponents: [MyApp, HomePage],
  providers: [
    { provide: ErrorHandler, useClass: IonicErrorHandler },
    GoogleMaps,
  ],
})
export class AppModule {}
2. Implement the Google Maps Provider
This provider will handle the bulk of the logic for the application, so we are going to jump straight into building it. Once this is in place, the rest of the application will be quite simple to piece together.
Since it is quite a complex provider, we are just going to set up a skeleton of it first and then step through implementing it.
Modify src/providers/google-maps.ts to reflect the following:
import { Injectable } from '@angular/core';
import { Http, Headers } from '@angular/http';
import 'rxjs/add/operator/map';

@Injectable()
export class GoogleMaps {

    map: any;
    markers: any = [];

    constructor(public http: Http) {

    }

    initMap(mapElement){

    }

    loadMarkers(){

    }

    getMarkers(options){

    }

    addMarkers(markers){

    }

    markerExists(lat, lng){

    }

    getBoundingRadius(center, bounds){
        return this.getDistanceBetweenPoints(center, bounds.northEast, 'km');
    }

    getDistanceBetweenPoints(pos1, pos2, units){

        let earthRadius = {
            miles: 3958.8,
            km: 6371
        };

        let R = earthRadius[units || 'miles'];
        let lat1 = pos1.lat;
        let lon1 = pos1.lng;
        let lat2 = pos2.lat;
        let lon2 = pos2.lng;

        let dLat = this.toRad((lat2 - lat1));
        let dLon = this.toRad((lon2 - lon1));
        let a = Math.sin(dLat / 2) * Math.sin(dLat / 2) +
        Math.cos(this.toRad(lat1)) * Math.cos(this.toRad(lat2)) *
        Math.sin(dLon / 2) *
        Math.sin(dLon / 2);
        let c = 2 * Math.atan2(Math.sqrt(a), Math.sqrt(1 - a));
        let d = R * c;

        return d;

    }

    toRad(x){
        return x * Math.PI / 180;
    }

}
This is the basic skeleton for our Google Maps provider. I’ve left out most of the functions, except a few helper functions at the end. These helper functions are responsible for calculating the distance between two points, which will allow us to calculate the distance between the center of the map and the edge of the map. By doing this, we will know the area in which we need to load markers for, and we can pass that information onto our server.
Let’s implement the remaining functions one by one now.
Modify the
initMapfunction to reflect the following:
initMap(mapElement){

        let latLng = new google.maps.LatLng(-34.9290, 138.6010);

        let mapOptions = {
            center: latLng,
            zoom: 5,
            mapTypeId: google.maps.MapTypeId.ROADMAP
        };

        this.map = new google.maps.Map(mapElement, mapOptions);

        google.maps.event.addListenerOnce(this.map, 'idle', () => {

            this.loadMarkers();

            google.maps.event.addListener(this.map, 'dragend', () => {
                this.loadMarkers();
            });

        });

    }
This function will be called from our home page and is what kicks off the whole process. It is responsible for creating a new Google Map, and it is also responsible for setting up two listeners. We set up a idle listener which will trigger the loadMarkers function as soon as the map has loaded for the first time (giving us our initial set of markers), and it also sets up a dragend listener which will also trigger loadMarkers every time the user moves the map. This is what will allow us to load in markers only as the user requires them.
Modify the
loadMarkersfunction to reflect the following:
loadMarkers(){

        let center = this.map.getCenter(),
            bounds = this.map.getBounds(),
            zoom = this.map.getZoom();

        // Convert to readable format
        let centerNorm = {
            lat: center.lat(),
            lng: center.lng()
        };

        let boundsNorm = {
            northEast: {
                lat: bounds.getNorthEast().lat(),
                lng: bounds.getNorthEast().lng()
            },
            southWest: {
                lat: bounds.getSouthWest().lat(),
                lng: bounds.getSouthWest().lng()
            }
        };

        let boundingRadius = this.getBoundingRadius(centerNorm, boundsNorm);

        let options = {
            lng: centerNorm.lng,
            lat: centerNorm.lat,
            maxDistance: boundingRadius
        }

        this.getMarkers(options);

    }
This function looks a little intimidating but it’s actually reasonably straightforward. We are using methods provided by the Google Maps JavaScript SDK to grab some information about the current status of the map, including the center point, zoom level, and the bounding coordinates (the North East corner of the map, and the South West corner of the map).
We then use this information to calculate the boundingRadius, which will be the distance between the center and the bound. It’s important that we calculate this value in terms of the latitude and longitude of those points, as the map can be viewed at a variety of zoom levels.
Modify the
getMarkersfunction to reflect the following:
getMarkers(options){

        let headers = new Headers();
        headers.append('Content-Type', 'application/json');

        this.http.post('http://localhost:8080/api/markers', JSON.stringify(options), {headers: headers})
            .map(res => res.json())
            .subscribe(markers => {

                console.log(markers);
                this.addMarkers(markers);

            });

    }
This is the function that actually makes a request to the server we created. We create a POST request to:
http://localhost:8080/api/markerswhich is the route that we set up. We pass our options, which contains the center and bounds data, as the body of the request, and we set a JSON header on the request.
We are able to subscribe to this request (in fact, subscribing is required to kick off the request anyway) to receive the data that the server will return. Once the server returns the marker data, we pass it along to the addMarkers function.
Modify the
addMarkersfunction to reflect the following:
addMarkers(markers){

        let marker;
        let markerLatLng;
        let lat;
        let lng;

        markers.forEach((marker) => {

            lat = marker.loc.coordinates[1];
            lng = marker.loc.coordinates[0];

            markerLatLng = new google.maps.LatLng(lat, lng);

            if(!this.markerExists(lat, lng)){

                marker = new google.maps.Marker({
                    map: this.map,
                    animation: google.maps.Animation.DROP,
                    position: markerLatLng
                });

                let markerData = {
                    lat: lat,
                    lng: lng,
                    marker: marker
                };

                this.markers.push(markerData);

            }

        });

    }
This function is responsible for adding all of the markers to the map, but before doing so it checks to see if a marker with the same coordinates has not already been added. If we did not perform this check first, markers would continually be readded to the map every time the user moves the map and triggers the loadMarkers function.
Modify the
markerExistsfunction to reflect the following:
markerExists(lat, lng){

        let exists = false;

        this.markers.forEach((marker) => {
            if(marker.lat === lat && marker.lng === lng){
                exists = true;
            }
        });

        return exists;

    }
This is the function that gets called to check if a marker already exists or not. It just loops through the markers array and checks for markers with matching coordinates.
3. Set up the Google Maps JavaScript SDK
We have the hard part out of the way now, but there are still a few more steps. Now we are going to set up the Google Maps JavaScript SDK in our project.
Modify src/index.html to include the following script:
<script src="https://maps.googleapis.com/maps/api/js"></script>NOTE: If you are creating a production application, you will need to generate an API key with Google and supply it here.
By default, the Google Maps JavaScript SDK will cause us some issues with the TypeScript compiler since it won’t know what the google object is. To solve this, we will need to install the types for Google Maps.
Run the following command to install types for Google Maps
npm install @types/google-maps --save4. Set up the Home Page
Now we just need to set up the map on our home page. I’ve explained how to set up Google Maps in-depth in this video so if you are unfamiliar with the process you may want to check that out, as I won’t be explaining it here.
Modify src/pages/home/home.ts to reflect the following:
import { Component, ViewChild } from '@angular/core';
import { NavController } from 'ionic-angular';
import { GoogleMaps } from '../../providers/google-maps';

@Component({
  selector: 'page-home',
  templateUrl: 'home.html'
})
export class HomePage {

    @ViewChild('map') mapElement;
    map: any;

    constructor(public navCtrl: NavController, public maps: GoogleMaps) {

    }

    ionViewDidLoad(){
        this.maps.initMap(this.mapElement.nativeElement);
    }

}
Notice that we call the initMap function from our Google Maps provider here to kick off the whole process.
Modify src/pages/home/home.html to reflect the following:
<ion-header>
  <ion-navbar>
    <ion-title> Dynamic Markers </ion-title>
  </ion-navbar>
</ion-header>

<ion-content>
  <div #map id="map"></div>
</ion-content>
Modify src/pages/home/home.scss to reflect the following:
page-home {
  #map {
    height: 100%;
    width: 100%;
  }
}
Summary
That’s it! You should now be able to serve the application, scroll around the map, and watch markers load in on the fly. Just make sure that you are also running the server we created in Part 1 at the same time (by running node server.js) otherwise the HTTP request will fail.
Since we are loading markers in on the fly as required, and we are using a very efficient mechanism for storing and retrieving the location data (thanks to MongoDB and its GeoSpatial queries), we have a solution that is highly scalable.