In this tutorial series, we are going to cover how to dynamically load markers from a server and add them to a Google Map in Ionic 2. When dealing with a small number of markers it isn’t a big deal to just load them all and dump them into the map all at once, but when we start getting into the thousands and tens of thousands of markers this starts to become an issue.
Adding a large number of markers at once will cause a performance hit, and if we think about the scale of social applications like Facebook and Foursquare where location data would get into the millions, this strategy is not suitable. A better approach is to only load in the markers as you need them. This means that we will need to:
- Implement a server that will only return a subset of available markers for locations based on proximity
- Calculate the region of space that is displayed on the Google Map so that we know what markers we need to request
We will create functionality that will make a request to load any available markers every time that the map is moved by the user, but calculating what markers are on the screen is also going to depend on the current zoom level of the map.
There’s certainly a few tricky issues to solve here, but we will be covering how to get past all of those in this two-part series. In Part 1, we will focus on creating the server backend that will serve the requests our application will make, and in Part 2 we will build the front end in Ionic 2 that communicates with the server.
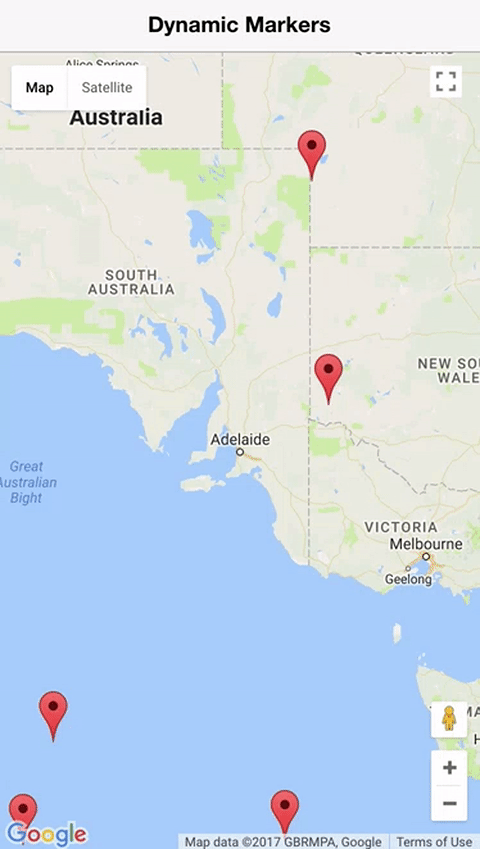
Here’s what it will look like when it is all done:
Before We Get Started
Before you go through this tutorial, you should have at least a basic understanding of Ionic 2 concepts and the differences to Ionic 1. You must also already have Ionic 2 installed on your machine.
If you’re not familiar with Ionic 2 already, I’d recommend reading my Ionic 2 Beginners Guide first to get up and running and understand the basic concepts. If you want a much more detailed guide for learning Ionic 2, then take a look at Building Mobile Apps with Ionic 2.
This tutorial also assumes some level of familiarity with Node, Express, and MongoDB. You don’t have to be proficient with these, but it will help to have had some exposure to the basic concepts. If you are not familiar with these technologies, this tutorial provides a somewhat gentler introduction. If the concept of NoSQL databases like MongoDB are also unfamiliar to you, you may want to read An Introduction to NoSQL for HTML5 Mobile Developers.
1. Install MongoDB and Create a Database
Before continuing this tutorial, you should already have MongoDB installed on your computer. If you do not have MongoDB installed, please read 1. Creating the Database with MongoDB in this tutorial first.
Once you have MongoDB installed, you can create a new database for this tutorial with it.
Run the following command to create a new MongoDB database:
mongo markersThis will create a new database called markers.
2. Create the Project Structure
We will be using the MEAN stack for this project, except instead of Angular we will be using Ionic 2. So we will be using Node.js and Express for the server, MongoDB for the database, and Ionic 2 for the front end. We are just going to be running the server locally for this tutorial, but you could also upload this server to somewhere like Heroku if you wanted to deploy this application to a real device. If you need instructions on how to upload a project to Heroku, I have covered that in part of this tutorial.
MongoDB is a great choice of database for a project like this because it has inbuilt support for querying GeoSpatial data. This makes it quite easy for us to code, but it also means that it is going to perform well.
We are going to start off by creating the folder structure for this application – we are going to create two separate folders to hold the front end and the back end.
Create a new folder called ionic2-dynamic-markers
Create a inside of ionic2-dynamic-markers called server
The server folder will contain all of our server code, and we will later create a client folder that will contain all of our front-end code that we will implement with Ionic 2 in the next part.
2. Set up the Dependencies
We’re going to start working inside of our server folder now, and the first thing we are going to do is set up a package.json file to set up all of the dependencies we require.
Create a file at server/package.json and add the following:
{
  "name": "ionic2-dynamic-markers",
  "version": "0.1.0",
  "description": "A sample Node.js app using Express 4",
  "engines": {
    "node": "5.9.1"
  },
  "main": "server.js",
  "scripts": {
    "start": "node server.js"
  },
  "dependencies": {
    "body-parser": "^1.15.2",
    "cors": "^2.8.1",
    "express": "^4.14.0",
    "mongoose": "^4.6.3",
    "morgan": "^1.7.0"
  }
}
This file defines some basic information about our project, including the file that should be used to start the server (server.js) and the npm packages that are required for the project. We use body-parser to help us process requests, cors to deal with CORS (Cross Origin Resource Sharing) issues, express to help us create the server, mongoose to help with MongoDB, and morgan which helps with logging debug information.
Once you have created this file, you will need to install the dependencies with npm.
Make sure you are inside of the server folder:
cd serverRun the following command to install the dependencies:
npm installThis will create a node_modules folder in your project, just like in normal Ionic 2 projects.
3. Create the Server
Now we are going to add the code for the server itself. Since this is going to be a very simple server, I’m just going to add all of the code to the server.js file.
I will talk through the code step by step, but again, if you are not familiar with Node servers and MongoDB, it might be a little hard to follow.
3.1 Basic Server Set Up
We are going to start by setting up the basic structure of the server. This will set up a new Express server, and we will set up all of the dependencies we installed before on this server.
Modify server/server.js to reflect the following:
// Set up
var express = require('express');
var app = express();
var mongoose = require('mongoose');
var logger = require('morgan');
var bodyParser = require('body-parser');
var cors = require('cors');

// Configuration
mongoose.Promise = global.Promise;
mongoose.connect('mongodb://localhost/markers');

app.use(bodyParser.urlencoded({ extended: false })); // Parses urlencoded bodies
app.use(bodyParser.json()); // Send JSON responses
app.use(logger('dev')); // Log requests to API using morgan
app.use(cors());

// Listen
app.listen(8080);
console.log('App listening on port 8080');
Notice that we are connecting to the markers MongoDB database we created earlier using mongoose. Then we just set up the bodyParser, logger, and cors on the Express app. At the end of the file, we tell the server to listen on port 8080, so when we start running this server we will be able to make requests through that port.
3.2 Create the Markers Schema
Since we are using Mongoose, we can easily create a Schema which models the data we want to store. This simplifies the process of adding new documents to the database and querying them, and it also ensures that the data is in a consistent format.
We are going to create a Schema now to define what our marker data should look like.
Modify server/server.js to reflect the following:
// Set up
var express = require('express');
var app = express();
var mongoose = require('mongoose');
var logger = require('morgan');
var bodyParser = require('body-parser');
var cors = require('cors');

// Configuration
mongoose.Promise = global.Promise;
mongoose.connect('mongodb://localhost/markers');

app.use(bodyParser.urlencoded({ extended: false })); // Parses urlencoded bodies
app.use(bodyParser.json()); // Send JSON responses
app.use(logger('dev')); // Log requests to API using morgan
app.use(cors());

// Models
var markerSchema = new mongoose.Schema({
  loc: {
    type: {
      type: String,
      default: 'Point',
    },
    coordinates: {
      type: [Number],
    },
  },
});

markerSchema.index({ loc: '2dsphere' });

var Marker = mongoose.model('Marker', markerSchema);

// Listen
app.listen(8080);
console.log('App listening on port 8080');
First, we create the schema and then we create a model using that schema. We have specified that our data will contain a single object with a type and some coordinates. The coordinates will be an array of numbers that will represent the longitude and latitude of where the marker should be placed.
We also add a 2dsphere index to the schema, which creates an index on the data and indicates to MongoDB that we are working with GeoJSON data. The GeoSpatial queries will not work without an index.
It is very important that this format is followed. You can store other data along with the loc if you like (title, address, names, etc.) but it MongoDB expects a specific format for the loc object. As you will see later, it is also important that the longitude is supplied first in the array of coordinates.
3.3 Create Test Data
Now that we have our model created, we are going to use it to add some test data to the database.
Modify server/server.js to reflect the following:
// Set up
var express = require('express');
var app = express();
var mongoose = require('mongoose');
var logger = require('morgan');
var bodyParser = require('body-parser');
var cors = require('cors');

// Configuration
mongoose.Promise = global.Promise;
mongoose.connect('mongodb://localhost/markers');

app.use(bodyParser.urlencoded({ extended: false })); // Parses urlencoded bodies
app.use(bodyParser.json()); // Send JSON responses
app.use(logger('dev')); // Log requests to API using morgan
app.use(cors());

// Models
var markerSchema = new mongoose.Schema({
  loc: {
    type: {
      type: String,
      default: 'Point',
    },
    coordinates: {
      type: [Number],
    },
  },
});

markerSchema.index({ loc: '2dsphere' });

var Marker = mongoose.model('Marker', markerSchema);

/*
 * Generate some test data, if no records exist already
 * MAKE SURE TO REMOVE THIS IN PROD ENVIRONMENT
 */

// http://stackoverflow.com/questions/6878761/javascript-how-to-create-random-longitude-and-latitudes
function getRandomInRange(from, to, fixed) {
  return (Math.random() * (to - from) + from).toFixed(fixed) * 1;
}

/*Marker.remove({}, function(res){
    console.log("removed records");
});*/

Marker.count({}, function (err, count) {
  console.log('Markers: ' + count);

  if (count === 0) {
    var recordsToGenerate = 2000;

    for (var i = 0; i < recordsToGenerate; i++) {
      var newMarker = new Marker({
        loc: {
          type: 'Point',
          coordinates: new Array(
            getRandomInRange(-180, 180, 3),
            getRandomInRange(-180, 180, 3)
          ),
        },
      });

      newMarker.save(function (err, doc) {
        console.log('Created test document: ' + doc._id);
      });
    }
  }
});

// Listen
app.listen(8080);
console.log('App listening on port 8080');
If there are currently no documents in the database, this code will generate a bunch of random coordinates and add them as Markers to the database. Each time we create a new instance of the Marker model, add the data, and then save it to the database.
I have also added a commented out bit of code for removing all existing data in the database. When you are deploying to a production environment, you should remove all of this test code.
3.4 Create the Route
We have one final step before we have our server completed, and that is to add the route we will be using to access the data. We will eventually be making an HTTP request from our Ionic 2 application to the following URL:
http://localhost:8080/api/markersWe will be able to POST some data to this URL (which will indicate which markers we want to return), and we should receive an array of markers to be added to the map in return.
Modify server/server.js to reflect the following:
// Set up
var express = require('express');
var app = express();
var mongoose = require('mongoose');
var logger = require('morgan');
var bodyParser = require('body-parser');
var cors = require('cors');

// Configuration
mongoose.Promise = global.Promise;
mongoose.connect('mongodb://localhost/markers');

app.use(bodyParser.urlencoded({ extended: false })); // Parses urlencoded bodies
app.use(bodyParser.json()); // Send JSON responses
app.use(logger('dev')); // Log requests to API using morgan
app.use(cors());

// Models
var markerSchema = new mongoose.Schema({
  loc: {
    type: {
      type: String,
      default: 'Point',
    },
    coordinates: {
      type: [Number],
    },
  },
});

markerSchema.index({ loc: '2dsphere' });

var Marker = mongoose.model('Marker', markerSchema);

/*
 * Generate some test data, if no records exist already
 * MAKE SURE TO REMOVE THIS IN PROD ENVIRONMENT
 */

// http://stackoverflow.com/questions/6878761/javascript-how-to-create-random-longitude-and-latitudes
function getRandomInRange(from, to, fixed) {
  return (Math.random() * (to - from) + from).toFixed(fixed) * 1;
}

/*Marker.remove({}, function(res){
    console.log("removed records");
});*/

Marker.count({}, function (err, count) {
  console.log('Markers: ' + count);

  if (count === 0) {
    var recordsToGenerate = 2000;

    for (var i = 0; i < recordsToGenerate; i++) {
      var newMarker = new Marker({
        loc: {
          type: 'Point',
          coordinates: new Array(
            getRandomInRange(-180, 180, 3),
            getRandomInRange(-180, 180, 3)
          ),
        },
      });

      newMarker.save(function (err, doc) {
        console.log('Created test document: ' + doc._id);
      });
    }
  }
});

// Routes
app.post('/api/markers', function (req, res) {
  var lng = req.body.lng;
  var lat = req.body.lat;
  var maxDistance = req.body.maxDistance * 1000; //kn

  Marker.find(
    {
      loc: {
        $near: {
          $geometry: {
            type: 'Point',
            coordinates: [lng, lat],
          },
          $maxDistance: maxDistance,
          $spherical: true,
        },
      },
    },
    function (err, markers) {
      if (err) {
        res.send(err);
      } else {
        res.json(markers);
      }
    }
  );
});

// Listen
app.listen(8080);
console.log('App listening on port 8080');
We grab three values when a POST is made to this route: lat, lng, and maxDistance. The lat and lng represent the center of the map in our Ionic 2 application, and the maxDistance will represent the distance to the bounds of the map from the center point.
We supply this information to the GeoSpatial query we are running against the Marker model. We use the lat and lng to create a Point which will act as the center point for the query, supplying the longitude first, and we supply the maxDistance which limits the query to only points that fall within that range.
You will now be able to start the server by running:
node server.jsThis will make the server available via localhost for the Ionic 2 application that we will create in the next part to communicate with.
Summary
Our backend is entirely completed now. We have a route set up that we can POST a request to, and it will return us a set of markers based on the information contained in our POST request.
There is still quite a bit to do of course. In the next part, we will build the Ionic 2 front end and implement the functionality for making the appropriate requests to this backend.