

When I built the Elite Ionic course, I built it as a PWA using Ionic. Anybody who signs up for the course can log in to the application and browse through the various modules. When people create accounts, they need passwords, and when passwords are involved they will inevitably be forgotten at some point.
For convenience, I added a public-facing “Forgot Password” feature to the course application that would send a password reset email to the registered user’s email address. This mostly works fine, but I did get an email from a user who mentioned that they were occasionally getting password reset emails that they did not trigger. It’s possible that it was a human attempting to steal this persons account, but the likely explanation is that it was a bot triggering these requests. This isn’t a security threat, but it can be annoying for the account holder to receive unwanted password reset emails.
I think bots are generally less of a problem for applications that need to be downloaded through the native app stores, but for applications distributed as a PWA, bots can sink their digital claws into them like any other website on the Internet. This prompted me to investigate adding some form of CAPTCHA to my Ionic application.
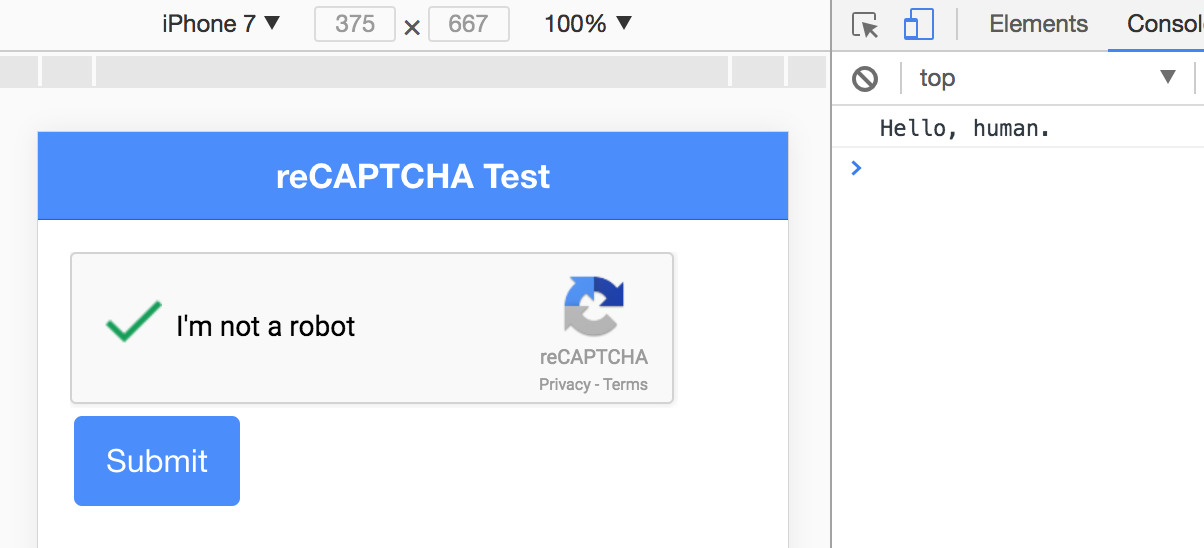
In this tutorial, we will be investigating adding Google’s reCAPTCHA to an Ionic application that is powered by a NodeJS backend. You can use any kind of backend to validate that the user has successfully completed the CAPTCHA, but we will be covering an example for NodeJS specifically. This is what the end result will look like:
Before We Get Started
Last updated for Ionic 3.9.2
Before you go through this tutorial, you should have at least a basic understanding of Ionic concepts. You must also already have Ionic set up on your machine.
If you’re not familiar with Ionic already, I’d recommend reading my Ionic Beginners Guide or watching my beginners series first to get up and running and understand the basic concepts. If you want a much more detailed guide for learning Ionic, then take a look at Building Mobile Apps with Ionic.
You should also have a basic understanding of building a simple NodeJS server using TypeScript. I also have some more basic NodeJS tutorials available if you are not yet comfortable with this.
What is CAPTCHA?
If you’ve used the Internet then there is about a 100% chance that you will have used various different forms of CAPTCHA at some point. It is an acronym that stands for: Completely Automated Public Turing Test to Tell Computers and Humans Apart. It is some form of test that is hard for a computer to complete, but easy for a human. These tests are typically used to make sure that humans are performing certain actions and not bots.
These CAPTCHA tests have gone through various iterations over the years, but the most ubiquitous one now is Google’s I’m not a robot check box. There is, of course, more going on behind the scenes besides the simple action of clicking a box. If Google detects any kind of suspicious behaviour, it will instead challenge the user with a more difficult CAPTCHA.
The great thing about Google’s reCAPTCHA is that it is super easy to complete for humans, and not all that annoying.
Adding reCAPTCHA to an Ionic Application
In order to add reCAPTCHA to our Ionic application’s, we need to perform two tasks. We need to add the reCAPTCHA library to the application, which will allow us to embed the CAPTCHA and get a response code from Google (which indicated successful completion).
We will then need to secure whatever action it is we are protecting by sending that code to our backend and verifying the code with Google by making a request to their API.
In order to use reCAPTCHA, you will first need to click here to register a site with Google. During this process, you will need to add the domains that will be using the service:
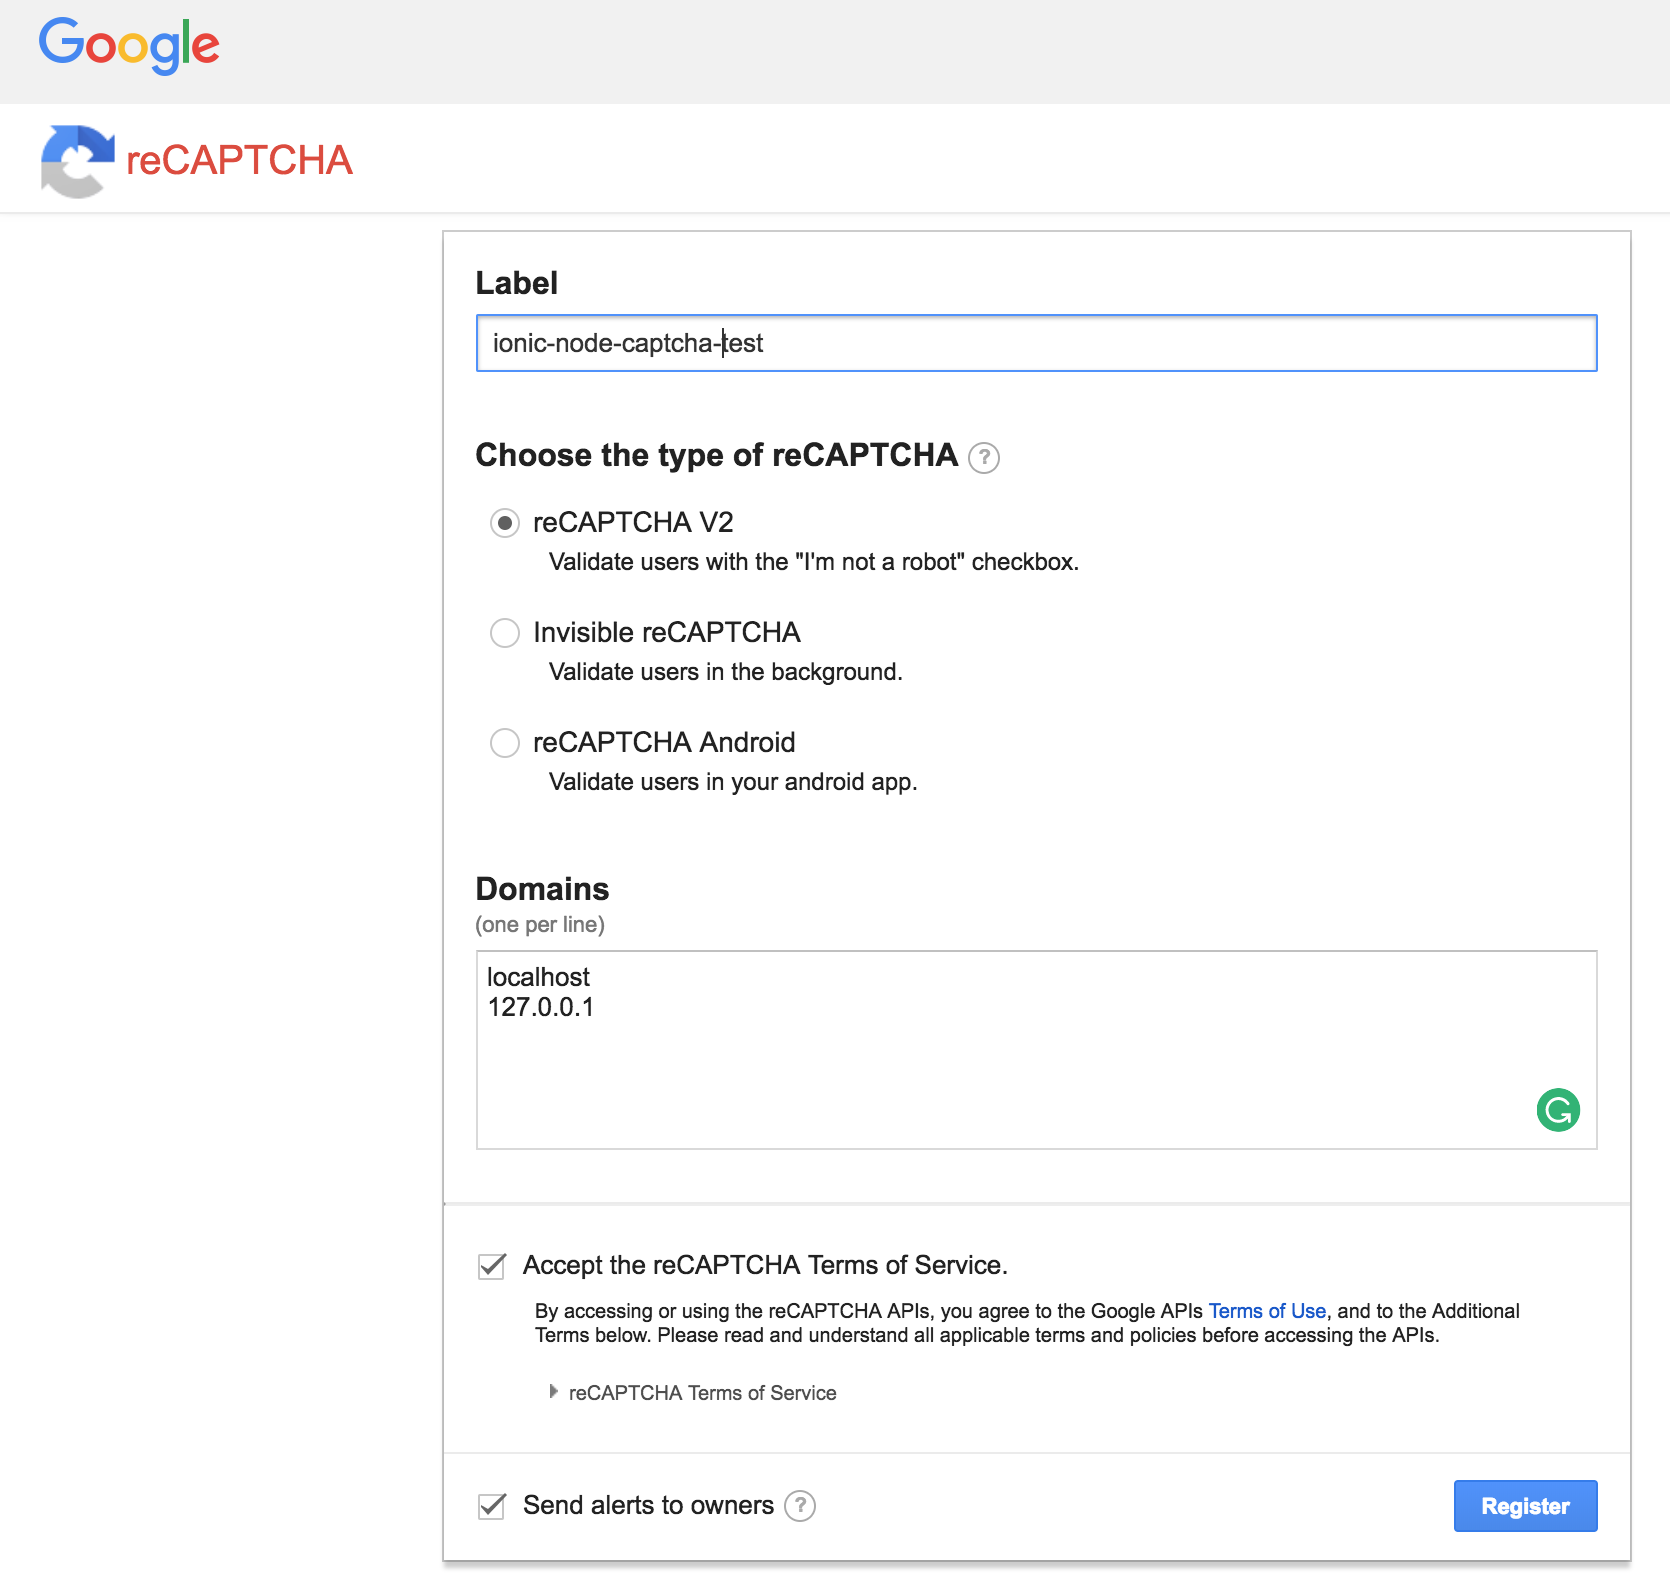
If you intend to test your Ionic application through localhost, you need to make sure to add that to the domains list. Once you have registered your site, you will be given two important bits of information:
- A site key
- A secret key
You will need to add the site key to the reCAPTCHA form on the client side, and the secret key will need to be sent along with the request that you make from the server side. Your secret key should remain secret – you should not attempt to make a request to the reCAPTCHA API from your Ionic application.
You will also be given a <script> to embed and an example reCAPTCHA form, but we will not be using these. To better integrate reCAPTCHA with our Ionic application, we will be using a library called ng-recaptcha.
Add ng-recaptcha to your application with the following command:
npm install ng-recaptcha --saveModify app.module.ts to reflect the following:
import { BrowserModule } from '@angular/platform-browser';
import { ErrorHandler, NgModule } from '@angular/core';
import { HttpClientModule } from '@angular/common/http';
import { IonicApp, IonicErrorHandler, IonicModule } from 'ionic-angular';
import { SplashScreen } from '@ionic-native/splash-screen';
import { StatusBar } from '@ionic-native/status-bar';

import { MyApp } from './app.component';
import { HomePage } from '../pages/home/home';

import { RecaptchaModule } from 'ng-recaptcha';

@NgModule({
  declarations: [MyApp, HomePage],
  imports: [
    BrowserModule,
    HttpClientModule,
    RecaptchaModule.forRoot(),
    IonicModule.forRoot(MyApp),
  ],
  bootstrap: [IonicApp],
  entryComponents: [MyApp, HomePage],
  providers: [
    StatusBar,
    SplashScreen,
    { provide: ErrorHandler, useClass: IonicErrorHandler },
  ],
})
export class AppModule {}
NOTE: As well as adding the RecaptchaModule we have also added the HttpClientModule as we will be making an example request to our backend later.
With this library installed, we will be able to drop a reCAPTCHA anywhere using:
<re-captcha
  (resolved)="captchaResolved($event)"
  siteKey="SITE-KEY-HERE"
></re-captcha>
Now let’s set up an example.
Modify src/pages/home/home.html to reflect the following:
<ion-header>
  <ion-navbar color="primary">
    <ion-title>
      reCAPTCHA Test
    </ion-title>
  </ion-navbar>
</ion-header>

<ion-content padding>

    <re-captcha (resolved)="captchaResolved($event)" siteKey="SITE-KEY-HERE"></re-captcha>

    <button [disabled]="!captchaPassed" ion-button (click)="sendForm()">Submit</button>

</ion-content>
Make sure to replace the siteKey with your own.
Modify src/pages/home/home.ts to reflect the following:
import { Component, NgZone } from '@angular/core';
import { NavController } from 'ionic-angular';
import { HttpClient } from '@angular/common/http';

@Component({
  selector: 'page-home',
  templateUrl: 'home.html'
})
export class HomePage {

    private captchaPassed: boolean = false;
    private captchaResponse: string;

    constructor(private http: HttpClient, private zone: NgZone) {

    }

    captchaResolved(response: string): void {

        this.zone.run(() => {
            this.captchaPassed = true;
            this.captchaResponse = response;
        });

    }

    sendForm(): void {

        let data = {
            captchaResponse: this.captchaResponse
        };

        this.http.post('http://localhost:8080/test', data).subscribe(res => {
            console.log(res);
        });

    }

}
We have created an example that just has the reCAPTCHA and a submit button. We are disabling the submit button until the reCAPTCHA’s resolve event is triggered so that the user can not submit the form before performing the CAPTCHA. However, keep in mind this is just a UX consideration for the honest people – a malicious actor could circumvent the button being disabled.
When the captchaResolved function is triggered, we flip the captchaPassed boolean and we record the response. You will likely notice that we are running this inside of a zone. The method for receiving the response from the reCaptcha library relies on receiving a global callback, which would fall outside of Angular’s zone. If we do not explicitly run this code inside of Angular’s zone, change detection will not be triggered and the button would remain disabled even though the value has been updated to true.
If you would like to learn more about zones and change detection in Angular, you should check out this article.
Finally, we have the sendForm method. When triggered, this will just make a request to a test route that we will set up on our NodeJS backend (which we will be running over localhost). The response from reCAPTCHA will be sent along with this POST request.
Securing a Form with reCAPTCHA using a NodeJS Backend
We now have a reCAPTCHA form embedded in our Ionic application, and we are able to receive a code back from Google indicating successful completion of the turing test. However, we still need to validate that on our backend and prevent access to the route if there are any shenanigans.
Performing any kind of validation with client-side code is not secure. We could code something like the following in our Ionic application:
if (theCaptchaHasBeenPassed) {
  // submit the form
} else {
  // do not submit the form
}
But if the code is running on the client side, it can be modified by the client. It would be trivial to skirt around this check and submit the form anyway.
In order to perform secure validation, the validation needs to happen on the server side – where the user can’t modify the code.
We already have a code that Google has given us, and that we are sending in the POST request to our backend. We now need to make a request from our backend to Google’s API with that code, and our secret key, to verify the authenticity of the code. If the API gives us the all clear, we can let the user access the test route.
For example, let’s say we have the following route set up:
import * as express from 'express';
import * as bodyParser from 'body-parser';
import * as logger from 'morgan';
import * as methodOverride from 'method-override';
import * as cors from 'cors';
import * as axios from 'axios';

const app = express();
app.use(logger('dev'));
app.use(bodyParser.json());
app.use(methodOverride());
app.use(cors());

app.post('/test', (req, res) => {
  res.json('Hello, human.');
});

app.listen(process.env.PORT || 8080);
We have a route here, but we only want humans to be able to make requests to that route. However, nothing is currently stopping a bot from making a POST request to that route. We only want to send out Hello, human. response if the request does indeed come from a human.
To do this, we are going to create a middleware function that will verify a valid response code from reCAPTCHA has been supplied with the request:
import * as express from 'express';
import * as bodyParser from 'body-parser';
import * as logger from 'morgan';
import * as methodOverride from 'method-override';
import * as cors from 'cors';
import * as axios from 'axios';

const app = express();
app.use(logger('dev'));
app.use(bodyParser.json());
app.use(methodOverride());
app.use(cors());

const captchaCheck = (req, res, next) => {
  console.log('CAPTCHA middleware activated');

  let urlEncodedData =
    'secret=SECRET-KEY-HERE&response=' +
    req.body.captchaResponse +
    '&remoteip=' +
    req.connection.remoteAddress;

  axios
    .post('https://www.google.com/recaptcha/api/siteverify', urlEncodedData, {
      headers: {
        'Content-Type': 'application/x-www-form-urlencoded',
      },
    })
    .then((res) => {
      if (res.data.success) {
        next();
      } else {
        res.status(401).send({ message: 'No bots!' });
      }
    })
    .catch((err) => {
      console.log(err);
      res.status(401).send({ message: 'No bots!' });
    });
};

app.use(captchaCheck);

app.post('/test', (req, res) => {
  res.json('Hello, human.');
});

app.listen(process.env.PORT || 8080);
NOTE: Make sure to replace SECRET-KEY-HERE with your own secret key.
We now have a middleware function that will send the captchaResponse in the request to Google’s API to be verified (along with our secret key and the users IP address). If a successful response is returned, we allow NodeJS to proceed onto the requested test route by triggering the next() callback. If an unsuccessful response is returned, we instead send an error message and never proceed to the test route.
We apply this middleware to every route on our server by doing this:
app.use(captchaCheck);If you only want to apply the reCAPTCHA middleware to a single route, you should instead remove the app.use(captchaCheck) line, and instead add the middleware function directly to the route:
app.post('/test', captchaCheck, (req, res) => {
  res.json('Hello, human.');
});
NOTE: You will need to make sure all the npm dependencies that are being used in the example above in order to be able to run this example.
With that done, you should now be able to run your NodeJS server, serve your Ionic application, and make a request to the backend.
Summary
Google’s reCAPTCHA is a reasonably simple and convenient solution to a pretty annoying problem. With a few extra lines of code, we can effectively combat the evil bots.