

Rather than starting from scratch I started to take a look around to see if somebody had already done it and came across Bombevo which executes the concept very well in a fun game where you fight an alien space ship.
This game was made for Ludum Dare and you can download the original source code for Bombevo here. The code is quite complex though and in some parts unfinished so I wanted to create my own version based on Bombevo that takes it all back to its simplest form.
In this tutorial we will be creating a basic Bejeweled / Candy Crush style game which will consist of:
- A grid of any size
- Different tile types
- The ability to swap two tiles
- If there are three or more tiles of the same type in a row they will be removed
- The tiles should fall down after other tiles are removed
- New tiles should be added from the top to fill the gaps
Although quite a few parts are different in this tutorial when compared to Bombevo, it is still heavily based on it (especially the match finding algorithm and tile resetting) so a big thanks to the creator harsanalif. The end result of our version of the game will look like this:
and you can play the live version here.
Before we get started
As is usually the case with my Phaser tutorials, I will be building this game on top of my basic Phaser game template. This is a skeleton application with some default states and structure set up that I use to start just about all of my Phaser games. If you want to follow along with the tutorial, you can download the template by entering your email address below:
If you’re already pretty confident with Phaser though, you should be able to apply the steps in this tutorial into your own Phaser game that you have set up.
IMPORTANT: If you are using the template code, make sure you change the following code in preload.js:
create: function(){
        this.game.state.start("GameTitle");
    }
to
create: function(){
        this.game.state.start("Main");
    }
Since we are not creating a title screen we want the game to launch right into the Main state. If you don’t make this change then you will just see a blank screen.
1. Create the Grid
It’s quite obvious that all of these types of matching games work within some kind of grid. As a first step we will be creating a grid to hold all of our tiles.
We will create a representation of the game grid using a two dimensional array that looks like this:
me.tileGrid = [
  [null, null, null, null, null, null],
  [null, null, null, null, null, null],
  [null, null, null, null, null, null],
  [null, null, null, null, null, null],
  [null, null, null, null, null, null],
  [null, null, null, null, null, null],
];
This is clearly a good structure to use for our grid since it basically mimics exactly how the actual grid will look (especially when we format it over several lines like that). An important distinciton to make before we jump into it though is that this is only a representation of the state of the game, what we actually see on screen will just be achieved by placing sprites at certain coordinates (which we will work out using this grid).
Before we start building the game, let’s set up a few assets to use. I’ll be using these images from Kenney’s Game Assets as tiles:


but you can use whatever you like. The game will be designed to work with any size tile, as long as all of your tiles are the same size.
Add gemBlue.png, gemRed.png, gemGreen.png and gemYellow.png (or your own) to your assets folder.
Load the assets into the game by adding the following code to the preload method in preload.js:
preload: function(){
        this.game.load.image('blue', 'assets/gemBlue.png');
        this.game.load.image('green', 'assets/gemGreen.png');
        this.game.load.image('red', 'assets/gemRed.png');
        this.game.load.image('yellow', 'assets/gemYellow.png');
    },
Let’s start building the game itself now by setting up a few variables in our main state.
Add the collowing code to your create method in main.js:
create: function() {

        var me = this;

        //me.game.physics.startSystem(Phaser.Physics.ARCADE);
        me.game.stage.backgroundColor = "34495f";

        //Declare assets that will be used as tiles
        me.tileTypes = [
            'blue',
            'green',
            'red',
            'yellow'
        ];

        //Keep track of the users score
        me.score = 0;

        //Keep track of the tiles the user is trying to swap (if any)
        me.activeTile1 = null;
        me.activeTile2 = null;

        //Controls whether the player can make a move or not
        me.canMove = false;

        //Grab the weigh and height of the tiles (assumes same size for all tiles)
        me.tileWidth = me.game.cache.getImage('blue').width;
        me.tileHeight = me.game.cache.getImage('blue').height;

        //This will hold all of the tile sprites
        me.tiles = me.game.add.group();

        //Initialise tile grid, this array will hold the positions of the tiles
        //Create whatever shape you'd like
        me.tileGrid = [
            [null, null, null, null, null, null],
            [null, null, null, null, null, null],
            [null, null, null, null, null, null],
            [null, null, null, null, null, null],
            [null, null, null, null, null, null],
            [null, null, null, null, null, null]
        ];

        //Create a random data generator to use later
        var seed = Date.now();
        me.random = new Phaser.RandomDataGenerator([seed]);

    },
Most of the code above should be pretty self explanatory with the comments. One of the important concepts here is the active tiles, which we use activeTile1 and activeTile2 to keep track of. This forms the basis of how we know when to switch two tiles, later on in the code we will keep track of where a user clicks (which will be the first active tile) and then where the user drags to (which will be the second active tile). When we have two active tiles we will switch their positiojs.
Another important part of the code above is the tileGrid. As I mentioned before, this is what we will use to store a representation of the state of the game (i.e. where all the tiles currently are). The example above will create a 6 x 6 game grid, but you can easily add extra elements or arrays to create whatever grid shape you like, e.g. you could just as easily do this:
me.tileGrid = [
  [null, null, null, null],
  [null, null, null, null],
  [null, null, null, null],
  [null, null, null, null],
  [null, null, null, null],
  [null, null, null, null],
  [null, null, null, null],
  [null, null, null, null],
];
to create an 8 x 4 grid.
2. Initialise the Grid
We have our theoretical grid now that will keep track of all of our tiles, but we haven’t added any tiles to it yet and we also haven’t rendered any tiles on the screen.
To do that we are going to create an initTiles function that will handle filling the tileGrid array. This will also call another function called addTile that will handle rendering the tile on the screen. Let’s create both of these functions now.
Add the initTiles and addTile functions to your main.js file:
initTiles: function(){

        var me = this;

        //Loop through each column in the grid
        for(var i = 0; i < me.tileGrid.length; i++){

            //Loop through each position in a specific column, starting from the top
            for(var j = 0; j < me.tileGrid.length; j++){

                //Add the tile to the game at this grid position
                var tile = me.addTile(i, j);

                //Keep a track of the tiles position in our tileGrid
                me.tileGrid[i][j] = tile;

            }
        }

        //Once the tiles are ready, check for any matches on the grid
        me.game.time.events.add(600, function(){
            me.checkMatch();
        });

    },

    addTile: function(x, y){

        var me = this;

        //Choose a random tile to add
        var tileToAdd = me.tileTypes[me.random.integerInRange(0, me.tileTypes.length - 1)];

        //Add the tile at the correct x position, but add it to the top of the game (so we can slide it in)
        var tile = me.tiles.create((x * me.tileWidth) + me.tileWidth / 2, 0, tileToAdd);

        //Animate the tile into the correct vertical position
        me.game.add.tween(tile).to({y:y*me.tileHeight+(me.tileHeight/2)}, 500, Phaser.Easing.Linear.In, true)

        //Set the tiles anchor point to the center
        tile.anchor.setTo(0.5, 0.5);

        //Enable input on the tile
        tile.inputEnabled = true;

        //Keep track of the type of tile that was added
        tile.tileType = tileToAdd;

        //Trigger the tileDown function whenever the user clicks or taps on this tile
        tile.events.onInputDown.add(me.tileDown, me);

        return tile;

    },
Again, for all the finer details and what they do I’ve left detailed comments in the code, but I’ll talk through the grand scheme of what’s happening here. The initTiles function loops through every cell in the grid, adds a tile to that cell and then calls the addTile function to add that tile to the screen. The addTile function handles animating the tile into its correct position, and also sets up input events so that when the user clicks the tile it will trigger the tileDown function.
Let’s add that tileDown function now.
Add the following function in your main.js file:
tileDown: function(tile, pointer){

        var me = this;

        //Keep track of where the user originally clicked
        if(me.canMove){
            me.activeTile1 = tile;

            me.startPosX = (tile.x - me.tileWidth/2) / me.tileWidth;
            me.startPosY = (tile.y - me.tileHeight/2) / me.tileHeight;
        }

    },
The tileDown function will set the first active tile and keep track of where the click started (so that we can compare it to where the user is hovering later to work out if a tile swap should be triggered).
Of course, we will need to trigger this initTiles function from somewhere to start this whole process, so we will add a call to it in the create method.
Add the following code to the end of the create method in main.js
me.initTiles();3. Watch for changes and swap tiles
So now we have our grid set up and we’ve filled it with tiles. We’ve also set up a listener to detect when and where a user clicks on a tile. Now we need to figure out when the user has dragged over the top of another tile, indicating that they want to make a swap with that tile. When we detect this we need to swap the tiles positions and check if a match has occured, if there is a match we want to remove the matching tiles, but if there’s not then we want to swap the tiles back to their original position.
First, let’s add the code that will figure out when the user is trying to swap a tile. We’re going to use the update method to do this.
Add the following code to the update method in main.js
update: function() {

        var me = this;

        //The user is currently dragging from a tile, so let's see if they have dragged
        //over the top of an adjacent tile
        if(me.activeTile1 && !me.activeTile2){

            //Get the location of where the pointer is currently
            var hoverX = me.game.input.x;
            var hoverY = me.game.input.y;

            //Figure out what position on the grid that translates to
            var hoverPosX = Math.floor(hoverX/me.tileWidth);
            var hoverPosY = Math.floor(hoverY/me.tileHeight);

            //See if the user had dragged over to another position on the grid
            var difX = (hoverPosX - me.startPosX);
            var difY = (hoverPosY - me.startPosY);

            //Make sure we are within the bounds of the grid
            if(!(hoverPosY > me.tileGrid[0].length - 1 || hoverPosY < 0) && !(hoverPosX > me.tileGrid.length - 1 || hoverPosX < 0)){

                //If the user has dragged an entire tiles width or height in the x or y direction
                //trigger a tile swap
                if((Math.abs(difY) == 1 && difX == 0) || (Math.abs(difX) == 1 && difY ==0)){

                    //Prevent the player from making more moves whilst checking is in progress
                    me.canMove = false;

                    //Set the second active tile (the one where the user dragged to)
                    me.activeTile2 = me.tileGrid[hoverPosX][hoverPosY];

                    //Swap the two active tiles
                    me.swapTiles();

                    //After the swap has occurred, check the grid for any matches
                    me.game.time.events.add(500, function(){
                        me.checkMatch();
                    });
                }

            }

        }

    },
There’s some pretty funky stuff going on here and I’ve tried to explain it as well as I can in the comments. The first if condition will execute when we have one active tile (which is triggered when the user clicks a tile). If a user is clicking on a tile then we want to know if they are currently hovering over a different tile, and that’s what this code does.
We work out where the user is currently hovering, we then translate that into a position on the grid (so if the user is hovering a x: 375, y:200 in the game, that might convert to a position of tileGrid[1][3]). If the difY or difX values are 1 then we know the user has moved over 1 tile space, in which case we trigger the tile swapping process.
When swapping two tiles we first set the me.canMove value to false so that the player can’t make additional moves during the swap process, then we set the second active tile and trigger the swapTiles function, which will handle swapping the two tiles. We wait a little bit to give the animation time to finish and then trigger the checkMatch function which will figure out if this change has created any runs of 3 or more tiles of the same type. We’re going to create both of those functions now.
Add the following two functions to your main.js file:
swapTiles: function(){

        var me = this;

        //If there are two active tiles, swap their positions
        if(me.activeTile1 && me.activeTile2){

            var tile1Pos = {x:(me.activeTile1.x - me.tileWidth / 2) / me.tileWidth, y:(me.activeTile1.y - me.tileHeight / 2) / me.tileHeight};
            var tile2Pos = {x:(me.activeTile2.x - me.tileWidth / 2) / me.tileWidth, y:(me.activeTile2.y - me.tileHeight / 2) / me.tileHeight};

            //Swap them in our "theoretical" grid
            me.tileGrid[tile1Pos.x][tile1Pos.y] = me.activeTile2;
            me.tileGrid[tile2Pos.x][tile2Pos.y] = me.activeTile1;

            //Actually move them on the screen
            me.game.add.tween(me.activeTile1).to({x:tile2Pos.x * me.tileWidth + (me.tileWidth/2), y:tile2Pos.y * me.tileHeight + (me.tileHeight/2)}, 200, Phaser.Easing.Linear.In, true);
            me.game.add.tween(me.activeTile2).to({x:tile1Pos.x * me.tileWidth + (me.tileWidth/2), y:tile1Pos.y * me.tileHeight + (me.tileHeight/2)}, 200, Phaser.Easing.Linear.In, true);

            me.activeTile1 = me.tileGrid[tile1Pos.x][tile1Pos.y];
            me.activeTile2 = me.tileGrid[tile2Pos.x][tile2Pos.y];

        }

    },

    checkMatch: function(){

        var me = this;

        //Call the getMatches function to check for spots where there is
        //a run of three or more tiles in a row
        var matches = me.getMatches(me.tileGrid);

        //If there are matches, remove them
        if(matches.length > 0){

            //Remove the tiles
            me.removeTileGroup(matches);

            //Move the tiles currently on the board into their new positions
            me.resetTile();

            //Fill the board with new tiles wherever there is an empty spot
            me.fillTile();

            //Trigger the tileUp event to reset the active tiles
            me.game.time.events.add(500, function(){
                me.tileUp();
            });

            //Check again to see if the repositioning of tiles caused any new matches
            me.game.time.events.add(600, function(){
                me.checkMatch();
            });

        }
        else {

            //No match so just swap the tiles back to their original position and reset
            me.swapTiles();
            me.game.time.events.add(500, function(){
                me.tileUp();
                me.canMove = true;
            });
        }

    },
The swapTiles function is straight forward enough: it takes our two active tiles, figures out where they are located on the grid, and then swaps their positions. We change the position both in the tileGrid and on the screen itself – we use a tween to animate the sprite to its new position.
The checkMatch function is where stuff starts to get a little crazy. The function itself isn’t too complicated, but it makes calls to several other complicated functions. First we search through the grid for any matches by using the getMatches function, then if there are any matches we:
- Remove all the matches from the grid by calling the removeTileGroup function.
- Move the tiles left on the board into their new positions (i.e. if there is a blank space below a tile it should fall down) with the resetTile function.
- Fill all the empty spots on the board with new tiles with the fillTile function.
- Reset the active tiles and then check if there are any matches with the newly added tiles (and if there is we repeat the process again)
If there are no matches then we simply swap the two active tiles back to their initial positions. We’re going to go through all of those functions one by one, but first let’s add the tileUp function since it’s nice and easy.
Add the following function to your main.js file
tileUp: function(){

        //Reset the active tiles
        var me = this;
        me.activeTile1 = null;
        me.activeTile2 = null;

    },
Alright, now let’s move on to the hard stuff!
4. Find and Remove Matches in the Grid
We’re going to create both the getMatches and removeTileGroup functions now, but let’s focus on just getMatches for now because it is probably the most complicated function in the whole game. It’s mostly unchanged from the original Bombevo source, so a big thanks to harsanalif for this.
Add the following function to your main.js file
getMatches: function(tileGrid){

        var matches = [];
        var groups = [];

        //Check for horizontal matches
        for (var i = 0; i < tileGrid.length; i++)
        {
            var tempArr = tileGrid[i];
            groups = [];
            for (var j = 0; j < tempArr.length; j++)
            {
                if(j < tempArr.length - 2)
                    if (tileGrid[i][j] && tileGrid[i][j + 1] && tileGrid[i][j + 2])
                    {
                        if (tileGrid[i][j].tileType == tileGrid[i][j+1].tileType && tileGrid[i][j+1].tileType == tileGrid[i][j+2].tileType)
                        {
                            if (groups.length > 0)
                            {
                                if (groups.indexOf(tileGrid[i][j]) == -1)
                                {
                                    matches.push(groups);
                                    groups = [];
                                }
                            }

                            if (groups.indexOf(tileGrid[i][j]) == -1)
                            {
                                groups.push(tileGrid[i][j]);
                            }
                            if (groups.indexOf(tileGrid[i][j+1]) == -1)
                            {
                                groups.push(tileGrid[i][j+1]);
                            }
                            if (groups.indexOf(tileGrid[i][j+2]) == -1)
                            {
                                groups.push(tileGrid[i][j+2]);
                            }
                        }
                    }
            }
            if(groups.length > 0) matches.push(groups);
        }

        //Check for vertical matches
        for (j = 0; j < tileGrid.length; j++)
        {
            var tempArr = tileGrid[j];
            groups = [];
            for (i = 0; i < tempArr.length; i++)
            {
                if(i < tempArr.length - 2)
                    if (tileGrid[i][j] && tileGrid[i+1][j] && tileGrid[i+2][j])
                    {
                        if (tileGrid[i][j].tileType == tileGrid[i+1][j].tileType && tileGrid[i+1][j].tileType == tileGrid[i+2][j].tileType)
                        {
                            if (groups.length > 0)
                            {
                                if (groups.indexOf(tileGrid[i][j]) == -1)
                                {
                                    matches.push(groups);
                                    groups = [];
                                }
                            }

                            if (groups.indexOf(tileGrid[i][j]) == -1)
                            {
                                groups.push(tileGrid[i][j]);
                            }
                            if (groups.indexOf(tileGrid[i+1][j]) == -1)
                            {
                                groups.push(tileGrid[i+1][j]);
                            }
                            if (groups.indexOf(tileGrid[i+2][j]) == -1)
                            {
                                groups.push(tileGrid[i+2][j]);
                            }
                        }
                    }
            }
            if(groups.length > 0) matches.push(groups);
        }

        return matches;

    },
Basically what we are doing here is building an array of matches, if a tile belongs to a matching group then that tile is added to the array. The function looks pretty scary, but it’s really more long than complicated. We basically loop through each position in the grid, trying to find runs of the same type both horizontally and vertically. We can check a tiles neighbour by simply adding to the index of the array, i.e i+1, i+2 etc.
Once we have that array of matches we want to remove them from the grid, and to do that we will create the removeTileGroup function.
Add the following function to your main.js file:
removeTileGroup: function(matches){

        var me = this;

        //Loop through all the matches and remove the associated tiles
        for(var i = 0; i < matches.length; i++){
            var tempArr = matches[i];

            for(var j = 0; j < tempArr.length; j++){

                var tile = tempArr[j];
                //Find where this tile lives in the theoretical grid
                var tilePos = me.getTilePos(me.tileGrid, tile);

                //Remove the tile from the screen
                me.tiles.remove(tile);

                //Remove the tile from the theoretical grid
                if(tilePos.x != -1 && tilePos.y != -1){
                    me.tileGrid[tilePos.x][tilePos.y] = null;
                }

            }
        }
    },
This function loops through all of the matches returned from the previous function and removes them both from the grid and from the screen. The problem we have though is that we only have a reference to the tile, which is a sprite, but we need its position in the grid so that we can remove it from the grid. To do that, we create another function called getTilePos which will search for that specific tile in the grid and then return the x and y coordinates of where it lives in the grid.
Add the following function to your **main.js file
getTilePos: function(tileGrid, tile)
{
var pos = {x:-1, y:-1};
//Find the position of a specific tile in the grid
for(var i = 0; i < tileGrid.length ; i++)
{
for(var j = 0; j < tileGrid[i].length; j++)
{
//There is a match at this position so return the grid coords
if(tile == tileGrid[i][j])
{
pos.x = i;
pos.y = j;
break;
}
}
}
return pos;
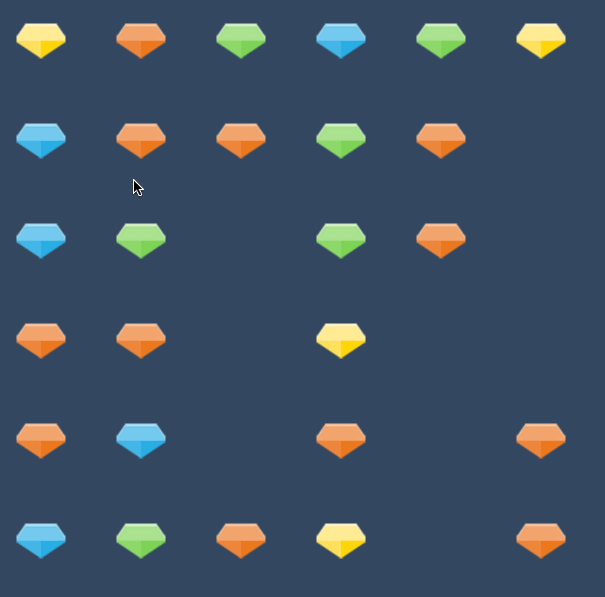
},You should now be able to make matches in the game and see them being removed:
Remember, if you want to try this out now you’ll have to comment out the calls to functions we haven’t defined yet in the checkMatch function.
5. Move Existing Tiles to Their New Positions
Next up, let’s scoot all those left over tiles into the right spots. We’ll add the resetTile function to do this now.
Add the following code to your main.js file:
resetTile: function(){

        var me = this;

        //Loop through each column starting from the left
        for (var i = 0; i < me.tileGrid.length; i++)
        {

            //Loop through each tile in column from bottom to top
            for (var j = me.tileGrid[i].length - 1; j > 0; j--)
            {

                //If this space is blank, but the one above it is not, move the one above down
                if(me.tileGrid[i][j] == null && me.tileGrid[i][j-1] != null)
                {
                    //Move the tile above down one
                    var tempTile = me.tileGrid[i][j-1];
                    me.tileGrid[i][j] = tempTile;
                    me.tileGrid[i][j-1] = null;

                    me.game.add.tween(tempTile).to({y:(me.tileHeight*j)+(me.tileHeight/2)}, 200, Phaser.Easing.Linear.In, true);

                    //The positions have changed so start this process again from the bottom
                    //NOTE: This is not set to me.tileGrid[i].length - 1 because it will immediately be decremented as
                    //we are at the end of the loop.
                    j = me.tileGrid[i].length;
                }
            }
        }

    },
With this function we look at each column of tiles one by one, and then we look at each specific tile within that column. If we find a spot that is blank, but the spot above it is not then we move the tile above down one space. If this happens then we do a little trick with the for loop by resetting the counter (j) back to the beginning again. Since the positions have changed we need to start from the beginning again. Imagine if you had a tile with three blank spaces below it, this code would need to restart two times since when we check the bottom blank space the first time there will be nothing above it to move down, but when we check it on the second reset it will have a tile above it because the tile keeps getting moved down into the empty spots below.
6. Fill Empty Spaces with new Tiles
Now all that’s left to do is fill the empty spaces that are left over back up with new tiles.
Add the following function to your main.js file:
fillTile: function(){

        var me = this;

        //Check for blank spaces in the grid and add new tiles at that position
        for(var i = 0; i < me.tileGrid.length; i++){

            for(var j = 0; j < me.tileGrid.length; j++){

                if (me.tileGrid[i][j] == null)
                {
                    //Found a blank spot so lets add animate a tile there
                    var tile = me.addTile(i, j);

                    //And also update our "theoretical" grid
                    me.tileGrid[i][j] = tile;
                }

            }
        }

    },
This one is pretty straight forward, we just search the grid for empty spaces and if we find one we add a new tile there, just like we did with the initTiles function.
7. Add Scoring and a Scoreboard
Ok so I lied a little, we’re still going to add one more little thing to the game, and that’s to track the users score. We will simply increment the users score by 10 every time a tile is removed.
Add the following two functions to your main.js file
createScore: function(){

        var me = this;
        var scoreFont = "100px Arial";

        me.scoreLabel = me.game.add.text((Math.floor(me.tileGrid[0].length / 2) * me.tileWidth), me.tileGrid.length * me.tileHeight, "0", {font: scoreFont, fill: "#fff"});
        me.scoreLabel.anchor.setTo(0.5, 0);
        me.scoreLabel.align = 'center';

    },

    incrementScore: function(){

        var me = this;

        me.score += 10;
        me.scoreLabel.text = me.score;

    },
This will add a score label underneath the grid and in the center, and we can call the incrementScore function to increase the users score by 10 whenever we want. So let’s do that by modifying the removeTileGroup function.
Modify the removeTileGroup function to reflect the following:
removeTileGroup: function(matches){

        var me = this;

        //Loop through all the matches and remove the associated tiles
        for(var i = 0; i < matches.length; i++){
            var tempArr = matches[i];

            for(var j = 0; j < tempArr.length; j++){

                var tile = tempArr[j];
                //Find where this tile lives in the theoretical grid
                var tilePos = me.getTilePos(me.tileGrid, tile);

                //Remove the tile from the screen
                me.tiles.remove(tile);

                //Increase the users score
                me.incrementScore();

                //Remove the tile from the theoretical grid
                if(tilePos.x != -1 && tilePos.y != -1){
                    me.tileGrid[tilePos.x][tilePos.y] = null;
                }

            }
        }
    },
and finally, we just need to call the createScore method from within the create method.
Add the following to the end of your create method in main.js
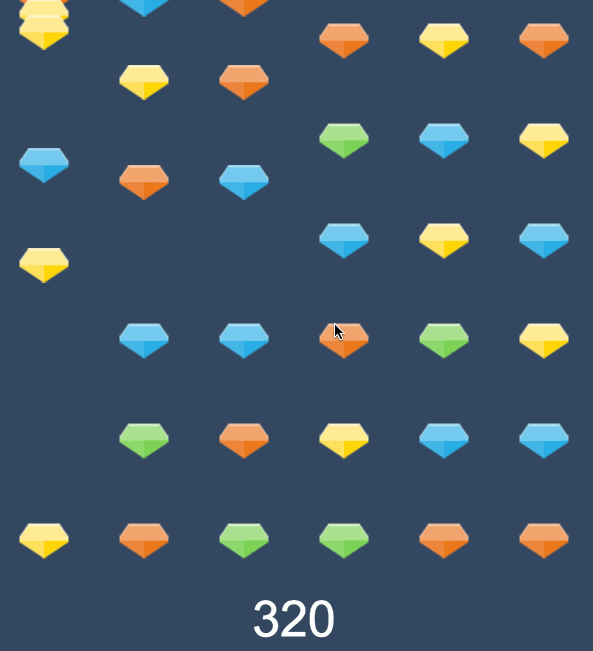
me.createScore();and that’s it, we now have our finished game:
Summary
That was a pretty complex game, but it makes sense if you step through it slowly and try to figure out what each function is doing. Now that you have the basic mechanic for the game, you could extend this to make it more fun and interesting. A few things to try might be:
- Add a time limit for the game
- Add some particle effects for when the tiles are removed from the grid
- Give bonus points to the player for destroying more than three tiles
- Modify the getMatches function to match different patterns, squares or perhaps diagonals for example
- Get more creative like the Bombevo game where you fight an alien space ship
These types of games are very popular and there’s a lot you can do with them. If you do end up making something, I’d love to see it in the comments below!