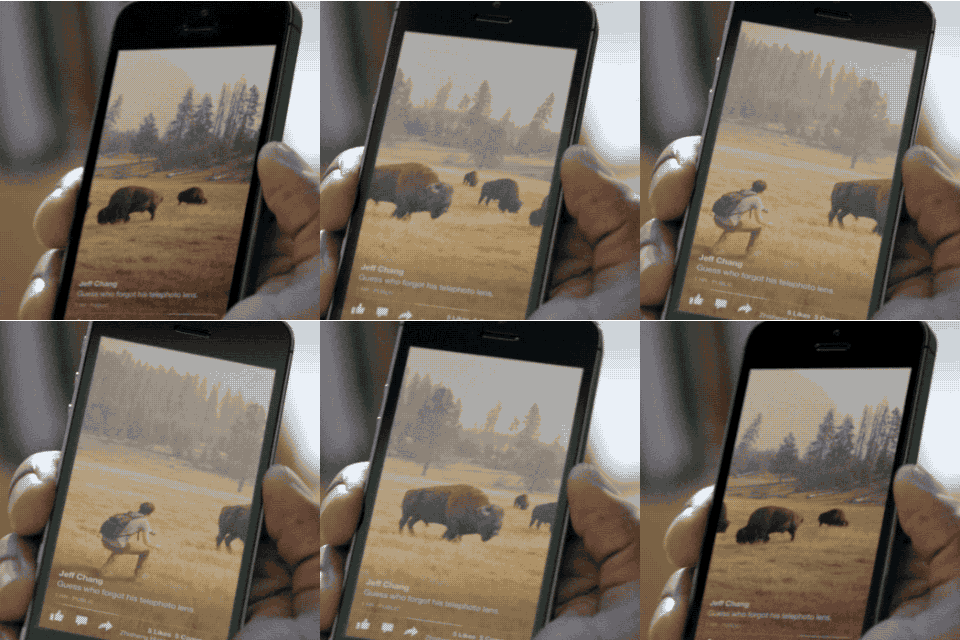
Anybody remember Facebook Paper? It was somewhat of a re-imagining of the current Facebook experience into a more news focused format. Despite being quite well-received, it failed to gain traction and eventually shut down.
When Facebook Paper was announced, they introduced this new UI concept that was built into the application:
Image from http://jt.io/2014/photo-tilt/
Changing the orientation of the device would allow you to view different sections of an image, essentially acting as a “window” into another place, which is quite immersive. Similar methods for viewing panoramas or 360-degree photos or videos are now commonplace in mobile applications.
When this feature was announced, John Tregoning took up the challenge of attempting to recreate the same effect using just HTML, CSS, and Javascript. The results were impressive. A while back, I decided to adapt the code for use in Sencha Touch so that it could easily be used in HTML5 mobile applications, and now I’m going to do the same thing for Ionic 2!
Unlike the Sencha Touch example, this will be more of a recreation from scratch rather than a simple port. I’ve modified the code to use a standard Angular 2 component format, and I’ve also integrated performance enhancements Ionic 2 offers for DOM writes.
Here’s a preview of the custom component we will be building:
or you can watch the higher resolution example video.
Although I will take some time to explain most of the concepts, this is a more advanced tutorial. If you would like more of an introduction to components in Ionic 2, I would recommend reading Build a Simple Progress Bar Component in Ionic 2 first.
Before We Get Started
Before you go through this tutorial, you should have at least a basic understanding of Ionic 2 concepts. You must also already have Ionic 2 set up on your machine.
If you’re not familiar with Ionic 2 already, I’d recommend reading my Ionic 2 Beginners Guide first to get up and running and understand the basic concepts. If you want a much more detailed guide for learning Ionic 2, then take a look at Building Mobile Apps with Ionic 2.
1. Generate a New Ionic 2 Application
We’re going to start off by generating a new Ionic 2 application with the following command:
ionic start ionic2-photo-tilt blank --v2Once that has finished generating, you should make it your working directory by running the following command:
cd ionic2-photo-tiltTo create the photo tilt functionality we are going to create a custom component. This way, we will be able to add the following code:
<photo-tilt tiltImage="path/to/image"></photo-tilt>in any template where we want to include the functionality. By default, the component will take up the entire height of the viewport, but we are also going to add an @Input so that we can control the height ourselves using the following syntax:
<photo-tilt tiltHeight="300" tiltImage="path/to/image"></photo-tilt>We are going to use the Ionic CLI to automatically generate a component template for us.
Run the following command to generate the PhotoTilt component:
ionic g component PhotoTiltand in order to use that component throughout the application, we will need to set it up in the app.module.ts file.
Modify src/app/app.module.ts to reflect the following:
import { NgModule, ErrorHandler } from '@angular/core';
import { IonicApp, IonicModule, IonicErrorHandler } from 'ionic-angular';
import { MyApp } from './app.component';
import { HomePage } from '../pages/home/home';
import { PhotoTiltComponent } from '../components/photo-tilt/photo-tilt';

@NgModule({
  declarations: [MyApp, HomePage, PhotoTiltComponent],
  imports: [IonicModule.forRoot(MyApp)],
  bootstrap: [IonicApp],
  entryComponents: [MyApp, HomePage],
  providers: [{ provide: ErrorHandler, useClass: IonicErrorHandler }],
})
export class AppModule {}
2. Implement the Photo Tilt Component
This component is a slightly simplified version of the one John created, it doesn’t include a tilt bar indicator and the reverse tilt and max tilt options, but it’s still quite complex. To break things down a little bit, we are going to set up a bare-bones implementation of the component first, and then add the more complicated functionality.
Let’s start by setting up the template and styling.
Modify src/components/photo-tilt/photo-tilt.html to reflect the following:
<div #mask class="mask">
  <img #image [src]="tiltImage" (load)="initTilt()" />
</div>
The template is quite simple, we just have the image inside of a container. We set the src property to tiltImage which will be defined by user input, we have a load listener that will initialise the component after the image has finished loading (this is important because we need to do some calculations based on the image size), and we’ve also set up #mask and #image local variables so we can grab a reference to these elements.
Modify src/components/photo-tilt/photo-tilt.scss to reflect the following:
.ios,
.md {
  photo-tilt {
    .mask img {
      max-width: none;

      -webkit-transition: -webkit-transform 0.2s linear;
      -moz-transition: -moz-transform 0.2s linear;
      -ms-transition: -ms-transform 0.2s linear;
      transition: transform 0.2s linear;

      -webkit-transform: translate3d(0, 0, 0);
      -moz-transform: translate3d(0, 0, 0);
      -ms-transform: translate3d(0, 0, 0);
      transform: translate3d(0, 0, 0);
    }
  }
}
We will eventually write some code in the TypeScript file that will change the translate3d property to animate the photo left and right, but first let’s just set up a basic implementation of it.
Modify src/pages/components/photo-tilt/photo-tilt.ts to reflect the following:
import { Component, Input, ViewChild, Renderer } from '@angular/core';
import { Platform, DomController } from 'ionic-angular'

@Component({
  selector: 'photo-tilt',
  templateUrl: 'photo-tilt.html',
  host: {
    '(window:deviceorientation)': 'onDeviceOrientation($event)',
    '(window:resize)': 'initTilt()'
  }
})
export class PhotoTiltComponent {

  @Input('tiltImage') tiltImage: any;
  @Input('tiltHeight') tiltHeight: any;

  @ViewChild('mask') mask: any;
  @ViewChild('image') image: any;

  averageGamma: any = [];
  maxTilt: number = 20;
  latestTilt: any = 0;
  centerOffset: any;
  resizedImageWidth: any;
  aspectRatio: any;
  delta: any;
  height: any;
  width: any;

  constructor(public platform: Platform, public domCtrl: DomController, public renderer: Renderer) {

  }

  initTilt(){

  }

  renderTilt(){

  }

  onDeviceOrientation(ev){

  }

  updatePosition(){

  }

  updateTiltImage(pxToMove){

  }

}
This is the basic set up for our photo tilt component. We have two host listeners set up, so that whenever we detect the deviceorientation event (which is just a normal HTML5 API, no plugins or fancy stuff required) the onDeviceOrientation event is triggered, and when the resize event is detected we trigger the initTilt function.
We have two inputs set up with @Input. This is what allows the user to bind to properties on the <photo-tilt> element. One input sets up the image to be used, and the other is an optional input that can manually control the height of the component. Again, if you would a more in-depth explanation on some component concepts, take a look at this tutorial.
We grab references to the two elements in the template for the component using @ViewChild, which allows us to grab a reference using the local variable we set up earlier. We also have a bunch of member variables defined that we will use to hold references to values as we are doing some calculations.
We’ve injected a few services into our constructor. We will use Platform to grab the device’s height and width, the DomController so that we can write to the DOM at the most opportune time to improve performance, and Renderer so that we can modify styles of elements.
Finally, we have our various functions. The initTilt function will be triggered once the image finishes loading (because we added a (load) listener in the template), and the onDeviceOrientation function will trigger whenever an orientation event is detected. The rest will be triggered internally.
Now let’s set up the complete implementation of this component:
import { Component, Input, ViewChild, Renderer } from '@angular/core';
import { Platform, DomController } from 'ionic-angular'

@Component({
  selector: 'photo-tilt',
  templateUrl: 'photo-tilt.html',
  host: {
    '(window:deviceorientation)': 'onDeviceOrientation($event)',
    '(window:resize)': 'initTilt()'
  }
})
export class PhotoTiltComponent {

  @Input('tiltImage') tiltImage: any;
  @Input('tiltHeight') tiltHeight: any;

  @ViewChild('mask') mask: any;
  @ViewChild('image') image: any;

  averageGamma: any = [];
  maxTilt: number = 20;
  latestTilt: any = 0;
  centerOffset: any;
  resizedImageWidth: any;
  aspectRatio: any;
  delta: any;
  height: any;
  width: any;

  constructor(public platform: Platform, public domCtrl: DomController, public renderer: Renderer) {

  }

  initTilt(){

      this.height = this.tiltHeight || this.platform.height();
      this.width = this.platform.width();

      this.aspectRatio = this.image.nativeElement.width / this.image.nativeElement.height;
      this.renderTilt();

  }

  renderTilt(){

    this.image.nativeElement.height = this.height;

    this.resizedImageWidth = this.aspectRatio * this.image.nativeElement.height;
    this.renderer.setElementStyle(this.image.nativeElement, 'width', this.resizedImageWidth + 'px');

    this.delta = this.resizedImageWidth - this.width;
    this.centerOffset = this.delta / 2;

    this.updatePosition();

  }

  onDeviceOrientation(ev){

    if(this.averageGamma.length > 8){
      this.averageGamma.shift();
    }

    this.averageGamma.push(ev.gamma);

    this.latestTilt = this.averageGamma.reduce((previous, current) => {
      return previous + current;
    }) / this.averageGamma.length;

    this.domCtrl.write(() => {
      this.updatePosition();
    });


  }

  updatePosition(){

    let tilt = this.latestTilt;

    if(tilt > 0){
      tilt = Math.min(tilt, this.maxTilt);
    } else {
      tilt = Math.max(tilt, this.maxTilt * -1);
    }

    let pxToMove = (tilt * this.centerOffset) / this.maxTilt;

    this.updateTiltImage((this.centerOffset + pxToMove) * -1);

  }

  updateTiltImage(pxToMove){
    this.renderer.setElementStyle(this.image.nativeElement, 'transform', 'translate3d(' + pxToMove + 'px,0,0)');
  }

}
It looks quite a bit more complex now, but the process is relatively straight forward. First initTilt will be triggered which sets up the width, height, and aspect ratio (so that our image doesn’t get distorted). Then renderTilt will calculate the new image width, and trigger the updatePosition function which will handle repositioning the image (using the x parameter on the translate3d property) according to the current tilt/orientation of the device. The use of translate3d over translatex is important, as it will cause the GPU (Graphics Processing Unit) to handle the transformation.
Another important performance consideration here is that we use the following block of code to trigger the updatePosition function:
this.domCtrl.write(() => {
  this.updatePosition();
});
The updatePosition function is writing to the DOM, and by using this write function we are able to schedule that write for a time where it will have the least negative impact on performance, rather than us forcing it to happen right away. I’ve written more about how this works in this post.
3. Use the Photo Tilt Component
The component is complete now, so all we have to do is use it. It’s as simple as adding the following line wherever you want it:
<photo-tilt tiltImage="path/to/image"></photo-tilt>If you want to recreate the same effect that I have in the example, you can just do the following.
Modify src/pages/home/home.html to reflect the following:
<ion-header>
  <ion-navbar color="danger">
    <ion-title> Photo Tilt </ion-title>
  </ion-navbar>
</ion-header>

<ion-content>
  <photo-tilt
    tiltImage="http://farm5.staticflickr.com/4016/4251578904_f13592585c_b.jpg"
  ></photo-tilt>
</ion-content>
Summary
Components in Angular 2 and Ionic 2 are a great way to abstract all of the complicated code into a neat little package, that we can then use easily anywhere in our applications. This component in particular highlights that. I really like this component, so I will probably take it further with a new tutorial in the near future.


