

The Ionic team have been more than a little bit busy lately. Not only have they just recently officially launched the 1.0.0 release of Ionic, they have also announced alpha versions of Ionic Push and Ionic Deploy.
Ionic Deploy will allow Ionic developers to push updates to applications that are already live on the app store without having to wait for the review process (as long as no binary changes are required). I’ll revisit this feature in the future with a dedicated blog post, but for now I’d like to take a better look at Ionic Push.
Push notifications are endlessly useful. They fundamentally change the way a user interacts with an application, changing it from just pull communication to push communication. You could consider mail that gets sent to your house to be like a “push” and mail that you have to go pick up from the post office “pull”. In a push scenario, the sender gets to decide when the receiver will receive the message, but in a pull scenario the sender must wait until the receiver wants to retrieve a message.
This is especially useful in mobile applications, as it makes your application a lot more engaging. Consider Facebook for example – if you get a message whilst the app is closed you will receive a push notification (if you have allowed it). You will most likely check this immediately, and this may happen another 10 times throughout the day. If push notifications weren’t used though, you might only check Facebook when you’re bored and discover your 10 unread messages (perhaps we could argue that push notifications are largely responsible for some peoples social media addiction!).
So, Push Notifications are extremely powerful and could be the difference between an applications success or failure. The only problem though is that they are bloody hard to implement. Fortunately, services like PushWoosh and Parse have popped up to simplify sending push notifications but it’s still certainly not easy. The Ionic Push service is another competitor in this arena – it’s not going to be a game changer, but it may prove to be a great option for Ionic developers.
Let’s take a look at how to get up and running with the Ionic Push service and then discuss how it might stack up to the existing services.
Getting Started with Ionic Push
Ionic already have a great tutorial for setting up Ionic Push so I’m just going to do a real quick step by step guide here. I’ll provide the code I ended up using based on the tutorial from Ionic, so if you want to get up and running quickly keep reading here, but if you want a more thorough explanation then read the tutorial on the Ionic blog.
NOTE: At the time of writing this, Ionic Push is still in Alpha and has a lot of development left to go. I’ll try to keep this post updated with any changes but just keep in mind that the service could change drastically before its release. It’s also worth noting you should not use this in production applications. Ionic Push will be free during the Alpha so it may be tempting, but there is currently no guaranteed stability.
I’ll assume that you already have Ionic and Cordova set up.
1. Create a new application and make it your working directory
ionic start IonicPush blank
cd IonicPush
2. Add the dependencies
Ionic Push requires the inclusion of the PushPlugin plugin, as well as ngCordova, ionic-service-core and ionic-service-push. You can add these to your project by running the following commands:
ionic plugin add https://github.com/phonegap-build/PushPlugin.git
ionic add ngCordova
ionic add ionic-service-core
ionic add ionic-service-push
3. Include references to the libraries
You will also need to include references to these new libraries in your index.html file:
    <!-- ionic/angularjs js -->
    <script src="lib/ionic/js/ionic.bundle.js"></script>
    <script src="lib/ngCordova/dist/ng-cordova.js"></script>
    <script src="lib/ionic-service-core/ionic-core.js"></script>
    <script src="lib/ionic-service-push/ionic-push.js"></script>
4. Add the libraries to your module
You will need to require these libraries in your applications module in app.js:
angular.module('starter', ['ionic', 'ngCordova', 'ionic.service.core', 'ionic.service.push'])5. Configure Push Notifcations
You will need to add the following configuration in app.js:
    .config(['$ionicAppProvider', function($ionicAppProvider) {
      // Identify app
      $ionicAppProvider.identify({
        // The App ID (from apps.ionic.io) for the server
        app_id: 'YOUR_APP_ID',
        // The public API key all services will use for this app
        api_key: 'YOUR_PUBLIC_KEY',
        // Set the app to use development pushes
        dev_push: true
      });
    }])
You can find your App ID through the dashboard when you log into apps.ionic.io. Before you can access that you will need to upload your application, so first make an account and then run the following command:
ionic login
and log in with your account details, and then run:
ionic uploads
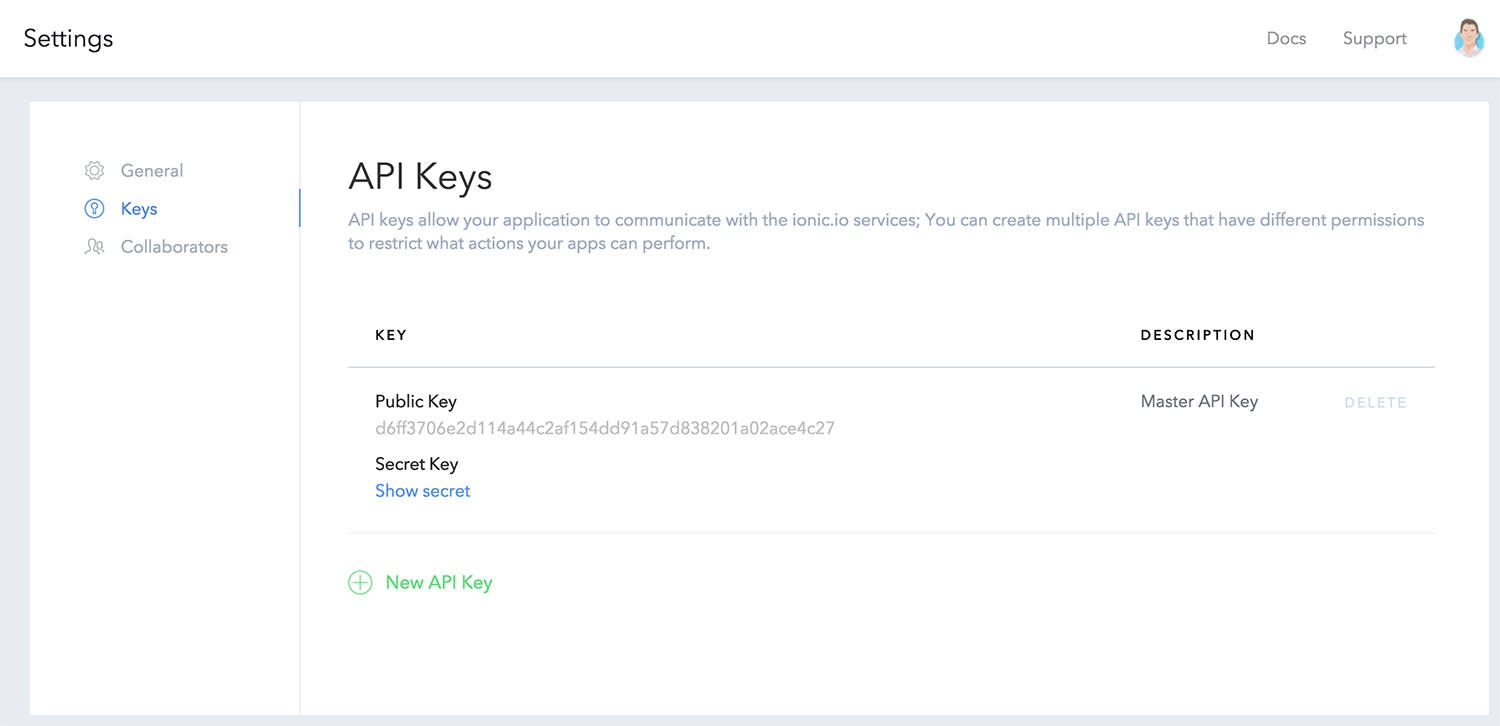
Now you should be able to log in to apps.ionic.io and find your App ID. To retrieve your Public Key you will need to go into your application from the dashboard, and then go to Settings. From this page you can go to Keys and you will find your Public Key. Also make note of the Secret Key here. You will need that to send push notifications a little later.
You may notice in the code above we have set:
dev_push: true
By setting this flag we can send development push notifications. These pushes do not go through GCM (Google Cloud Messaging) or APNS (Apple Push Notfication Service) for push notifications so it means you don’t have to go through the hassle of setting those up. However there is some limitations to using development pushes:
- Tokens only last 2 hours
- You can only receive push notifications if the application is open
If you’d like you can install the local notification plugin and the Ionic Push service will use this to display push notifications.
When I first read the Ionic post I thought they meant installing this plugin would allow you to send development push notifications even if the application was not open. Unless I’m mistaken, this is not the case – I’m not sure that would even be possible anyway.
6. Create buttons to register for push notifications
We will need two buttons: One to identify the user, and one to register them for push notifications (this creates a token that can be used to identify them). Make the following changes to your index.html file:
      <body ng-app="starter" ng-controller="MainCtrl">

        <ion-pane>
          <ion-header-bar class="bar-stable">
            <h1 class="title">Ionic Blank Starter</h1>
          </ion-header-bar>
          <ion-content>
            <button class="button button-block button-dark" ng-click="identifyUser()">
              Identify a user
            </button>

            <button class="button button-block button-positive" ng-if="identified" ng-click="pushRegister()">
              Register for Push
            </button>
          </ion-content>
        </ion-pane>
      </body>
I’ve also added a controller in the code above, which we will create now.
7. Create a controller to handle registering users
    .controller('MainCtrl', function($scope, $rootScope, $ionicUser, $ionicPush) {

      $rootScope.$on('$cordovaPush:tokenReceived', function(event, data) {
        alert("Successfully registered token " + data.token);
        console.log('Ionic Push: Got token ', data.token, data.platform);
        $scope.token = data.token;
      });

      // Identifies a user with the Ionic User service
      $scope.identifyUser = function() {
        console.log('Ionic User: Identifying with Ionic User service');

        var user = $ionicUser.get();
        if(!user.user_id) {
          // Set your user_id here, or generate a random one.
          user.user_id = $ionicUser.generateGUID();
        };

        // Add some metadata to your user object.
        angular.extend(user, {
          name: 'Ionitron',
          bio: 'I come from planet Ion'
        });

        // Identify your user with the Ionic User Service
        $ionicUser.identify(user).then(function(){
          $scope.identified = true;
          alert('Identified user ' + user.name + '\n ID ' + user.user_id);
        });
      };

      // Registers a device for push notifications and stores its token
      $scope.pushRegister = function() {
        console.log('Ionic Push: Registering user');

        // Register with the Ionic Push service.  All parameters are optional.
        $ionicPush.register({
          canShowAlert: true, //Can pushes show an alert on your screen?
          canSetBadge: true, //Can pushes update app icon badges?
          canPlaySound: true, //Can notifications play a sound?
          canRunActionsOnWake: true, //Can run actions outside the app,
          onNotification: function(notification) {
            // Handle new push notifications here
            alert(notification);
            return true;
          }
        });
      };
    })
The code above should make sense for the most part as the options are well named and there’s plenty of comments. The interesting part I think those is the use of $ionicUser. This is a separate service provided by Ionic that is used to identify users and remember information about that user (such as the push notification token in this case) even if your app doesn’t contain any kind of log in functionality. The service is pretty simple right now, but it would be exciting to see (and I wouldn’t be surprised) if Ionic created a platform to rival Parse for managing user and data storage in the cloud.
8. Send a Push Notification
Ok, we have everything set up now, so now we can try sending a push notification. Ionic Push provides a Remote API for sending push notifications, but they currently do not have a web interface. So you will have to use something like cURL to POST a request to their servers.
If you don’t already have cURL set up on your machine you can grab it here and you can watch the following video for simple instructions to install it:
Once you have that set up you can run the following command to send a push notification:
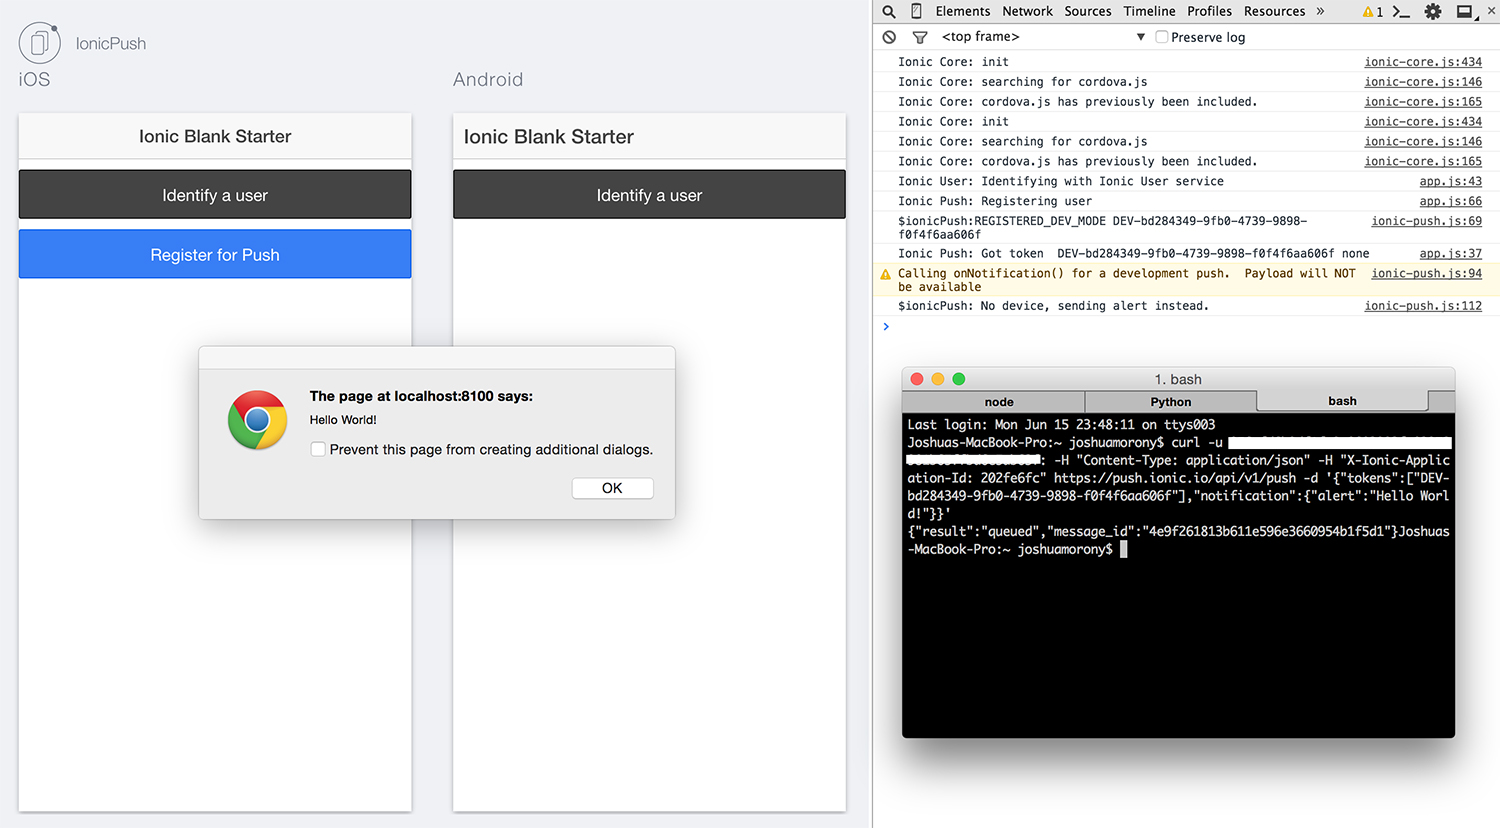
curl -u YOUR_PRIVATE_KEY: -H "Content-Type: application/json" -H "X-Ionic-Application-Id: YOUR_APP_ID" https://push.ionic.io/api/v1/push -d '{"tokens":["DEV-YOUR-TOKEN"],"notification":{"alert":"Hello World!"}}'
(thanks to Raymond Camden for this command)
You will need to replace:
- YOUR_PRIVATE_KEY with the secret key you revealed previously in the ionic.io dashboard
- YOUR_APP_ID with your App ID
- DEV-YOUR-TOKEN with the token for the device you are targeting. You will get this token when you press “Identify User” and then “Register User”.
in the command above. If everything has gone correctly you should get a message saying that it has been queued, and then you will see the notification appear:
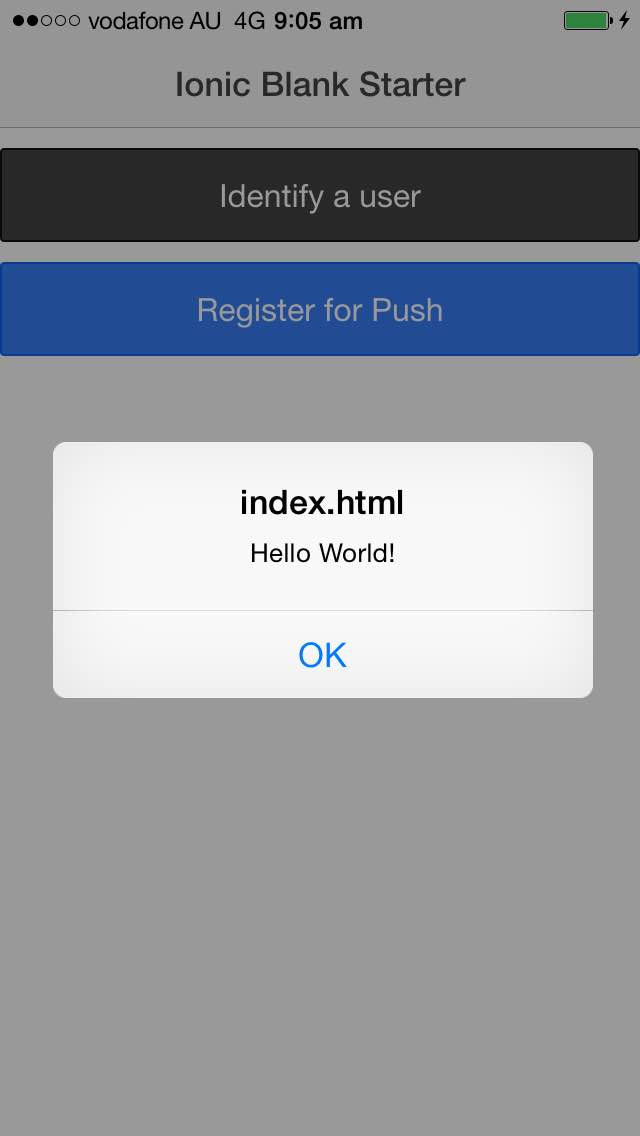
and you can also do the same for your application running through Ionic View:
9. Using Real Push Notifications
If you want to send real (non development ones that can be received even when the app is closed) push notifications to a device then you will need to configure your application correctly to use GCM (Android) and APNS (iOS). This process is pretty involved and Ionic has already created a really good guide on doing this so I’ll let them take it from here:
Ionic Push vs PushWoosh and Others
Overall it is very similar in complexity to setting up PushWoosh. The hardest part by far is setting up iOS and Android. Obvisouly I’ve done this before with PushWoosh so I didn’t find this step as difficult as I did the first time, but I think the Ionic documentation was a a lot easier to follow. Most likely because PushWoosh has so many different options (Native iOS, Native Android, Titanium, PhoneGap, PhoneGap Build) and have documentation for each, so it’s a little bit harder to find information.
The big questions left to compare Ionic to other established services, which we can’t really tell just yet, are: stability and pricing.
I haven’t experienced any problems so far but being an Alpha product there’s likely going to be some kinks in the Ionic Push service and there’s still missing features, so it’s probably best to hold off using it in production applications just yet. There’s a lot of experience in the Ionic team so I’m sure they’ll be able to create a stable system as it scales up.
I don’t imagine the Ionic Push service will be any better than existing options when it is fully released, so it will most likely come down to pricing.
PushWoosh is fairly reasonably priced. The free tier allows you to send push notifications to up to 1,000,000 devices across 5 applications, and then their paid packages start at $49 which offer extra features. It’s also worth noting that PushWoosh has a lot of bells and whistles like Twitter Feeds, Beacons, Advanced Stats, Segmentation and so on that Ionic probably won’t have when it is released (at least not right away). Most people will likely only require broadcasting and simple use of the Remote API though.
The biggest problem I have with PushWoosh is that the free tier does not allow access to the Remote API. This means that you can broadcast push notifications to users through the PushWoosh control panel, but you can’t interact with it through their API. So if you wanted to send a push notification to one specific user whenever another user sends them a message for example, you would have to be on the paid tier.
What I would like to see from Ionic Push’s free tier is at least some limited access to the Remote API. Even a free tier of just 100 users for the Remote API would be extremely useful and will make development a lot easier. When using PushWoosh once your free trial is over you need to pay to continue developing with the Remote API.
Another prominent competitor is Parse, and although I haven’t used their Push service it seems that it does not have this restriction on the Remote API. Hopefully whatever pricing structure Ionic comes up with makes it enticing for developers.
It’s a very exciting time to be an Ionic devleoper, and I can’t wait to see where the Ionic team and community takes it in the future!