

In the previous few NestJS tutorials we have been discussing how to set up a basic REST API that we can interact with using an Ionic application. We have covered making both GET and POST requests to the backend, but so far we have just been using dummy data and placeholder code - our API doesn’t really do anything yet.
In this tutorial, we will be covering how to integrate MongoDB into a NestJS backend and how to use that to add and retrieve records from an Ionic application. We will be walking through an example where we POST data to the NestJS backend which will then be stored in a MongoDB database, and we will also make a GET request to the NestJS backend in order to retrieve data from the MongoDB database to display in our Ionic application.
If you are not already familiar with creating a NestJS server, or if you are unfamiliar with making GET and POST requests from an Ionic application to a NestJS server, I would recommend reading through the other tutorials in this series first:
- An Introduction to NestJS for Ionic Developers
- Using Providers and HTTP Requests in a NestJS Backend
- Sending Data with POST Requests to a NestJS Backend
We will be continuing on from the code in the last tutorial above. Although you do not have to complete the previous tutorials in order to do this one, if you want to follow along step-by-step it will help to have already completed the previous tutorials.
MongoDB and Mongoose
This tutorial is going to focus on covering how to integrate MongoDB with Ionic and NestJS more than explaining the concept of MongoDB in general. In short, MongoDB is a document based NoSQL database and Mongoose is a library that allows us to define objects/schemas that represent the types of data/documents we want to store. Mongoose provides methods that make it easier to create and retrieve the data we are working with (and it also does a lot more than just that). MongoDB is the database that stores the data, and Mongoose makes it easier to interact with that database.
If you would like more information on both of these technologies, this tutorial is a particularly good introduction.
1. Installing MongoDB and Mongoose
In order to work with MongoDB on your machine, you will need to have it installed. If you do not already have MongoDB installed on your machine, you can find information on how to do that here. I also released a video recently that covers installing MongoDB on macOS: Installing MongoDB with Homebrew on macOS.
Once you have installed MongoDB, you will need to make sure to open a separate terminal window and run the following command:
mongodThis will start the MongoDB daemon, meaning that the database will be running in the background on your computer and you will be able to interact with it. You will also need to install the mongoose package and the NestJS package associated with that by running the following command in your NestJS server project:
npm install --save @nestjs/mongoose mongooseThe NestJS Backend
First, we are going to work on our NestJS server. We will walk through setting up a connection to the database, creating a schema to represent the data we want to store, creating a service to handle adding and retrieving records, and setting up the appropriate routes in the controller.
1. Connecting to MongoDB
In order to connect to MongoDB in our NestJS server, we need to add the MongooseModule to our root module. We will use the forRoot method to supply the connection address, which is exactly the same as what we would use if we were just using the standard mongoose.connect method described here.
Modify src/app.module.ts to reflect the following:
import { Module, HttpModule } from '@nestjs/common';
import { MongooseModule } from '@nestjs/mongoose';
import { AppController } from './app.controller';
import { AppService } from './app.service';

@Module({
  imports: [HttpModule, MongooseModule.forRoot('mongodb://localhost/mydb')],
  controllers: [AppController],
  providers: [AppService],
})
export class AppModule {}
As you can see, we supply mongodb://localhost/mydb to the MongooseModule which will set up a connection to the mydb MongoDB database on localhost. Keep in mind that in a production environment this connection address would be different.
If you have been following along with the previous tutorials you might notice that we have made some other changes to this module. Previously, we had included a QuotesService and a MessagesController in this module. We will be getting rid of the QuotesService as this was just an example for a previous tutorial. Instead of adding the MessagesController directly to the root module, we are going to give the messages functionality its own module that we will import into the root module later. Since the Messages functionality is becoming a little more complex now, it is going to be neater to organise the functionality into its own module. Even though that isn’t strictly required, it does allow for better code organisation.
2. Create a Message Schema
As I mentioned before, we can use Mongoose to define the type of data we want to store in the database. A “schema” represents the structure of the data that we want to store - if you are familiar with types and interfaces it is basically the same concept.
Create a file at src/messages/message.schema.ts and add the following:
import * as mongoose from 'mongoose';

export const MessageSchema = new mongoose.Schema({
  content: String,
  submittedBy: String,
});
We create a new Schema with new mongooose.Schema and we supply the properties that we want that schema to contain along with the types for those properties. The type of data that we are adding to this schema is the same as what we have defined in the message.dto.ts file in the previous tutorials (this represents the Data Transfer Object (DTO) used to POST data to a NestJS server). It makes sense that these match because we intend to store the same data that we will POST to the NestJS server in the MongoDB database.
3. Create the Messages Module
We are going to create the Messages module now as we need this to set up a Model based on our MessageSchema which will allow us to interact with messages in our database. This module will set up all of the message related functionality that we need, and then we can import this single module into our main root module (rather than having to add all of these things individually to app.module.ts).
Create a file at src/messages/messages.module.ts and add the following:
import { Module } from '@nestjs/common';
import { MongooseModule } from '@nestjs/mongoose';
import { MessagesController } from './messages.controller';
import { MessagesService } from './messages.service';
import { MessageSchema } from './message.schema';

@Module({
  imports: [
    MongooseModule.forFeature([{ name: 'Message', schema: MessageSchema }]),
  ],
  controllers: [MessagesController],
  providers: [MessagesService],
})
export class MessagesModule {}
We use MongooseModule.forFeature to set up our Message model that we will make use of in a moment - this is based on the MessageSchema that we just created. Also, notice that we are importing MessagesService and adding it as a provider - we haven’t created this yet but we will in the next step.
4. Create a Messages Service
Now we are going to create a messages service that will handle adding documents to the MongoDB database and retrieving them.
Create a file at src/messages/messages.service.ts and add the following:
import { Injectable } from '@nestjs/common';
import { Model } from 'mongoose';
import { InjectModel } from '@nestjs/mongoose';
import { MessageDto } from './message.dto';
import { Message } from './message.interface';

@Injectable()
export class MessagesService {

    constructor(@InjectModel('Message') private messageModel: Model<Message>){

    }

    async createMessage(messageDto: MessageDto): Promise<Message>{
        const message = new this.messageModel(messageDto);
        return await message.save();
    }

    async getMessages(): Promise<Message[]>{
        return await this.messageModel.find().exec();
    }

    async getMessage(id): Promise<Message>{
        return await this.messageModel.findOne({_id: id});
    }

}
We are creating three different methods here:
- A
createMessagemethod that will add a new document to the database - A
getMessagesmethod that will return all message documents from the database - A
getMessagemethod that will return one specific document from the database (based on its_id)
In the constructor we add @InjectModel('Message') which will inject our Message model (which we just set up in the messages module file) into this class. We will be able to use this model to create new messages and retrieve them from the database.
Our createMessage method accepts the messageDto which will POST from our Ionic application to the NestJS backend. It then creates a new message model using the data from this DTO, and then calls the save method which will add it to the MongoDB database. We are returning the result of the save operation which will allow us to see the document that was added.
The getMessages method we call the find method on the messages model which will return all message documents from the database (as an array).
The getMessage method will accept an id parameter, and then it will return one document from the database that matches the id that was supplied. MongoDB _id fields are generated automatically if you add a document to the database that does not contain an _id.
Before this will work, we will need to define an interface for our messages since we are using Message as a type in this service.
Create a file at src/messages/message.interface.ts and add the following:
export interface Message {
  content: string;
  submittedBy: string;
}
5. Create the Routes
Now we need to create the appropriate routes in the message controller.
Modify src/messages/messages.controller.ts to reflect the following:
import { Controller, Get, Post, Body, Param } from '@nestjs/common';

import { MessageDto } from './message.dto';
import { MessagesService } from './messages.service';

@Controller('messages')
export class MessagesController {

    constructor(private messagesService: MessagesService){

    }

    @Post()
    async createMessage(@Body() message: MessageDto){
        return await this.messagesService.createMessage(message);
    }

    @Get()
    async getMessages(){
        return await this.messagesService.getMessages();
    }

    @Get(':id')
    async getMessage(@Param('id') id: String){
        return await this.messagesService.getMessage(id);
    }

}
I’ve already covered the concepts used above in the previous tutorials, so if you aren’t familiar with what is happening here make sure to check those out.
6. Import the Messages Module
Finally, we just need to import our messages module into the root module for the application.
Modify src/app.module.ts to reflect the following:
import { Module, HttpModule } from '@nestjs/common';
import { MongooseModule } from '@nestjs/mongoose';
import { AppController } from './app.controller';
import { AppService } from './app.service';
import { MessagesModule } from './messages/messages.module';

@Module({
  imports: [
    HttpModule,
    MessagesModule,
    MongooseModule.forRoot('mongodb://localhost/mydb'),
  ],
  controllers: [AppController],
  providers: [AppService],
})
export class AppModule {}
As you can see above, we can set up all of that messages functionality we just created with one clean and simple import in our root module.
The Ionic Frontend
Now we just need to update our frontend to make use of the new backend functionality - fortunately, there isn’t much we need to do here. It doesn’t really have to be an Ionic/Angular application either, as we are just interacting with a REST API.
1. Modify the Messages Service
Our frontend also has a messages service to handle making the calls to the backend, we will need to update that.
Modify src/app/services/messages.service.ts to reflect the following:
import { Injectable } from '@angular/core';
import { HttpClient } from '@angular/common/http';
import { Observable } from 'rxjs'

@Injectable({
  providedIn: 'root'
})
export class MessagesService {

  constructor(private http: HttpClient) {

  }

  createMessage(message): Observable<Object> {

    return this.http.post('http://localhost:3000/messages', {
      content: message.content,
      submittedBy: message.submittedBy
    });

  }

  getMessages(): Observable<Object> {
    return this.http.get('http://localhost:3000/messages');
  }

  getMessage(id): Observable<Object> {
    return this.http.get(`http://localhost:3000/messages/${id}`);
  }

}- Trigger Calls to the API
Now we just need to make some calls to the API we created. We will just trigger these from the home page.
Modify src/app/home/home.page.ts to reflect the following:
import { Component, OnInit } from '@angular/core';
import { MessagesService } from '../services/messages.service';

@Component({
  selector: 'app-home',
  templateUrl: 'home.page.html',
  styleUrls: ['home.page.scss'],
})
export class HomePage implements OnInit {

  constructor(private messages: MessagesService){

  }

  ngOnInit(){

    let testMessage = {
      content: 'Hello!',
      submittedBy: 'Josh'
    };

    let testId = '5c04b73880159ab69b1e29a9'

    // Create a test message
    this.messages.createMessage(testMessage).subscribe((res) => {
      console.log("Create message: ", res);
    });

    // Retrieve all messages
    this.messages.getMessages().subscribe((res) => {
      console.log("All messages: ", res);
    });

    // Retrieve one specific message
    this.messages.getMessage(testId).subscribe((res) => {
      console.log("Specific message: ", res);
    });

  }

}
This will trigger three separate calls to each of the different routes we added to the server. In the case of retrieving a specific message, I am using a testId - in order for you to replicate this, you will first need to add a document to the database and then copy its _id as the testId here. The first time you serve this application in the browser you will be able to see the _id of one of the documents that are created.
To run this code you will need to:
- Make sure that the MongoDB daemon is running by executing the
mongodcommand in a separate terminal window - Make sure that your NestJS server is running by executing the
npm run startcommand in another terminal window - Serve your Ionic application by executing the
ionic servecommand in another terminal window
When you run the application, you should see something like this output to the console:
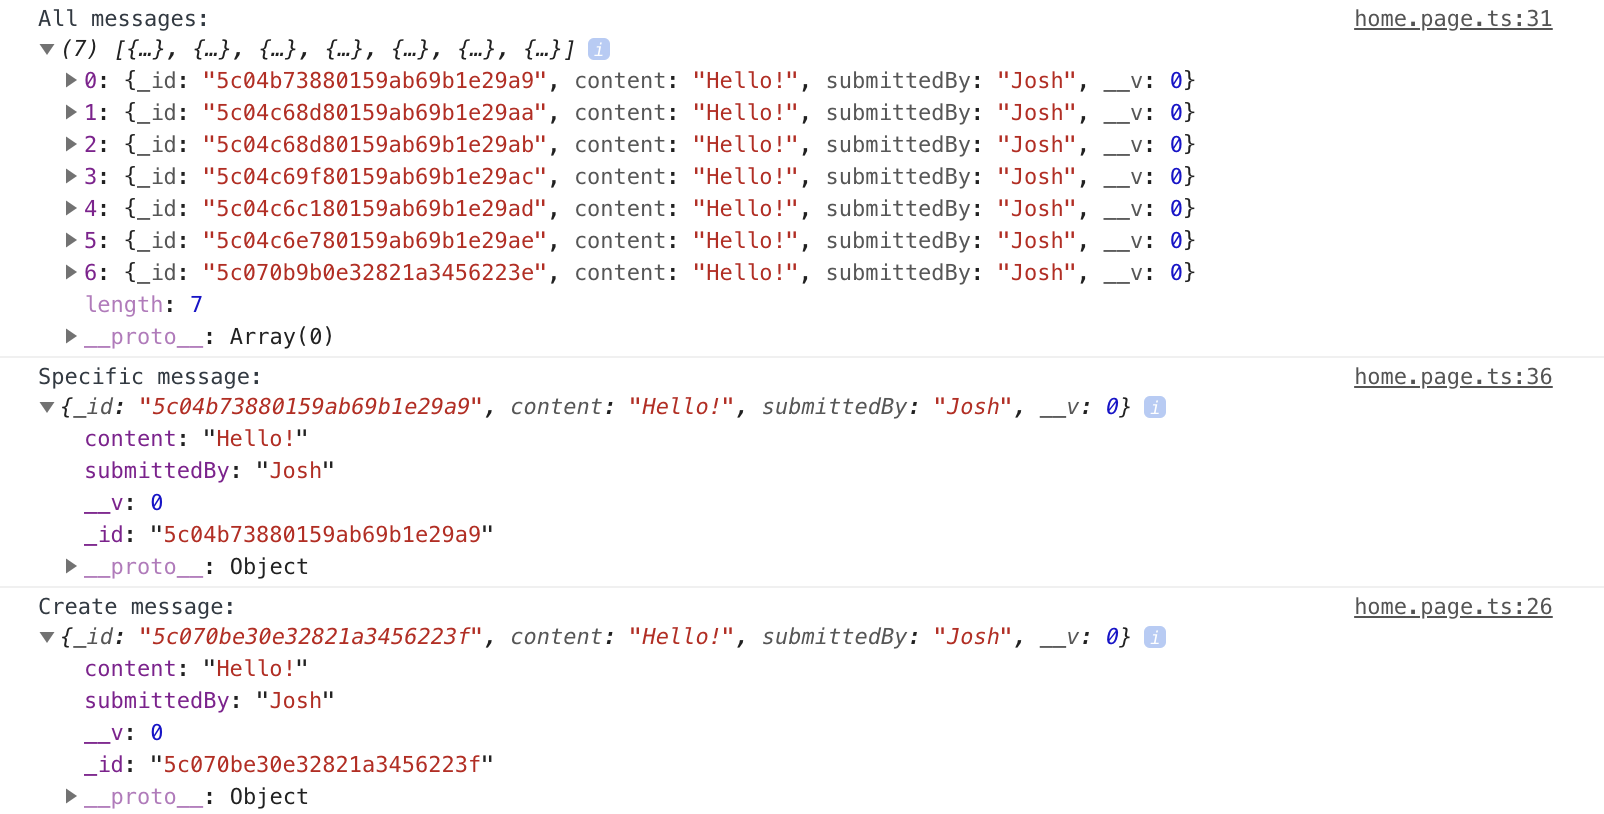
You can see the document that was just created, all of the documents currently in the database, and the specific document that matches the testId (assuming that you have set up a testId that actually exists).
Summary
The built-in support for MongoDB that NestJS provides makes for a really smooth experience if you want to use MongoDB as your database. You will be able to use all the features you would expect from Mongoose within an Angular style application architecture. We have only scratched the surface of what you might want to do with a MongoDB integration here, in future tutorials we are going to focus on more advanced concepts like adding authentication.