

You may have heard the term JWT being thrown around lately, it seems to be picking up popularity – and for good reason. If you’re not familiar, JWT stands for JSON Web Tokens, which are little encoded strings that look like this:
eyJhbGciOiJIUzI1NiIsInR5cCI6IkpXVCJ9
  .eyJ1c2VyX2lkIjoiMTIzIiwidXNlcm5hbWUiOiJqb3NoIiwiY291bnRyeSI6IkF1c3RyYWxpYSJ9
  .RUDA2pRLpy7JdE8YdOMEjpNUC8m115F7ccvxRXlc1 - U;
If you break this string up wherever there is a ., you get three separate strings. The first is the encoded header (which contains information about the token), the second is the encoded payload (which contains the data that is being sent), and the third is the verification signature (which we can use to verify that the data has not been changed). We will talk a little more about how this works exactly soon.
So, what is the point of a JWT? If we go by the definition on jwt.io (which contains a handy tool for creating and testing JWTs):
As is usually the case, this is an awesome and succinct description – but it probably makes no sense to most people. If you have some time, I’d actually recommend having a bit of a skim through the RFC 7519 standard – the academic format may make it look like a long and boring read, but it is quite concise and informative.
In short, JSON Web Tokens are a way to securely communicate information between two parties. A “claim” is some data that is sent along with the token, like a user_id or some other information. The important thing to note is that “securely communicate” in this context means that we know the information has not been tampered with, not that it is hidden from any potential attackers – an attacker could read what is in the JWT (so don’t send passwords!) but it would be impossible for them to modify it.
You could consider that one might “claim” in a web token that the user_id has a value of 23, and we can verify that claim with the verification signature, which we can use to tell if a JWT has been tampered with. Since we know that a JSON Web Token can not be tampered with, it is very useful for authentication. We can give a user a JWT that contains their user_id, which can be stored locally and used to verify that requests are coming from the correct user. Although JSON Web Tokens are typically used for authentication, that’s certainly not all they are useful for.
The great thing about JWTs are that they are easy to create, read (by people), parse (by programs), and they are super short. This means we can easily send them as a POST parameter, HTTP header, or add it as a query string to a URL. They can also be easily stored in local storage to, as we just discussed, ensure that the user is authorised each time they make a request to the server.
In this tutorial, we are going to talk a bit more about what a JSON Web Token is, and how we can use them to create our own custom authentication with the Ionic Cloud platform. Part 1 will focus on JSON Web Tokens, and Part 2 will focus on how to use JSON Web Tokens to integrate with the Ionic Cloud platform.
Before We Get Started
Before you go through this tutorial, you should have at least a basic understanding of Ionic 2 concepts. You must also already have Ionic 2 set up on your machine.
If you’re not familiar with Ionic 2 already, I’d recommend reading my Ionic 2 Beginners Guide first to get up and running and understand the basic concepts. If you want a much more detailed guide for learning Ionic 2, then take a look at Building Mobile Apps with Ionic 2.
A Brief Introduction to JSON Web Tokens
The introduction should have given you the gist of what JSON Web Tokens are all about, but now I’m going to discuss how they work in a little more detail. Reading this section is not critical to completing this tutorial, but it will give you a better understanding of JWTs (they’re pretty cool, so I think they deserve a little love). If you are not interested in learning the specifics then you can just jump straight to Part 2.
We’re going to create our own JSON Web Token now, but keep in mind this is purely for the sake of learning how they work. There’s plenty of libraries available to handle creating and verifying JWTs for you.
Creating a JSON Web Token From Scratch
Let’s start from the beginning, and say I want to send the following data securely to someone else:
{
    "user_id": "123",
    "username": "josh",
    "country": "Australia"
}
This is my payload. We can’t add it to our JWT in this form though, so we have to base64 encode it. You can do this quite easily with Javascript by using the btoa function:
btoa(
  JSON.stringify({
    user_id: '123',
    username: 'josh',
    country: 'Australia',
  })
);
which will give us the following string:
eyJ1c2VyX2lkIjoiMTIzIiwidXNlcm5hbWUiOiJqb3NoIiwiY291bnRyeSI6IkF1c3RyYWxpYSJ9;Notice that I also used the stringify function before encoding it, if you try encode the object directly the resulting decoded string will just be ’[object Object]’. You can also decode a base 64 encoded string by using the atob function.
Now that we have our payload encoded, we will need to create and encode our header (which comes before the payload in the JWT). In our header we want to specify that we are creating a JWT, and that we are going to use the HMAC SHA256 hash algorithm. This algorithm will allow us to use a secret password that is only known to us, and the person we are sending the JWT to. Alternatively, you can use the RSA SHA256 algorithm to use a private & public key pair instead.
Here’s what our header will look like:
{
    "alg": "HS256",
    "typ": "JWT"
}
and once we base64 encode it, it will become the following string:
eyJhbGciOiJIUzI1NiIsInR5cCI6IkpXVCJ9;Finally, we will need to create our verification signature. This signature is generated by joining our encoded header and payload string (separated by a ”.”), and then using the HMAC SHA256 algorithm along with the secret password that is only known to the sender and the receiver. We are going to use a secret of superDuperSecret. For obvious reasons, use something a little more obscure in real world scenarios.
The format of the signature will look like this:
HMACSHA256(encodedHeader + '.' + encodedPayload, secret);Unfortunately, there’s no simple Javascript function available for executing that hashing algorithm. Instead, we are going to use a little Node script to do it for us.
Run the following command to install base64url
npm install base64urlWe need this package to convert the resulting hash from the Node crypto library from base64 encoding to base64url encoding. We are just going to be running Node locally for this so you can install this package anywhere.
Run the following command to start Node
nodeNow our terminal will allow us to run node commands, which we are going to generate our verification signature for the last part of the JWT.
Paste the following command into your terminal and run it:
var base64url = require('base64url');

var crypto = require('crypto');
var token =
  'eyJ0eXAiOiJKV1QiLCJhbGciOiJIUzI1NiJ9.eyJ1c2VyX2lkIjoiMTIzIiwidXNlcm5hbWUiOiJqb3NoIiwiY291bnRyeSI6IkF1c3RyYWxpYSJ9';
var key = 'superDuperSecret';
var algorithm = 'sha256';
var hash, hmac;

hmac = crypto.createHmac(algorithm, key);
hmac.setEncoding('base64');
hmac.write(token);
hmac.end();
hash = hmac.read();

var final = base64url.fromBase64(hash);
console.log(final);
Notice that we have set our token to be [header].[payload] and we have also set our key as superDuperSecret. We use the crypto library to hash that string using our secret, and then convert it to base64url encoding. Make sure to hit enter to execute the final line and you should receive your verification signature, which will look like this:
RUDA2pRLpy7JdE8YdOMEjpNUC8m115F7ccvxRXlc1-UNow we just need to combine the three strings we generated in the format of:
[header][payload][signature];which will give us our very own JSON Web Token that looks like this:
eyJhbGciOiJIUzI1NiIsInR5cCI6IkpXVCJ9.eyJ1c2VyX2lkIjoiMTIzIiwidXNlcm5hbWUiOiJqb3NoIiwiY291bnRyeSI6IkF1c3RyYWxpYSJ9.RUDA2pRLpy7JdE8YdOMEjpNUC8m115F7ccvxRXlc1-U`You can test this JWT by pasting it into the box on jwt.io:
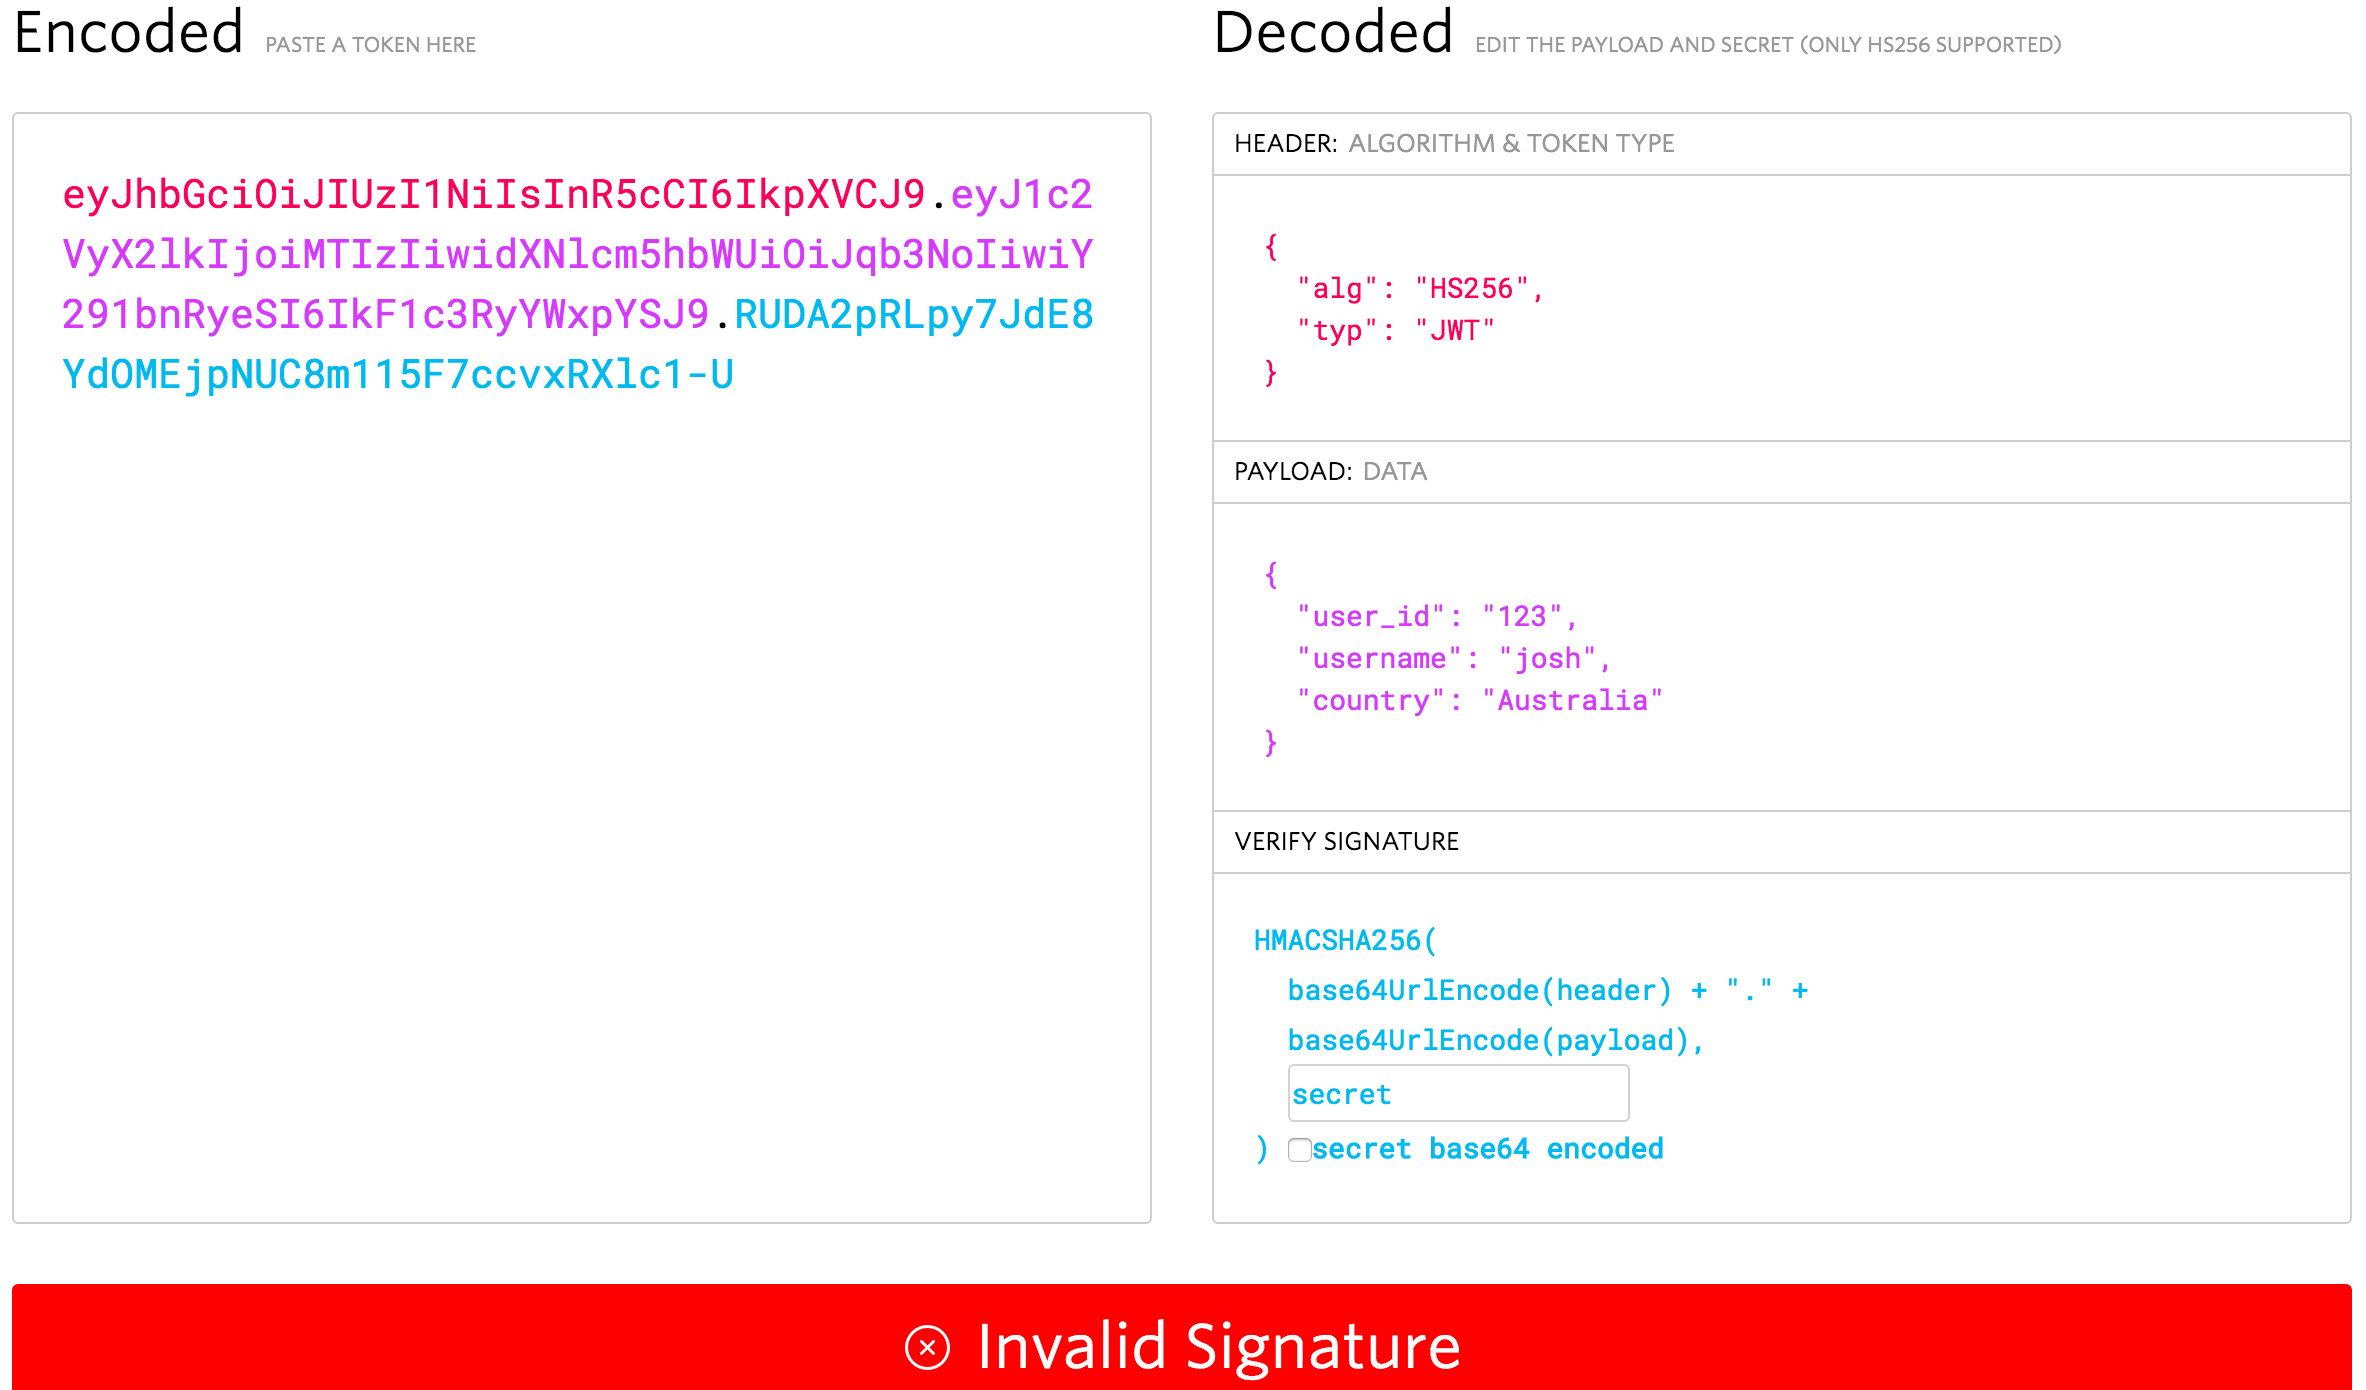
As you can see, it successfully grabs the data from the header and payload, but we get an Invalid Signature warning. This is because we haven’t provided the correct secret of superDuperSecret. If you type that into the secret box in the verify signature section, it should become valid:
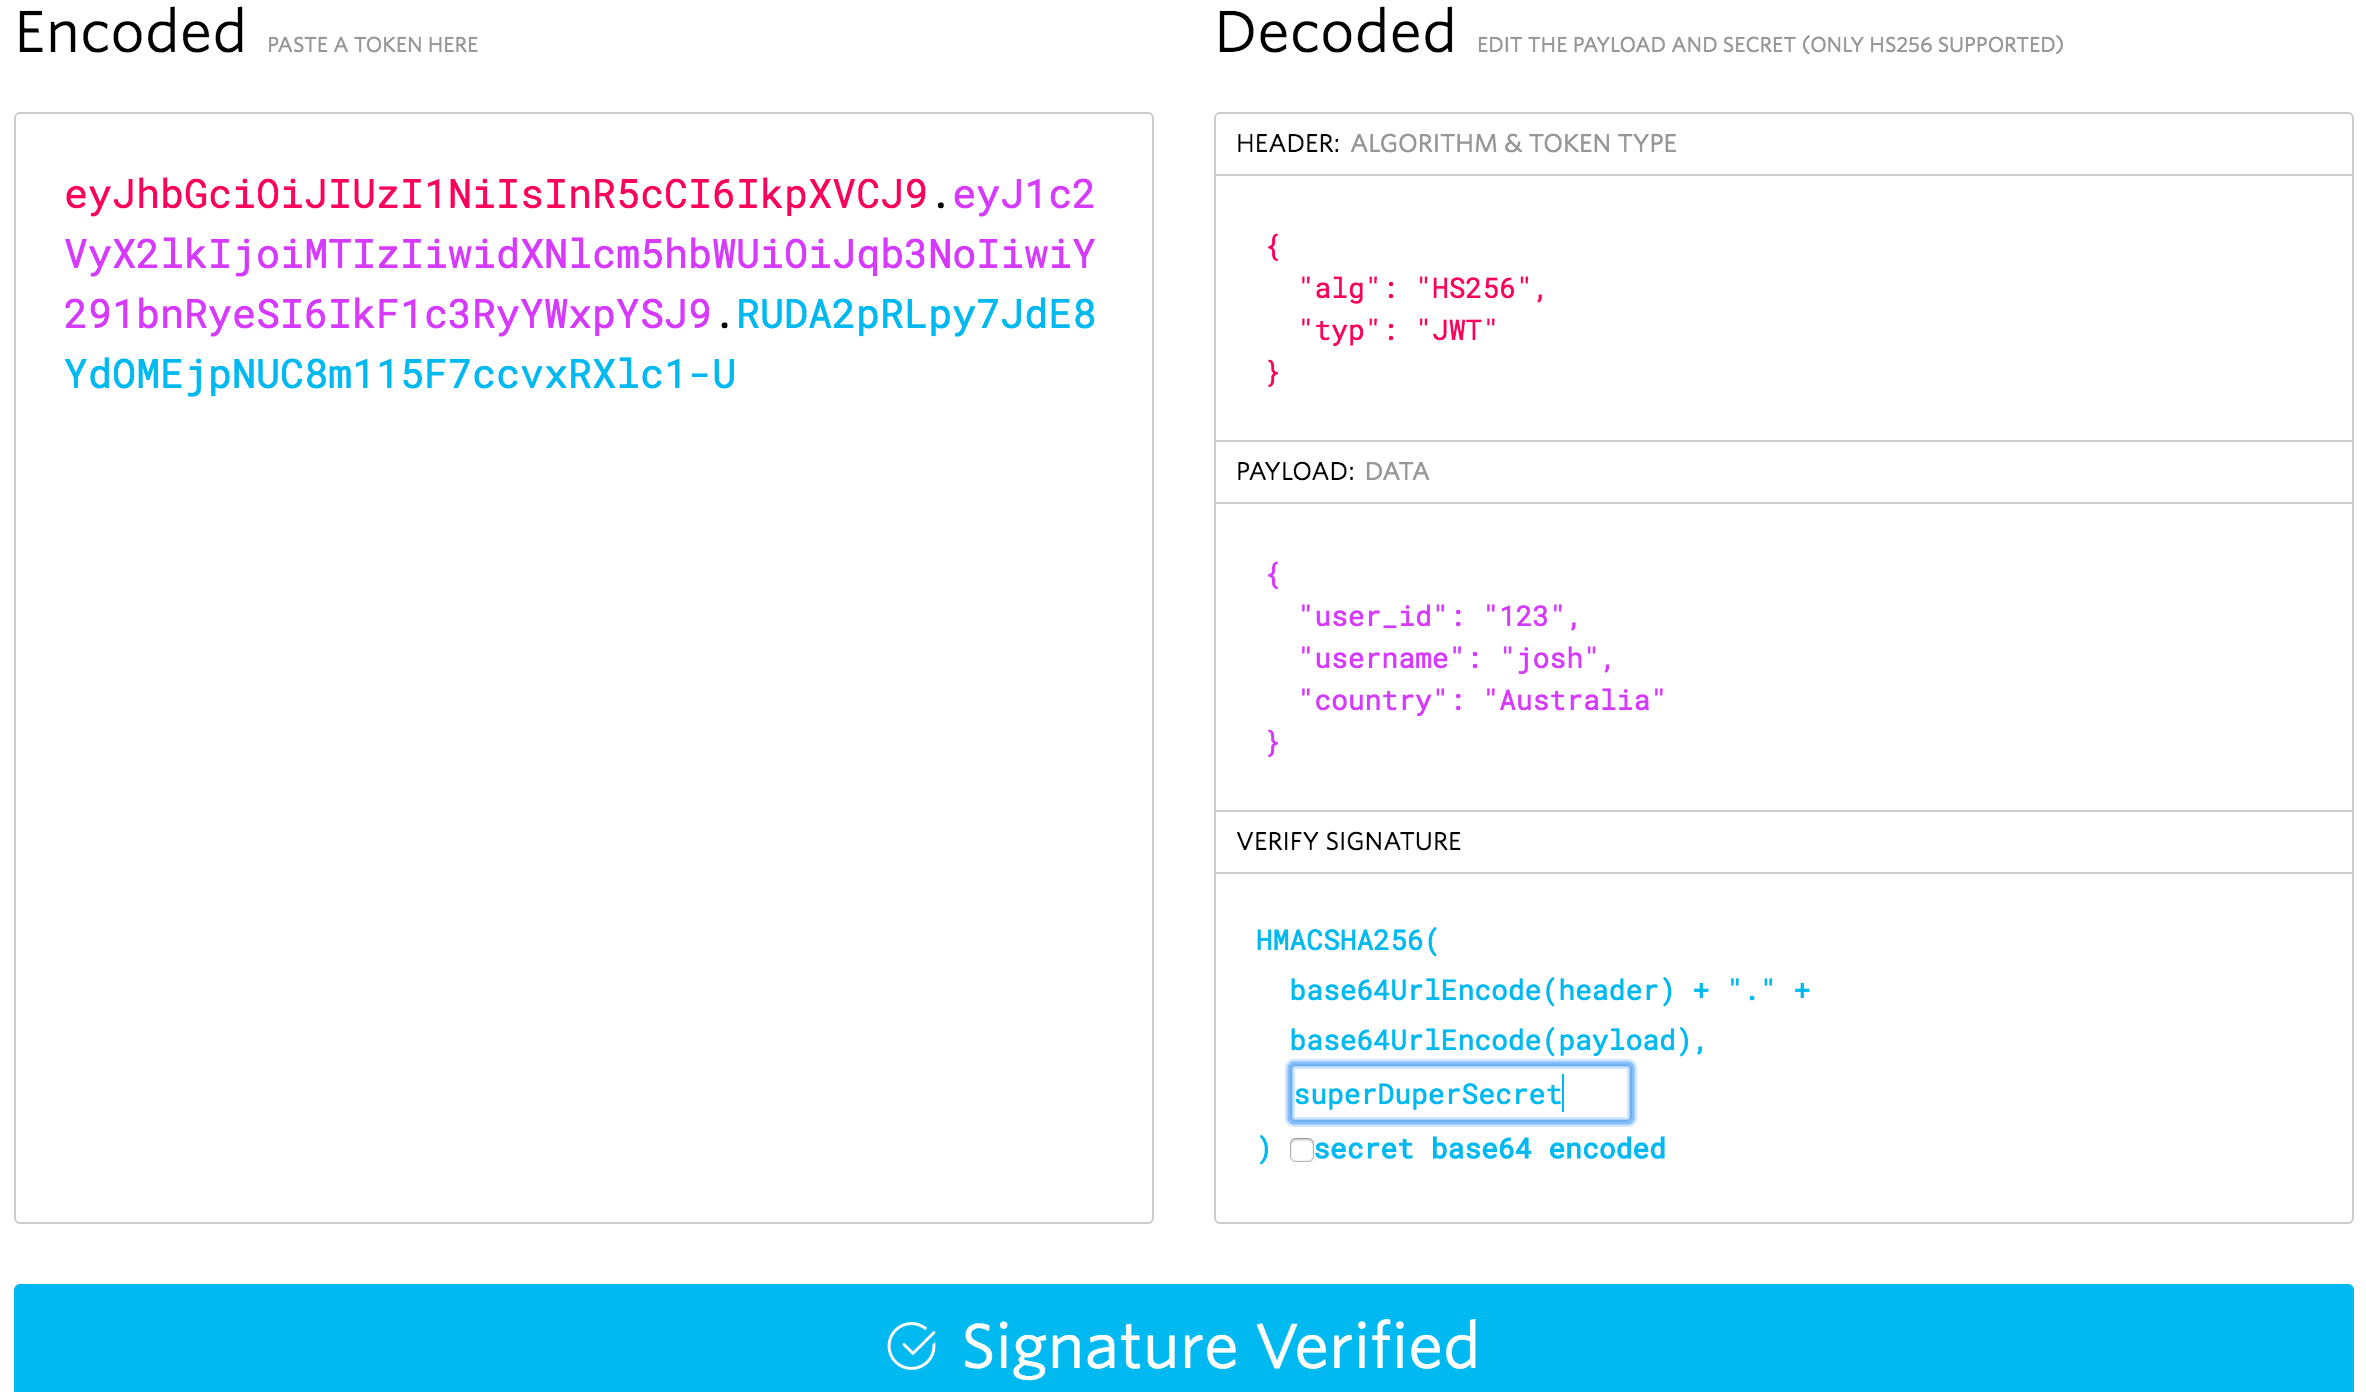
So, how exactly is this secure? Our payload data and header have just been base64 encoded, which can just as easily be base64 decoded by anybody. Indeed, if you were able to get your hands on the JWT we just created, even if you didn’t know the secret, you could easily read the payload (by using the atob function in Javascript for example, or by pasting it into the debugger we just used). The important point is that it can’t be changed, since the verification signature is built using the header and the payload data, if either of those change, we won’t be able to verify the signature – so if somebody tampers with the JWT, we will know.
To give an example, let’s say that I log into some service, and that service sends me a JWT with the following payload (which I have nefariously decoded after digging through the browser local storage):
{
    "user_id": "24"
}
The service could use that JWT to identify me as the user with an id of 24 and, as long as I send that token with my requests, allow me to do all the things “User 24” is allowed to do. Thinking I’m super clever and that this server has an awful authorisation process, I could change that id to 25 or 45, encode it again, and send back the JWT, granting me access to those user accounts. Not quite. Since the payload data has been changed, the verification signature will now no longer match, and there’s no way to forge the signature unless you know the secret that was used to hash it. When this JWT hits the services server, it will know that it has been tampered with.
Summary
Hopefully this tutorial has given you a decent understanding of what a JSON Web Token is – they are a super simple and secure mechanism for handling the secure communication of data, which have great uses especially for authentication and authorisation.
This part of the tutorial was mostly theory, but in the next part we will be jumping in to using the Ionic Cloud platform to authenticate a user, and then creating our own custom authentication that integrates with the Ionic Cloud platform using JSON Web Tokens.