

Google Maps integration is consistently one of the most popular features of mobile applications. I’ve published tutorials on how to use Google Maps with Ionic many times in the past, but I wanted to revisit the basics again now that some time has passed.
Previously, I have used Ionic and Cordova to build a Google Maps service, but now I want to look into building a more robust Google Maps component for Ionic/Angular using Capacitor. The Google Maps component that we are aiming to build will:
- Load the Google Maps JavaScript SDK dynamically
- If a connection is not currently available, automatically load the SDK when a connection becomes available
- Add styling to display the map on screen correctly
- Provide a method for adding markers to the map
Specifically, some things that this approach improves upon over what we have done previously is:
- Everything is handled in the one component, so integration is very easy (just drop in
<google-map></google-map>) - Previously, we built a custom
ConnectivityServiceto handle online/offline states. Now we will just rely on the Network plugin in Capacitor. - The dynamically loaded Google Maps script will be added in a more Angular friendly way
- This version will use the Geolocation Capacitor plugin, which aims to address some common issues faced on Android
- It will just be better designed all round
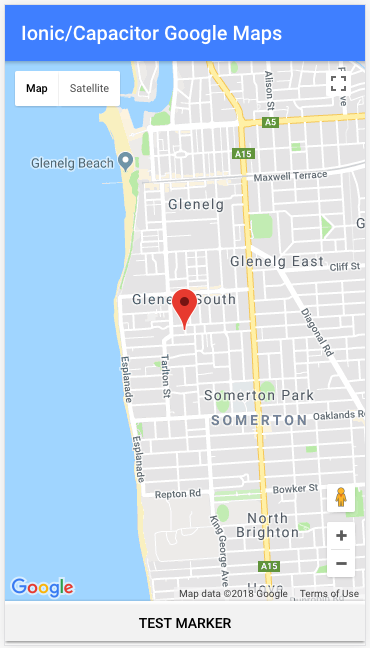
By the end of this tutorial, we will have something that looks like this:
In a production scenario, there are a few more features that I would add. It is simple enough to add more methods to integrate various other methods of the Google Maps SDK, but I think perhaps the most important missing features are UI/UX related. Ideally, we would want some kind of loading indicator displayed to the user as the map is loading in rather than just having a blank space. If the user were to go offline we would want to automatically disable the map, and then reenable the map when they come back online again. Basically, we don’t want our UI to be confusing or break due to network changes.
However, those features would expand the scope of this tutorial too much, and it is something I will be adding to the Ionic 4 update for Building Mobile Apps with Ionic. I don’t mean to tease you with missing features, these are just some important considerations to be aware of should you wish to extend the component in this tutorial.
Before We Get Started
Last updated for Ionic 3.9.2
Before you go through this tutorial, you should have at least a basic understanding of Ionic concepts. You must also already have Ionic set up on your machine.
If you’re not familiar with Ionic already, I’d recommend reading my Ionic Beginners Guide or watching my beginners series first to get up and running and understand the basic concepts. If you want a much more detailed guide for learning Ionic, then take a look at Building Mobile Apps with Ionic.
1. Generate a New Ionic Application
To get started, we are going to generate a new Ionic application.
Run the following command to generate a new Ionic application:
ionic start ionic-google-maps-example blankWe are also going to set up our custom component now.
Run the following command to generate the Google Maps component:
ionic generate component GoogleMapsIn order to be able to use that component, we need to make sure it is included in our app.module.ts file.
Modify src/app/app.module.ts to reflect the following:
import { BrowserModule } from '@angular/platform-browser';
import { ErrorHandler, NgModule } from '@angular/core';
import { IonicApp, IonicErrorHandler, IonicModule } from 'ionic-angular';
import { SplashScreen } from '@ionic-native/splash-screen';
import { StatusBar } from '@ionic-native/status-bar';

import { MyApp } from './app.component';
import { HomePage } from '../pages/home/home';

import { ComponentsModule } from '../components/components.module';

@NgModule({
  declarations: [MyApp, HomePage],
  imports: [BrowserModule, ComponentsModule, IonicModule.forRoot(MyApp)],
  bootstrap: [IonicApp],
  entryComponents: [MyApp, HomePage],
  providers: [
    StatusBar,
    SplashScreen,
    { provide: ErrorHandler, useClass: IonicErrorHandler },
  ],
})
export class AppModule {}
If you are not familiar with using or creating custom components in Ionic/Angular, it might be worthwhile to watch this video first.
Since we will be loading an external library and referencing a global google object, it is also important that we let the TypeScript compiler know about it. Otherwise, it will get confused as to what google is and you will run into the following error:
Cannot find name 'google'.To install the appropriate types for Google Maps, just run the following command:
npm install @types/googlemaps --save-dev2. Set up Capacitor
Before we get into the actual coding, we are also going to set up Capacitor in our project. Keep in mind that Capacitor is still in alpha, and is not production ready. Since Capacitor is in alpha, things are likely to change including the setup instructions. Therefore, I would suggest that you follow these steps in order to install Capacitor in your Ionic project.
We will be using Capacitor APIs for both Geolocation and Network. If you intend to run your application on iOS and Android you will need to make sure that your application has the appropriate permissions. Make sure to read the iOS and Android notes here and ensure that your application is set up correctly.
What about the native Google Maps plugin?
It is possible to use the native Google Maps SDK if you plan on running your application on iOS or Android. We will not be doing this, and will instead use the Google Maps Javascript SDK across all platforms. I have some pretty strong opinions on why you shouldn’t use the Native SDK with Ionic, and you can read about that here: Google Maps in Ionic: Native or Web?.
The main point I make in the above article is that the method for integrating the Native SDK is essentially cutting a window into your web view so that the native view that sits behind your web view can be seen. This seems like a very hacky approach to me and just doesn’t integrate that well with a web-based application. On the other hand, the JavaScript SDK is designed to work in a web environment.
This is just my opinion, it doesn’t mean I am correct, but that is why we will be focusing on the JavaScript SDK for this tutorial.
3. Set up the Google Maps Component
Now that we have set up everything we need, it is time to jump into the code. The code for this component is actually reasonably complex. So, what I am going to do is paste all of it at once, and then we will talk through what each section is doing step by step.
Modify src/components/google-maps/google-maps.ts to reflect the following:
import { Component, Input, Renderer2, ElementRef, Inject } from '@angular/core';
import { DOCUMENT } from '@angular/platform-browser';
import { Plugins } from '@capacitor/core';

const { Geolocation, Network } = Plugins;

@Component({
  selector: 'google-map',
  templateUrl: 'google-map.html'
})
export class GoogleMapComponent {

    @Input('apiKey') apiKey: string;

    public map: any;
    public markers: any[] = [];
    private mapsLoaded: boolean = false;
    private networkHandler = null;

    constructor(private renderer: Renderer2, private element: ElementRef, @Inject(DOCUMENT) private _document){

    }

    ngOnInit(){

        this.init().then((res) => {
            console.log("Google Maps ready.")
        }, (err) => {
            console.log(err);
        });

    }

    private init(): Promise<any> {

        return new Promise((resolve, reject) => {

            this.loadSDK().then((res) => {

                this.initMap().then((res) => {
                    resolve(true);
                }, (err) => {
                    reject(err);
                });

            }, (err) => {

                reject(err);

            });

        });

    }

    private loadSDK(): Promise<any> {

        console.log("Loading Google Maps SDK");

        return new Promise((resolve, reject) => {

            if(!this.mapsLoaded){

                Network.getStatus().then((status) => {

                    if(status.connected){

                        this.injectSDK().then((res) => {
                            resolve(true);
                        }, (err) => {
                            reject(err);
                        });

                    } else {

                        if(this.networkHandler == null){

                            this.networkHandler = Network.addListener('networkStatusChange', (status) => {

                                if(status.connected){

                                    this.networkHandler.remove();

                                    this.init().then((res) => {
                                        console.log("Google Maps ready.")
                                    }, (err) => {
                                        console.log(err);
                                    });

                                }

                            });

                        }

                        reject('Not online');
                    }

                }, (err) => {

                    // NOTE: navigator.onLine temporarily required until Network plugin has web implementation
                    if(navigator.onLine){

                        this.injectSDK().then((res) => {
                            resolve(true);
                        }, (err) => {
                            reject(err);
                        });

                    } else {
                        reject('Not online');
                    }

                });

            } else {
                reject('SDK already loaded');
            }

        });


    }

    private injectSDK(): Promise<any> {

        return new Promise((resolve, reject) => {

            window['mapInit'] = () => {
                this.mapsLoaded = true;
                resolve(true);
            }

            let script = this.renderer.createElement('script');
            script.id = 'googleMaps';

            if(this.apiKey){
                script.src = 'https://maps.googleapis.com/maps/api/js?key=' + this.apiKey + '&callback=mapInit';
            } else {
                script.src = 'https://maps.googleapis.com/maps/api/js?callback=mapInit';
            }

            this.renderer.appendChild(this._document.body, script);

        });

    }

    private initMap(): Promise<any> {

        return new Promise((resolve, reject) => {

            Geolocation.getCurrentPosition().then((position) => {

                console.log(position);

                let latLng = new google.maps.LatLng(position.coords.latitude, position.coords.longitude);

                let mapOptions = {
                    center: latLng,
                    zoom: 15
                };

                this.map = new google.maps.Map(this.element.nativeElement, mapOptions);
                resolve(true);

            }, (err) => {

                reject('Could not initialise map');

            });

        });

    }

    public addMarker(lat: number, lng: number): void {

        let latLng = new google.maps.LatLng(lat, lng);

        let marker = new google.maps.Marker({
            map: this.map,
            animation: google.maps.Animation.DROP,
            position: latLng
        });

        this.markers.push(marker);

    }

}
First, let’s take a look at the initial set up of the component.
@Input('apiKey') apiKey: string;

    public map: any;
    public markers: any[] = [];
    private mapsLoaded: boolean = false;
    private networkHandler = null;

    constructor(private renderer: Renderer2, private element: ElementRef, @Inject(DOCUMENT) private _document){

    }

    ngOnInit(){

        this.init().then((res) => {
            console.log("Google Maps ready.")
        }, (err) => {
            console.log(err);
        });

    }
The only input we need to pass into the component is an apiKey which we will supply like this:
<google-map apiKey="YOUR_GOOGLE_API_KEY"></google-map>We have set up some class members that will hold a reference to the map, keep track of the markers added to the map, keep track of whether or not the SDK has finished loading, and we also have a reference for the network listener we will set up later.
We are injecting Renderer2 and ElementRef which we will need to inject the script into the document. We also inject DOCUMENT which is a way for us to access the global document object in a more Angular friendly way. If you are unfamiliar with using Renderer and ElementRef I would recommend watching this tutorial: Safely Modifying Elements with ElementRef & Renderer in Ionic.
In our ngOnInit lifecycle hook we trigger the init method, which triggers the entire chain of the process we will use to load the Google Maps JavaScript SDK and create a new map.
private init(): Promise<any> {

        return new Promise((resolve, reject) => {

            this.loadSDK().then((res) => {

                this.initMap().then((res) => {
                    resolve(true);
                }, (err) => {
                    reject(err);
                });

            }, (err) => {

                reject(err);

            });

        });

    }
The first init function is reasonably straightforward. This will trigger loading the Google Maps JavaScript SDK into the application, and once it has finished loading it calls the initMap function to set up the map.
private loadSDK(): Promise<any> {

        console.log("Loading Google Maps SDK");

        return new Promise((resolve, reject) => {

            if(!this.mapsLoaded){

                Network.getStatus().then((status) => {

                    if(status.connected){

                        this.injectSDK().then((res) => {
                            resolve(true);
                        }, (err) => {
                            reject(err);
                        });

                    } else {

                        if(this.networkHandler == null){

                            this.networkHandler = Network.addListener('networkStatusChange', (status) => {

                                if(status.connected){

                                    this.networkHandler.remove();

                                    this.init().then((res) => {
                                        console.log("Google Maps ready.")
                                    }, (err) => {
                                        console.log(err);
                                    });

                                }

                            });

                        }

                        reject('Not online');
                    }

                }, (err) => {

                    // NOTE: navigator.onLine temporarily required until Network plugin has web implementation
                    if(navigator.onLine){

                        this.injectSDK().then((res) => {
                            resolve(true);
                        }, (err) => {
                            reject(err);
                        });

                    } else {
                        reject('Not online');
                    }

                });

            } else {
                reject('SDK already loaded');
            }

        });


    }
The loadSDK function starts to get a little more complicated. At a high level, what this function does is:
- If the user is online, load the Google Maps JavaScript SDK
- If the user is not online, set up a listener for when they come online and then load the SDK
We use the Network Capacitor API to check whether the user has an Internet connection available or not, and we also use the same API to set up the listener if they don’t. As of the time of writing this, the Network API does not have a web implementation. This is why in the error handler for our getStatus call we need to use navigator.onLine to check if they are online and then add the SDK if they are. The Network API will have a web implementation in future, so this portion of the code could be removed when it does.
private injectSDK(): Promise<any> {

        return new Promise((resolve, reject) => {

            window['mapInit'] = () => {
                this.mapsLoaded = true;
                resolve(true);
            }

            let script = this.renderer.createElement('script');
            script.id = 'googleMaps';

            if(this.apiKey){
                script.src = 'https://maps.googleapis.com/maps/api/js?key=' + this.apiKey + '&callback=mapInit';
            } else {
                script.src = 'https://maps.googleapis.com/maps/api/js?callback=mapInit';
            }

            this.renderer.appendChild(this._document.body, script);

        });

    }
This function just handles adding the Google Maps script to the document. The way in which the Google Maps JavaScript SDK indicates that it has finished loading is through the use of a callback function specified in the SDK URL: callback=mapInit. So, we need to set up a global function on the window object so that this function can successfully be called by the SDK. We wait for this callback function to be triggered before we resolve the promise.
private initMap(): Promise<any> {

        return new Promise((resolve, reject) => {

            Geolocation.getCurrentPosition().then((position) => {

                console.log(position);

                let latLng = new google.maps.LatLng(position.coords.latitude, position.coords.longitude);

                let mapOptions = {
                    center: latLng,
                    zoom: 15
                };

                this.map = new google.maps.Map(this.element.nativeElement, mapOptions);
                resolve(true);

            }, (err) => {

                reject('Could not initialise map');

            });

        });

    }

    public addMarker(lat: number, lng: number): void {

        let latLng = new google.maps.LatLng(lat, lng);

        let marker = new google.maps.Marker({
            map: this.map,
            animation: google.maps.Animation.DROP,
            position: latLng
        });

        this.markers.push(marker);

    }
The remaining two functions cover pretty generic Google Maps functionality. The initMap function handles grabbing the users location and then generating a new map centered on that location. The addMarker function will allow us to call it to add a marker on the map whenever we like.
To finish off this component, we will just need to make a couple of small changes:
Modify src/components/google-map/google-map.scss to reflect the following:
google-map {
  display: block;
  width: 100%;
  height: 100%;
}
This will force the Google Map to display properly on the screen.
Modify src/components/google-map/google-map.html to be empty (we don’t need a template!)
4. Use the Google Maps Component
Now that we have our component created, we just need to make use of it. In order to add Google Maps to your Ionic application, you will need to get an API key from Google. Just visit this page to generate your own API key.
Once you have that, let’s take a look at how we can add a Google Map to our application.
Modify src/pages/home/home.html to reflect the following:
<ion-header>
  <ion-navbar color="primary">
    <ion-title> Ionic/Capacitor Google Maps </ion-title>
  </ion-navbar>
</ion-header>

<ion-content>
  <google-map apiKey="YOUR_GOOGLE_API_KEY"></google-map>
</ion-content>

<ion-footer>
  <button ion-button color="light" full (click)="testMarker()">
    Test Marker
  </button>
</ion-footer>
All we need to do is drop in:
<google-map apiKey="YOUR_GOOGLE_API_KEY"></google-map>We have also added a button to test adding a marker to the map. Let’s implement the code for that.
Modify src/pages/home/home.ts to reflect the following:
import { Component, ViewChild } from '@angular/core';
import { GoogleMapComponent } from '../../components/google-map/google-map';

@Component({
  selector: 'page-home',
  templateUrl: 'home.html',
})
export class HomePage {
  @ViewChild(GoogleMapComponent) mapComponent: GoogleMapComponent;

  constructor() {}

  testMarker() {
    let center = this.mapComponent.map.getCenter();
    this.mapComponent.addMarker(center.lat(), center.lng());
  }
}
All we need to do to access our addMarker method is to grab a reference to the Google Map component using @ViewChild. If you are not familiar with @ViewChild you should check out this tutorial.
That’s it! You should now be able to see your map and add markers to it:
Summary
This custom Google Maps components now provides us with a reliable way to inject a Google Map into our Ionic/Capacitor applications without having to do any kind of complicated integration. It can also be easily extended to include more features.