Animations are one of those little extra touches in an application that can transform an average looking application into something truly impressive. When done well, we can create animations that perform well, look great, and improve the user experience of our application.
There is a lot of talk around the performance of web-based or hybrid mobile applications, but it is often irrelevant as web tech is capable of smoothly running most (but not all) types of mobile applications. However, animations are one of those legitimate areas of concern for performance when using a web-based approach. Animations, in some cases, will need to make use of the extra computing power that is available to native applications that aren’t making use of the browser to render the user interface.
There will be more limitations for animations when using a web-based approach, but that does not mean that we can not do animations effectively with Ionic. It is just important that we understand a few concepts and how best to approach designing the animations - simple changes in the approach to an animation can transform it from being extremely laggy/janky to smooth and performant.
The more complex the animations become, the more they will need to be optimised, and some types of animations might not be feasible for Ionic applications. A big factor to consider is the types of devices you intend for your application to run on, as older devices may have a harder time running animations that may perform smoothly on more modern devices.
However, we can actually achieve quite a lot in terms of animation with very little impact on performance - probably a lot more than some people might think. As an example, take a look at this custom page transition animation that I created in one of my recent UI Challenge videos:
Episode #2 of my UI Challenge series is up! This time we live code an expanding button screen transition animation for @ionicframework and cover:
— Josh Morony (@joshuamorony) November 19, 2019
✅ Animating with Transforms
✅ Page Transition Animations
✅ CSS Variables
✅ Sneaky Tricks
Full video 👉 https://t.co/Vk7hva794f pic.twitter.com/IrtT2GPA1t
It looks quite cool and complex - it appears as if the button is expanding and morphing into the new page that is being displayed. Aside from looking cool, this animation also achieves something in terms of user experience. Rather than just transitioning directly to a new page, it makes the connection between the cart button and the cart button much more obvious, as one transitions smoothly into the other.
Despite how complex the animation may look, it actually uses very simple techniques that are easy for the browser to perform. I’ll let you watch the video if you are interested in the full implementation but the basic idea is using a CSS transition to animate the transform property on the button to:
transform: scale3d(35, 35, 1);which makes it big enough (35 times its original size in this case) to fill the whole screen, and then using a custom page transition animation that Ionic supports to fade in a modal rather than using the default transition animation.
The combination of these two simple techniques leads to an effect that is impressive, easy to implement, and also cheap in terms of performance. That is what the rest of this article is going to be about: how to identify and use simple techniques that can lead to impressive and efficient animations. The point of this article is not to cover all of the impressive things you could do with animations in Ionic, but rather how you can get a lot of value from just understanding a few reasonably simple concepts and techniques.
1. Understand browser rendering
Aside from wanting our animations to be cool/relevant/interesting the key goal is to get them to feel fluid and smooth. The most impressive animation is going to detract from the application if it feels jumpy or janky or laggy.
The basic idea behind creating an experience that feels smooth is that our application continues to render at around, at least, 60fps (frames per second) and is able to deliver “instantaneous” feedback to the user - if the user interacts with the application (e.g. by swiping or clicking a button) it should respond with some kind of feedback within about 80ms which will make the interaction feel instant to the user.
This means that we need to make our applications efficient enough that the browser can render visual changes to the screen at least 60 times per second. This will mean the user perceives everything as happening smoothly/fluidly like a movie, rather than as a series of individual images being displayed to them (which will feel “janky”). A movie is still just a series of still images, but when those still images are displayed quickly enough our brains kind of fill in the blanks and don’t perceive the gaps in-between. We also need to make sure the browser can respond to interactions within about 80ms.
The more work we ask the browser to do (e.g. through inefficient animations or other complex operations) the less likely it is that it will be able to achieve these results. It is therefore important to understand how the browser does its work, so that you can integrate your animations into that process as efficiently as possible.
One of the key aspects of optimising for performance is avoiding causing too many “layouts” which is where the browser calculates the position/size of everything on the screen. For example, if we were to animate the height of a particular element on the page in response to scroll events coming from an <ion-content> component, this would cause a bit of a disaster. If we animate the height of one element, it is going to affect the position of other elements on the page, which means the browser needs to calculate the position of everything again (e.g. it will cause a “layout” or “reflow”). Not only are we causing layouts, but we are also triggering these layouts in quick succession since scroll events are fired off very rapidly. This is a scenario which might be referred to as layout thrashing where we are basically bombarding the browser rendering process with expensive work.
We are going to talk about some aspects of this throughout this article, but it is a good idea to have a general understanding of the browser rendering process. Having a better understanding of the browser rendering process will also help you design more performant applications in general, as well as helping you create performant animations.
2. Use CSS Transitions
Now we are going to get into the actual animation tips - remember that the point of these tips is focusing on the simple things we can do that can create impressive effects with little to no performance cost. Animations can seem complex and difficult to create, but you can create suprisingly impressive animations with very little work.
One of the easiest ways you can create animations in your applications is to use the CSS transition property. You can quite simply do this:
.some-element {
  transition: 1s linear;
}
Now any time that an animatable property changes on the element that has the transition property, it will animate the change instead of just instantly changing. If the opacity property were to change from 0 to 1, the element would smoothly fade in over 1 second rather than instantly appearing. If you get creative, you can create some impressive animations with this simple concept - it is generally what I use to create most of the animations I add to my Ionic applications.
You can apply a generic transition property that will target any property changes, or you can target properties specifically:
.some-element {
  transition: opacity 1s linear;
}
Now only opacity changes would be animated. You can also play around with the easing functions which control how the animation plays. Above we have used a “linear” easing function which will play the animation evenly over the 1 second, but you can use different timings that will cause the animation to play faster/slower at certain points of the animation. This can help add a bit of “character” to the animation, making it feel more sleek/smooth or perhaps fun/bouncy. Animations can drastically affect the mood of your application.
IMPORTANT: When it comes to animating CSS properties, not all properties are created equal in terms of performance. Although we can achieve lots of interesting things by animating the many different CSS properties that are animatable, we should generally try to only use a few of them which we will discuss now.
3. Use Transforms
The transform property is something that I rely on a lot to create animations. We can supply different values to the CSS transform property to do things like rotate, scale, and translate elements on the page. A rotate transform will rotate the element to the degree value you specify, a scale transform will make an element smaller or larger, and a translate transform will change the position of the element.
This is a concept I have made use of if both of my UI Challenge videos to scale the cart button as we saw above:
Episode #2 of my UI Challenge series is up! This time we live code an expanding button screen transition animation for @ionicframework and cover:
— Josh Morony (@joshuamorony) November 19, 2019
✅ Animating with Transforms
✅ Page Transition Animations
✅ CSS Variables
✅ Sneaky Tricks
Full video 👉 https://t.co/Vk7hva794f pic.twitter.com/IrtT2GPA1t
and to translate the position of the content area (so that it moves up when the user scrolls down):
Watch as I attempt to live code a fancy animated card layout in @Ionicframework and @angular. This one has all sorts of juicy stuff like:
— Josh Morony (@joshuamorony) November 12, 2019
✅ Shadow DOM
✅ CSS Variables
✅ CSS Animations
✅ Intersection Observer API
✅ Silly Mistakes
Full video 👉 https://t.co/3Zi87eC10q pic.twitter.com/JqybmeiFMJ
The fantastic thing about transforms is that they don’t affect the position of other elements on the page, which means it is cheap for the browser to perform. If we changed the width/height of an element to make it bigger it would be a big drain on performance, however if we scale it to make it bigger it will perform very well. That means that we have the ability to spin things, move things, or shrink/grow them (maybe all at the same time) all without having much of an impact on performance.
4. Use Opacity
Another thing that is easy for the browser to animate that can create some interesting effects is opacity. This can be used to create animations as simple as something appearing on the screen, but it can also be used to create more complex effects like the screen transition animation above, as well as this shared element transition effect:
5. Avoid everything else
The properties we have discussed above are things that we can animate without having to worry too much about wrecking performance. That doesn’t mean that we can’t also animate other properties as well, but you should be much more careful and check how much it is impacting performance by using the browser performance profiling tools. Animating things like margin and height is going to be a lot more costly than transforms and opacity - especially if the animation is happening in response to something like scroll events that are triggered fast and often.
6. Add/Remove a Class
Now we are going to get more into how to actually apply the animations - again, focusing on keeping things reasonably simple. With CSS transitions, all we need to happen is for the CSS property to change (e.g. changing the opacity property on an element from 1 to 0). One way we can do this is by applying or removing a CSS class on an element. Once the class is added or removed, the animation will play (assuming that the element has the transition property added to it).
7. Manually modify a style to apply an animation
As well as using classes to change the value of a CSS property, we can also just modify it directly. For example, we could just do something like this:
const fab = this.el.querySelector('ion-fab');
fab.style.transform = 'scale3d(35,35,1)';
Exactly how you go about modifying styles through JavaScript might depend on the framework that you are using (in Angular for example you would want to use the Renderer), but this is the code I used in my Ionic/StencilJS example for the expanding button page transition. Since the button had the transition property applied to it, the animation could be triggered within the JavaScript code by directly modifying the style property.
Modifying styles as part of some kind of complex application logic can lead to some much more interesting animations.
8. Use CSS Keyframes
If it isn’t enough to just simply change a property and have that change animate, you can also use CSS keyframes to define an animation. This will allow you to easily define multiple properties and what they should change from and to - you can even define what certain properties should be at a certain percentage of the way through an animation. For example, let’s suppose you were animating a translate transform. Rather than just shifting the element 100px to the left and animating back to its normal position, maybe you want the element to fly past its final resting position halfway through the animation and then settle back into the final position to create a bit more motion. This can be achieved with keyframes.
9. Use SVGs
Scalable Vector Graphics (SVG) are an animation super power for the web. If you are unfamiliar with vector graphics, it is an image that is defined mathematically such that it can be scaled without losing quality. However, an SVG brings much more to the table than the ability to scale. An SVG has its own DOM structure (you can literally copy and paste the code for an SVG directly into your application if you want), and that DOM can be manipulated and animated just like the rest of your application. There is a lot to learn about how to create and use SVGs, but the possibilities are endless. The entire SVG is defined in that DOM structure, and we can manipulate/animate whatever we like within that DOM.
Keeping the same performance concepts in mind, we can create many impressive animations in Ionic applications with the help of SVGs. Here is one example from a tutorial I wrote a little while ago:
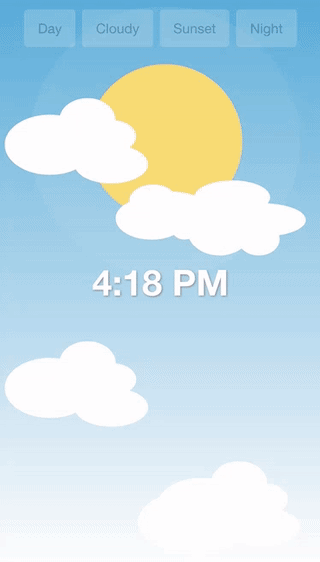
It uses SVGs to animate the background to reflect the current weather conditions. You can check out the full tutorial here: Animating a Dynamic Background with an SVG in Ionic.
10. Use what the framework provides
Finally, make sure you aren’t missing something obvious. Ionic provides us with a lot out of the box, so before you start building out your own custom solution make sure to check if there are any Ionic components or APIs that suit your needs. The <ion-modal> component allows you to supply a custom enterAnimation and leaveAnimation, and the <ion-nav> component can also be configured with custom animations. There are the <ion-spinner> and <ion-progress-bar> components both of which serve as animated progress indicators. We have the <ion-skeleton-text> which can also be configured as an animated placeholder for content.
Constantly improving the user interface of Ionic applications seems to be a goal of the Ionic team, so always keep an eye out for further improvements and innovations are animations in Ionic applications.
Summary
There is a lot more that can be achieved with animations, and many more ways we can do it. We haven’t even discussed the Web Animations API or any of the many different libraries out there that can help with animations, but the main point of this article was to cover some simple tips for how you can relatively easily create impressive animations without negatively affecting the performance of your application.