

In the previous tutorial in this series, we covered the concept of mocks and creating a fake/mock backend that we could make HTTP requests to. The general idea is that we want to isolate the thing we are testing, we don’t want external dependencies complicating/influencing our unit tests.
We have been taking a Test Driven Development to developing a simple eCommerce application, which means that we write the tests for our code before we write the code itself. If you are not familiar with this concept, I’d recommend going back and reading earlier tutorials in this series.
At this point, we have a pretty basic app that just displays a product list loaded via an HTTP request. Functionality wise, we haven’t done a whole lot yet, but we have been adhering to TDD principles, and the code that we do have has great test coverage. We can be quite confident that the code we do have is working as intended.
Now we’re going to continue to develop the application using the Test Driven Development approach. We will be adding a few new requirements to the application:
- Add the ability to add products to a wishlist
- Add the ability to view products in the wishlist
In this tutorial, we will just be focusing on creating the wishlist page and creating a test to ensure that navigation between our two pages is working. To do this, we will introduce the concept of spies.
Before We Get Started
IMPORTANT: This tutorial follows on from Test Driven Development in Ionic: Http Requests and Mocks, if you want to follow along with the example you will need to have completed the previous tutorial first.
1. Let’s check on our progress
So far we have been doing most of our development just by trying to satisfy the tests that we have written - there has been little need to actually run the application in the browser. This is a funny thing about the development workflow with automated testing. Without using a TDD approach you would likely spend a lot of time serving your application and checking/debugging there, but if you are writing and satisfying tests you could spend hours developing your application without ever running it in the browser and find that it all works as intended.
There comes a time where we will need to actually serve our application at some point, and it is a good idea to check in on the progress every now and then - this can help serve as a sanity test for your automated tests, because maybe things aren’t going as smoothly as they appear.
If we run ionic serve now, we will find that the default Ionic “Home” page is displayed with none of our work. This is because we have been doing all of our work on a separate “Product” page. Eventuallly, we may want to have a “home” page for the application, but for now let’s just make it the default page of the application.
Modify src/app/app-routing.module.ts to reflect the following:
import { NgModule } from '@angular/core';
import { PreloadAllModules, RouterModule, Routes } from '@angular/router';

const routes: Routes = [
  { path: '', redirectTo: 'product', pathMatch: 'full' },
  {
    path: 'home',
    loadChildren: () =>
      import('./home/home.module').then((m) => m.HomePageModule),
  },
  {
    path: 'product',
    loadChildren: './product/product.module#ProductPageModule',
  },
];

@NgModule({
  imports: [
    RouterModule.forRoot(routes, { preloadingStrategy: PreloadAllModules }),
  ],
  exports: [RouterModule],
})
export class AppRoutingModule {}
WARNING: We just modified some code without first writing a test - this is a big no no for the TDD approach. In the grand scheme of things this probably seems unimportant/insignificant, but I think it is a good idea to pretty strictly adhere to the TDD methodology if you are using it. If you cut a few corners here and there you might end up cutting more corners than you intended initially.
The reason that we have done this is because this code change would usually be covered by an E2E test, not a unit test, and we are not focusing on E2E tests in this series. We are focusing just on unit tests, but typically you would use E2E tests to test the application as a whole and unit tests to test indiviudual chunks of your application - these are both important to the TDD approach for Ionic applications.
If we attempt to serve our application again now, we will run into this error:
StaticInjectorError(Platform: core)[HttpClient]:
    NullInjectorError: No provider for HttpClient!
If we had integrated E2E tests into our TDD workflow for this application, it would have caught this error before it became an issue for us. The reason we are receiving this error is because we are now making use of the HttpClient but our application does not have the HttpClientModule included. This is why we can’t rely on only unit testing, as individual parts can work in isolation but as a whole the application could be completely broken.
Typically, we would have run into this error during the execution of an E2E test, and then we would have fixed the issue in response to that. For now (since we are not covering E2E tests) we will just fix it without an E2E test.
Add the
HttpClientModuleto src/app/app.module.ts:
import { NgModule } from '@angular/core';
import { BrowserModule } from '@angular/platform-browser';
import { RouteReuseStrategy } from '@angular/router';
import { HttpClientModule } from '@angular/common/http';

import { IonicModule, IonicRouteStrategy } from '@ionic/angular';
import { SplashScreen } from '@ionic-native/splash-screen/ngx';
import { StatusBar } from '@ionic-native/status-bar/ngx';

import { AppComponent } from './app.component';
import { AppRoutingModule } from './app-routing.module';

@NgModule({
  declarations: [AppComponent],
  entryComponents: [],
  imports: [
    BrowserModule,
    IonicModule.forRoot(),
    AppRoutingModule,
    HttpClientModule,
  ],
  providers: [
    StatusBar,
    SplashScreen,
    { provide: RouteReuseStrategy, useClass: IonicRouteStrategy },
  ],
  bootstrap: [AppComponent],
})
export class AppModule {}
If you serve the application you should now be able to see the list of products.
2. A bit of styling
Sure, our application works and all our tests are passing, but it looks ugly. We’re going to take a minute to pretty things up a bit. As I mentioned in the last tutorial, this falls into the refactor step of the TDD approach. Since we have our tests to ensure that the application is working as expected, we can refactor the application as we wish without having to worry so much about creating regressions (breaking existing code in the application by adding new features).
Modify src/app/product/product.page.scss to reflect the following:
ion-content {
  --ion-background-color: #f9f9f9;
}

ion-card {
  --ion-item-background: #fff;

  ion-card-subtitle {
    color: #b1b1b1;
  }
}
Modify src/pages/product/product.html to reflect the following:
<ion-header>
  <ion-toolbar>
    <ion-title>Product</ion-title>
  </ion-toolbar>
</ion-header>

<ion-content>
  <ion-card *ngFor="let product of productsService.products">
    <ion-card-header>
      <ion-card-title>{{ product.title }}</ion-card-title>
      <ion-card-subtitle>{{ product.price }}</ion-card-subtitle>
    </ion-card-header>
    <ion-card-content>{{ product.description }}</ion-card-content>
  </ion-card>
</ion-content>
Now the application should look something like this:
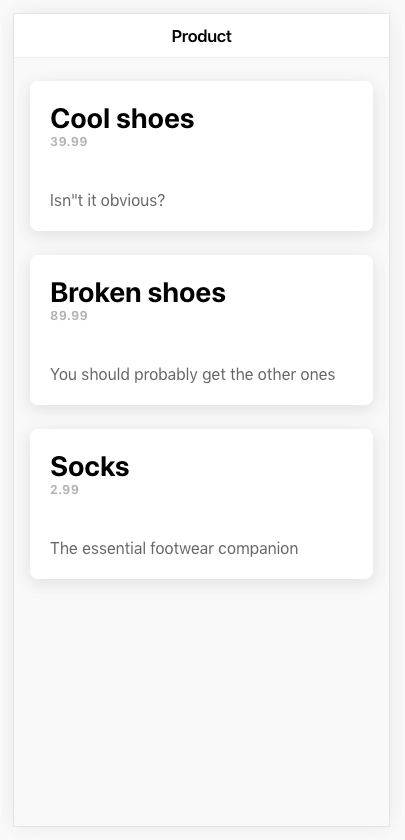
Still not the most “eCommerce-y” looking application in the world, but it doesn’t hurt so much to look at anymore. I just mentioned that since we have our tests in place we are (reasonably) safe to change features that are covered by tests as we please. If something breaks, our tests will (hopefully) tell us about it.
Let’s check to see if everything is fine after our changes by running npm test:
6 specs, 1 failure, randomized with seed 21147
Page: Product Page > displays products containing a title, description, and price in the list
TypeError: Cannot read property 'nativeElement' of null
Oops! We’ve broken something. We haven’t actually broken the application, we’ve broken the test itself. Our test relied on grabbing an ion-item inside of an ion-list to check for content, but since we have changed our template to use cards that won’t work anymore. Everything still might be working just fine, but we need to fix that test to reflect the new structure.
Update the appropriate test in src/app/product/product.page.spec.ts to reflect the following:
it('displays products containing a title, description, and price in the list', () => {
  let productsService = fixture.debugElement.injector.get(ProductsService);
  let firstProduct = productsService.products[0];

  fixture.detectChanges();

  de = fixture.debugElement.query(By.css('ion-card'));
  el = de.nativeElement;

  expect(el.textContent).toContain(firstProduct.title);
  expect(el.textContent).toContain(firstProduct.description);
  expect(el.textContent).toContain(firstProduct.price);
});
Now let’s check that it works again with npm test:
Executed 6 of 6 SUCCESS (0.375 secs / 0.354 secs)All good! Let’s continue.
3. Creating our First Spy
We want to create a WishlistPage but we can’t write any code until we have a test, so we are going to write that first. We’re going to continue using the methodology of writing tests in the way that we want them to work (even if the things we are attempting to use don’t exist yet), and use the errors that the tests create to drive the development of the application.
We want to be able to navigate from our ProductPage to our WishlistPage (which does not exist yet), so let’s create a test for that in the test file for the product page.
Modify src/app/product/product.page.spec.ts to reflect the following:
import { CUSTOM_ELEMENTS_SCHEMA } from '@angular/core';
import { async, ComponentFixture, TestBed } from '@angular/core/testing';
import { HttpClientTestingModule } from '@angular/common/http/testing';
import { By } from '@angular/platform-browser';
import { DebugElement } from '@angular/core';

import { NavController } from '@ionic/angular';
import { NavMock } from '../../mocks';

import { ProductsService } from '../services/products.service';
import { ProductsMock } from '../../mocks';

import { ProductPage } from './product.page';

describe('Page: Product Page', () => {
  let comp: ProductPage;
  let fixture: ComponentFixture<ProductPage>;
  let de: DebugElement;
  let el: HTMLElement;

  beforeEach(async(() => {
    TestBed.configureTestingModule({
      declarations: [ProductPage],
      imports: [HttpClientTestingModule],
      providers: [
        {
          provide: ProductsService,
          useClass: ProductsMock,
        },
        {
          provide: NavController,
          useClass: NavMock,
        },
      ],
      schemas: [CUSTOM_ELEMENTS_SCHEMA],
    }).compileComponents();
  }));

  beforeEach(() => {
    fixture = TestBed.createComponent(ProductPage);
    comp = fixture.componentInstance;
  });

  afterEach(() => {
    fixture.destroy();
    comp = null;
    de = null;
    el = null;
  });

  it('is created', () => {
    expect(fixture).toBeTruthy();
    expect(comp).toBeTruthy();
  });

  it('displays products containing a title, description, and price in the list', () => {
    let productsService = fixture.debugElement.injector.get(ProductsService);
    let firstProduct = productsService.products[0];

    fixture.detectChanges();

    de = fixture.debugElement.query(By.css('ion-card'));
    el = de.nativeElement;

    expect(el.textContent).toContain(firstProduct.title);
    expect(el.textContent).toContain(firstProduct.description);
    expect(el.textContent).toContain(firstProduct.price);
  });

  it('should be able to launch wishlist page', () => {
    let navCtrl = fixture.debugElement.injector.get(NavController);
    spyOn(navCtrl, 'navigateForward');

    de = fixture.debugElement.query(By.css('ion-buttons ion-button'));

    de.triggerEventHandler('click', null);

    expect(navCtrl.navigateForward).toHaveBeenCalledWith('wishlist');
  });
});
We’ve done a few things here, so let’s talk through them. We have provided NavController since our page will make use of that to navigate, but we have replaced it with a new mock called NavMock.
Add the following mock to src/mocks.ts
export class NavMock {
  public navigateBack: Function = (url: string | any[], options: any) => {};
  public navigateForward: Function = (url: string | any[], options: any) => {};
  public navigateRoot: Function = (url: string | any[], options: any) => {};
}
The basic idea with creating mocks is just to implement the same methods/properties that the real implementation provides, but just use dummy implementations. This way we can call these methods (which is what we want to check happens), but calling them won’t actually do anything. For this mock, I have just mocked the methods that the application might use, but there are more methods available in the real NavController - you can mock everything if you wish. To make sure you are setting up the methods correctly, it is a good idea to just take a look at the real implementation and copy out the function signatures (which is how I knew to use url: string | any[], options: any above).
We overwrite the existing NavController by using useClass – if you would like a more in-depth explanation about mocks then I would recommend reading the previous tutorial.
Let’s take a look at our new test:
it('should be able to launch wishlist page', () => {
  let navCtrl = fixture.debugElement.injector.get(NavController);
  spyOn(navCtrl, 'navigateForward');

  de = fixture.debugElement.query(By.css('ion-buttons ion-button'));

  de.triggerEventHandler('click', null);

  expect(navCtrl.navigateForward).toHaveBeenCalledWith('wishlist');
});
We are testing that we can launch the WishlistPage from our ProductPage. We get a reference to the NavController in the same way that we have referenced the Products service in previous tests, but we are doing a couple of things here that we haven’t before.
We set up a spy on the navigateForward method of the NavController. Spies are provided by the Jasmine framework (the framework that we are using to create these tests), and it allows you to track any calls that are made to a function. This allows us to use methods like toHaveBeenCalled and toHaveBeenCalledWith to check if a function was ever called throughout the duration of the test, or whether the function was called with the correct arguments. In this case, we expect that the navigateForward method of the NavController should have been called with the wishlist (which will be our route for our new page).
We also use the triggerEventHandler method on DebugElement to trigger the (click) handler for a button that we will use to launch the WishlistPage. This button also does not exist yet, but again, it’s how we want it to work.
Let’s see what’s happening with our tests now:
Page: Product Page should be able to launch wishlist page FAILED
	TypeError: Cannot read property 'triggerEventHandler' of null
As we should expect (and as we want), we are getting an error for our test. We are trying to trigger an event on a button that does not even exist yet. Now that we have a failing test, let’s work on getting the test to pass.
4. Navigating to the Wishlist Page
We are going to cheat again. We don’t actually need the Wishlist page itself in order to get the unit test for our Product page to pass. All we need to know is that the navigateForward method was called with the wishlist parameter, which can happen successfully without the Wishlist page actually existing.
This is another scenario where having an E2E test would verify the existence of the page itself and the ability to actually navigate to it (rather than just calling the method that should trigger the navigation). Since we are not dealing with E2E tests in this series, we will never hit a point with our workflow that forces us to create the Wishlist page, so we are just going to do it now.
Run the following command to generate the
WishlistPage:
ionic g page WishlistWith that created, let’s get back to the error at hand:
Page: Product Page should be able to launch wishlist page FAILED
	TypeError: Cannot read property 'triggerEventHandler' of null
This makes sense because we are trying to get a reference to a button we haven’t added yet. Let’s do that now.
Modify src/app/product/product.page.html to reflect the following:
<ion-header>
  <ion-toolbar>
    <ion-title>Product</ion-title>
    <ion-buttons slot="end">
      <ion-button (click)="launchWishlist()"
        ><ion-icon slot="icon-only" name="heart"></ion-icon
      ></ion-button>
    </ion-buttons>
  </ion-toolbar>
</ion-header>

<ion-content>
  <ion-card *ngFor="let product of productsService.products">
    <ion-card-header>
      <ion-card-title>{{ product.title }}</ion-card-title>
      <ion-card-subtitle>{{ product.price }}</ion-card-subtitle>
    </ion-card-header>
    <ion-card-content>{{ product.description }}</ion-card-content>
  </ion-card>
</ion-content>
We’ve added an ion-button to the header, which should now be able to be successfully referenced by using the CSS selector ion-buttons ion-button (which we are doing in our test).
Page: Product Page should be able to launch wishlist page FAILED
	Error: Expected spy navigateForward to have been called with [ 'wishlist' ] but it was never called.
We are still stuck on the same test, but it’s a different error now (which is good). This is because we have not implemented the launchWishlist method that will trigger the navigation.
NOTE: We are programatically triggering the navigation with NavController here for the sake of the example, but there is no need for it. We could much more easily just link the button directly to the Wishlist page with a simple routerLink on the button.
Modify src/app/product/product.page.ts to reflect the following:
import { Component, OnInit } from "@angular/core";
import { NavController } from "@ionic/angular";
import { ProductsService } from "../services/products.service";

@Component({
  selector: "app-product",
  templateUrl: "./product.page.html",
  styleUrls: ["./product.page.scss"]
})
export class ProductPage implements OnInit {
  constructor(public navCtrl: NavController, public productsService: ProductsService) {}

  ngOnInit() {
    this.productsService.load();
  }

  launchWishlist() {
    this.navCtrl.navigateForward("wishlist");
  }
}
Now let’s check the tests:
Executed 8 of 8 SUCCESS (0.33 secs / 0.315 secs)It works! We will move on to creating some tests for the WishlistPage itself next, but that is something we will save for the next tutorial. For now, let’s just do another check to see that everything works as we expect when we run ionic serve. You should see that you can click on the heart icon in the toolbar and it will take you to the new Wishlist page (which doesn’t have anything on it).
Summary
We’ve covered a few new concepts in this tutorial, most notably spies and triggering event bindings on elements, and we have also taken some more steps towards developing our application using the Test Driven Development methodology. In the next tutorial, we will continue to drive out the functionality of the Wishlist page with some more tests.