

A StencilJS application, like many modern applications including those built with Angular or React, consists of a “tree” of components (in the case of StencilJS, this is a tree of web components).
We start with our root component that is added to the index.html file (the entry point for the application), then our root component will add additional components to its template, and then those components will add additional components to their templates and so on.
If we were to visualise the structure of a typical Ionic application built with StencilJS it might look something like this:
<app-root>
  <ion-app>
    <ion-router></ion-router>
    <ion-nav>
      <app-home>
        <my-custom-component> </my-custom-component>
      </app-home>
    </ion-nav>
  </ion-app>
</app-root>
The “root” of our tree is <app-root> which then branches out to <ion-app> which branches out to <ion-router> and <ion-nav> and then our <ion-nav> branches out to <app-home> and so on. The entire application is encapsulated/nested within our initial <app-root> component, which you could consider to be the base of a tree.
Understanding this structure is key to understanding the concepts we will be discussing in this article. Before we discuss exactly what Stencil’s State Tunnel is (and how to use it), we are going to cover the basics of passing data through a StencilJS application. This will help highlight how using state management can simplify that process.
Throughout the article we will also be making references to React’s Context API and Redux - if you are already familiar with these concepts then you will have a headstart in understanding State Tunnel.
Passing Data to Components
If we want to pass data to a component, we can do so using props. If we have the following structure:
<component-one>
  <component-two></component-two>
</component-one>
If we want to pass data from component-one to component-two we can do so using a prop like this:
<component-one>
  <component-two name="Josh"></component-two>
</component-one>
We could then retrieve that data inside of component-two.tsx using the @Prop decorator:
@Prop() name: string;This concept can be used to pass data throughout an application, even to deeply nested child components. For example, let’s take a look at an example using an Ionic web component structure:
<app-root>
  <app-home>
    <some-custom-component></some-custom-component>
  </app-home>
  <app-profile></app-profile>
</app-root>
If we want to share some data from app-root among both the app-profile and some-custom component components (e.g. we are attempting to create some kind of “global” data) we could do so by using props like this:
<app-root>
<app-home userData={data}>
<some-custom-component userData={data} />
</app-home>
<app-profile userData={data} />
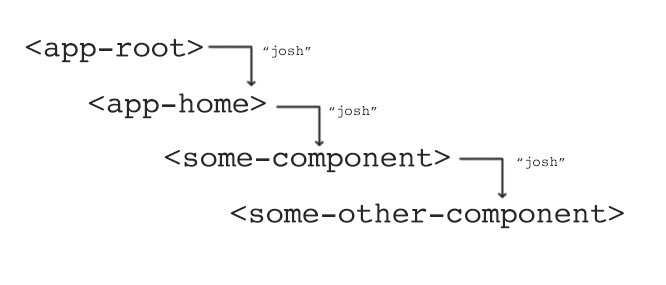
</app-root>This concept is referred to as prop drilling. We basically pass the data to the component that needs it by “drilling” through each level of nesting with props. To get data from app-root to some-custom-component we first pass it to app-home and then app-home can pass it to some-custom-component.
There is nothing wrong with doing this, but you can see how cumbersome it could become if you have a high level of nesting. If you wanted to pass some data to a component that was nested 6 levels deep, you need to do a lot of “drilling”.
There are other methods for achieving the data sharing we are aiming to accomplish, but in this article, we are going to focus on something that StencilJS offers us out of the box.
Introducing Stencil State Tunnel
StencilJS provides a package called State Tunnel that allows us to share “state” throughout the application. By “state” we mostly just mean “data”. If our application has various dynamic parts that can be changed (e.g. different users might log in, different settings or filters might be applied) then our application’s “state” can change, and parts of our application might want to know what that “state” is.
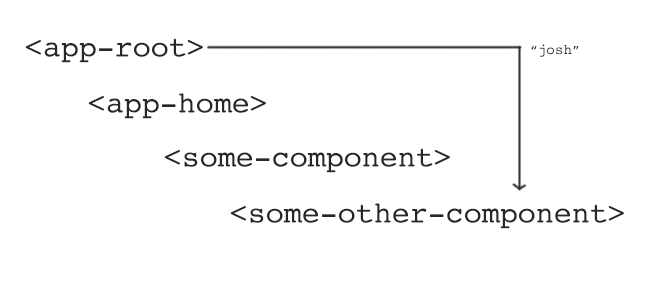
Instead of having to pass data through each component along the way with prop drilling, with State Tunnel we can kind of teleport or “tunnel” data from one component to another. We could pass data directly from app-root to any component, no matter how many levels of nesting we have, by using State Tunnel.
If you are familiar with React’s Context API, State Tunnel is heavily inspired by that and the general concepts are largely the same.
Basically, we can change this:
to this:
If you have an Angular background, you could consider this to somewhat fill the role of providers/services - where in Angular we can “inject” a service into particular components to provide values and methods. As we will touch on later, Redux might be a better fit for this role but State Tunnel can be used to achieve it too.
Using Stencil State Tunnel
Now we are going to walk through the basics of using State Tunnel in a StencilJS application. Before we begin, you will need to make sure that you have the following package installed in your StencilJS project:
npm install --save @stencil/state-tunnel1. Create the Tunnel
We can create a “tunnel” by implementing a file that makes use of the createProviderConsumer provided by the @stencil/state-tunnel package. We create an interface containing the data or methods that we want to be able to pass through the application:
Create a file at src/components/data/user.tsx and add the following:
import { createProviderConsumer } from '@stencil/state-tunnel';

export interface State {
  username: string;
}

export default createProviderConsumer <
  State >
  ({
    username: null,
  },
  (subscribe, child) => (
    <context-consumer subscribe={subscribe} renderer={child} />
  ));
The first parameter we supply to the createProviderConsumer here just sets a default value for the data that we are passing, and the second argument will generally remain the same for any tunnel you create.
2. Pass State to the Tunnel
Next, we need to add our tunnel to the root component and pass it the appropriate “state”. You do not need to set this up on the root component, but since the root component contains all other components, by setting up the tunnel on the root component you will be able to access the data from the tunnel anywhere in the application.
Modify src/components/app-root/app-root.tsx to include your tunnel:
import { Component } from '@stencil/core';
import Tunnel from '../data/user';

@Component({
  tag: 'app-root',
  styleUrl: 'app-root.css',
})
export class AppRoot {
  render() {
    const state = {
      username: 'Josh',
    };

    return (
      <ion-app>
        <ion-router useHash={false}>
          <ion-route url="/" component="app-home" />
          <ion-route url="/profile/:name" component="app-profile" />
        </ion-router>
        <Tunnel.Provider state={state}>
          <ion-nav />
        </Tunnel.Provider>
      </ion-app>
    );
  }
}
The important part here is that any child of <Tunnel.Provider>, at any level of nesting, will be able to access data/methods from the tunnel. In the case of an Ionic application, all of the components in the application are displayed using <ion-nav />, so by surrounding <ion-nav /> with our tunnel we will be able to access the data all throughout the application.
3. Consume State from the Tunnel
Now we just need to access the data from the tunnel, and there are actually a couple of ways to do this. I will show you my preferred method of using injectProps, although it’s not really the “default” approach. I find that this approach is a little cleaner and it also allows for access to the data outside of the render method. You can read about the other approach in the documentation.
Add the tunnel to the component you want to access the data in:
import { Component, Prop, Element } from '@stencil/core';
import Tunnel from '../data/user';

@Component({
  tag: 'app-profile',
  styleUrl: 'app-profile.css',
})
export class AppProfile {
  @Element() el: AppProfile;
  @Prop() username: string;

  render() {
    return [
      <ion-header>
        <ion-toolbar color="primary">
          <ion-buttons slot="start">
            <ion-back-button defaultHref="/" />
          </ion-buttons>
          <ion-title>Profile</ion-title>
        </ion-toolbar>
      </ion-header>,

      <ion-content padding>
        <p>My username is {this.username}</p>
      </ion-content>,
    ];
  }
}

Tunnel.injectProps(AppProfile, ['username']);
There are a couple of important parts here. First, it is important that we set up both @Element() and a @Prop():
  @Element() el: AppProfile
  @Prop() username: string
The injectProps method requires that the component has an @Element decorator (otherwise it can’t inject the prop), and then we use the @Prop to hold the data that is being passed in through the tunnel.
At the bottom of the file, we add this line:
Tunnel.injectProps(AppProfile, ['username']);To pull the data in from the tunnel and set it up on our @Prop.
What about Redux?
If you are familiar with Redux, then you will probably notice similarities with what we are trying to achieve here and Redux. In a sense, Redux is a more complex/powerful/capable version of the React Context API, and the same comparison applies to Stencil’s State Tunnel. For typical application purposes, you might find Redux a better fit for state management, and StencilJS also provides Stencil Redux for this purpose.
I will likely be covering Redux in more depth in future posts.
Summary
Stencil State Tunnel is a convenient way to share state among various components - all you need to do is install the package, create a tunnel and add it the root component (or to the some parent/ancestor of the component you want to share to), and then consume that tunnel in whatever component you like (as long as it is a child of the tunnel entry point).
As I just mentioned, for general “application” purposes, you may find that Redux is a better fit (but that doesn’t mean you can’t still use State Tunnel for simple scenarios).