

Simon Reimler of Devdactic has dropped by this week to drop some knowledge on how you can integrate an Ionic app with the Spotify API to create a sweet music player. Simon knows more than a thing or two about Ionic and has just launched his own video course Ionic by Doing. Enjoy!
Spotify is a great way to stream all of your loved music. As nearly all great services have a public API today, so has Spotify. In this tutorial I will show you how to login to Spotify, access your playlists, read the track data and also play some music snippets. Everything will be wrapped inside a mobile app using the great Ionic Framework .Setup a Clean App
We start with a blank Ionic app and also install ngCordova which we will need for the OAuth process and also the angular-spotify wrapper for the Rest API of Spotify:
ionic start mySpotify blank
cd mySpotify
bower install ngCordova angular-spotify --save
I had some problems with the login process when only using angular-spotify, so I used ngCordova as this makes life a lot easier. After installing those dependencies, make sure to add them to your module inside your app.js:
angular.module('myspotify', [
  'ionic',
  'myspotify.controllers',
  'ngCordova',
  'spotify',
]);
We will also have a controllers.js file for our controllers, so create that file next to your app.js. Also make sure to load all of those files inside the header of your index.html:
<!-- before cordova.js -->
<script src="lib/ngCordova/dist/ng-cordova.js"></script>
<script src="lib/angular-spotify/dist/angular-spotify.min.js"></script>

<!-- your app's js -->
<script src="js/app.js"></script>
<script src="js/controllers.js"></script>
As we need some templates for our views later, make also sure to create a templates folder inside your www/ folder, and create an empty lists.html and playlist.html file inside the templates folder. If you are done with all of this, you are ready to build the simple Spotify player app!
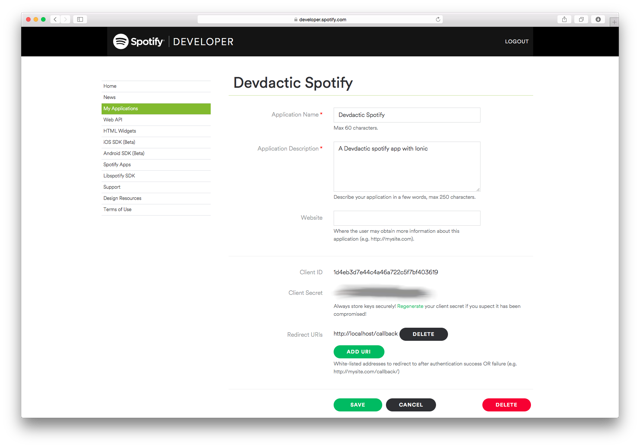
Finally, you need to create a Spotify App, which will give you a client id for your OAuth process. If you got a Spotify account, just login to the Spotify Applications Developer Area and create a new application. Make sure to add http://localhost/callback as a Redirect URI so we can get our access token later. Save your information and it should look similar to this:
Building the Playlist View
Our app will consist of 2 states: The first is the playlists view, the second is the track list for a specific playlist. We want to wrap everything inside a simple navigation, so let’s start with defining the states we need inside our app.js:
.config(function($stateProvider, $urlRouterProvider) {
  $urlRouterProvider.otherwise('/');

  $stateProvider.state('lists', {
    url: '/',
    templateUrl: 'templates/lists.html',
    controller: 'ListsCtrl'
  })
  .state('playlist', {
    url: '/playlist/:listid/:userid/:listname',
    templateUrl: 'templates/playlist.html',
    controller: 'PlaylistCtrl'
  });
});
To get those states rendered correctly, open the index.html and add the base for our navigation view inside the body:
<body ng-app="myspotify">
  <ion-nav-bar class="bar-balanced">
    <ion-nav-back-button> </ion-nav-back-button>
  </ion-nav-bar>
  <ion-nav-view></ion-nav-view>
</body>
We will see how to set the parameters for our second state later, first of all let’s add the controllers we need for our 2 states.
The ListsCtrl will handle the OAuth process using $cordovaOauth once our $ionicPlatform get’s called. Make sure to set your Spotify App id (which you created in the previous step) as the clientId inside the controller. The Spotify OAuth process needs an array of permissions, so in our case we call it with
$cordovaOauth.spotify(clientId, [‘user-read-private’, ‘playlist-read-private’]) which means we want access to the user data and the private playlists of the user.
Once the login was successful, we store the OAuth token to retrieve it on the next app startup and get the playlist by:
- calling Spotify.getCurrentUser() to identify the current logged in user
- calling Spotify.getUserPlaylists(userid) to grab the playlists of this specific user
Add all of the code below to your controllers.js:
angular
  .module('myspotify.controllers', [])

  // To prevent errors
  .controller('PlaylistCtrl', function () {})

  .controller(
    'ListsCtrl',
    function ($scope, $ionicPlatform, $cordovaOauth, Spotify) {
      var clientId = 'your-spotify-app-client-id';
      $scope.playlists = [];

      $scope.performLogin = function () {
        $cordovaOauth
          .spotify(clientId, ['user-read-private', 'playlist-read-private'])
          .then(
            function (result) {
              window.localStorage.setItem('spotify-token', result.access_token);
              Spotify.setAuthToken(result.access_token);
              $scope.updateInfo();
            },
            function (error) {
              console.log('Error -> ' + error);
            }
          );
      };

      $scope.updateInfo = function () {
        Spotify.getCurrentUser().then(
          function (data) {
            $scope.getUserPlaylists(data.id);
          },
          function (error) {
            $scope.performLogin();
          }
        );
      };

      $ionicPlatform.ready(function () {
        var storedToken = window.localStorage.getItem('spotify-token');
        if (storedToken !== null) {
          Spotify.setAuthToken(storedToken);
          $scope.updateInfo();
        } else {
          $scope.performLogin();
        }
      });

      $scope.getUserPlaylists = function (userid) {
        Spotify.getUserPlaylists(userid).then(function (data) {
          $scope.playlists = data.items;
        });
      };
    }
  );
After all of this the complete playlists information of the user is inside our $scope.playlists, so now we can craft a view around this object. Open the lists.html and insert:
<ion-view title="My Playlists">
<ion-content class="has-header">
<ion-list>
<ion-item
ng-repeat="list in playlists"
ui-sref="playlist({listid: list.id, userid: list.owner.id, listname: list.name})"
>
{{list.name}}
</ion-item>
</ion-list>
</ion-content>
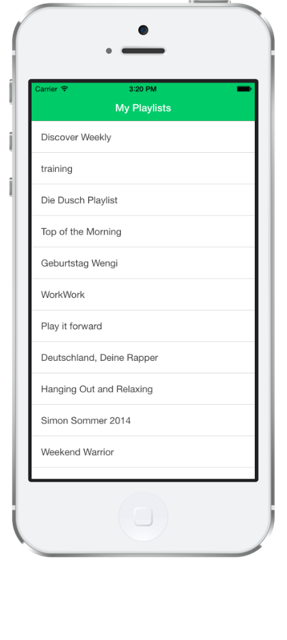
</ion-view>Inside this view we will repeat over all playlists and also call our next state with all the parameters we need to get the complete tracklist of a playlist. If you run your app right now, you should be able to perform the login and see all of the playlists. Keep in mind that we use Cordova so this will only work on the simulator/device! Your app should look like this (depending on your playlists..) to this point:
Showing Spotify Tracks and playing Music
The last step is to handle the selected playlist and grab all the tracks in it. For this we can use the passed parameters of the state, and call Spotify.getPlaylist(userid, listid) to get a list with all the information regarding to a specific list.
Inside the controller we will also handle the playback of a track, which is limited to a 30 second sample using the Spotify Web Api. If you want to stream a complete song, you need to do this through Spotify and also use the appropriate SDK for your platform. Take a look at this iOS wrapper with Cordova for the Spotify Api for more information.
As this is beyond the scope of this article, we will use what we get – which is in fact a lot already. To play and stop the sound we just have to create a new Audio() and set the source of it once we click on a song.
Finally we want to be able to open a song in the Spotify app, so inside openSpotify we call the inAppBrowser which should be automatically installed when you initiated your project.
Now go ahead and add the code to your controllers.js and replace the current existing dummy PlaylistCtrl with this:
.controller('PlaylistCtrl', function($scope, $stateParams, Spotify) {
  var listid = $stateParams.listid;
  var userid = $stateParams.userid;
  $scope.listname = $stateParams.listname;

  $scope.audio = new Audio();

  $scope.tracks = [];

  Spotify.getPlaylist(userid, listid).then(function (data) {
    $scope.tracks = data.tracks.items;
  });

  $scope.playTrack = function(trackInfo) {
    $scope.audio.src = trackInfo.track.preview_url;
    $scope.audio.play();
  };

  $scope.openSpotify = function(link) {
    window.open(link, '_blank', 'location=yes');
  };

  $scope.stop = function() {
    if ($scope.audio.src) {
      $scope.audio.pause();
    }
  };

  $scope.play = function() {
    if ($scope.audio.src) {
      $scope.audio.play();
    }
  };
});
Like with the playlists before, we got all the information about the tracks of this list inside our scope variable $scope.tracks. The last thing we need to do is craft the playlist.html view, so add these lines:
<ion-view title="{{listname}}">
<ion-content class="has-header">
<ion-list>
<ion-item ng-repeat="item in tracks" class="list card">
<div class="item item-avatar">
<img src="{{item.track.album.images[0].url}}" />
<h2>{{item.track.name}}</h2>
<p>{{item.track.artists[0].name}}</p>
</div>
<div class="item tabs tabs-secondary tabs-icon-left">
<a class="tab-item" ng-click="playTrack(item)">
<i class="icon ion-music-note"></i>
Play Preview
</a>
<a
class="tab-item"
ng-click="openSpotify(item.track.external_urls.spotify)"
>
<i class="icon ion-share"></i>
Open in Spotify
</a>
</div>
</ion-item>
</ion-list>
</ion-content>
<ion-footer-bar align-title="left" class="bar-light" ng-show="audio.src">
<button class="button button-outline button-balanced" ng-click="play()">
<i class="ion-play"> Play</i>
</button>
<button class="button button-outline button-balanced" ng-click="stop()">
<i class="ion-stop"> Stop</i>
</button>
</ion-footer-bar>
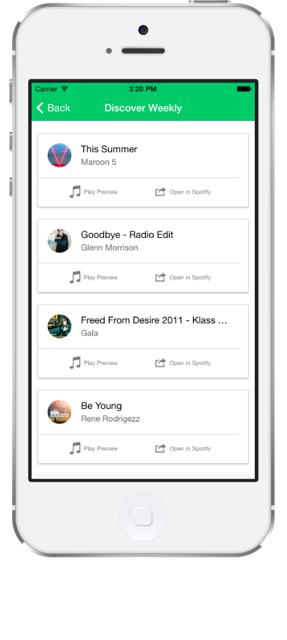
</ion-view>This will go through the information and create little cards for every song with an image of the album, the name of the song and the band. Below every card is a simple bar with the option to play the preview or open the complete song inside the Spotify app with a special URL.
Below our content is a ion-footer-bar which holds the controls to start/stop the music once we selected a song. This bar will only be shown when we selected a song. If you run your app now and select a playlist, your view should look somehow like this:
Conclusion
In this tutorial you learned how to easily connect to the Spotify Web Api with Ionic to grab information about a user, see his lists and even play a bit of audio from Spotify. There are a lot more options inside the Spotify Wrapper which we have installed, so you could craft a real Spotify management app around that one!
If you want learn more about the Ionic Framework and how to make great Apps, take a look at my Blog Devdactic or join my online course Ionic by Doing: Create Mobile Apps with HTML5 and Javascript.