There’s a few different Physics systems provided by default in Phaser, each with their own uses cases, advantages and disadvantages. The three default physics systems are:
- Arcade
- Ninja
- P2
Arcade Physics is probably the one most people use in general, most examples and tutorials you will find for Phaser will use the Arcade Physics system. It’s the simplest and fastest physics system available in terms of performance, but the physics are also very basic. Most notably, all collisions using the Arcade Physics system are AABB vs AABB, or, rectangle vs rectangle. All collisions are calculated based on a bounding rectangle (hitbox), so if you had a circular sprite that you wanted to collide the collision would have to be with its bounding rectangle, not the circle itself:
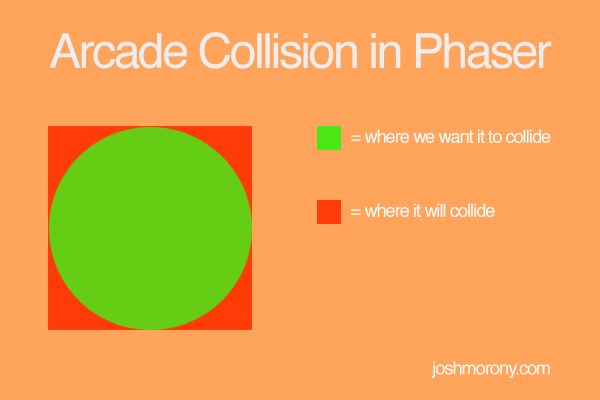
In a game this would mean that a collision could occur even if the circle is not colliding with anything. Circles are a bit of an unfortunate example, but in most cases this collision detection works well and will look fine.
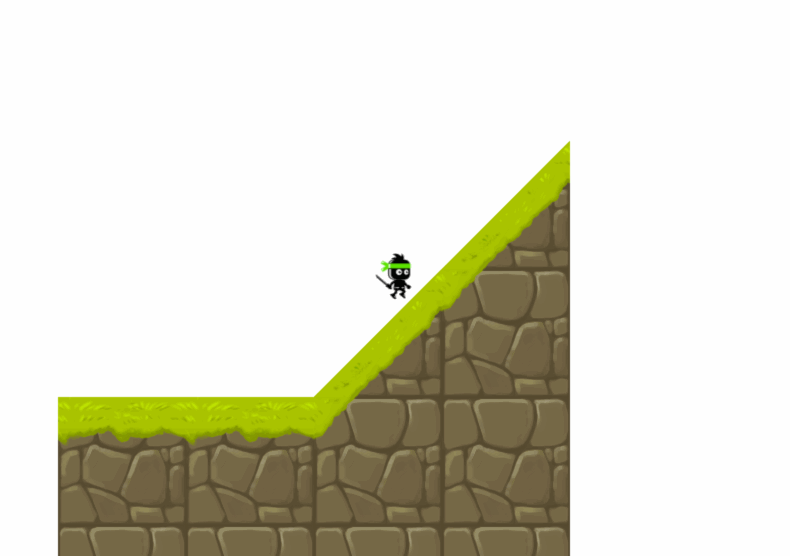
Ninja Physics is a bit more complex than the Arcade Physics system. It was originally created for Flash games but has been ported to JavaScript by Phaser’s creator Richard Davey. The most noteable difference about the Ninja Physics system is that it allows collisions with slopes. Ninja Physics would allow you to create a platformer with ramps and hills and so on, whereas in the Arcade Physics sytem the map would have to be completely blocky (Minecraft style).
P2 Physics is a much more complex and realistic physics system. Using P2 you could create things like springs, pendulums, motors and so on – the only real downside to using this system is that it’s much more “expensive” and can put a strain on resources. Using P2 physics on a mobile device would not work as well as Arcade Or Ninja would.
That’s a very brief summary of the different types of physics systems you can use in Phaser (there’s also another commercial physics system, Box2D). You can even use different physics systems together, as I mentioned P2 is the most “expensive” physics system, but you could design your game to use Arcade Physics mostly, and only use P2 where required.
In the rest of this tutorial we are going to look at how you can get Ninja Physics set up in your game (it’s not quite as easy as you might think).
Setting up Ninja Physics
Before we get started, it’s important to note that the Ninja Physics system is not actually included in Phaser by default anymore. It will be making a return in Phaser 3, but since it is not often used Richard decided to leave it out by default:
So we will need to create a version of the Phaser library with Ninja Physics included from the source code by using Grunt. To do this we will need to clone the Phaser repository locally and then run a command to build it.
Before you can do that you will need to make sure you have git and Node.js set up on your machine. Once you have those set up, or if you do already, you can follow the rest of these steps.
NOTE: If you’re from the future and you are viewing this post, Ninja Physics may be included by default now. So before doing all of this, check if Ninja Physics is available or not. Alternatively, if you don’t feel like doing all of this you can grab a copy of Phaser v2.4.2 with Ninja Physics that I compiled here.
Clone the Phaser repository to your machine by running the following command
git clone https://github.com/photonstorm/phaser.git
Run the following commands to install Grunt and the Grunt CLI
npm install grunt-cli
npm install grunt
If you don’t know what Grunt is, you can check out the website here. Essentially, it’s a tool for running automated tasks.
Install all of the dependencies for Phaser by running the following command
npm install
Create a build of Phaser with Ninja Physics included by running the following command
grunt build ninjaphysics
Now if you go to the build/custom folder you should find a JavaScript file called phaser-ninja-physics.js.
Replace your phaser.js or phaser.min.js file in your Phaser project with the phaser-ninja-physics.js file you just created
and that’s it! I’ll be writing a tutorial very shortly that expands upon my Arcade Physics based running platformer tutorial to use the Ninja Physics system instead so keep an eye out for that!
UPDATE: The Ninja Physics Game Tutorial is out now.