The Firebase JavaScript SDK - which we will be using in this tutorial - provides a really simple web-based method for authenticating your users in an Ionic application by using Facebook. If we are intending to launch the application as a PWA then this method will work fantastically.
However, if we are using Capacitor (or Cordova) to create native builds for the iOS/Android platforms, this web-based authentication flow becomes a little bit more awkward.
If you are using Facebook for authentication, then you are probably expecting that your users will have the native Facebook application installed on their iOS/Android device. If we make use of that native Facebook application (which the user is probably already logged into) we can provide a really smooth log-in experience, where the user will just need to click to allow access to your application.
The downside of using a web-based authentication flow is that we won’t be able to utilise the native Facebook application in the login flow, it would have to be done through the browser instead, which would likely require the user to manually enter in their username and password. This isn’t ideal, and doesn’t provide a good user experience (in fact, this is likely something that would cause users to quit the app right away).
But do not despair! In the wise words of everybody’s favourite commercial taco meme: Por qué no los dos?:

Fortunately, Capacitor (and Cordova if you prefer) will allow us to quite simply use both of these authentication methods. When our code is running on the web we will use the web-based authentication flow, and when the application is running natively we will use the native authentication flow.
Before We Get Started
Last updated for Ionic/Angular 4.7.1
This is an advanced tutorial, and I will be assuming that you already have a reasonably good understanding of how to use both Ionic and Angular, and also how to set up and configure native platforms with Capacitor. Although I won’t be explaining the more basic concepts in this tutorial, I will try to link out to additional resources where possible for those of you who might not be as familiar.
This tutorial will be specifically for Ionic/Angular, but it should be quite adaptable to other frameworks. For example, I have previously covered a similar process for an Ionic/StencilJS application that used Anonymous authentication instead of Facebook: Firebase: Anonymous Authentication. It would require a bit of tweaking, but you could implement most of the concepts we will be discussing in this tutorial in an Ionic/StencilJS application as well.
We will not be building the application from scratch in this tutorial, I will just be using a Login page and a Home page as an example which you could then integrate into however your application is set up. If you don’t already have an application to work with, just create a new blank Ionic/Angular application:
ionic start ionic-facebook-login blank --type=angularcreate a Login page:
ionic g page Loginand set up your routes in src/app/app-routing.module.ts as follows:
import { NgModule } from '@angular/core';
import { PreloadAllModules, RouterModule, Routes } from '@angular/router';

const routes: Routes = [
  { path: '', redirectTo: 'login', pathMatch: 'full' },
  {
    path: 'home',
    loadChildren: () =>
      import('./home/home.module').then((m) => m.HomePageModule),
  },
  { path: 'login', loadChildren: './login/login.module#LoginPageModule' },
];

@NgModule({
  imports: [
    RouterModule.forRoot(routes, { preloadingStrategy: PreloadAllModules }),
  ],
  exports: [RouterModule],
})
export class AppRoutingModule {}
The general idea is that we want the Login page to be the default page, and then we will go through our authentication process before proceeding to the Home page. On future visits to the application, this process should happen automatically (unless the user manually logs out).
1. Set up Facebook
First, we are going to set up everything that is required to interact with Facebook. This will involve quite a few different steps including:
- Creating an application through the Facebook developer portal
- Installing plugins/packages in our application
- Creating a key hash (if you are building for Android)
- Configuring for the native platforms
Each of these steps individually are quite straight-forward, but there is a bit to get through.
1.1 Configure the App with Facebook
First, we will register our application through the Facebook developer portal. To do that, follow these steps:
- Go to developers.facebook.com and create an account if necessary
- Go to My Apps and click Create App
- Add a Display Name and click Create App ID
- Under Add a Product click Set Up on Facebook Login
- Select Settings from the left side menu (we don’t want to use the “Quickstart” we are presented with initially)
- Select Basic
- From here, you will be able to see your App ID and App Secret - make a note of both of these for later
- Scroll to the bottom and click + Add Platform
- Select iOS (if you are building for iOS) and add the Bundle ID of your application (e.g.
com.yourcompany.yourapp) - Select + Add Platform again and then select Android (if you are building for Android) and add your Bundle ID to the Google Play Package Name
- Click Save Changes
If you are building for Android you will also need to create a key hash of your keystore file that will be used to sign your Android application. You will need to provide a key hash for the keystore file you use for the production version of your application, but throughout development, you can just provide a key hash of the default debug.keystore file used by Android Studio.
If you are using a Mac, you can use the following command:
keytool -exportcert -alias androiddebugkey -keystore ~/.android/debug.keystore | openssl sha1 -binary | openssl base64or if you are using Windows you can use the following command (this will require OpenSSL):
keytool -exportcert -alias androiddebugkey -keystore %HOMEPATH%\.android\debug.keystore | openssl sha1 -binary | openssl
base64
You will need to enter the password: android. Once you do this, your key hash will be displayed on the screen and you can add it to the Key Hashes field in the Facebook devleoper portal. Remember that you will need to update this key hash later (or add an additional one) to reflect the keystore file that is used to sign the production version of your application.
NOTE: If you do not already have a JDK installed you may be asked to do so when performing this step. Typically, this isn’t required because Android Studio comes bundled with its own JDK. However, attempting to use this command from your terminal to generate the key hash will require the JDK to be installed separately from Android Studio. If you are on a Mac, you can get around this requirement by using the keytool command in the context of Android Studio like this:
/Applications/Android\ Studio.app/Contents/jre/jdk/Contents/Home/bin/keytool -exportcert -alias androiddebugkey -keystore ~/.android/debug.keystore | openssl sha1 -binary | openssl base641.2 Install the Required Dependencies
In order to interact with the Facebook API, we will be installing the cordova-plugin-facebook4 plugin, as well as the matching Ionic Native package for using this plugin. You can install both of these by running the following commands:
npm install cordova-plugin-facebook4 --savenpm install --save @ionic-native/facebookSince we are using Ionic Native, we will also need to add this plugin into the app.module.ts file as a provider.
Modify
src/app/app.module.tsto include the Facebook plugin:
import { NgModule } from '@angular/core';
import { BrowserModule } from '@angular/platform-browser';
import { RouteReuseStrategy } from '@angular/router';

import { IonicModule, IonicRouteStrategy } from '@ionic/angular';

import { AppComponent } from './app.component';
import { AppRoutingModule } from './app-routing.module';

import { Facebook } from '@ionic-native/facebook/ngx';

@NgModule({
  declarations: [AppComponent],
  entryComponents: [],
  imports: [BrowserModule, IonicModule.forRoot(), AppRoutingModule],
  providers: [
    Facebook,
    { provide: RouteReuseStrategy, useClass: IonicRouteStrategy },
  ],
  bootstrap: [AppComponent],
})
export class AppModule {}
1.3 Configure the Native Platforms
There is just one more step we need to complete now. In order for the Cordova plugin to work, we need to configure our applications APP_ID and APP_NAME with the native iOS/Android platforms. We can not use “install variables” when using Capacitor, so we will just need to add these values directly to the native projects.
NOTE: This section assumes that you already have Capacitor installed and have added the iOS/Android platforms. If you need more information on installing Capacitor and adding native platforms, you can read more here: Using Capacitor with Ionic.
Run the following command to open your project in Android Studio:
ionic cap open androidOnce the project is open, you will need to open the following file:
android > app > src > main > res > values > strings.xmlInside of this file, you will need to add the following entries inside of the <resources> tag:
<string name="fb_app_id">YOUR APP ID</string>
<string name="fb_app_name">YOUR APP NAME</string>
Make sure to replace YOUR APP ID with your Facebook App ID and YOUR APP NAME with your Facebook App Name. Now we need to do something similar for iOS. Open the iOS project with:
ionic cap open iosOnce the project is open, you should:
- Click App from the left menu (above Pods, select it don’t expand it)
- In the right panel, click the Info tab
- Under Custom iOS Target Properties hover over any of the existing Keys and click the little + icon to add a new key
- Create a new entry for FacebookDisplayName, set it to String, and add your Facebook App Name
- Crete a new entry for FacebookAppID, set it to String, and add your Facebook App ID as the value
- Crete a new entry for FacebookAutoLogAppEventsEnabled, set it to Boolean, and set the value to
NO - Crete a new entry for FacebookAdvertiserIDCollectionEnabled, set it to Boolean, and set the value to
NO - You will need to add an array of values under the LSApplicationQueriesSchemes key, add the key and set it to Array, and then add the following items under that array (by first clicking to expand the key - the arrow should point down - and then right click > Add Row):

The items in the image above are:
- Item 0 - String - fbshareextension
- Item 1 - String - fb-messenger-api
- Item 2 - String - fbapi
- Item 3 - String - fbauth2
You will also need to add a new URL Scheme that reflects your Facebook App ID prefixed with fb, like this:
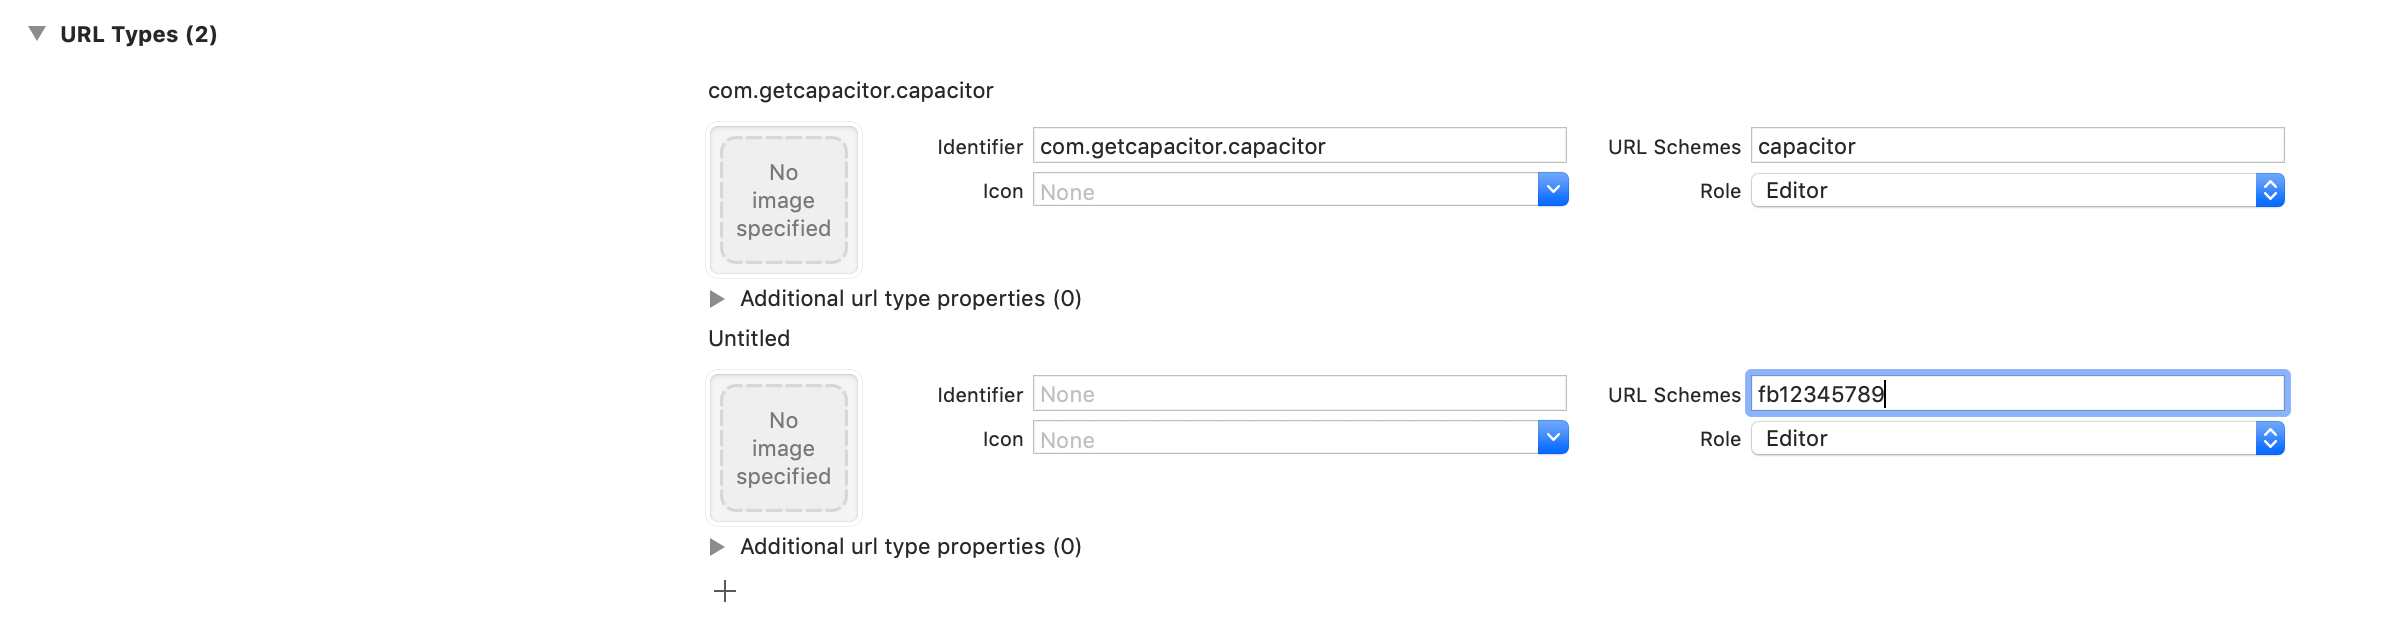
Just scroll down to URL Types and click the + button to add a new URL scheme. You will need to put the fbxxxxx value in the URL Schemes field. If you do not do this, you will get an error complaining about not having the URL scheme registered:
Terminating app due to uncaught exception 'InvalidOperationException', reason: 'fb123456789 is not registered as a URL scheme.You will also need to update your capacitor.config.json file to include the cordovaLinkerFlags property under ios:
{
  "appId": "io.ionic.starter",
  "appName": "ionic-angular-firebase-facebook",
  "bundledWebRuntime": false,
  "npmClient": "npm",
  "webDir": "www",
  "ios": {
    "cordovaLinkerFlags": ["-ObjC"]
  }
}
2. Set up Firebase
We will also need to set up a few things in order to use Firebase in our application, this is quite a bit simpler than the Facebook steps. First, we need to install the firebase package:
Run the following command to install Firebase:
npm install firebase --saveIf you would like a little more context/explanation for getting Firebase set up and installed in your application, I would recommend watching the video I linked to earlier: Firebase: Anonymous Authentication. This walks through setting up everything required on screen (except for a StencilJS application). I will just outline the basic steps you need to follow below.
- Go to console.firebase.google.com and click Add Project (assuming you have an account)
- Once you have created the project and are taken to the Dashboard, click the web icon
</>above where it says Add an app to get started - After this step, you will be given your configuration code. We will not be using that code as is in our application, but we will need the details in the
configobject. Make note of this for later (or you can just come back to the dashboard again to get the configuration code).
You will also need to enable Facebook Authentication inside of Firebase, to do this follow these steps:
- Click on Authentication from the menu on the left side of the screen
- Enable Facebook as a Sign-in method and add your App ID and App secret from the Facebook application you created in the previous step
- Copy the OAuth redirect URI and add it to Products > Facebook Login > Settings under Valid OAuth Redirect URIs in your application in the Facebook developer portal
- Click Save
NOTE: Keep in mind that there is also a package available called @angular/fire that you can use to help integrate an Angular application with the various features Firebase offers. Our requirements for this example are quite simple, but depending on what you are trying to do, you might consider using this package.
3. Create the Auth Service
With all of the configuration out of the way, we can finally get to implementing the functionlaity in our application. We are going to create an Auth service that will handle everything for us in an easy to use way. The basic idea is that we will simply call login() or logout() through the service, and it will handle everything for us and figure out the best authentication flow (web or native) for the platform the application is running on.
To create this Auth service, you can run the following command (or you might prefer to add this functionality to one of your own services):
ionic g service services/AuthWe are going to implement the entire code for this at once, and then talk through it.
Modify
src/services/auth.service.tsto reflect the following:
import { Injectable, NgZone } from "@angular/core";
import { Platform } from "@ionic/angular";

import { Facebook } from "@ionic-native/facebook/ngx";

import { BehaviorSubject } from "rxjs";
import firebase from "@firebase/app";
import "@firebase/auth";

@Injectable({
  providedIn: "root"
})
export class AuthService {
  public loggedIn: BehaviorSubject<boolean> = new BehaviorSubject<boolean>(false);

  constructor(private platform: Platform, private zone: NgZone, private facebook: Facebook) {}

  init(): void {
    // Your web app's Firebase configuration
    const firebaseConfig = {
      apiKey: "YOUR-API-KEY",
      authDomain: "YOUR-DOMAIN.firebaseapp.com",
      databaseURL: "YOUR-URL",
      projectId: "YOUR-PROJECT-ID",
      storageBucket: "",
      messagingSenderId: "********",
      appId: "*******"
    };

    // Initialize Firebase
    firebase.initializeApp(firebaseConfig);

    // Emit logged in status whenever auth state changes
    firebase.auth().onAuthStateChanged(firebaseUser => {
      this.zone.run(() => {
        firebaseUser ? this.loggedIn.next(true) : this.loggedIn.next(false);
      });
    });
  }

  login(): void {
    if (this.platform.is("capacitor")) {
      this.nativeFacebookAuth();
    } else {
      this.browserFacebookAuth();
    }
  }

  async logout(): Promise<void> {
    if (this.platform.is("capacitor")) {
      try {
        await this.facebook.logout(); // Unauth with Facebook
        await firebase.auth().signOut(); // Unauth with Firebase
      } catch (err) {
        console.log(err);
      }
    } else {
      try {
        await firebase.auth().signOut();
      } catch (err) {
        console.log(err);
      }
    }
  }

  async nativeFacebookAuth(): Promise<void> {
    try {
      const response = await this.facebook.login(["public_profile", "email"]);

      console.log(response);

      if (response.authResponse) {
        // User is signed-in Facebook.
        const unsubscribe = firebase.auth().onAuthStateChanged(firebaseUser => {
          unsubscribe();
          // Check if we are already signed-in Firebase with the correct user.
          if (!this.isUserEqual(response.authResponse, firebaseUser)) {
            // Build Firebase credential with the Facebook auth token.
            const credential = firebase.auth.FacebookAuthProvider.credential(
              response.authResponse.accessToken
            );
            // Sign in with the credential from the Facebook user.
            firebase
              .auth()
              .signInWithCredential(credential)
              .catch(error => {
                console.log(error);
              });
          } else {
            // User is already signed-in Firebase with the correct user.
            console.log("already signed in");
          }
        });
      } else {
        // User is signed-out of Facebook.
        firebase.auth().signOut();
      }
    } catch (err) {
      console.log(err);
    }
  }

  async browserFacebookAuth(): Promise<void> {
    const provider = new firebase.auth.FacebookAuthProvider();

    try {
      const result = await firebase.auth().signInWithPopup(provider);
      console.log(result);
    } catch (err) {
      console.log(err);
    }
  }

  isUserEqual(facebookAuthResponse, firebaseUser): boolean {
    if (firebaseUser) {
      const providerData = firebaseUser.providerData;

      providerData.forEach(data => {
        if (
          data.providerId === firebase.auth.FacebookAuthProvider.PROVIDER_ID &&
          data.uid === facebookAuthResponse.userID
        ) {
          // We don't need to re-auth the Firebase connection.
          return true;
        }
      });
    }

    return false;
  }
}
First of all, notice that we are using a BehaviorSubject:
public loggedIn: BehaviorSubject<boolean> = new BehaviorSubject<boolean>(false);We are providing this loggedIn observable that we will be able to subscribe to elsewhere, and it will emit data whenever the user logs in or out. We are going to utlise this to trigger our page navigations when necessary. You might wish to implement this in a different way for your own purposes.
Next, we have our init() function that handles configuring Firebase - you will need to make sure to replace the values here with your own config that was provided to you in the Firebase dashboard earlier. As well as configuring Firebase, we also do this:
firebase.auth().onAuthStateChanged((firebaseUser) => {
  this.zone.run(() => {
    firebaseUser ? this.loggedIn.next(true) : this.loggedIn.next(false);
  });
});
We set up a listener for onAuthStateChanged which will trigger every time the user logs in or out. When this happens, we want to trigger that loggedIn observable that we created. If there is a firebaseUser it means the user is logged in and so we trigger the observable with true, otherwise we trigger it with false.
Notice that we run this code inside of the run method of NgZone. Since these auth state changes are originating from the Firebase SDK, it is occurring outside of Angular’s “zone”, and so we might run into trouble with Angular’s change detection not triggering as a result of this. To solve this, we just force the code to run inside of Angular’s zone by using NgZone.
Our login() function is quite simple, but it is responsible for the “cleverness” of our service. It just detects whether the application is running natively (i.e. on the capacitor platform) or if it is running through the web. We trigger two different authentication functions depending on the platform.
In both cases, we are just using the authentication code that is provided by Firebase (with some slight modifications). In the case of our “native” authentication, we are manually retrieving the authResponse from Facebook by using the Facebook plugin that we installed - this will allow us to grab the required information for Firebase from the native Facebook application installed on the device. In the case of a “browser” environment, we just run the regular Firebase signInWithPopup method.
We have also defined a logout method that will sign the user out of both Facebook and Firebase. If the application is not running natively, we skip the native Facebook log out.
Before we move on, there is one more thing we need to do, and that is to trigger the init method of our Auth service at some point. A good place to do this is in the root component.
Call
initinside ofsrc/app/app.component.ts:
import { Component } from "@angular/core";

import { Platform } from "@ionic/angular";
import { SplashScreen } from "@ionic-native/splash-screen/ngx";
import { StatusBar } from "@ionic-native/status-bar/ngx";

import { AuthService } from "./services/auth.service";

@Component({
  selector: "app-root",
  templateUrl: "app.component.html",
  styleUrls: ["app.component.scss"]
})
export class AppComponent {
  constructor(
    private platform: Platform,
    private splashScreen: SplashScreen,
    private statusBar: StatusBar,
    private authService: AuthService
  ) {
    this.initializeApp();
  }

  initializeApp() {
    this.authService.init();

    this.platform.ready().then(() => {
      this.statusBar.styleDefault();
      this.splashScreen.hide();
    });
  }
}
4. Use the Auth Service
Finally, we just need to make use of our Auth service. To do that, you might implement some logic on your Login page that looks like this:
import { Component, OnInit } from "@angular/core";
import { NavController, LoadingController } from "@ionic/angular";
import { AuthService } from "../services/auth.service";

@Component({
  selector: "app-login",
  templateUrl: "./login.page.html",
  styleUrls: ["./login.page.scss"]
})
export class LoginPage implements OnInit {
  private loading;

  constructor(
    public authService: AuthService,
    private navCtrl: NavController,
    private loadingCtrl: LoadingController
  ) {}

  async ngOnInit() {
    await this.showLoading();

    this.authService.loggedIn.subscribe(status => {
      this.loading.dismiss();

      if (status) {
        this.navCtrl.navigateForward("/home");
      }
    });
  }

  async login() {
    await this.showLoading();
    this.authService.login();
  }

  async showLoading() {
    this.loading = await this.loadingCtrl.create({
      message: "Authenticating..."
    });

    this.loading.present();
  }
}
The key part here is that we subscribe to that loggedIn observable, and then trigger the navigation if we receive a true value from that. All we need to do is call the login method at some point to kick off the process (e.g. when the user clicks the login button). We have also added in a loading overlay here so that something is displayed whilst the authentication with Facebook is happening.
We can also do something like the following on the Home page to log the user out:
import { Component, OnInit } from "@angular/core";
import { NavController } from "@ionic/angular";
import { AuthService } from "../services/auth.service";

@Component({
  selector: "app-home",
  templateUrl: "home.page.html",
  styleUrls: ["home.page.scss"]
})
export class HomePage implements OnInit {
  constructor(public authService: AuthService, private navCtrl: NavController) {}

  ngOnInit() {
    this.authService.loggedIn.subscribe(status => {
      if (!status) {
        this.navCtrl.navigateBack("/login");
      }
    });
  }
}
Summary
The result of the work we have done above is a seamless login experience with Facebook, regardless of whether the application is running as a PWA or natively on iOS or Android. There is quite a lot of set up work involved to get the native Facebook authentication working, but it is well worth it for the improved experience that it provides.
We have covered a lot in this tutorial, and I didn’t want to bloat it with even more stuff. However, it would also be a good idea to combine this functionality with an “auth guard” to “protect” specific routes from being accessed by users that are not authenticated. I have another tutorial available on doing that which you can check out here: Prevent Access to Pages in Ionic with Angular Route Guards.