

If you want to accept a user supplied location in your application, and you want it to be in any kind of remotely useful format, it could be quite hard to do. You could of course just have a simple text field and allow the user to type the address, but that’s a lot of work for the user and would lead to very inconsistent data – you could type the same address in many different ways.
If you wanted to display that address on a map, it would be difficult to do by going off of a user supplied address. It would be much easier if you had the latitude and longitude of that address, but I suspect there are very few people on the planet that know that Uluru is at -25.344428, 131.036882 off the top of their head.
The Google Places API can do a great deal to help us solve this problem. It gives us the best of both worlds in that we can allow users to input an address easily, but we can also store the location in a more developer friendly format.
In this tutorial, we are going to walk through how to build a location selection page in Ionic using the Google Places API. The user will be able to start typing an address and as they do the Google Places API will suggest a list of possible places. Upon selecting a particular place, we will set that place on a Google Map, and we will also be given the latitude, longitude, and name for the place that was selected.
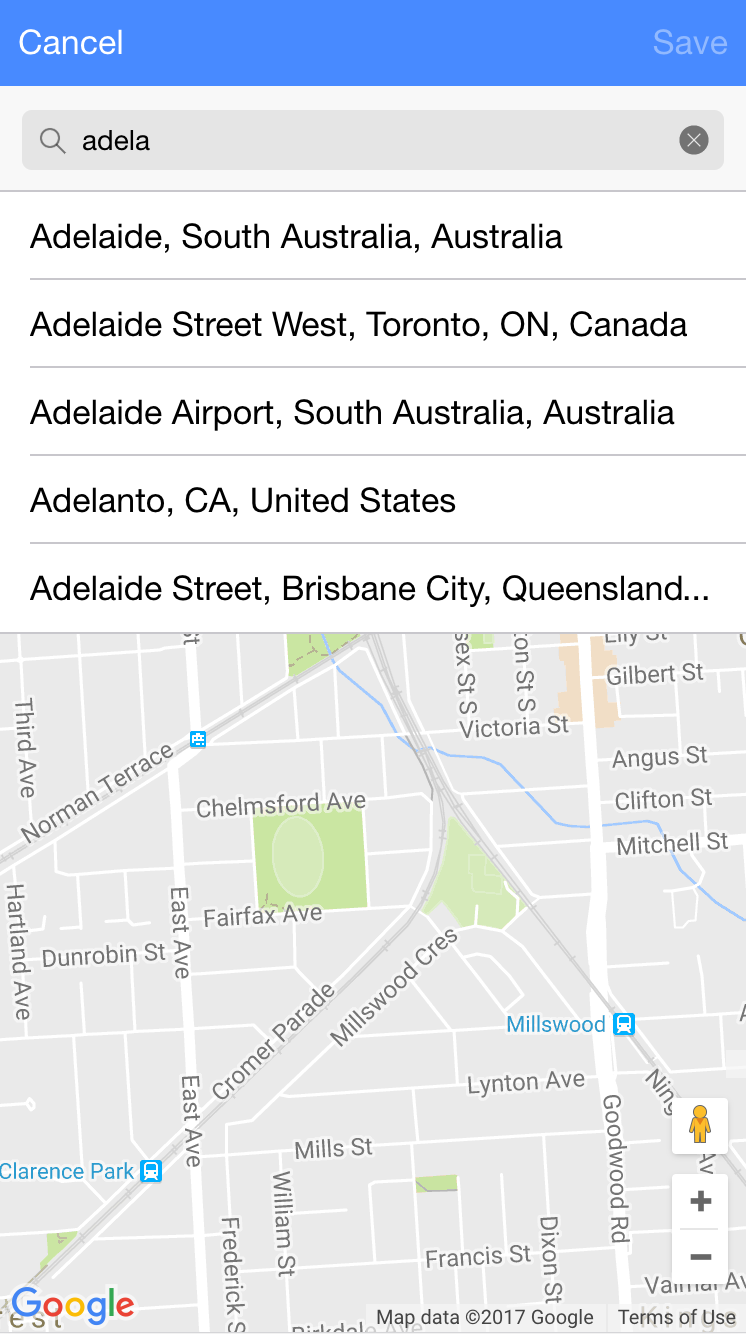
Once we are finished, it will look something like this:
Before We Get Started
Last updated for Ionic 3.1.0
Before you go through this tutorial, you should have at least a basic understanding of Ionic concepts. You must also already have Ionic set up on your machine.
If you’re not familiar with Ionic already, I’d recommend reading my Ionic Beginners Guide or watching my beginners series first to get up and running and understand the basic concepts. If you want a much more detailed guide for learning Ionic, then take a look at Building Mobile Apps with Ionic.
1. Generate a New Ionic Application
To begin, we are going to generate a new Ionic application with the following command:
ionic start ionic-location-select blankOnce that has finished generating, you should make it your working directory by running the following command:
cd ionic-location-selectWe are going to create our LocationSelect page as an independent modal that can be popped up in your application wherever you require it. When the modal is dismissed it will pass back the location information to whatever page called it.
Run the following command to generate the LocationSelect page:
ionic g page LocationSelectWe are also going to create a couple of providers to help us with the functionality for this application, so let’s create those as well:
Run the following command to generate the required providers:
ionic g provider ConnectivityServiceionic g provider GoogleMapsWe will implement these in just a moment. We are also going to need to install a couple of Cordova plugins, and we will be using the Ionic Native packages to help use those.
Run the following commands to install the Network and Geolocation plugins:
ionic plugin add --save cordova-plugin-geolocation
npm install --save @ionic-native/geolocation
ionic plugin add --save cordova-plugin-network-information
npm install --save @ionic-native/networkIn order for the Google Maps functionality to work well with TypeScript, you will need to run the following command:
npm install @types/google-maps --saveIf you do not install the types for Google Maps, you will get errors that complain about not knowing what google is. Finally, we are going to need to set up these providers and plugins in our app.module.ts file.
Modify src/app/app.module.ts to reflect the following:
import { BrowserModule } from '@angular/platform-browser';
import { ErrorHandler, NgModule } from '@angular/core';
import { IonicApp, IonicErrorHandler, IonicModule } from 'ionic-angular';
import { SplashScreen } from '@ionic-native/splash-screen';
import { StatusBar } from '@ionic-native/status-bar';
import { MyApp } from './app.component';
import { HomePage } from '../pages/home/home';
import { LocationSelect } from '../pages/location-select/location-select';
import { Connectivity } from '../providers/connectivity-service';
import { GoogleMaps } from '../providers/google-maps';
import { Network } from '@ionic-native/network';
import { Geolocation } from '@ionic-native/geolocation';

@NgModule({
  declarations: [MyApp, HomePage, LocationSelect],
  imports: [BrowserModule, IonicModule.forRoot(MyApp)],
  bootstrap: [IonicApp],
  entryComponents: [MyApp, HomePage, LocationSelect],
  providers: [
    StatusBar,
    SplashScreen,
    Connectivity,
    GoogleMaps,
    Network,
    Geolocation,
    { provide: ErrorHandler, useClass: IonicErrorHandler },
  ],
})
export class AppModule {}
2. Implement the Dependencies
There’s quite a bit of setup required for this tutorial that is related to Google Maps, but it is all stuff I have covered previously. We will be loading in Google Maps dynamically so that in the case that the user is not currently online when launching the application, or that they go offline when using the application, the app will continue to function as expected.
If you would like to read in more detail about exactly what is happening with the following steps I would recommend reading Creating an Advanced Google Map Component in Ionic. We will mostly just be copying and pasting for these initial steps.
Modify src/providers/connectivity-service.ts to reflect the following:
import { Injectable } from '@angular/core';
import { Network } from '@ionic-native/network';
import { Platform } from 'ionic-angular';
import { Observable } from 'rxjs/Observable';

declare var Connection;

@Injectable()
export class Connectivity {

  onDevice: boolean;

  constructor(public platform: Platform, public network: Network){
    this.onDevice = this.platform.is('cordova');
  }

  isOnline(): boolean {
    if(this.onDevice && this.network.type){
      return this.network.type != 'none';
    } else {
      return navigator.onLine;
    }
  }

  isOffline(): boolean {
    if(this.onDevice && this.network.type){
      return this.network.type == 'none';
    } else {
      return !navigator.onLine;
    }
  }

  watchOnline(): any {
    return this.network.onConnect();
  }

  watchOffline(): any {
    return this.network.onDisconnect();
  }

}
Modify src/providers/google-maps.ts to reflect the following:
import { Injectable } from '@angular/core';
import { Platform } from 'ionic-angular';
import { Connectivity } from './connectivity-service';
import { Geolocation } from '@ionic-native/geolocation';

@Injectable()
export class GoogleMaps {

  mapElement: any;
  pleaseConnect: any;
  map: any;
  mapInitialised: boolean = false;
  mapLoaded: any;
  mapLoadedObserver: any;
  currentMarker: any;
  apiKey: string = "YOUR_API_KEY";

  constructor(public connectivityService: Connectivity, public geolocation: Geolocation) {

  }

  init(mapElement: any, pleaseConnect: any): Promise<any> {

    this.mapElement = mapElement;
    this.pleaseConnect = pleaseConnect;

    return this.loadGoogleMaps();

  }

  loadGoogleMaps(): Promise<any> {

    return new Promise((resolve) => {

      if(typeof google == "undefined" || typeof google.maps == "undefined"){

        console.log("Google maps JavaScript needs to be loaded.");
        this.disableMap();

        if(this.connectivityService.isOnline()){

          window['mapInit'] = () => {

            this.initMap().then(() => {
              resolve(true);
            });

            this.enableMap();
          }

          let script = document.createElement("script");
          script.id = "googleMaps";

          if(this.apiKey){
            script.src = 'http://maps.google.com/maps/api/js?key=' + this.apiKey + '&callback=mapInit&libraries=places';
          } else {
            script.src = 'http://maps.google.com/maps/api/js?callback=mapInit';
          }

          document.body.appendChild(script);

        }
      } else {

        if(this.connectivityService.isOnline()){
          this.initMap();
          this.enableMap();
        }
        else {
          this.disableMap();
        }

        resolve(true);

      }

      this.addConnectivityListeners();

    });

  }

  initMap(): Promise<any> {

    this.mapInitialised = true;

    return new Promise((resolve) => {

      this.geolocation.getCurrentPosition().then((position) => {

        let latLng = new google.maps.LatLng(position.coords.latitude, position.coords.longitude);

        let mapOptions = {
          center: latLng,
          zoom: 15,
          mapTypeId: google.maps.MapTypeId.ROADMAP
        }

        this.map = new google.maps.Map(this.mapElement, mapOptions);
        resolve(true);

      });

    });

  }

  disableMap(): void {

    if(this.pleaseConnect){
      this.pleaseConnect.style.display = "block";
    }

  }

  enableMap(): void {

    if(this.pleaseConnect){
      this.pleaseConnect.style.display = "none";
    }

  }

  addConnectivityListeners(): void {

    this.connectivityService.watchOnline().subscribe(() => {

      setTimeout(() => {

        if(typeof google == "undefined" || typeof google.maps == "undefined"){
          this.loadGoogleMaps();
        }
        else {
          if(!this.mapInitialised){
            this.initMap();
          }

          this.enableMap();
        }

      }, 2000);

    });

    this.connectivityService.watchOffline().subscribe(() => {

      this.disableMap();

    });

  }

}
IMPORTANT: In order for Google Maps to work, you will need to overwrite:
apiKey: string = 'YOUR_API_KEY';with your own API key. If you do not have one or do not know how to create one, you should read this.
Although the code above is mostly unchanged from the tutorial I link, there is one important change and that is:
script.src =
  'http://maps.google.com/maps/api/js?key=' +
  this.apiKey +
  '&callback=mapInit&libraries=places';
Notice that at the end of this URL we include &libraries=places, this will include the Google Places API on top of the normal Google Maps API.
3. Implement the Location Select Page
Now that we have our dependencies set up, we can move on to creating the LocationSelect page itself. We will start off by implementing the template because I think it will help give context to the functionality we will add in the TypeScript file.
Modify src/pages/location-select/location-select.html to reflect the following:
<ion-header>
  <ion-navbar color="primary">
    <ion-buttons left>
      <button ion-button (click)="close()">Cancel</button>
    </ion-buttons>
    <ion-buttons right>
      <button [disabled]="saveDisabled" ion-button (click)="save()">
        Save
      </button>
    </ion-buttons>
  </ion-navbar>

  <ion-toolbar>
    <ion-searchbar
      [(ngModel)]="query"
      (ionInput)="searchPlace()"
    ></ion-searchbar>
  </ion-toolbar>

  <ion-list>
    <ion-item *ngFor="let place of places" (touchstart)="selectPlace(place)"
      >{{place.description}}</ion-item
    >
  </ion-list>
</ion-header>

<ion-content>
  <div #pleaseConnect id="please-connect">
    <p>Please connect to the Internet...</p>
  </div>

  <div #map id="map">
    <ion-spinner></ion-spinner>
  </div>
</ion-content>
In the <ion-content> section we have an element for where the map will be injected, and an element for the message that displays when no Internet connection is available. Details on how this works is available in the advanced Google Maps tutorial that I linked above.
The content area is just a normal map, the interesting stuff in terms of this tutorial happens in the header. As well as having some buttons to dismiss the modal, we also have an additional toolbar in the header area. This contains a search bar that will define the query that is used with the Google Places API to predict some locations. We then also have a list that will display the results of those predictions (and give the user the ability to select one of those).
A touchstart event binding is used for the places that will display in the list because if a click event is used it would require the user to tap twice to select a place (once to remove focus from the search bar, another to trigger a click on a particular place). The downside of this is that this will only work on devices, or through something like the Chrome DevTools mobile emulator (so that touch events are triggered rather than mouse events).
In order to get everything in the template displaying correctly, we will also need to add a few styles.
Modify src/pages/location-select/location-select.scss to reflect the following:
page-location-select {
  ion-list {
    margin: 0 !important;
  }

  #please-connect {
    position: absolute;
    background-color: #000;
    opacity: 0.5;
    width: 100%;
    height: 100%;
    z-index: 1;
  }

  #please-connect p {
    color: #fff;
    font-weight: bold;
    text-align: center;
    position: relative;
    font-size: 1.6em;
    top: 30%;
  }

  .scroll-content {
    overflow: hidden;
  }

  #map {
    width: 100%;
    height: 100%;
    display: flex;
    justify-content: center;
    align-items: center;
  }
}
Now let’s move on to the interesting stuff. We are going to implement the Google Places functionality in the TypeScript file for the LocationSelect page.
Modify src/pages/location-select/location-select.ts to reflect the following:
import { NavController, Platform, ViewController } from 'ionic-angular';
import { Component, ElementRef, ViewChild, NgZone } from '@angular/core';
import { Geolocation } from '@ionic-native/geolocation';
import { GoogleMaps } from '../../providers/google-maps';

@Component({
  selector: 'page-location-select',
  templateUrl: 'location-select.html'
})
export class LocationSelect {

    @ViewChild('map') mapElement: ElementRef;
    @ViewChild('pleaseConnect') pleaseConnect: ElementRef;

    latitude: number;
    longitude: number;
    autocompleteService: any;
    placesService: any;
    query: string = '';
    places: any = [];
    searchDisabled: boolean;
    saveDisabled: boolean;
    location: any;

    constructor(public navCtrl: NavController, public zone: NgZone, public maps: GoogleMaps, public platform: Platform, public geolocation: Geolocation, public viewCtrl: ViewController) {
        this.searchDisabled = true;
        this.saveDisabled = true;
    }

    ionViewDidLoad(): void {

        let mapLoaded = this.maps.init(this.mapElement.nativeElement, this.pleaseConnect.nativeElement).then(() => {

            this.autocompleteService = new google.maps.places.AutocompleteService();
            this.placesService = new google.maps.places.PlacesService(this.maps.map);
            this.searchDisabled = false;

        });

    }

    selectPlace(place){

        this.places = [];

        let location = {
            lat: null,
            lng: null,
            name: place.name
        };

        this.placesService.getDetails({placeId: place.place_id}, (details) => {

            this.zone.run(() => {

                location.name = details.name;
                location.lat = details.geometry.location.lat();
                location.lng = details.geometry.location.lng();
                this.saveDisabled = false;

                this.maps.map.setCenter({lat: location.lat, lng: location.lng});

                this.location = location;

            });

        });

    }

    searchPlace(){

        this.saveDisabled = true;

        if(this.query.length > 0 && !this.searchDisabled) {

            let config = {
                types: ['geocode'],
                input: this.query
            }

            this.autocompleteService.getPlacePredictions(config, (predictions, status) => {

                if(status == google.maps.places.PlacesServiceStatus.OK && predictions){

                    this.places = [];

                    predictions.forEach((prediction) => {
                        this.places.push(prediction);
                    });
                }

            });

        } else {
            this.places = [];
        }

    }

    save(){
        this.viewCtrl.dismiss(this.location);
    }

    close(){
        this.viewCtrl.dismiss();
    }

}
There is a bit going on here, but if we step through it function by function it is all reasonably straightforward. In the ionViewDidLoad() function we initialise the Google Maps as usual (again, this is covered in the other Google Maps tutorial), but we also do something a little different. Once the map has initialised, we create new instances of an AutocompleteService and a PlacesService. Both of these come from the Google Maps Places API, and will allow us to get a list of predictions for a partial address and also grab details about a specific address (like the latitude and longitude).
The searchPlace function is what handles getting the predictions and populating the <ion-list> in the header of the template. All we do is call the getPlacePredictions method on the AutocompleteService and that will return us a bunch of predictions. We then push each of those predictions into the places array, which is what is used to populate the <ion-list> in the template.
The selectPlace function is triggered when the user taps on a prediction in the list. We then pass that prediction into the PlacesService to grab the details for that place. We set some of the information that is returned from that onto our location object, and we call the setCenter method on the map to change the position of the map to that location.
The save function simply hands passing back whatever place was selected to the page that launched the modal.
4. Launch the Location Select Page
Our LocationSelect page is implemented now, and that was the hard part, so now we just have to launch it from somewhere.
Modify src/pages/home/home.ts to reflect the following:
import { Component } from '@angular/core';
import { NavController, ModalController } from 'ionic-angular';
import { LocationSelect } from '../location-select/location-select';

@Component({
  selector: 'page-home',
  templateUrl: 'home.html'
})
export class HomePage {

    constructor(public navCtrl: NavController, public modalCtrl: ModalController) {

    }

    launchLocationPage(){

        let modal = this.modalCtrl.create(LocationSelect);

        modal.onDidDismiss((location) => {
            console.log(location);
        });

        modal.present();

    }

}
This is super simple, because all we need to do is create a new modal using the LocationSelect page and add an onDidDismiss handler. If the user selects a location, the information for that location will be passed back to this function, and then you can do whatever you want with it.
Now, all we need to do is trigger that function.
Modify src/pages/home/home.html to reflect the following:
<ion-header>
  <ion-navbar>
    <ion-title> Ionic Blank </ion-title>
  </ion-navbar>
</ion-header>

<ion-content padding>
  <button ion-button (click)="launchLocationPage()">Launch</button>
</ion-content>
Summary
The Google Places API manages to turn an awkward and complex problem into a reasonably manageable one. I like this solution in particular because it allows you to easily drop this LocationSelect page anywhere you like in your application, and receive data back in a nice and useable format.