

When Pokémon GO was released I was in the middle of the Australian outback – the PokéStops, Gyms, and even the Pokémon were few and far between. Although I was missing out on the action a bit, I knew that it was gaining popularity fast but it wasn’t until I got back to a major city that I saw hordes of people of all ages walking around, not so discreetly flailing their phones around attempting to catch Pokémon.
I think it’s a great concept, and it hits the nostalgia bone hard. It goes without saying that this has been an enormous social phenomenon, and what kind of blogger would I be if I didn’t try to cash in on all of this excitement with some contrived blog post?
Although it is somewhat of a gimmick, one of the most notable features in Pokémon GO is the augmented reality mode, where the user interface and the Pokémon you are trying to catch are overlaid on to the devices camera:
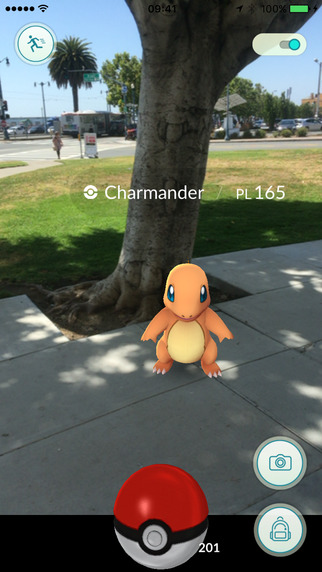
This gives the sense that your device is a portal into the Pokémon world. Augmented reality can be a lot of fun, like Pokémon GO and Snapchat filters, but also very useful and practical with applications like Planet Finder that overlays the position of planets and stars, or Augmented Car Finder.
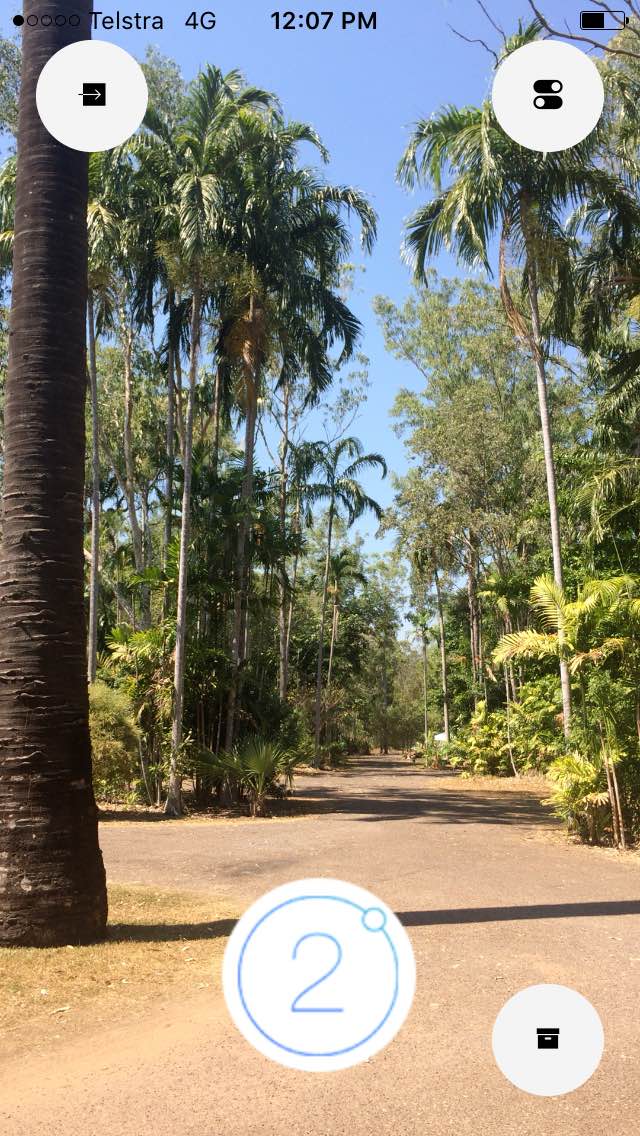
In this tutorial we are going to create our own, very simple, example of augmented reality. We will be recreating the Pokémon GO interface above, into something that looks like this:
Unfortunately, we won’t be coding in little bugs for you to catch with your Ionballs, it’ll just be the interface overlaid onto the camera for now.
NOTE: The Cordova plugin that allows us to overlay an interface onto the camera is super cool, and the contributors have done a great job in developing it. It is not currently in a stable state though, and I’ve experienced a few quirks and bugs in developing this example. Keep in mind that this is just intended to be a fun example, I wouldn’t recommend using this for real projects just yet (hopefully that will be a possibility in future though).
Before We Get Started
Before you go through this tutorial, you should have at least a basic understanding of Ionic 2 concepts. You must also already have Ionic 2 set up on your machine.
If you’re not familiar with Ionic 2 already, I’d recommend reading my Ionic 2 Beginners Guide first to get up and running and understand the basic concepts. If you want a much more detailed guide for learning Ionic 2, then take a look at Building Mobile Apps with Ionic 2.
1. Generate a New Ionic 2 Application
Let’s start by generating a new Ionic 2 application. The application is just going to have one screen, and no providers or anything like that, so we are going to just stick with a simple blank application.
Run the following command to generate a new application
ionic start ionic2-go blank --v22. Install the Camera Preview Plugin
The camera is a native function of the device, and to interact with Native APIs with Cordova we need to use plugins. One very commonly used plugin is the Camera plugin, which will launch the camera, allow the user to capture an image, and then return that image for us to make use of in the application.
It’s a bit of a black box though – the app makes a call to launch the camera, then the app receives the image data back. There’s not really any way for us to control what happens when the user is interacting with the camera (apart from a few options we can specify when launching the camera). This isn’t of much use to us in creating the Ionic GO interface.
Recently though, I came across the Camera Preview plugin, which allows you to interact with the camera through the HTML interface in your applications. So rather than the camera behaving as some external thing that it is launched on request, with this plugin we can integrate it directly into our application.
Run the following command to install the Camera Preview plugin:
ionic plugin add cordova-plugin-camera-preview3. Launch the Camera Preview
Now that we have the plugin ready to use, we need to trigger it when the app starts. We will hook into the ready() method in the root component to do this. We will be using the Ionic Native version of this plugin, so we need to make sure that we import it first.
Modify src/app/app.component.ts to reflect the following:
import { Component } from '@angular/core';
import { Platform } from 'ionic-angular';
import { StatusBar, Splashscreen } from 'ionic-native';
import { CameraPreview } from 'ionic-native';
import { HomePage } from '../pages/home/home';

@Component({
  template: `<ion-nav [root]="rootPage"></ion-nav>`,
})
export class MyApp {
  rootPage = HomePage;

  constructor(platform: Platform) {
    platform.ready().then(() => {
      StatusBar.styleDefault();
      Splashscreen.hide();

      let tapEnabled: any = false;
      let dragEnabled: any = false;
      let toBack: any = true;
      let alpha = 1;
      let rect: any = {
        x: 0,
        y: 0,
        width: platform.width(),
        height: platform.height(),
      };

      CameraPreview.startCamera(
        rect,
        'rear',
        tapEnabled,
        dragEnabled,
        toBack,
        alpha
      );
    });
  }
}
All we’ve done is add a call to the startCamera method of the plugin with some options. Most importantly, we have set toBack to true, which is what sends the camera behind the web view. There’s quite a few options you can supply to the plugin, including allowing the user to take a picture, but I won’t be covering most of those here so make sure to check out the documentation.
Another important thing to take note of is that since we are sending the camera behind the web view, we won’t be able to see it. In order to be able to see the camera behind the web view, we need to make a bunch of elements transparent:
Modify src/app/app.scss to include the following:
html,
body,
ion-app,
ion-content,
ion-page,
.nav-decor {
  background-color: transparent !important;
}
As you can see we are now making the entire web page transparent, including some of the Ionic elements as well. Now anything we add to our templates will still be visible, but we will be able to see the camera in the background.
4. Create the User Interface
We have everything set up now, so all we have left to do is add the interface. This is as simple as adding to the template file as you usually would. We are going to use some FAB buttons (Floating Action Buttons) to create the interface, which we are able to create in Ionic 2 simply by adding some attributes to a normal button.
Modify src/pages/home/home.html to reflect the following:
<ion-content>
  <div id="ionball"></div>

  <ion-fab right top small>
    <button ion-fab color="light"><ion-icon name="switch"></ion-icon></button>
  </ion-fab>

  <ion-fab left top small>
    <button ion-fab color="light"><ion-icon name="exit"></ion-icon></button>
  </ion-fab>

  <ion-fab right bottom small>
    <button (click)="refresh()" ion-fab color="light">
      <ion-icon name="archive"></ion-icon>
    </button>
  </ion-fab>
</ion-content>
We have three buttons now: one in the top left, one in the top right, and one in the bottom right. We also have a <div> to hold our “ionball”, which we will be adding shortly.
Also notice that one of these buttons calls the refresh() function, this is to deal with a bug I will talk about in a moment.
Modify home.scss to reflect the following:
page-home {
  #ionball {
    position: absolute;
    bottom: 30px;
    left: calc(50% - 50px);
    width: 100px;
    height: 100px;
    background-image: url(../assets/images/ionball.png);
  }
}
This CSS just handles setting up the “ionball” at the bottom center of the screen. You will of course also need to include that image.
Create a new folder at src/assets/images and add the following image:

Now let’s deal with that bug I was talking about.
Modify home.ts to reflect the following:
import { Component } from '@angular/core';
import { NavController } from 'ionic-angular';

@Component({
  selector: 'page-home',
  templateUrl: 'home.html'
})
export class HomePage {

  constructor(public navCtrl: NavController) {

  }

  refresh(){
    window['location'].reload();
  }

}
The refresh function that is being called from the template (the bottom right button) will now reload the application when it is clicked. I have found that on iOS, the camera won’t display until the application is refreshed. I’m not sure if this is a bug or limitation with the plugin, the browser, or Ionic but I haven’t been able to make it work without first refreshing. If you have any more information on this, please leave a comment!
If you load the application up on your device now (remember, the camera won’t work through the browser), you should have an interface that looks like this:
Summary
This was a bit of a fun and silly example without much of a practical purpose, but I think it demonstrates that there is potential for creating augmented reality applications with Cordova. I’ve always considered augmented reality to be a case for native applications, but if you can overlay an interface on top of the camera then there is plenty you could do with that.
I’d like to investigate this more in the future and see if I can come up with a more “real world” example, but in the mean time it’d be great to see what all of you could come up with. If you do create something, please email me or post in the comments – I’d love to feature some creations in another blog post.