Pipes are super useful to have in your application – in general they are used to manipulate data before displaying it to the user (think date conversions, formatting and so on). Before we get into how to use them though, I’ll give a little more background.
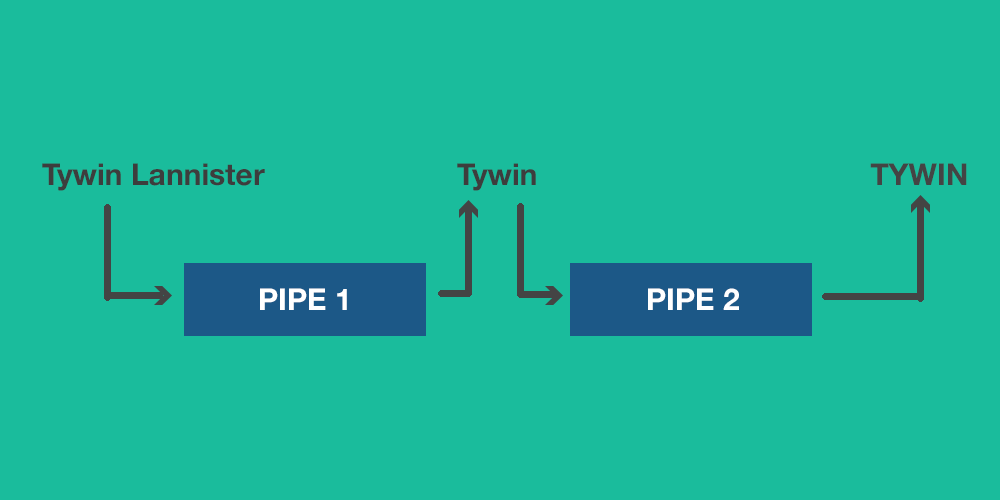
You could imagine pipes to be literal pipes that you pass information through, and each pipe does something to the information as it passes through. Let’s say we start off with the strings Robb Stark and Tywin Lannister and we want to convert those strings to only contain the first name, and to have it be all uppercase. To do that we could create two pipes, one that modifies the data to only include the first name and another one that capitalises the remaining string from the result of the previous pipe, which might look something like this:
Of course, we could just do both operations in one pipe, but I wanted to demonstrate how you can pass data through multiple pipes. Pipes have been around for a long time – I’m a little rusty on my pipe history but I imagine the name comes from the use of the pipe ’|’ character in a command line interface environment.
In a linux environment for example you might have seen commands like this:
grep -ir "findme" | someOtherCommand | oneMoreCommand
This example first searches for some data with grep which matches the findme string. Once it finds that, it will then pass that data through someOtherCommand and then oneMoreCommand. The end result might be a sorted list of entries that contain the findme string.
In Angular and Ionic you might be more used to seeing these pipes in expressions in a template like this:
{{someData | somePipe}}
In Ionic 2 pipes still look like this in the template, but the way in which you create them is a little different. In this tutorial we are going to walk through how to build and use a pipe for filtering data in Ionic 2. If you want to see how to do this in Ionic 1, take a look at this post by Andrew McGivery.
DISCLAIMER: At the time of writing this, Ionic 2 is still in Alpha and things may change. If you find that the code in this tutorial no longer works, let me know and I’ll do my best to update it.
Before we Get Started
Before you go through this tutorial, you should have at least a basic understanding of Ionic 2 concepts. You must also already have Ionic 2 set up on your machine.
If you’re not familiar with Ionic 2 already, I’d recommend reading my Ionic 2 Beginners Guide first to get up and running and understand the basic concepts. If you want a much more detailed guide for learning Ionic 2, then take a look at Building Mobile Apps with Ionic 2.
1. Generate a New Application
Let’s start by generating a new Ionic 2 application by running the following command:
ionic start ionic2-pipes blank --v2
2. Create a Pipe
We’re going to create a new pipe the same way we create just about anything with Ionic 2. We will create a folder for it, define it using a file that contains a class definition and a decorator (decorators are the @Something statements before your class definition), import it into wherever we want to use it, and then use it. Creating a custom pipe is very similar to creating a custom directive.
The pipe we are going to create is one that will replace all words in a string with Matt Damon.
Create a new folder at app/pipes
Create a new file called matt-damon.ts and add the following code:
import { Pipe } from '@angular/core';

@Pipe({
  name: 'mattDamon',
})
export class MattDamon {
  transform(value, args) {
    return value;
  }
}
This is the basic structure of a pipe in Ionic 2, and all it will do right now is return the same value that it was passed. You can see in the transform method we pass in a value and args. The value is the data you are passing through the pipe, and the args are any arguments that have been passed to the pipe (which can be used to alter what the pipe does).
The syntax for using a pipe in a template looks like this:
{
  {
    data | pipe;
  }
}
so we could use our Matt Damon pipe like this:
{
  {
    myString | mattDamon;
  }
}
or maybe we would want to create a more generic version of the pipe that could replace all the words in a string with anybody’s name that is supplied to the pipe using args, i.e:
{{myString | mattDamon:"Josh Morony"}}If you want to get even fancier, you can even pass in multiple arguments to the pipe using an array like this:
{{myString | mattDamon:["Josh Morony", "something"]}}So our transform method in the pipe will receive our data through the value parameter, and an array of arguments through the args parameter. Whatever value is used in the return statement is what the data will display as in the template, so you can modify the incoming data in any way you want before returning it, or even just return something completely different.
Now that we understand how a pipe works, let’s finish off our Matt Damon pipe by altering the value before we return it.
Modify matt-damon.ts to reflect the following:
import { Pipe } from '@angular/core';

@Pipe({
  name: 'mattDamon',
})
export class MattDamon {
  transform(value, args) {
    //Count how many words were passed in
    let wordCount = value.split(' ').length;
    let newValue = '';

    for (let i = 0; i < wordCount; i++) {
      newValue += 'Matt Damon ';
    }

    return newValue;
  }
}
Now we’ve added some code that will take the value that is passed in, count how many words are in the string, and then return a string containing the same number of “Matt Damon“‘s. You could do this by using regular expressions to match words instead, but I still haven’t got my head around regex and I think this is way easier to understand anyway.
3. Using a Pipe
Our pipe is ready to be used now, but it’s existence in the project is not enough to use it anywhere. We still need to import it and add it to the decorator of the page we want to use it on.
Let’s use one of the auto generated tabs to practice using our new pipe.
Modify page1.js to reflect the following
import { Component } from '@angular/core';
import { MattDamon } from '../../pipes/matt-damon';

@Component({
  templateUrl: 'build/pages/home/home.html',
  pipes: [MattDamon],
})
export class HomePage {
  myString: any;

  constructor() {
    this.myString = 'Pipes are super cool';
  }
}
Notice that we are now importing the pipe, and we also declare it in the @Component decorator (just like we need to do for directives). We’ve also added some data inside our constructor so that we will be able to use that within our template.
All that is left to do now is to use it in the template.
Modify home.html to reflect the following:
<ion-header>
 <ion-navbar>
  <ion-title>Tab 1</ion-title>
 </ion-navbar>
</ion-header>

<ion-content padding>
  <h2>Welcome to Ionic!</h2>
  <p>
    {{myString | mattDamon}}
  </p>
</ion-content>
If you take a look at the app now you should be able to see our totally useless pipe in action:

Summary
This was a pretty simple example, but that’s pretty much all you need to know about pipes. You can make the pipe itself much more complex, but the general idea is that you pass some data in and pass some different data back out. The pipe we created was obviously a bit silly, but here’s a few example of where a pipe might come in really handy:
- Converting dates or times to a specific format
- Formatting addresses
- Detecting if a value meets certain criteria
I mentioned before that we could modify the Matt Damon pipe to be able to use anybody’s name that is supplied as an argument to the pipe, but I never showed you how to do it. If pipes are a new concept to you, it’d be a worthwhile exercise to try and implement this by yourself.