

A Content Management System (CMS) provides an easy way to store and manage data related to content that you want to display. Popular Content Management Systems include the likes of Wordpress, Drupal, Magento and many more. One of the main benefits of a CMS is that it allows you to manage content without having to worry about the code - once the website or application is built you can typically manage everything through some kind of administration interface rather than having to push updates to the code (which also means that they are a viable option for people who do not have permanent developers available).
In this tutorial, we are going to focus on using a Headless CMS with Ionic. A typical CMS would not only allow you to store and manage your content, but it would also provide a way to display that content - a headless CMS does not do this. Instead, a headless CMS provides an API to access the data - the headless CMS handles the data, and it is up to you to decide how you want to display that data - in this case, we want to display the data in an Ionic application like this:
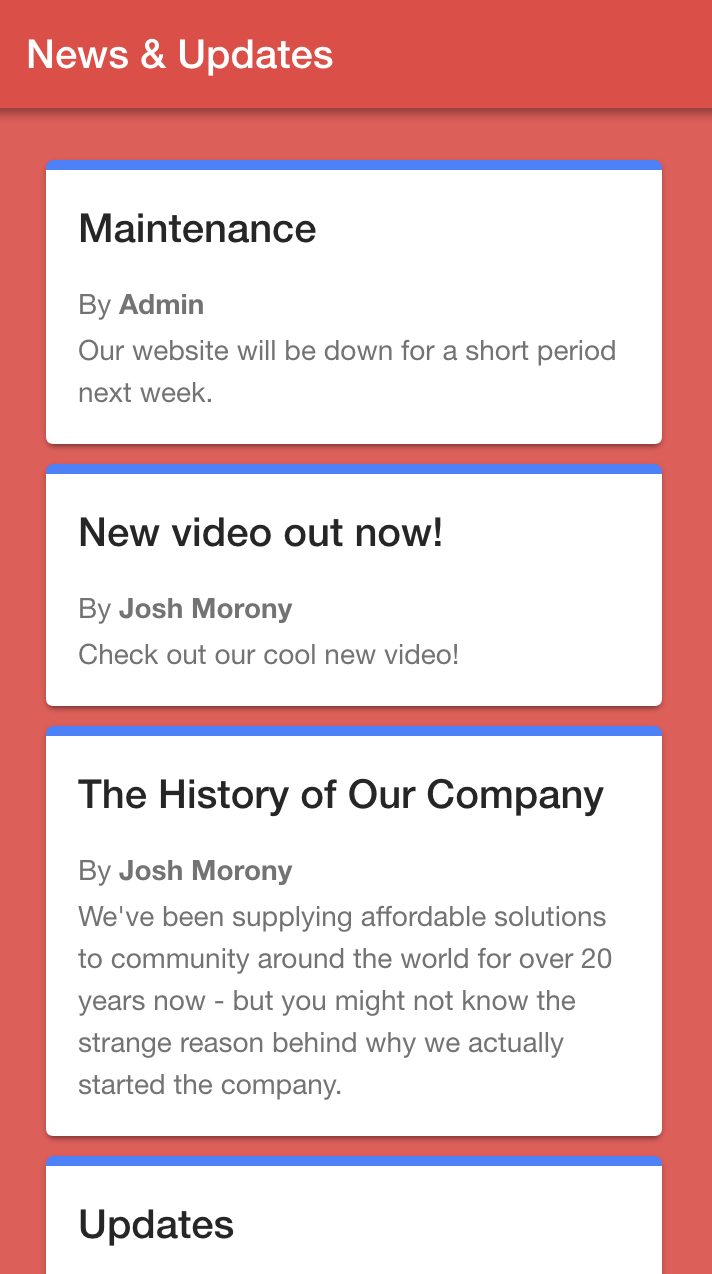
Using a Headless CMS with Ionic
It is relatively easy to pull data into an Ionic application through an API, so a headless CMS can be a fantastic way to manage data in an Ionic application.
You can use many different platforms as a headless CMS even if they are not specifically marketed that way. As long as you can store/manage data through the platform, and you can query that data through an API, you can use it as a headless CMS. For example, Wordpress provides an API that you can use to access your data, so you could even use Wordpress as a headless CMS if you built your own front-end instead of using Wordpress to display the user interface.
You could use something simple like Google Sheets as a headless CMS, or you could use something that is more specifically targeted to this purpose like Contentful. You can use anything as simple or as complex as you like - as long as you can query an API to pull in the data you can use it as a headless CMS with your Ionic application.
We will be using Airtable in this tutorial. Airtable allows you to store/manage data in a table/spreadsheet type of environment, and it provides an excellent API for accessing the data that you add.
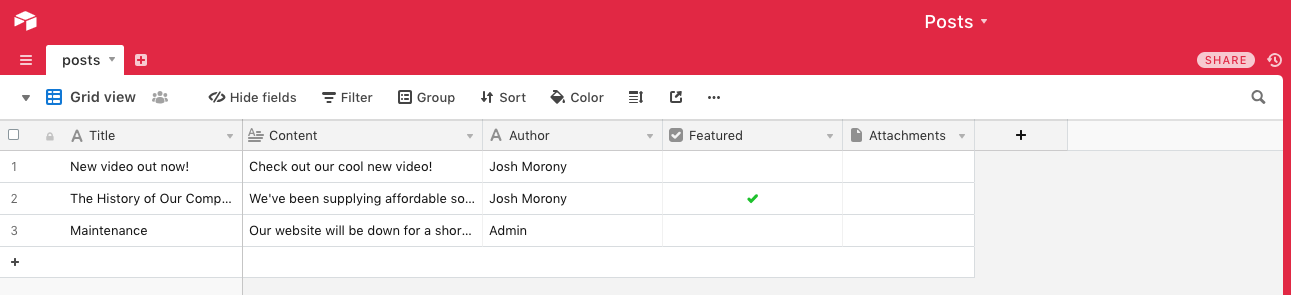
There is much, much more to Airtable than just being a simple online spreadsheet with an API, but that is all we will need it to be for this tutorial. Once we have finished this tutorial we will be able to update/add to the spreadsheet above as we please, and then that data will automatically be reflected in our Ionic application the next time it is reloaded.
1. Sign up for Airtable
You will first need to create an account with Airtable. There are paid plans available with different features, but the free tier is enough for the sake of this tutorial (you might need to investigate limits if you intend to use this in a production environment).
2. Set up a Workspace and Base
Once you have signed up, you will need to add a new workspace by clicking + Add a workspace:
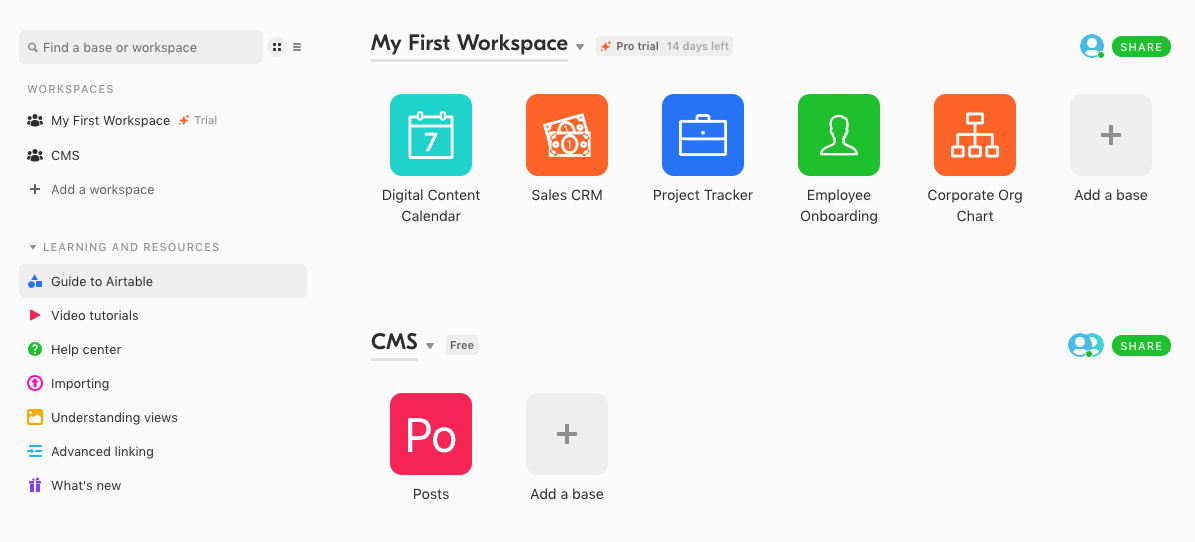
As you can see in the image above, I have created a workspace called CMS. Once you have created the workspace, you should add a “base” to it and name it Posts (or whatever you would prefer to call it). Once you have created the base, click on it to enter it.
You can now define this spreadsheet however you wish - you can add additional columns, rename them, and add as much content as you want. As you can see above, I have five fields:
- Title
- Content
- Author
- Featured
- Attachments
Also, keep in mind that I have changed the name of this table to posts instead of Table 1 (I would advise you do something similar as it will make the API nicer to use). If you want to follow along with exactly what I am doing in this tutorial you might want to make your table reflect everything you see above, but you are free to set up your fields however you please.
3. Generate a Read-Only API Key
In order to interact with the Airtable API for the base above, we will need an API key. Since we are creating a simple solution that has no server between our Ionic front-end and our “database” it means that this API key will need to be exposed publicly in our client-side code (there is no way to keep an API key secret if you store it in client-side code).
The problem with exposing our API key is that anybody who finds it might be able to do nefarious things - like change or update our Airtable content when we don’t want them to. To solve this, we will generate a key that is “read only”, meaning that even if someone does find the API key they would only be able to use it to read the content stored in Airtable (which they are allowed to do in this case anyway).
It is important that you do not use the API key for your account. If you generate an API key for your main account it will have ‘Owner’ privileges, meaning it can read/write/update/delete which we definitely do not want. Instead, we will be creating another user. If you click on the SHARE button next to your workspace, it will pop up a screen like this:
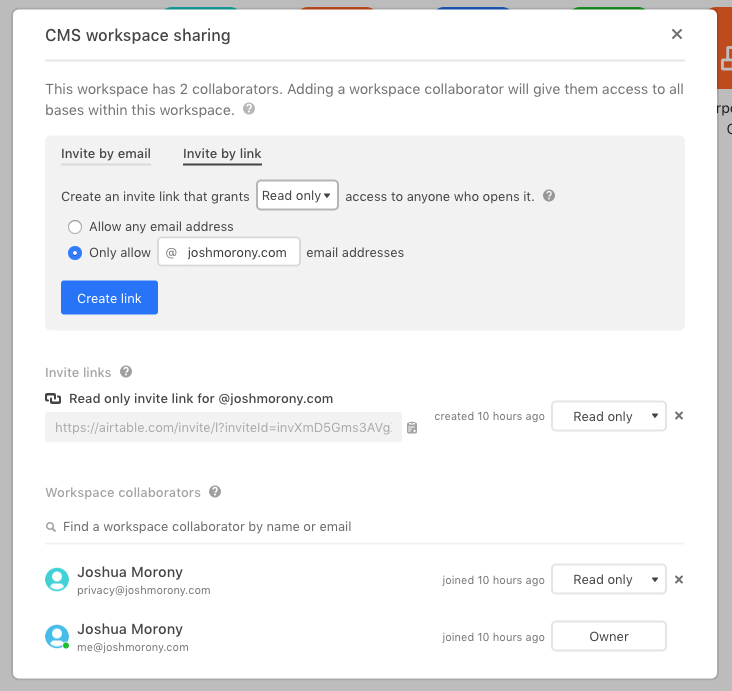
What you want to do is invite a new user, but change Creator to Read only. You will then need to sign up using that invite link with a separate email address. This new user will only have permission to read the posts.
Make sure that you are signed in with the Read only account, and then click on the profile icon in the top-right and go to Account > Generate API Key. Make a note of this API key as we will need to use it in the Ionic application.
Now everything is set up for us to access the data stored in Airtable and pull it into an Ionic application if you go to the following link:
and select the base you want to use, you will be able to see tailored documentation on how to use the API. All of the field names and endpoints are updated in the documentation to reflect whatever it is you have named your bases data, which is pretty awesome.
Pulling Data into Ionic
To pull this Airtable data into our Ionic application we will just need to create a simple service. This might vary a little bit depending on exactly what your data looks like and what you want to do with it, but here is an example service that you can use:
import { Injectable } from '@angular/core';
import { HttpClient } from '@angular/common/http';
import { Observable } from 'rxjs';
import { map } from 'rxjs/operators';

interface AirtableResponse {
  records: Object[]
}

@Injectable({
  providedIn: 'root'
})
export class PostsService {

  // NOTE: This API key will be exposed publicly, make sure it is a 'read only' key
  private apiKey: string = 'YOUR-READ-ONLY-API-KEY-HERE';

  constructor(private http: HttpClient) {

  }

  public getPosts(): Observable<Object[]> {

    return this.http.get('https://api.airtable.com/v0/YOUR-AIRTABLE-BASE/posts?api_key=' + this.apiKey).pipe(
      map((res: AirtableResponse) => res.records)
    );

  }

  public deleteTest(){
    return this.http.delete('https://api.airtable.com/v0/YOUR-AIRTABLE-BASE/posts/YOUR-POST-ID?api_key=' + this.apiKey);
  }

}
Make sure to replace apiKey with your own read-only key, and replace the URL in the GET request with the URL to your own Airtable base (you can grab this URL from the API documentation). The key part here is the getPosts method that will make a GET request to the Airtable API - we just need to make sure to send our API key along with the request. I am mapping the response here to modify the data that is sent back so that we only get the records (which contains our “posts”) instead of all of the data as it makes the data a bit easier to work with, but you don’t need to do this if you don’t want to.
I have also added a deleteTest method which will use the API to attempt to delete a record. If you want, you can replace this URL with your own Airbase API URL and an id from one of your posts. The point of this is that when the method is called it should not work - you should get an unauthorized error. If you don’t, it means that your API key isn’t actually read-only.
Displaying the Data in Ionic
With the service in place, we just need to display the data somewhere - here is what I did:
home.page.ts
import { Component, OnInit } from '@angular/core';
import { PostsService } from '../services/posts.service';

@Component({
  selector: 'app-home',
  templateUrl: 'home.page.html',
  styleUrls: ['home.page.scss'],
})
export class HomePage implements OnInit {

  public posts: Object[] = [];

  constructor(private postsService: PostsService){

  }

  ngOnInit(){

    // This request should not work, it is just a test to verify that a user with a 'read only' API key is being used.
    // If a user with different permissions is used, the publicy exposed key can be used by anyone to get full
    // read/write/update/delete access to your CMS
    this.postsService.deleteTest().subscribe((res) => {
      console.log(res);
      console.warn("This DELETE request is supposed to fail, its success will mean that your users have full read/write/update/delete permissions");
    }, (err) => {
      console.log("This DELETE request is supposed to fail - if your API key has only 'read only' permissions you may remove this");
    });

    // This request will pull in all of the posts from AirTable
    this.postsService.getPosts().subscribe((posts) => {
      this.posts = posts;
      console.log(this.posts);
    });
  }

}
home.page.html
<ion-header>
  <ion-toolbar color="danger">
    <ion-title> News & Updates </ion-title>
  </ion-toolbar>
</ion-header>

<ion-content padding>
  <ion-card *ngFor="let post of posts">
    <ion-card-header>
      <ion-card-title>{{post.fields.Title}}</ion-card-title>
    </ion-card-header>
    <ion-card-content>
      <p>By <strong>{{post.fields.Author}}</strong></p>
      <p>{{post.fields.Content}}</p>
    </ion-card-content>
  </ion-card>
</ion-content>
home.page.scss
ion-content {
  --ion-background-color: var(--ion-color-danger-tint);
}

ion-card {
  border-top: 5px solid var(--ion-color-primary);
  --background: #fff;
}
Summary
The Airtable API is quite extensive, and there is a lot more you could do outside of this simple example. The main point of this tutorial was to demonstrate the purpose and use of a headless CMS, which can make for a pretty simple but powerful backend for Ionic applications. If you are interested in more tutorials on Airtable specifically or perhaps using other platforms as a headless CMS, let me know in the comments!