

I’m starting a big new project that will span several months, and I want to track exactly how much time I spend working on it. It’s the type of work that gets done in bits and pieces, fitting around other obligations I have, late at night and early in the morning. I’ve done several projects like this in the past, and once it is finally done someone will inevitably ask how long did it take to you? – the answer is I have no idea.
This time I’m doing things right. I needed a simple application where I could tap a project to start timing, tap a project to stop timing, and have this persist over time. I’m sure I could have found a suitable solution easily enough, like Hours which someone kindly suggested, but I decided to turn it into a bit of a challenge instead:
I need an app. Instead of finding one, I'm going to build it myself with @Ionicframework v2, non stop, until it is done. Starting… now!
— Joshua Morony (@joshuamorony) January 8, 2017
I didn’t want to just build the skeleton of an application or one that more-or-less-works-but-has-some-bugs, or one that worked OK but looked like I put no effort into design. I wanted a feature complete application that was ready for submission to the App Stores. I know that Ionic 2 allows me to work very efficiently, but I wanted to take that to the extreme and test it in a realistic scenario – building an application that has a set of requirements to be met, rather than one being built for demonstration purposes.
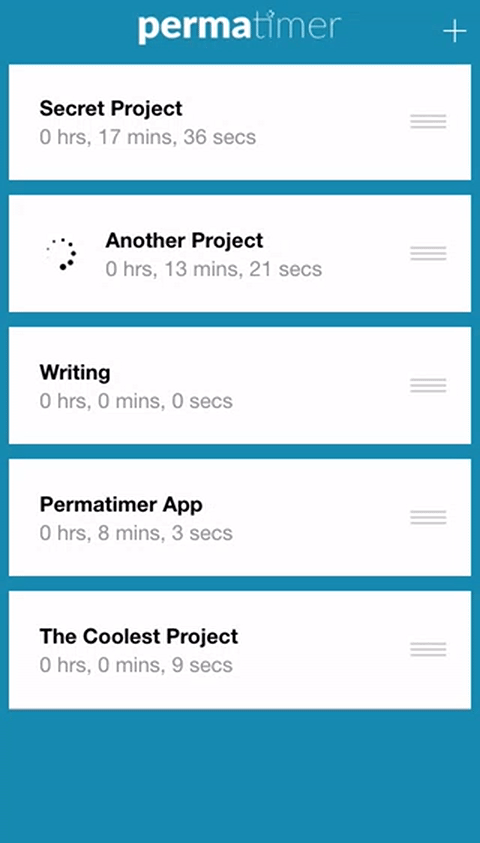
It’s also not just a basic example application, where you can just drop a few default components into place and call it a day. It requires a good deal of logic to track time and persist data, it uses a custom pipe to display data, it has conditional animations displayed and support for reordering projects and allows the user to correct a recorded time if they forgot to stop the timer.
It took me 3 hours and 57 minutes to complete the application from start to finish (ironically the application I was creating would’ve been able to track that for me). I think I achieved my goal; it was fully functional and it was finished to the point where it was ready for app store submission.
Here’s what it looked like:
I’ve started using the application to track my project now, and so far it has been working great for me. In a general sense, I don’t think it is a good idea at all to go building your own applications instead of just downloading off the shelf ones. However, it only took me a little longer to build than I probably would have spent looking around for a solution, it does no more and no less than exactly what I need, and it was a great opportunity for me to grow my skills, and hopefully teach others some things with this blog post.
I will do more testing and investigate if there is room to improve UX in the application before I actually submit it to the app store, but the application as it stands now performs all of its intended functions well, and I’m happy with the design (I even managed to squeeze in time for a simple logo in that 3 hours and 57 minutes).
In this tutorial, I’m going to step through building the time tracking application I built with Ionic 2, which will cover the following concepts:
- Basic CRUD (Create, Read, Update, Delete) operations
- Creating a timer that updates live
- Creating a pipe to manipulate data
- Using modals to pass data
- Reordering list items
- Saving data to permanent storage
- Loading data
- Working with times and dates
- Adding a conditional SVG animation to currently active projects
- Basic styling
I will explain these concepts briefly as we come across them in the tutorial, but I won’t spend too much time walking through the specifics of the code. If you would like a more in-depth explanation I already have some other tutorials out on these topics that you can check out below:
- How to Use Pipes to Manipulate Data in Ionic 2
- Passing Data Between Pages in Ionic 2
- An Introduction to Lists in Ionic 2
- A Simple Guide to Saving Data in Ionic 2
- A Guide to Styling an Ionic 2 Application
Let’s get into building the application.
Before We Get Started
Before you go through this tutorial, you should have at least a basic understanding of Ionic 2 concepts and the differences to Ionic 1. You must also already have Ionic 2 installed on your machine.
If you’re not familiar with Ionic 2 already, I’d recommend reading my Ionic 2 Beginners Guide first to get up and running and understand the basic concepts. If you want a much more detailed guide for learning Ionic 2, then take a look at Building Mobile Apps with Ionic 2.
1. Generate a new Ionic 2 application
We’re going to start off by generating a new Ionic 2 application with the following command:
ionic start permatimer blank --v2We will also need to generate another page, a pipe, and a provider before we move on to the coding.
Run the following command to generate the Stop Timing page:
ionic g page StopTimingThis page will display a confirmation screen to the user after they stop timing a project.
Run the following command to generate the Projects provider:
ionic g provider ProjectsThis provider will handle everything related to the projects.
Run the following command to generate the HoursMinutesSeconds pipe:
ionic g pipe HoursMinutesSecondsThis pipe will convert our time storage format into something more human readable.
We will also be using a model, but there aren’t currently generators for this, so we will just create it manually.
Create a folder at src/models and create a file inside of it called project-model.ts
In order to be able to use everything we have just added, we will need to set it up in the app.module.ts file.
Modify src/app/app.module.ts to reflect the following:
import { NgModule, ErrorHandler } from '@angular/core';
import { Storage } from '@ionic/storage';
import { IonicApp, IonicModule, IonicErrorHandler } from 'ionic-angular';
import { MyApp } from './app.component';
import { HomePage } from '../pages/home/home';
import { StopTimingPage } from '../pages/stop-timing/stop-timing';
import { Projects } from '../providers/projects';
import { HoursMinutesSeconds } from '../pipes/hours-minutes-seconds';

@NgModule({
  declarations: [MyApp, HomePage, StopTimingPage, HoursMinutesSeconds],
  imports: [IonicModule.forRoot(MyApp)],
  bootstrap: [IonicApp],
  entryComponents: [MyApp, HomePage, StopTimingPage],
  providers: [
    { provide: ErrorHandler, useClass: IonicErrorHandler },
    Storage,
    Projects,
  ],
})
export class AppModule {}
Notice that as well as adding our page, pipe, and provider, we have also added the Ionic Storage service as a provider.
Finally, we will need to install the SQLite plugin so that projects will be saved to a native SQLite database when running on a device:
Run the following command to install the SQLite plugin:
ionic plugin add cordova-sqlite-storage --saveWith the set up out of the way, we can start coding!
2. Create the Projects Model
We are going to create a basic model to represent our Projects. This will allow us to easily instantiate objects from this model, and lets us add helper functions to help us perform certain tasks (like adding time to a specific project).
Modify src/models/project-model.ts to reflect the following:
export class ProjectModel {

    constructor(public name: string,
                public lastChecked: Date,
                public totalSeconds: number,
                public active: boolean) {

    }

    setName(name: string): void {
        this.name = name;
    }

    setLastChecked(lastChecked: Date): void {
        this.lastChecked = lastChecked;
    }

    addToTotalSeconds(totalSeconds: number): void {
        this.totalSeconds += totalSeconds;
    }

    deductFromTotalSeconds(totalSeconds: number): void {
        this.totalSeconds -= totalSeconds;
    }

    setIsActive(active: boolean): void {
        this.active = active;
    }
}
3. Create the Projects Provider
We’re going to start off by implementing the Projects provider. This is going to handle all of the logic related to projects, which includes:
- Creating, Reading, Updating, and Deleting Projects
- Saving projects to storage
- Loading projects from storage
- Keeping track of time spent on projects
Modify src/providers/projects.ts to reflect the following:
import { Injectable } from '@angular/core';
import { Storage } from '@ionic/storage';
import { ProjectModel } from '../models/project-model';
import { reorderArray } from 'ionic-angular';

@Injectable()
export class Projects {

    projects: any[] = [];
    projectActive = false;
    timerInterval: any;
    secondsElapsed: number = 0;

    constructor(public storage: Storage) {

    }

    load(): void {

        this.storage.get('permatimerProjects').then((projects) => {

            if(projects){

                for(let project of projects){

                    let savedProject = new ProjectModel(project.name, new Date(project.lastChecked), project.totalSeconds, project.active);
                    this.projects.push(savedProject);

                    if(project.active){
                        this.startTiming(savedProject, true);
                    }

                }

            }

        });

        this.storage.get('permatimerTime').then((time) => {
            this.secondsElapsed = time;
        });

    }

    save(): void {
        this.storage.set('permatimerProjects', this.projects);
        this.storage.set('permatimerTime', this.secondsElapsed);
    }

    reorder(indexes): void {

        this.projects = reorderArray(this.projects, indexes);
        this.save();

    }

    startTiming(project, restarting): void {

        this.projectActive = true;

        if(!restarting){
            project.setIsActive(true);
            project.setLastChecked(new Date());
        }

        this.timerInterval = setInterval(() => {

            let now = new Date();
            let timeDifference = now.getTime() - project.lastChecked.getTime();
            let seconds = timeDifference / 1000;

            this.secondsElapsed += seconds;
            project.addToTotalSeconds(seconds);

            project.setLastChecked(now);
            this.save();

        }, 1000);
    }

    stopTiming(project): number {

        let totalTimeElapsed = this.secondsElapsed;

        this.projectActive = false;

        project.setIsActive(false);
        clearInterval(this.timerInterval);
        this.timerInterval = false;
        this.secondsElapsed = 0;
        this.save();

        return totalTimeElapsed;

    }

    increaseSeconds(project, amount): void {
        project.addToTotalSeconds(amount);
        this.save();
    }

    decreaseSeconds(project, amount): void {
        project.deductFromTotalSeconds(amount);
        this.save();
    }

    addProject(project): void {

        this.projects.push(project);
        this.save();

    }

    editProject(project, title): void {

        project.setName(title);
        this.save();

    }

    removeProject(project): void {

        let index = this.projects.indexOf(project);

        if(index > -1){
            this.projects.splice(index, 1);
            this.save();
        }

    }

}
There’s quite a lot to this file, so let’s go over the main points in brief:
We load the projects from storage if they are available, but we then have to recreate the objects by insantiating new Project Models. We can’t store complicated objects like Dates as a JSON string in storage, so we recreate the objects based on the values that are stored.
We have a start timing function that starts an interval that updates the time once every second. We use dates to calculate time elapsed rather than relying on the interval running exactly every 1000ms, as that is not always the case. We store the date that the time was last checked so that we can calculate the time elapsed even if the user exits the app and comes back to it later.
The stop timing function resets everything and returns the total time elapsed during that session so that the user can modify it if they wish.
The rest of the functions mostly just perform basic CRUD operations.
4. Create the HoursMinutesSeconds Pipe
By relying on the projects service, we will be able to grab all the data we need to display information about the projects. By default, the total time spent on a project is stored as totalSeconds which is the time in seconds that the user has spent working on the project.
Telling the user that they have spent 3405493 seconds on a project isn’t entirely useful, but it is an easy and convenient way for us to store the data and perform calculations on it.
What we will do instead is create a pipe that will convert those seconds into the following format:
X hrs, Y mins, Z secsModify src/pipes/hours-minutes-seconds.ts to reflect the following:
import { Injectable, Pipe } from '@angular/core';

@Pipe({
  name: 'hoursMinutesSeconds',
})
@Injectable()
export class HoursMinutesSeconds {
  transform(value, args?) {
    let minutes = Math.floor(value / 60);
    let hours = Math.floor(minutes / 60);
    let seconds = Math.floor(value % 60);

    return hours + ' hrs, ' + minutes + ' mins, ' + seconds + ' secs';
  }
}
This pipe will take in the seconds as the value, convert it into the format we want, and then return that value. We can use this in our template like this:
{{project.totalSeconds | hoursMinutesSeconds}}To run the value through the pipe before displaying it to the user.
5. Create the Home Page
We’re going to make use of that pipe now, and set up the rest of the template to display and work with projects, in our home page template.
Modify src/pages/home/home.html to reflect the following:
<ion-header>
  <ion-navbar color="primary" transparent>
    <ion-title>
      <img src="assets/images/logo.png" />
    </ion-title>
    <ion-buttons end>
      <button ion-button icon-only (click)="newProject()">
        <ion-icon name="add"></ion-icon>
      </button>
    </ion-buttons>
  </ion-navbar>
</ion-header>

<ion-content>
  <ion-list
    no-lines
    reorder="true"
    (ionItemReorder)="projectsService.reorder($event)"
  >
    <ion-item-sliding
      (click)="toggleTimer(project)"
      *ngFor="let project of projectsService.projects"
    >
      <ion-item>
        <ion-spinner
          *ngIf="project.active"
          name="bubbles"
          item-left
        ></ion-spinner>
        <h6>{{project.name}}</h6>
        <p>{{project.totalSeconds | hoursMinutesSeconds}}</p>
      </ion-item>

      <ion-item-options side="right">
        <button
          color="light"
          ion-button
          icon-only
          (click)="editProject(project)"
        >
          <ion-icon name="settings"></ion-icon>
        </button>
        <button
          color="danger"
          ion-button
          icon-only
          (click)="projectsService.removeProject(project)"
        >
          <ion-icon name="trash"></ion-icon>
        </button>
      </ion-item-options>
    </ion-item-sliding>
  </ion-list>
</ion-content>
We’ve set up a list of sliding items that repeats for every project we have stored in our projectsService which we will set up in the TypeScript file for the Home Page shortly. The (click) listener will trigger a function that controls starting and stopping timing for an individual project.
Inside of the sliding item, we have a conditional SVG shown with *ngIf which depends on whether or not the project is currently active. We use the <ion-spinner> component that Ionic provides to do this – the name attribute can also be changed to use a different style of spinner.
We also display the projects name and display the total time spent on the project by using the HoursMinutesSeconds pipe we created. There is also listeners hooked up to handle triggering the functions for creating, editing, and deleting projects. We are going to set up those corresponding functions in the TypeScript file now.
Modify src/pages/home/home.ts to reflect the following
import { Component } from '@angular/core';
import { NavController, AlertController, ModalController } from 'ionic-angular';
import { StopTimingPage } from '../stop-timing/stop-timing';
import { Projects } from '../../providers/projects';
import { ProjectModel } from '../../models/project-model';

@Component({
  selector: 'page-home',
  templateUrl: 'home.html'
})
export class HomePage {

    constructor(public navCtrl: NavController, public alertCtrl: AlertController, public projectsService: Projects, public modalCtrl: ModalController) {

    }

    ionViewDidLoad(){
        this.projectsService.load();
    }

    newProject(): void {

        let prompt = this.alertCtrl.create({
            title: 'New Project',
            message: 'Enter a name for your new project',
            inputs: [
                {
                    name: 'title'
                }
            ],
            buttons: [
                {
                    text: 'Cancel'
                },
                {
                    text: 'Add',
                    handler: (data) => {
                        let project = new ProjectModel(data.title, new Date(), 0, false);
                        this.projectsService.addProject(project);
                    }
                }
            ]
        });

        prompt.present();

    }

    editProject(project): void {

        let prompt = this.alertCtrl.create({
            title: 'Edit Project',
            message: 'Enter a new name for your new project',
            inputs: [
                {
                    name: 'title'
                }
            ],
            buttons: [
                {
                    text: 'Cancel'
                },
                {
                    text: 'Save',
                    handler: (data) => {
                        this.projectsService.editProject(project, data.title);
                    }
                }
            ]
        });

        prompt.present();

    }

    toggleTimer(project): void {


        if(!project.active){

            if(!this.projectsService.projectActive){
                this.projectsService.startTiming(project, false);
            } else {

                let alert = this.alertCtrl.create({
                    title: 'Oops!',
                    subTitle: 'You are already timing a project. You must stop it before timing a new project.',
                    buttons: ['OK']
                });

                alert.present();

            }

        } else {

            let elapsedTime = this.projectsService.stopTiming(project);

            let modal = this.modalCtrl.create(StopTimingPage, {
                elapsedTime: elapsedTime
            });

            modal.onDidDismiss((modifiedSeconds) => {

                if(modifiedSeconds > elapsedTime){
                    let difference = modifiedSeconds - elapsedTime;
                    this.projectsService.increaseSeconds(project, difference);
                } else {
                    let difference = elapsedTime - modifiedSeconds;
                    this.projectsService.decreaseSeconds(project, difference);
                }

            });

            modal.present();

        }

    }

}
We’ve injected the Project provider into this class as projectsService since we are referencing that in our template. We have some Alerts set up that we make use of to create and edit projects, and we also have a modal that launches the StopTiming page when the user stops timing.
Whether the user is starting or stopping timing is determined in the toggleTimer function, and then that will either start the timer on a project (if a project is not already being timed), or stop timing and launch the confirmation screen. This screen will automatically be filled out with the elapsed time, and if the user wishes they can modify this before saving the time.
6. Create the Stop Timing Page
The last page we need to create is the Stop Timing page. As I mentioned above, we pass in the total time elapsed for a project into this page so that the user can edit it if they wish before saving.
Modify src/pages/stop-timing/stop-timing.html to reflect the following:
<ion-header>
  <ion-navbar color="primary" transparent>
    <ion-title>Finished</ion-title>
  </ion-navbar>
</ion-header>

<ion-content padding>
  <p>Nice work! You've finished working on this project for now.</p>

  <p>
    Below is the time that you have spent working on this project this session.
    <strong>If this is correct, you can leave it as it is.</strong>
  </p>

  <p>
    If you forgot to turn off the timer, or spent a little too long on YouTube,
    you can edit the time below before saving.
  </p>

  <ion-list no-lines>
    <ion-item>
      <ion-label text-right>Hours: </ion-label>
      <ion-input [(ngModel)]="hours" type="tel"></ion-input>
    </ion-item>

    <ion-item>
      <ion-label text-right>Minutes: </ion-label>
      <ion-input [(ngModel)]="minutes" type="tel"></ion-input>
    </ion-item>

    <ion-item>
      <ion-label text-right>Seconds: </ion-label>
      <ion-input [(ngModel)]="seconds" type="tel"></ion-input>
    </ion-item>
  </ion-list>
</ion-content>

<ion-footer>
  <button color="light" outline ion-button (click)="submitTime()">
    Save Time
  </button>
</ion-footer>
These are just some basic inputs with two-way data binding set up with [(ngModel)] so that we can grab the values in the next step. Also notice here that we are using a type of tel, this field is for numeric input only and this will allow us to display the number keypad instead of the normal keyboard.
Modify src/pages/stop-timing/stop-timing.ts to reflect the following:
import { Component } from '@angular/core';
import { NavController, NavParams, ViewController } from 'ionic-angular';

@Component({
  selector: 'page-stop-timing',
  templateUrl: 'stop-timing.html'
})
export class StopTimingPage {

    elapsedTime: any = 0;
    hours: any;
    minutes: any;
    seconds: any;

    constructor(public navCtrl: NavController, public navParams: NavParams, public viewCtrl: ViewController) {}

    ionViewDidLoad() {

        this.elapsedTime = this.navParams.get('elapsedTime');

        this.minutes = Math.floor(this.elapsedTime / 60);
        this.hours = Math.floor(this.minutes / 60);
        this.seconds = Math.floor(this.elapsedTime % 60);

    }

    submitTime(){

        let modifiedSeconds = (this.hours * 60 * 60) + (this.minutes * 60) + this.seconds;

        this.viewCtrl.dismiss(modifiedSeconds);
    }

}
This sets the initial values up for the inputs in the template (the actual time spent on the project), and then when the modal is dismissed it will pass the values back to the home page (whether they have been modified by the user or not).
7. Add Styling
The application is basically done now, but as a last step, we are going to add a bit of styling to the application.
Modify the Shared Variables and Named Color Variables in src/theme/variables/scss to reflect the following:
// Shared Variables
// --------------------------------------------------
// To customize the look and feel of this app, you can override
// the Sass variables found in Ionic's source scss files.
// To view all the possible Ionic variables, see:
// http://ionicframework.com/docs/v2/theming/overriding-ionic-variables/

$background-color: #0b82b3;

// Named Color Variables
// --------------------------------------------------
// Named colors makes it easy to reuse colors on various components.
// It's highly recommended to change the default colors
// to match your app's branding. Ionic uses a Sass map of
// colors so you can add, rename and remove colors as needed.
// The "primary" color is the only required color in the map.

$colors: (
  primary: #387ef5,
  secondary: #32db64,
  danger: #f53d3d,
  light: #f4f4f4,
  dark: #222
);
Modify src/pages/home/home.scss to reflect the following:
.ios,
.md {
  page-home {
    ion-item-sliding {
      margin-bottom: 10px;
      width: 96%;
      margin-left: 2%;
      margin-right: 2%;
    }

    ion-item {
      background-color: #fff;
      padding-left: 20px;
      padding-top: 10px;
      padding-bottom: 10px;

      h6 {
        font-weight: bold;
      }
    }

    ion-item-options button {
      padding-left: 20px !important;
      padding-right: 20px !important;
    }
  }
}
Modify src/pages/stop-timing/stop-timing.scss to reflect the following:
.ios,
.md {
  page-stop-timing {
    ion-footer {
      text-align: center;
    }

    ion-footer button {
      width: 96%;
    }

    ion-item {
      padding-top: 5px;
      padding-bottom: 5px;

      ion-label {
        width: 30%;
        color: #fff;
        font-weight: bold;
      }
    }

    ion-input {
      background-color: map-get($colors, light);
    }

    p {
      color: #fff;
      text-align: center;
    }
  }
}
Summary
I’m really happy with how this challenge turned out. I now have a simple, high-quality application that does exactly what I need and it only took a few hours to build. The two things that made this possible are the Ionic CLI and the built-in components Ionic 2 provides.
The blank application that the Ionic CLI generates sets up all of the boilerplate code that’s required which saves a ton of time, and then I was able to use the generate command to quickly create templates for all of the other components my application needed.
The built-in components provide functionality for just about all of the standard features you would implement in a mobile application, and since they are styled so well by default, it means there’s not a whole lot you need to do before you have a great looking application.