

When we are building applications, there are many instances where we want data updates from the server to display immediately. Perhaps we have a chat application and we want to display new messages to a user, or maybe we’ve built a game that needs to display an update to the user as soon as something happens on the server.
The problem with a typical client/server set up is that we would trigger a request from the client to load some data from a server when the application loads and it would pull in the latest set of data - for the sake of an example, let’s say we would load in all of the current chat messages from the server. Once that initial load and request has been made, what happens when somebody else updates the data on the server (e.g. when someone adds a new chat message)? Nobody would know that a new chat message has been added except the person who added it, so we need some way to check the data on the server after the initial request for data.
We could, for example, set up some code in our client-side application to check (or “poll”) the server every 10 seconds. Every 10 seconds the application would make a request to the server for the latest chat data, and load any new messages. This is a viable solution, but it’s not ideal. This approach has two glaring flaws which are:
- A lot of likely unnecessary requests are made to the server
- There is a potentially long delay before the user will see the new data (which would be especially annoying in a chat application)
This brings me to the topic of today’s tutorial, there is a much better way to handle this situation…
Introducing Web Sockets
The WebSocket API allows for event-based two-way communication between a browser and a server. If we consider our initial example of “polling” a server every 10 seconds to get new data to be like calling somebody on the phone every 10 seconds for updates, then using web sockets instead would be like just calling them once and keeping the call open in the background so either party can communicate instantly whenever required.
When using Web Sockets, an event could be triggered as soon as a new chat message is added by anybody, and any clients listening will instantly be notified. This means that the chat message that was added would show up near instantaneously for the other users.
NestJS has support for web sockets built-in, which makes use of the popular socket.io package. This makes setting up communications using the WebSocket API in NestJS rather simple.
In this tutorial, we are going to build a simple live chat application using NestJS and Ionic/Angular. We will use our NestJS server to:
- Broadcast any chat messages to any listening clients
- Notify when a new client connects
- Notify when a client disconnects
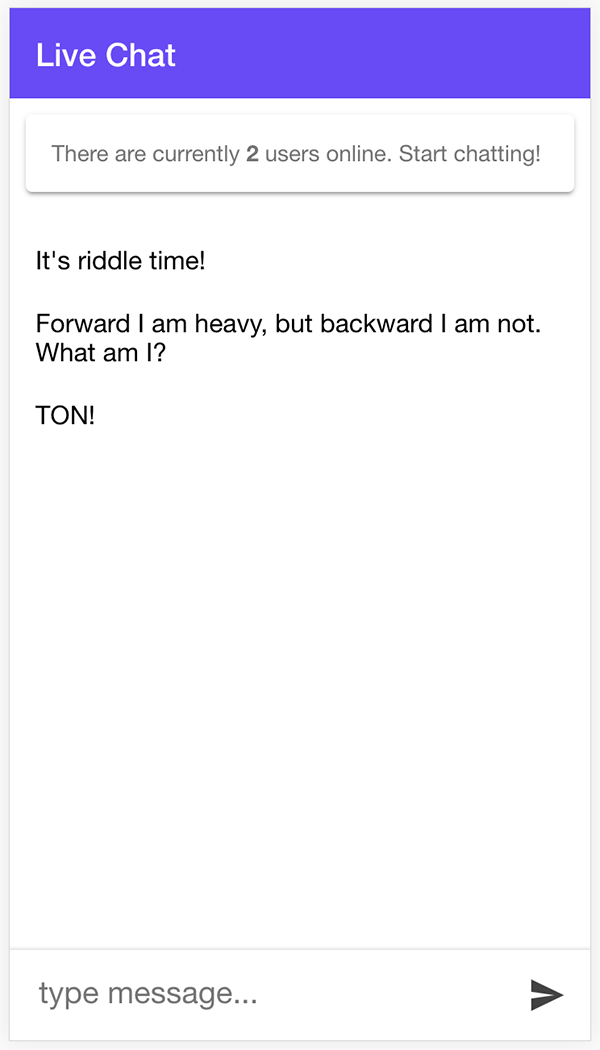
The server will just be used to relay information, it will be the responsibility of the clients to display the information. When we are done, the application should look something like this:
Before We Get Started
This tutorial assumes that you are already familiar with the basics of NestJS (and Ionic/Angular if you are using that on the front-end). If you need more tutorials on NestJS in general, I have more NestJS tutorials available here.
Although we are using Ionic on the front-end for this tutorial, it doesn’t particularly matter. You could use any front-end you like, but we will be covering specifically how to use the ngx-socket-io package which makes it easier to use socket.io in Angular. If you are not using Angular, then you would need to implement socket.io in some other way in your application (the basics concepts remain the same).
1. Creating the NestJS Server
First, we are going to create our NestJS server. In order to use web sockets in your NestJS project, you will need to install the following package:
npm install --save @nestjs/websocketsWith that package installed, we are going to create a new module called ChatModule which will handle our web socket communication.
Run the following command to create a new module called Chat:
nest g module chatOnce the module has been generated, we are going to create a new file to implement a @WebSocketGateway.
Create a file at src/chat/chat.gateway.ts and add the following:
import {
  WebSocketGateway,
  WebSocketServer,
  SubscribeMessage,
  OnGatewayConnection,
  OnGatewayDisconnect,
} from '@nestjs/websockets';

@WebSocketGateway()
export class ChatGateway implements OnGatewayConnection, OnGatewayDisconnect {
  @WebSocketServer() server;
  users: number = 0;

  async handleConnection() {
    // A client has connected
    this.users++;

    // Notify connected clients of current users
    this.server.emit('users', this.users);
  }

  async handleDisconnect() {
    // A client has disconnected
    this.users--;

    // Notify connected clients of current users
    this.server.emit('users', this.users);
  }

  @SubscribeMessage('chat')
  async onChat(client, message) {
    client.broadcast.emit('chat', message);
  }
}
This is basically everything we need to handle the communication for our application, so let’s break it down. First, we decorate our class with @WebSocketGateway which is what will allow us to make use of the socket.io functionality.
You will notice that this class also implements OnGatewayConnection and OnGatewayDisconnect. This isn’t strictly required, but since we want to keep track of clients connecting and disconnecting we implement the handleConnection() and handleDisconnect() hooks. These will be triggered every time a client connects or disconnects.
We set up a member variable called server that is decorated with @WebSocketServer which will give us access to the server instance. We can then use this to trigger events and send data to connected clients. We make use of this in our handleConnection and handleDisconnect hooks where we are incrementing or decrementing the total number of users, and then notifying any connected clients of the new number of users.
The @SubscribeMessage decorator is used to listening to incoming messages. If we want to send a chat event from our client to the server, then we need to decorate the function that will handle that event with @SubscribeMessage('chat'). This function (onChat in this case) has two parameters: the first (which we are calling client) will be a reference to the socket instance, and the second (which we are calling message) will be the data sent by the client.
Since we want all connected clients to know about this chat message when it is received, we trigger a broadcast to those clients with client.broadcast.emit('chat', message). Then, any clients listening for the chat event would receive this data instantly.
We are almost done with the server, but before our gateway will start listening we need to add it to the providers in our chat module.
Modify src/chat/chat.module.ts to reflect the following:
import { Module } from '@nestjs/common';
import { ChatGateway } from './chat.gateway';

@Module({
  providers: [ChatGateway],
})
export class ChatModule {}
Remember, when testing you will need to make sure your server is running with:
npm run start2. Creating the Client-Side Application
With the server complete, now we just need to set up some kind of front-end client to interact with it. As I mentioned, we will be creating an example using Ionic/Angular but you could use any front-end you like. You could even have multiple different front ends interacting with the same server.
Install the following package in your Ionic/Angular project:
npm install --save ngx-socket-ioThis package just implements socket.io in an Angular friendly way. As well as installing it, we will also need to configure the package in our root module.
Make sure to configure the
SocketIoModuleas shown in the app.module.ts file below:
import { NgModule } from '@angular/core';
import { BrowserModule } from '@angular/platform-browser';
import { RouteReuseStrategy } from '@angular/router';

import { IonicModule, IonicRouteStrategy } from '@ionic/angular';
import { SplashScreen } from '@ionic-native/splash-screen/ngx';
import { StatusBar } from '@ionic-native/status-bar/ngx';

import { AppComponent } from './app.component';
import { AppRoutingModule } from './app-routing.module';

import { SocketIoModule, SocketIoConfig } from 'ngx-socket-io';

const config: SocketIoConfig = { url: 'http://localhost:3000', options: {} };

@NgModule({
  declarations: [AppComponent],
  entryComponents: [],
  imports: [
    BrowserModule,
    IonicModule.forRoot(),
    AppRoutingModule,
    SocketIoModule.forRoot(config),
  ],
  providers: [
    StatusBar,
    SplashScreen,
    { provide: RouteReuseStrategy, useClass: IonicRouteStrategy },
  ],
  bootstrap: [AppComponent],
})
export class AppModule {}
We use a url of http://localhost:3000 as this is where our NestJS server is running. In a production environment, you would change this to the location of wherever your NestJS server is running. Now, we are going to focus on implementing a chat service to handle most of the logic, and afterward, we will create a simple interface to send and receive chats.
Run the following command to create a chat service:
ionic g service services/chatModify src/app/services/chat.service.ts to reflect the following:
import { Injectable } from '@angular/core';
import { Socket } from 'ngx-socket-io';

@Injectable({
  providedIn: 'root'
})
export class ChatService {

  constructor(private socket: Socket) {

  }

  sendChat(message){
    this.socket.emit('chat', message);
  }

  receiveChat(){
    return this.socket.fromEvent('chat');
  }

  getUsers(){
    return this.socket.fromEvent('users');
  }

}
Once again, there isn’t actually all that much code required to get this communication working. We inject Socket from the ngx-socket-io package to get a reference to the socket instance, and then we utilise that our three methods.
The sendChat function will allow us to send a message to the server. We call the emit method with a value of chat which means that it is going to trigger the function on the server decorated with @SubscribeMessage('chat'). The server will receive the message sent, and then rebroadcast that to any other clients listening.
Whilst the sendChat function handles sending data to the server, the other two methods handle receiving data from the server. The receiveChat method listens to the chat event, which means that every time this line is triggered on the server:
client.broadcast.emit('chat', message);The receiveChat method will get that message data. Similarly, the getUsers method listens to the users event, and every time this line is triggered on the server:
this.server.emit('users', this.users);The getUsers method will receive the total number of active users. With these methods in place, let’s make use of them in one of our pages.
Modify src/app/home/home.page.ts to reflect the following:
import { Component, OnInit } from '@angular/core';
import { ChatService } from '../services/chat.service';

@Component({
  selector: 'app-home',
  templateUrl: 'home.page.html',
  styleUrls: ['home.page.scss'],
})
export class HomePage implements OnInit {

  public users: number = 0;
  public message: string = '';
  public messages: string[] = [];

  constructor(private chatService: ChatService){

  }

  ngOnInit(){

    this.chatService.receiveChat().subscribe((message: string) => {
      this.messages.push(message);
    });

    this.chatService.getUsers().subscribe((users: number) => {
      this.users = users;
    });

  }

  addChat(){
    this.messages.push(this.message);
    this.chatService.sendChat(this.message);
    this.message = '';
  }

}
Your page might not look exactly like this, but the example above is the gist of what needs to happen. In our ngOnInit hook we subscribe to both the receiveChat and getUsers methods which both return an observable. Every time a communication is received from the server, the observable will emit the new data and we can do something with it. In this case, we are pushing any new messages into the messages array, and any time we receive the total number of users from the server we set the users member variable to that value.
The only other method we have here is addChat which simple passes on whatever message the user typed to the sendChat method in the chat service (as well as adding the message to the messages array, since this client won’t receive a broadcast for its own chat message).
All of the main functionality has been completed now, but let’s create a nice chat interface to test it out in.
Modify src/app/home/home.page.html to reflect the following:
<ion-header no-border>
  <ion-toolbar color="tertiary">
    <ion-title>Live Chat</ion-title>
  </ion-toolbar>
</ion-header>

<ion-content>
  <ion-card>
    <ion-card-content>
      There are currently <strong>{{users}}</strong> users online. Start
      chatting!
    </ion-card-content>
  </ion-card>

  <ion-list lines="none">
    <ion-item *ngFor="let message of messages"> {{message}} </ion-item>
  </ion-list>
</ion-content>

<ion-footer>
  <ion-toolbar>
    <textarea
      spellcheck="true"
      autocomplete="true"
      autocorrect="true"
      rows="1"
      class="chat-input"
      [(ngModel)]="message"
      placeholder="type message..."
      (keyup.enter)="addChat()"
    >
    </textarea>

    <ion-buttons slot="primary">
      <ion-button (click)="addChat()" slot="end" class="send-chat-button">
        <ion-icon slot="icon-only" name="send"></ion-icon>
      </ion-button>
    </ion-buttons>
  </ion-toolbar>
</ion-footer>
Modify src/app/home/home.page.scss to reflect the following:
textarea {
    width: calc(100% - 20px);
    margin-left: 10px;
    background-color: #fff;
    font-size: 1.2em;
    resize: none;
    border: none;
}
3. Test with Multiple Clients
Now, all we need to do is test it in the browser! This is a little bit awkward because we are going to need multiple clients in order to test the web socket communication. How you achieve this might depend on what kind of front-end you are using, but if you are using Ionic/Angular it is simple enough.
First, make sure your NestJS server is running with:
npm run startNext, in a separate terminal window, serve your Ionic application:
ionic serveThe, open up another terminal window, and serve your Ionic application again:
ionic serveYou should now have two instances of your Ionic application running on two separate ports in the browser. You should be able to enter a chat message into either instance, and it will immediately show up in the other. At this point, the application should look something like this:
Summary
This is a very simplistic/bare-bones example, but it demonstrates the basic usage of web sockets. In a more typical application, you might want to extend this to perhaps store the messages in a database like MongoDB - you could still use a similar set up where you broadcast new chat messages to the clients, but you would then also store the messages in the database.
If you’d like to dive further into using web sockets in NestJS, there is a great complex chat application example available here and you can also find a lot more information in the NestJS documentation for web sockets.