It is quite common in mobile games to provide a shop where players can purchase items and upgrades for the game. It might sometimes be called a store, upgrade center, barracks or something else but the general idea is the same: a screen where users can purchase things that affect their experience in the game some way.
A lot of the time this is integrated with In App Purchases, which allows you to charge real money for items that are purchased in the shop. It is also quite common to offer items in shops that use in game currency that the player can earn without spending real money too.
A combination of both of these is usually a good approach. You may allow the user to redeem experience points earned in battles for items and upgrades, but certain items will require using real money for example.
This allows people to enjoy the game for free – people who can not afford to pay or who do not think it is worth paying for will help drive the growth of a game. People who are willing to spend real money then help the game become profitable.
To summarise the benefits of including a shop in a mobile game:
- It adds replayability and encourages grinding for more in game currency (which could potentially lead to an increase in advertisement revenue in a mobile game)
- It allows the creators of the game to create a source of revenue
Creating a Shop in Phaser
A shop is typically implemented as its own screen or popup. A modal overlay with a scrolling list of all the available items is quite often used.
I found this a little difficult to achieve with Phaser for a few reasons:
- Phaser does not support a scrolling view
- Images have to be added as sprites; you can’t use HTML templates within Phaser
- If you include In App Purchases then the prices will be different depending on the region the user is from, so you can’t use static images (e.g. a graphic that says $1.99 since it won’t be $1.99 everywhere)
I initially tried coding a solution within Phaser that would pop up a modal screen (which was generated with canvas) and placed sprites within this screen that would auto scale images within it. Each sprite was a button that represented one of the items in the shop. It kind of worked, but I was going about it completely the wrong way (it was so much more complicated than it needed to be).
In the end a Phaser game is just a web page, a pretty fancy one but still just a web page. Typically you might see a Phaser game instantiated like this:
<!doctype html>
<html lang="en">
<head>
	<meta charset="UTF-8" />
	<title>My Game</title>
	<script type="text/javascript" src="js/phaser.min.js"></script>
	<script type="text/javascript" src="js/boot.js"></script>
	<script type="text/javascript" src="js/preload.js"></script>
	<script type="text/javascript" src="js/gametitle.js"></script>
	<script type="text/javascript" src="js/main.js"></script>
	<script type="text/javascript" src="js/gameover.js"></script>
    <style type="text/css">
        body {
            margin: 0;
            font-family: 'Verdana', Helvetica, Arial, sans-serif !important;
        }
    </style>
    <script type="text/javascript">
		var game = new Phaser.Game(500, 500, Phaser.CANVAS, 'gameDiv');
		game.state.add("Boot", boot);
		game.state.add("Preload", preload);
		game.state.add("GameTitle", gameTitle);
		game.state.add("Main", mainState);
		game.state.add("GameOver", gameOver);
		game.state.start("Boot");
    </script>
</head>
<body>
	<!-- Game Area -->
	<div id = "gameDiv"></div>
</body>
</html>
So our entire game is being held in that one little <div> tag there. There’s nothing stopping you from adding whatever other HTML content you want to add to that page. So I decided it would probably be best just to create a simple scrolling JavaScript modal outside of the game like I would on any other webpage and put my shop inside of that. This allowed me to use HTML and CSS to tweak it to my hearts desire and made for a much more flexible shop.
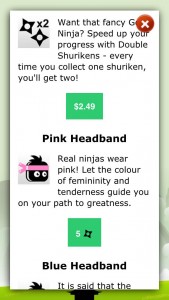
Above is an example of what the end result looks like.
So let’s walk through how you can add a shop to your Phaser game (and I’m sure you could use this approach with other HTML5 game frameworks as well).
1. Create the overlay element
We already have a <div> to hold our game, now we are going to create another <div> to hold our shop. Modify your **index.html **file to reflect the following:
<body>
	<!-- Game Area -->
	<div id = "gameDiv"></div>

	<!-- Shop -->
	<div id="overlay">
	    <div id = "shopContent"></div>
	</div>
</body>
2. Fill the shop with your items
There’s a few ways to go about this. You could just add them directly to the shopContent above, but since I’ve integrated In App Purchases with my shop I took a slightly more complicated approach (you can click that link to see how to add In App Purchases to your game). If you do not wish to include In App Purchases then you will have to modify this slightly.
When I’m ready to load my shop content I call a function called renderIAPs that loops through all of my In App Purchases and regular items, and builds one big string that contains the HTML elements I require. Once I’ve got everything I need in the string, I change the innerHTML of the shopContent to include the string:
function renderIAPs(el) {
  var html = "<button class = 'close' onclick = 'overlay()'></button><ul>";

  //Note: this is using code that is not present in this example file. Please see
  //http://www.joshmorony.com/how-to-create-ios-in-app-purchases-with-phonegap-build/
  //For information on how to include In App Purchases. Otherwise you can just remove this
  if (IAP.loaded) {
    var adfree = IAP.products['adfree'];
    var doubleshurikens = IAP.products['doubleshurikens'];

    //Add all available in app purchases
    for (var id in IAP.products) {
      var prod = IAP.products[id];
      html +=
        '<li>' +
        '<h3>' +
        prod.title +
        '</h3>' +
        "<p><img src = 'assets/" +
        prod.id +
        ".png' /> " +
        prod.description +
        '</p>' +
        "<button type='button' " +
        'onclick=\'IAP.buy("' +
        prod.id +
        '")\'>' +
        prod.price +
        '</button>' +
        '</li>';
    }
  }

  //Add all the normal items
  html +=
    '<li>' +
    '<h3>Pink Headband</h3>' +
    "<p><img src = 'assets/buypinkheadband.png' /> Real ninjas wear pink! Let the colour of femininity and tenderness guide you on your path to greatness.</p>" +
    "<button id='pinkHeadband' type='button' " +
    "onclick='purchaseHeadband(\"pinkHeadband\", 5)'>5 <img class = 'shurikenPrice' src = 'assets/shurikenscore.png' /></button>" +
    '</li>';

  html +=
    '<li>' +
    '<h3>Blue Headband</h3>' +
    "<p><img src = 'assets/buyblueheadband.png' /> It is said that the colour blue brings depth and stability. Maybe this headband will stop you falling off the rope so much?</p>" +
    "<button id = 'blueHeadband' type='button' " +
    "onclick='purchaseHeadband(\"blueHeadband\", 5)'>5 <img class = 'shurikenPrice' src = 'assets/shurikenscore.png' /></button>" +
    '</li>';

  html +=
    '<li>' +
    '<h3>Level Pack</h3>' +
    "<p><img src = 'assets/buylevels.png' /> A ninja gets bored playing on the same old levels all the time. Purchase this to unlock 4 new levels to play on!</p>" +
    "<button id = 'levels' type='button' " +
    "onclick='purchaseLevels(5)'>5 <img class = 'shurikenPrice' src = 'assets/shurikenscore.png' /></button>" +
    '</li>';

  html +=
    '<li>' +
    '<h3>Gold Ninja</h3>' +
    "<p><img src = 'assets/buygoldninja.png' /> The Gold Ninja is legend. It is prophecy that those who control the Gold Ninja will rise to the top of the leaderboards.</p>" +
    "<button id = 'goldninja' type='button' " +
    "onclick='purchaseNinja(5)'>5 <img class = 'shurikenPrice' src = 'assets/shurikenscore.png' /></button>" +
    '</li>';

  html += '</ul>';
  el.innerHTML = html;

  overlay();
}
Each of these buttons triggers another function when tapped that will handle the purchase. I haven’t included that code in this tutorial but essentially you will just check if the user has enough “currency” to purchase the item, and then trigger the code that activates the item. Also note that at the end of this function we are calling an overlay() function, we still need to create that.
3. Create an overlay function
This function will handle hiding and showing the shop overlay. We call overlay() when we want to open the shop, and we call overlay() again when we want to close it.
Create the following function in index.html:
function overlay() {
  el = document.getElementById('overlay');
  el.style.visibility = el.style.visibility == 'visible' ? 'hidden' : 'visible';
  window.scrollTo(0, 0);
}
4. Add some CSS styling
Finally, we will need to add some CSS so that the shop displays correctly. Some of this is required so that the shop actually displays correctly and scrolls, a lot of it is just specific styling that I wanted for my shop. You can modify this to your hearts content:
<style type="text/css">
        body {
            margin: 0;
            font-family: 'Verdana', Helvetica, Arial, sans-serif !important;
        }

		#overlay {
			visibility: hidden;
			position: absolute;
			top: 20px;
			bottom: 20px;
			width:88%;
			margin-left: 6%;
			text-align:center;
			background-color: #000;
			z-index: 1000;
			overflow-y: scroll;
			box-shadow: -1px 2px 15px -1px #000;
		}

		#overlay div {
			margin: auto;
			background-color: #fff;
			padding:15px;
		}

        #shopContent h3 {
        	display: inline;
        }

		#shopContent ul {
			list-style-type: none;
			padding-left: 0px;
		}

		#shopContent li {
			margin-bottom: 20px;
		}

		#shopContent p {
			text-align: left;
		}

		#shopContent p img {
			float: left;
			width: 60px;
			height: auto;
			padding-right: 15px;
			padding-bottom: 15px;
		}

		#shopContent ul button {
			background-color: #2ecc71;
			color: #fff;
			border: 1px solid #fff;
			font-size: 1em;
			font-weight: bold;
			padding: 15px 15px;
		}

		.shurikenPrice {
			height: 20px;
			position: relative;
			top: 5px;
		}

		.close {
			width: 50px;
			height: 50px;
			position: fixed;
			background-image: url(assets/close.png);
			right: 20px;
			top: 20px;
			border: none;
		}

    </style>
NOTE: I've included all of the code for this tutorial in the one index.html file, but you may separate the JavaScript and CSS out into separate files if you wish.
5. (Optional) Add some extra preferences to PhoneGap
If you are using PhoneGap to build your game for native devices, then you may also want to include the following preferences in your config.xml file to prevent the web view from bouncing as you scroll the shop up and down:
<preference name="webviewbounce" value="false"/>
    <preference name="UIWebViewBounce" value="false"/>
    <preference name="DisallowOverscroll" value="true"/>
You will still need to modify this tutorial somewhat to get it to work with your own shop, but this should get your UI most of the way there. If you have any trouble implementing this, feel free to leave a comment below!