

If you own an iOS device then you will have likely come across the TouchID feature at some point – it allows you to easily unlock your phone with your fingerprint rather than a passcode. We can also make use of this feature in our iOS applications, and thanks to a plugin designed by EddyVerbruggen we can use it directly in our Ionic applications to verify a user.
In this tutorial, we are going to use that plugin in such a way that it will force users to scan their fingerprint upon exiting (without fully closing the application) and then reentering the application. The basic flow will be something like:
- User exits the application
- User resumes using the application
- A “Lock Screen” will pop up over the application
- The “Lock Screen” will be dismissed if the user can be verified by TouchID
The TouchID authentication can also be passed by using the passcode for the device. The screens for the verification will look like this:
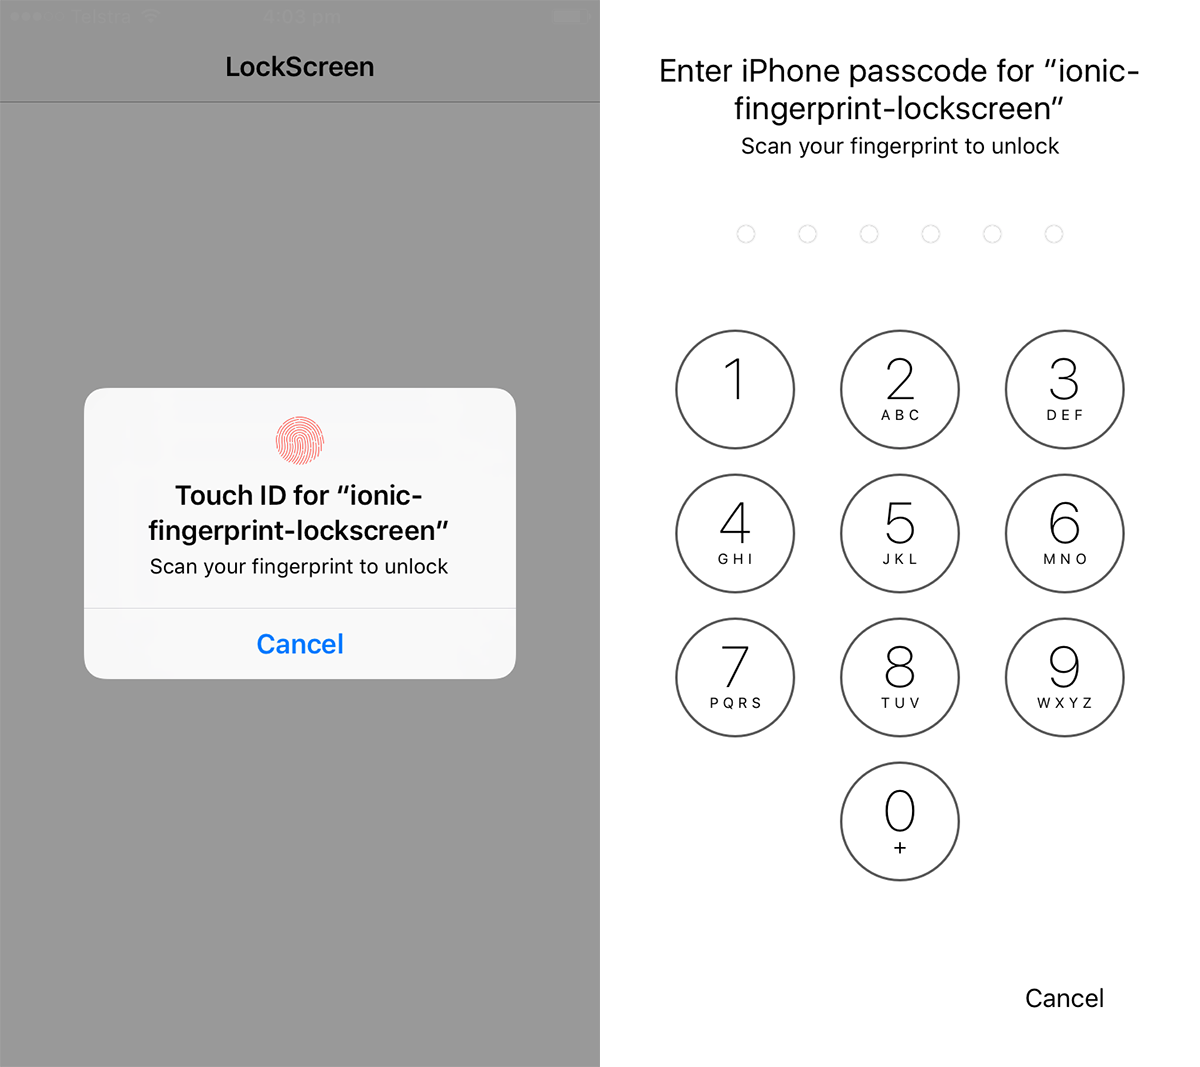
IMPORTANT: More needs to be done to make the code in this tutorial an actual security feature, you may want to more tightly integrate this reauthentication with your application code. Since we are just popping up a modal screen, nefarious users could potentially just hook this up to some remote debugging tools and work around it.
Before We Get Started
Last updated for Ionic 3.0.1
Before you go through this tutorial, you should have at least a basic understanding of Ionic concepts. You must also already have Ionic set up on your machine.
If you’re not familiar with Ionic already, I’d recommend reading my Ionic Beginners Guide or watching my beginners series first to get up and running and understand the basic concepts. If you want a much more detailed guide for learning Ionic, then take a look at Building Mobile Apps with Ionic.
1. Generate a New Ionic Application
We’re going to start by generating a new blank Ionic application, to do that just run the following command:
ionic start ionic-fingerprint-lockscreen blankIt’s not really important what application this lock screen is added to, so if you want you could just as easily add this to any project that you have already created.
We will need to install the TouchID plugin, as well as the TouchID package for Ionic Native with the following commands:
ionic plugin add cordova-plugin-touch-id
npm install --save @ionic-native/touch-id
You will also need to modify src/app/app.module.ts to include this plugin as a provider.
import { BrowserModule } from '@angular/platform-browser';
import { ErrorHandler, NgModule } from '@angular/core';
import { IonicApp, IonicErrorHandler, IonicModule } from 'ionic-angular';
import { SplashScreen } from '@ionic-native/splash-screen';
import { StatusBar } from '@ionic-native/status-bar';
import { TouchID } from '@ionic-native/touch-id';
import { MyApp } from './app.component';
import { HomePage } from '../pages/home/home';

@NgModule({
  declarations: [MyApp, HomePage],
  imports: [BrowserModule, IonicModule.forRoot(MyApp)],
  bootstrap: [IonicApp],
  entryComponents: [MyApp, HomePage],
  providers: [
    StatusBar,
    SplashScreen,
    TouchID,
    { provide: ErrorHandler, useClass: IonicErrorHandler },
  ],
})
export class AppModule {}
Now we just need to generate a page that will act as our lock screen. To do that, just run the following command:
ionic g page LockScreen2. Create the Verification Lock Screen
We are going to focus on implementing the lock screen itself first, and then we will move on to triggering it when necessary. The code for the lock screen is actually reasonably simple.
Modify src/pages/lock-screen/lock-screen.ts to reflect the following:
import { Component } from '@angular/core';
import { IonicPage, ViewController } from 'ionic-angular';
import { TouchID } from '@ionic-native/touch-id';

@IonicPage()
@Component({
  selector: 'page-lock-screen',
  templateUrl: 'lock-screen.html',
})
export class LockScreen {

    constructor(public viewCtrl: ViewController, public touchId: TouchID) {
    }

    ionViewDidEnter() {
        this.verify();
    }

    verify(){

        this.touchId.verifyFingerprint('Scan your fingerprint to unlock').then((res) => {
            this.viewCtrl.dismiss();
        }, (err) => {
            console.log(err);
            this.verify();
        });

    }

}
All we need to do is create this new function called verify. This will handle triggering the TouchID plugin, and then we just set up a success and error handler. If the user is successfully verified then we just called dismiss on the ViewController – since we will be launching this as a modal, this will close the modal and display whatever it is the user was looking at before closing the application.
If the user is not successfully verified, we simply call the verify function again recursively. Anybody but the person who owns the device (or anybody who knows the passcode) will be stuck in an endless loop.
We initially trigger the verify function from the ionViewDidEnter lifecycle hook, which will trigger every single time the page is launched (opposed to ionViewDidLoad which only triggers once when the page initially loads).
3. Trigger the Lock Screen when the App Resumes
We have our lock screen defined now, but we still need to trigger it at some point. We want it to pop up every time the user reopens the application, so we are going to make use of the resume event that Cordova provides, which we can access through Ionic’s Platform API.
Modify src/app/app.component.ts to reflect the following:
import { Component, ViewChild } from '@angular/core';
import { Platform, ModalController } from 'ionic-angular';
import { StatusBar } from '@ionic-native/status-bar';
import { SplashScreen } from '@ionic-native/splash-screen';

import { HomePage } from '../pages/home/home';
@Component({
  templateUrl: 'app.html',
})
export class MyApp {
  rootPage: any = HomePage;

  constructor(
    platform: Platform,
    modalCtrl: ModalController,
    statusBar: StatusBar,
    splashScreen: SplashScreen
  ) {
    platform.ready().then(() => {
      platform.resume.subscribe(() => {
        let modal = modalCtrl.create('LockScreen');
        modal.present();
      });
    });
  }
}
NOTE: The lock screen will only trigger upon the user reentering the application, it will not trigger on the initial launch. If you would like it to behave this way, you can easily just launch the LockScreen page as a modal from wherever you want to verify the user.
All we are doing here is subscribing to the resume event through the Platform API so that every time the resume event triggers it will run the code to create and show the modal.
Summary
Every time the user reopens the application now, they will be forced to verify themselves with their fingerprint or passcode. I think this is a pretty cool little feature because it’s easy to just drop into your application and trigger it anywhere, but do keep in mind that this is not really a “serious” security feature. If you’re trying to protect sensitive information from unauthorised access you may want to build something a little more robust.