For me, the final touches and app store preparation stuff has alway been the most dull and frustrating part of building applications. Once you’ve finally finished coding your application you probably won’t be super keen to create 50 different image files and resize them all to the correct resolution. It can be time-consuming, tedious, and boring, but it’s these final touches that can really add to or detract from the quality of the final proudct. It’s something that you should take care in doing.
When it comes to splash screens, you want to make sure that your splash screen displays well across the many different resolutions and screen sizes that are available - from very small and low resolution, to very large and high resolution.
By default, a Capacitor application will have default splash screens for various densities/resolutions set up for you. You can just replace these with our own splash screens of the same size, but this can be time consuming and with just a single portrait/landscape splash screen for each resolution, it won’t display perfectly on all screen sizes.
In this tutorial, I will present to you another option for creating your splash screens for Android that might make the process a bit easier. Although I am writing this tutorial in the context of Capacitor, this concept can be applied to any native Android application.
What is a 9-Patch File
The solution to our splash screen woes is the 9-Patch file. We can create 9-Patch files inside of Android Studio (you can also create them in an image editor program if you wish). A 9-Patch file is a special type of image that has an extra 1px border all the way around the original image. Within this 1px border, individual pixels can be coloured either black or left transparent to instruct how the image should be stretched:
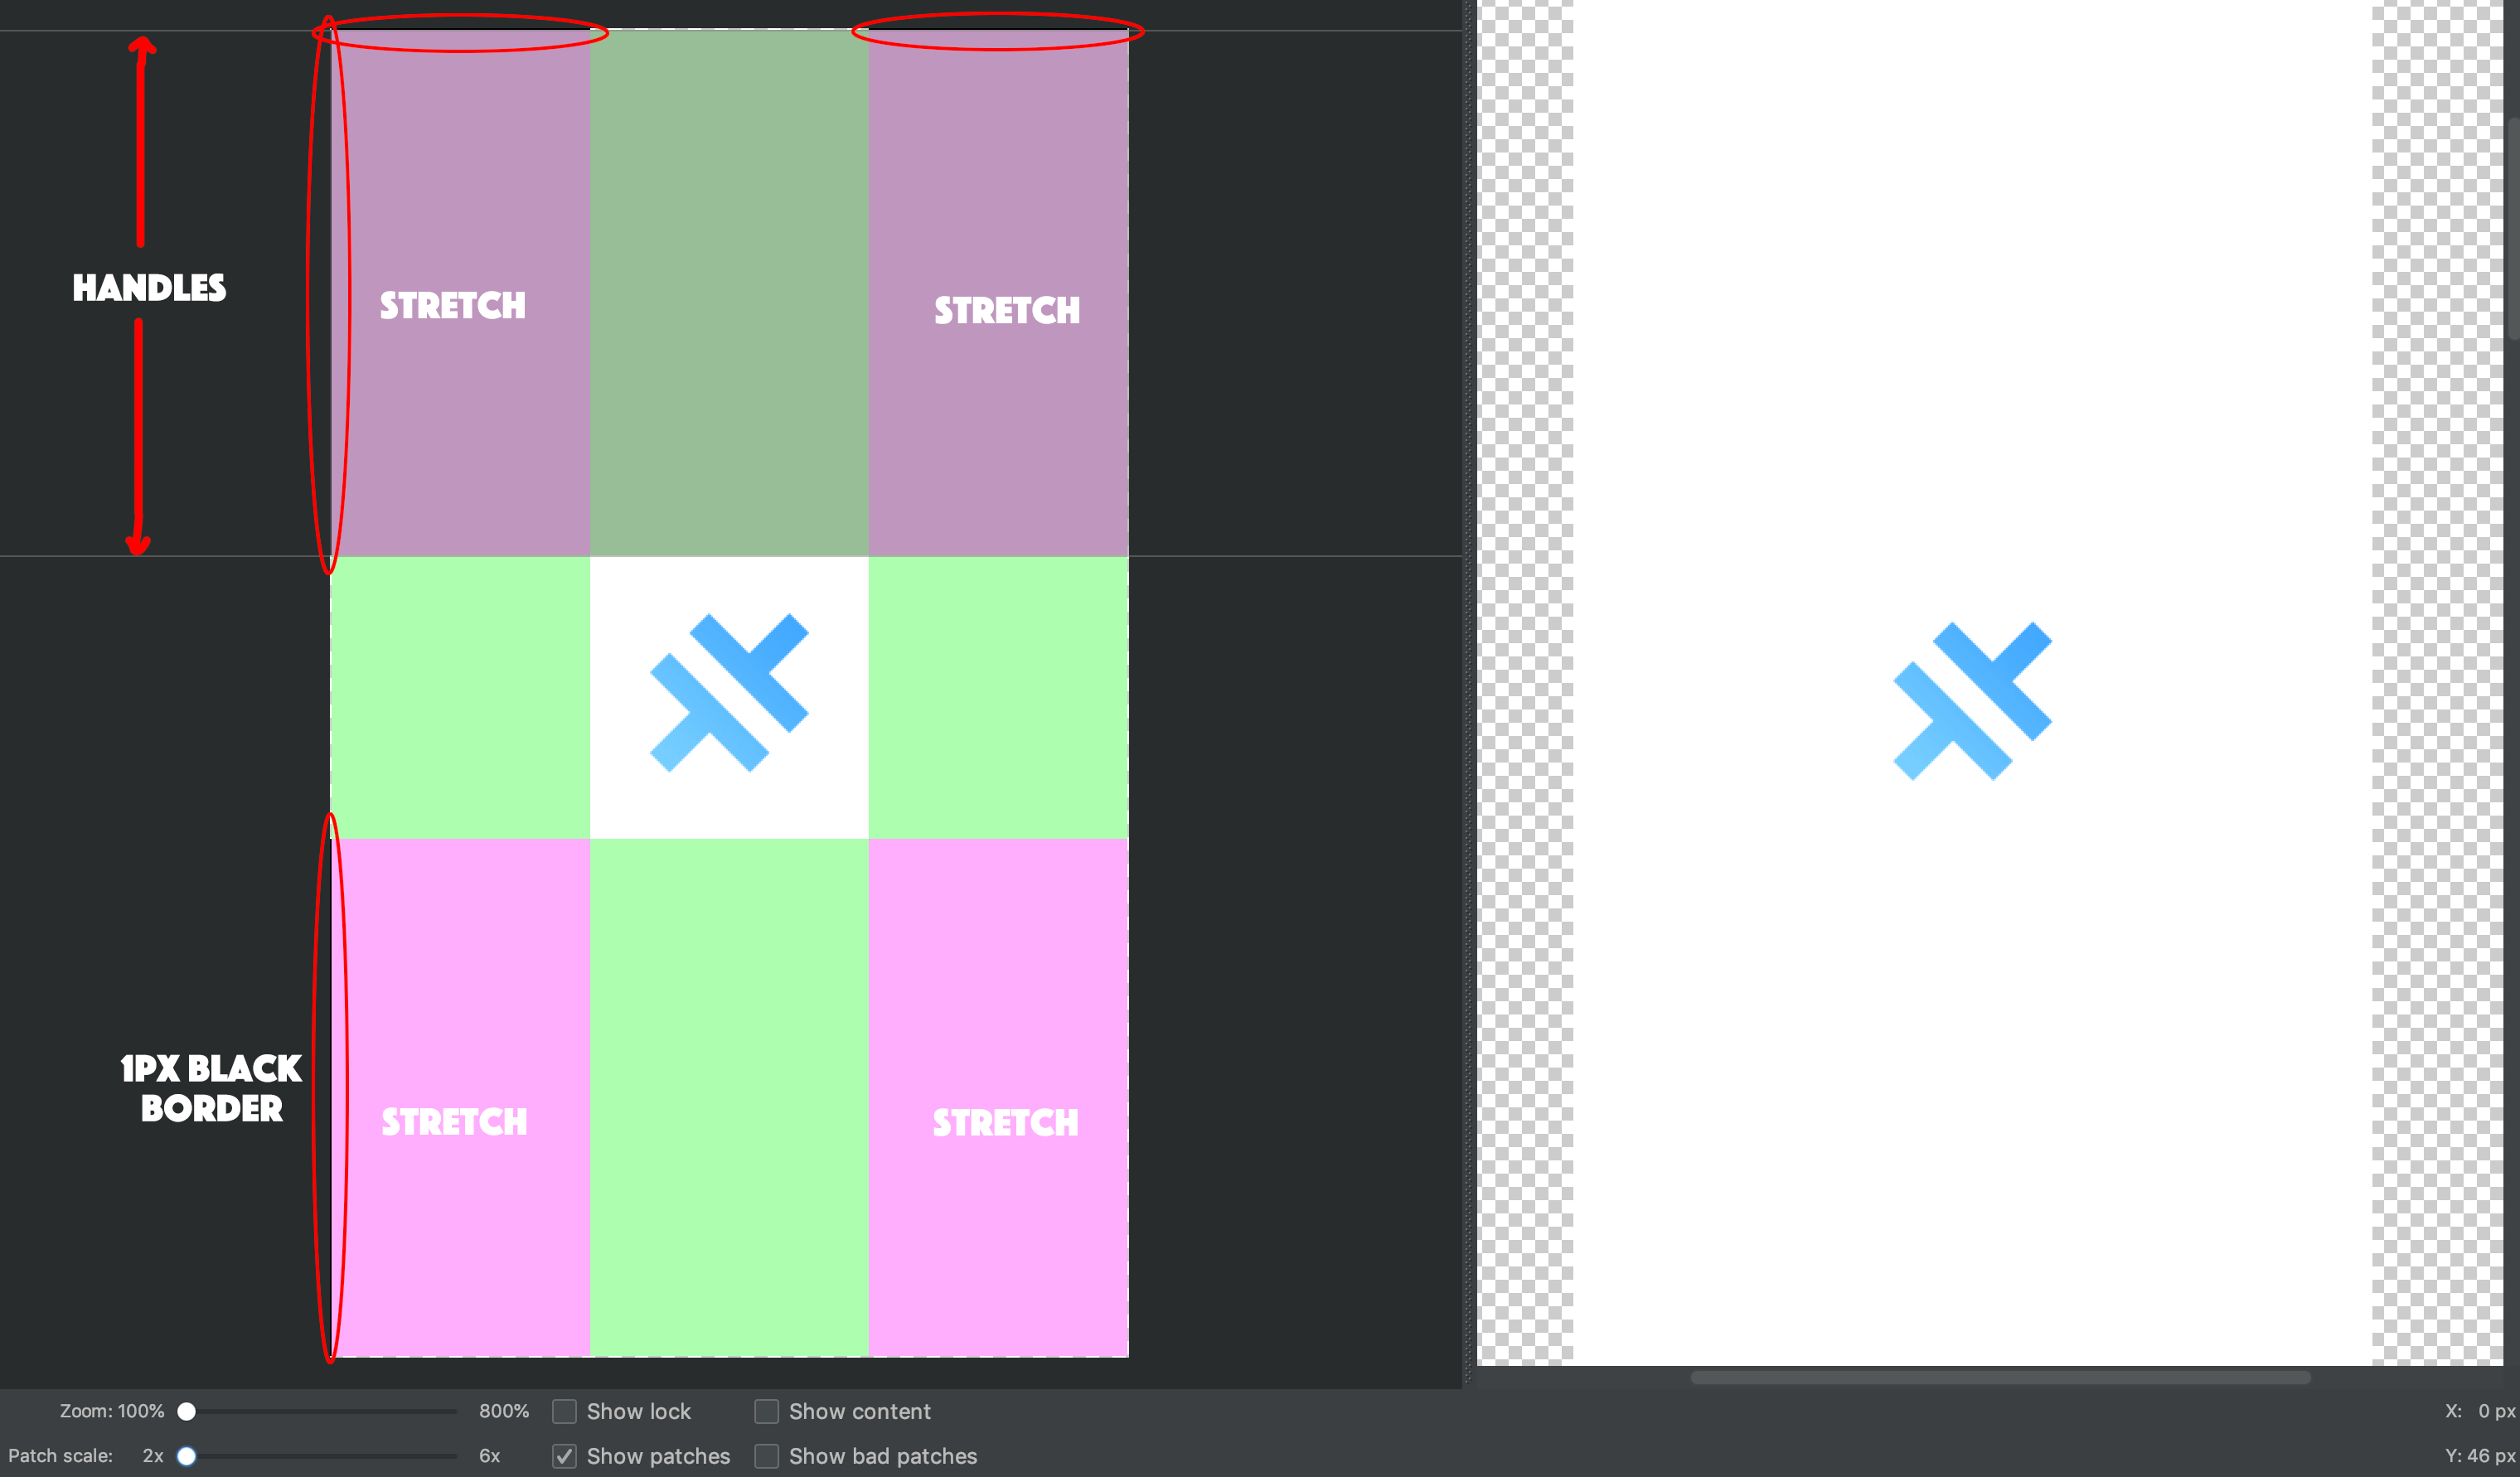
If you look closely at the image above, you will see this example splash screen has that 1px border all the way around. The sections I have circled in red are where black pixels have been placed. By marking sections on the top and left border with black pixels, we can indicate the sections that we want to be stretched to fit the necessary screen dimensions (these sections are shown in pink in the image above).
You can also add black pixels on the right and bottom border, but this does not define the area to be stretched. This defines the area to be “filled”, which is not required in our case for splash screens. The 9-Patch file is not just for splash screens, you can also use them in other contexts, and in some cases you might want to add something like text on top of the image and so it is useful to be able to define the area where this text is allowed to be “filled” into the image.
The basic idea is that it will allow us to define the areas of the splash screen that can be stretched. Generally we won’t care if the background colour is stretched, but we probably don’t want our logo/text to be stretched and distored to fit the screen.
Instead of creating a bunch of different versions of our splash screen, we can instead just create a single 9-Patch file for each resolution:
- mdpi
- hdpi
- xhdpi
- xxhdpi
- xxxhdpi
Creating 9-Patch Files for Splash Screens
With a basic understanding of what a 9-Patch file is, we will now walk through how to use 9-Patch files as your splash screen in a Capacitor project. At this point, I will assume that you already have a Capacitor project created and that you have added the android platform with:
npx cap add androidI will also assume that you haven’t modified/deleted any of the default splash screens that Capacitor includes.
1. Remove and Rename
By default, we will have both landscape (land) and portrait (port) splash screens - we won’t need to make this distinction anymore. First, open up your Capacitor project in Android Studio:
npx cap open androidOnce your project has opened, go to app > res > drawable. I find that it is easier to work with the standard file system to perform the next step, so just Right Click on drawable and choose Reveal in Finder....
In this folder you will find a drawable folder for each of the device resolutions, for both landscape and portrait orientations. The splash screen for each particular orientation/resolution will be inside the matching folder. At this point you should delete all of the landscape folders and rename all of the portrait folders to just drawable-hdpi, drawable-xhdpi, and so on. We only need one image for each resolution as our 9-Patch file will allow us to scale our original image both vertically and horizontally.
2. Create your Splash Screen
Next, you will need to replace the default Capacitor splash screen in all of the drawable folders with your own splash screen of the same size/resolution.
3. Create the 9-Patch Files
Now, back in Android Studio, you should Right Click on each of your splash screens and choose Create 9-Patch File.... Make sure to save these new files in the same folder as the original splash screen and keep the splash.9.png name format. Once you have created the 9-Patch file you can delete the original splash screen (although you might want to keep a backup until you are done).
4. Define the Stretchable Areas
If you double-click on one of your 9-Patch files that you created in Android Studio, you will see that it opens up an editor like the one in the image below:
How exactly you modify this 9-Patch file will depend on how exactly you want it to be stretched, but let’s just assume a basic solid colour splash screen with a logo in the middle like the default Capacitor splash screen.
The process for defining the stretchable areas goes like this (and be warned, the editor can take a little getting used to):
- Click Show patches so that it is easier to see the stretchable areas
- Drag one of the existing vertical handles from the right-side to the left-side until it is past your logo
- Drag one of the existing horizontal handles from the bottom-side to the top-side until it is past your logo
- Create a new stretchable area on the other side of the logo by clicking and dragging outside of the image boundary from where the new stretchable area should begin to the end of the image. If you don’t get it perfect right away, you can readjust using the new handles created.
- Create another new stretchable area for the vertical space on the other side of the logo
- Adjust the handles until you are happy and you have something that looks like the image above
In the end, you want some black pixels on the top and left indicating the areas that can be stretched - there shouldn’t be any black pixels on the right or the bottom. Check the previews in the right hand side of the screen to see that it appears as you want it to
TIP: When working with larger splash screens, it can be harder to create additional stretchable areas because you can’t fit the whole image on the screen, and there is no room off the top and the bottom to drag and create new boundaries (i.e. it’s impossible to click outside of the bounds of the image).
It is easier to create the stretchable areas this way (by just clicking and dragging outside of the boundary), but remember it all just comes down to whether that 1px border is coloured with black pixels or not. What you can do is just zoom in all the way and then go to the corner of the side that you want to create a new stretchable area on. Just add a few black pixels to the border by clicking and dragging along the border (only on the sides, don’t put pixels in the corner). When you zoom out, you will now have a new area with handles on both sides that you can drag.
5. Modify the Splash XML File
The final modification we need to make is to change the launch_splash.xml file for the splash screen. By default with a Capacitor project, it will look like this:
<?xml version="1.0" encoding="utf-8"?>
<bitmap
  xmlns:android="http://schemas.android.com/apk/res/android"
  android:src="@drawable/splash"
  android:scaleType="centerCrop"
/>
We just need to change the bitmap here to nine-patch:
<?xml version="1.0" encoding="utf-8"?>
<nine-patch
  xmlns:android="http://schemas.android.com/apk/res/android"
  android:src="@drawable/splash"
  android:scaleType="centerCrop"
/>
Now you can just run Build > Clean Project in Android Studio, and then you should be able to successfully run your application with your adaptable splash screen.