

One thing that I really enjoy doing with Ionic is attempting to implement cool and useful (most of the time) UI elements that I think a lot of people assume you can’t do in Ionic or that you can’t do well. Ionic provides a basic set of components by default, but you can extend that functionality to do a lot more than what is available out of the box.
Whilst experimenting, I came up with a directive that could give focus to just a single card in a list of cards by reducing the opacity of all of the other cards, which looks like this:
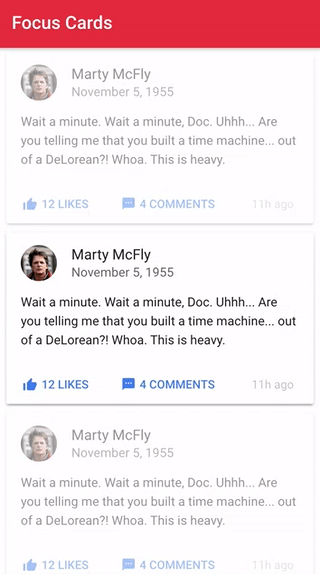
This effect can be triggered under just about any circumstance you like, however, for this directive, I settled on allowing the user to trigger the effect by performing a long press on a particular card item. In this tutorial, we are going to walk through building this directive. We’re going to implement two versions of this directive: one will just use a normal press event to trigger the effect, and the other will use 3D Touch to trigger it.
Before We Get Started
Before you go through this tutorial, you should have at least a basic understanding of Ionic 2 concepts. You must also already have Ionic 2 set up on your machine.
If you’re not familiar with Ionic 2 already, I’d recommend reading my Ionic 2 Beginners Guide first to get up and running and understand the basic concepts. If you want a much more detailed guide for learning Ionic 2, then take a look at Building Mobile Apps with Ionic 2.
NOTE: This tutorial currently only works with Ionic 2.2.0 due to incompatibilities with the 3D Touch plugin and a bug with scroll events in 2.3.0
1. Generate a new Ionic Application
To start off with we are going to create a new Ionic application with the following command:
ionic start ionic2-focus-cards blank --v2Once that has finished generating, you should make it your working directory:
cd ionic2-focus-cardsWe are also going to generate and set up the directive that we will be implementing now. To generate the directive, run the following command:
ionic g directive FocusCardsIn order to be able to use that directive throughout the application, we will also need to add it to the app.module.ts file.
Modify src/app/app.module.ts to reflect the following:
import { NgModule, ErrorHandler } from '@angular/core';
import { IonicApp, IonicModule, IonicErrorHandler } from 'ionic-angular';
import { MyApp } from './app.component';
import { HomePage } from '../pages/home/home';
import { FocusCards } from '../components/focus-cards/focus-cards';
import { StatusBar } from '@ionic-native/status-bar';
import { SplashScreen } from '@ionic-native/splash-screen';

@NgModule({
  declarations: [MyApp, HomePage, FocusCards],
  imports: [IonicModule.forRoot(MyApp)],
  bootstrap: [IonicApp],
  entryComponents: [MyApp, HomePage],
  providers: [
    StatusBar,
    SplashScreen,
    { provide: ErrorHandler, useClass: IonicErrorHandler },
  ],
})
export class AppModule {}
2. Implement the Focus Cards Directive
The goal for this directive is to be able to add it to the <ion-content> element, and then have the functionality apply automatically to any cards that are in the content area, i.e.:
<ion-content focusCards>
    <!-- cards go here -->
</ion-content>
Let’s walk through creating that now. We will start with the basic implementation of using a simple press event to trigger the effect.
Modify src/components/focus-cards/focus-cards.ts to reflect the following:
import { Directive, ContentChildren, Renderer, ElementRef } from '@angular/core';
import { Card, DomController } from 'ionic-angular';

@Directive({
    selector: '[focusCards]',
    host: {
        '(press)': 'onPress()'
    }
})
export class FocusCards {

    @ContentChildren(Card, {read: ElementRef}) cards;
    tappedCard: any;
    focusedCard: boolean = false;

    constructor(public renderer: Renderer, public domCtrl: DomController) {

    }

    ngAfterViewInit(){

        this.cards.forEach((card) => {
            this.renderer.listen(card.nativeElement, 'touchstart', (ev) => {

                if(this.focusedCard){
                    this.resetStyle();
                }

                this.tappedCard = card;

            });
        });

    }

    onPress(){

        this.focusedCard = true;

        this.domCtrl.write(() => {
            this.cards.forEach((card) => {
                if(card !== this.tappedCard){
                    this.domCtrl.write(() => {
                        this.renderer.setElementStyle(card.nativeElement, 'opacity', '0.4');
                    });
                }
            });
        });

    }

    resetStyle(){

        this.focusedCard = false;

        this.cards.forEach((card) => {
            this.domCtrl.write(() => {
                this.renderer.setElementStyle(card.nativeElement, 'opacity', '1');
            });
        });

    }

}
First, we set up the selector as focusCards and we set up a listener on the host to detect when a press event occurs (when a user taps and holds, rather than just tapping).
We set up a few member variables, we use @ContentChildren to grab a reference to any Cards in the content area (if you are unfamiliar with how @ContentChildren works, you can take a look at this tutorial), we set up a variable to keep track of the last card that was tapped, and we set up a flag to keep track of whether or not a card is currently focused or not.
Then we do some set up in ngAfterViewInit (doing the set up inside of this hook ensures that we will have access to the @ContentChildren). We set up a listener on every card for the touchstart event. This does two things for us: it allows us to clear the effect as soon as the user touches the screen again, and it also allows us to keep track of which card has been tapped.
Once we detect a press event, we trigger the onPress function which will set every card, except the currently tapped card, to have an opacity of 0.4.
Finally, we have the resetStyle function which just handles setting the opacity for all of the cards back to 1 to clear the effect.
The directive is finished now, but before we jump into an example of using it, I want to show you an alternative way to create it by using the native 3D Touch plugin.
3. (Optional) Triggering with 3D Touch for iOS
I’m not really a fan of 3D Touch, I’ve never been able to get used to it and it just feels a bit awkward to me. Nonetheless, it is something that people do use and this is a good use case for it and a nice technical challenge to work through.
We are able to use the 3D Touch Cordova plugin to trigger something when the user performs a “force touch” (i.e. they tap the screen harder than normal). We can get this to work with our directive, but it is a little tricky. The plugin will only tell us where on the screen the user force touched, we need to calculate what card they are actually tapping based on that.
We are going to create a separate directive inside of the same folder called focus-cards-3d.ts.
Create a file at src/components/focus-cards/focus-cards-3d.ts and add the following:
import { Directive } from '@angular/core';

@Directive({
  selector: '[focusCards]',
})
export class FocusCards {}
Install the 3D Touch plugin with the following commands:
ionic plugin add cordova-plugin-3dtouchnpm install --save @ionic-native/three-dee-touchModify the src/app/app.module.ts file to reflect the following:
import { NgModule, ErrorHandler } from '@angular/core';
import { IonicApp, IonicModule, IonicErrorHandler } from 'ionic-angular';
import { MyApp } from './app.component';
import { HomePage } from '../pages/home/home';
import { FocusCards } from '../components/focus-cards/focus-cards-3d';
import { ThreeDeeTouch } from '@ionic-native/three-dee-touch';
import { StatusBar } from '@ionic-native/status-bar';
import { SplashScreen } from '@ionic-native/splash-screen';

@NgModule({
  declarations: [
    MyApp,
    HomePage,
    FocusCards
  ],
  imports: [
    IonicModule.forRoot(MyApp)
  ],
  bootstrap: [IonicApp],
  entryComponents: [
    MyApp,
    HomePage
  ],
  providers: [
    StatusBar,
    SplashScreen,
    ThreeDeeTouch,
    {provide: ErrorHandler, useClass: IonicErrorHandler}
  ]
})
export class AppModule {}
We’ve set up the 3D Touch plugin here, and we’ve also just swapped out the import for the directive to use the 3D version of the file instead:
import { FocusCards } from '../components/focus-cards/focus-cards-3d';In order for the functionality we are going to implement to work, we will also need to install the WKWebView plugin. We will be relying on keeping track of some values using scroll events, and in order for these to be accurate, we must use WKWebView.
Install the WKWebView plugin with the following command:
ionic plugin add https://github.com/driftyco/cordova-plugin-wkwebview-engine.git --saveAdd the following before the closing
</widget>tag in your config.xml file:
<allow-navigation href="http://localhost:8080/*" />
<feature name="CDVWKWebViewEngine">
  <param name="ios-package" value="CDVWKWebViewEngine" />
</feature>

<preference name="CordovaWebViewEngine" value="CDVWKWebViewEngine" />
Now with all of that configuration out of the way, let’s actually implement the 3D Touch version of our directive!
Modify src/components/focus-cards/focus-cards-3d.ts to reflect the following:
import { Directive, ContentChildren, Renderer, ElementRef } from '@angular/core';
import { Card, DomController, Platform } from 'ionic-angular';
import { ThreeDeeTouch } from '@ionic-native/three-dee-touch';

@Directive({
    selector: '[focusCards]',
    host: {
        '(ionScroll)': 'onContentScroll($event)',
        '(touchstart)': 'resetStyle()'
    }
})
export class FocusCards {

    @ContentChildren(Card, {read: ElementRef}) cards;
    tappedCard: any;
    focusedCard: boolean = false;

    scrollTop: number = 0;

    constructor(public renderer: Renderer, public element: ElementRef, public domCtrl: DomController, public threeDee: ThreeDeeTouch, public platform: Platform) {

    }

    ngAfterViewInit(){

        this.platform.ready().then(() => {
            this.threeDee.watchForceTouches().subscribe(data => {

                this.cards.forEach((card) => {

                    let offset = card.nativeElement.offsetParent.offsetTop + card.nativeElement.offsetTop;

                    if(data.y > offset - this.scrollTop && data.y < offset + card.nativeElement.offsetHeight - this.scrollTop){
                        this.tappedCard = card;
                        this.onPress();
                    }
                });

            });
        });

    }

    onContentScroll(ev){
        this.scrollTop = ev.scrollTop;
    }

    onPress(){

        this.focusedCard = true;

        this.domCtrl.write(() => {
            this.cards.forEach((card) => {
                if(card !== this.tappedCard){
                    this.domCtrl.write(() => {
                        this.renderer.setElementStyle(card.nativeElement, 'opacity', '0.4');
                    });
                }
            });
        });

    }

    resetStyle(){

        this.focusedCard = false;

        this.cards.forEach((card) => {
            this.domCtrl.write(() => {
                this.renderer.setElementStyle(card.nativeElement, 'opacity', '1');
            });
        });

    }

}
The basic idea here is the same, except the way in which we determine what card is being tapped is different. Previously we were adding an event listener to each of the cards to determine what was being tapped, but the 3D Touch plugin won’t work this way. Instead, we listen for a 3D Touch and get its coordinates, and then we loop through each card to determine which card was tapped. We use the offset values and the distance the content has been scrolled, to calculate if the screen coordinates that the 3D Touch plugin provides would fall within the range of where the card is actually sitting. Once we have done this to determine which card is tapped, we just trigger the onPress function manually.
4. Use the Directive
We have the two different versions of our directive now, all you need to do is import the one that you actually want to use in the app.module.ts file. Once you’ve done that, using it is as simple as adding the directive to an <ion-content> element. Let’s walk through an example.
Modify src/pages/home/home.ts to reflect the following:
import { Component } from '@angular/core';

import { NavController } from 'ionic-angular';

@Component({
  selector: 'page-home',
  templateUrl: 'home.html'
})
export class HomePage {

    testData: any = new Array(30);

    constructor(public navCtrl: NavController) {

    }

}
Modify src/pages/home/home.html to reflect the following:
<ion-header>
  <ion-navbar color="danger">
    <ion-title> Focus Cards </ion-title>
  </ion-navbar>
</ion-header>

<ion-content focusCards>
  <ion-card *ngFor="let test of testData">
    <ion-item>
      <ion-avatar item-left>
        <img
          src="https://ionicframework.com/dist/preview-app/www/assets/img/marty-avatar.png"
        />
      </ion-avatar>
      <h2>Marty McFly</h2>
      <p>November 5, 1955</p>
    </ion-item>

    <ion-card-content>
      <p>
        Wait a minute. Wait a minute, Doc. Uhhh... Are you telling me that you
        built a time machine... out of a DeLorean?! Whoa. This is heavy.
      </p>
    </ion-card-content>

    <ion-row>
      <ion-col>
        <button ion-button icon-left clear small>
          <ion-icon name="thumbs-up"></ion-icon>
          <div>12 Likes</div>
        </button>
      </ion-col>
      <ion-col>
        <button ion-button icon-left clear small>
          <ion-icon name="text"></ion-icon>
          <div>4 Comments</div>
        </button>
      </ion-col>
      <ion-col center text-center>
        <ion-note> 11h ago </ion-note>
      </ion-col>
    </ion-row>
  </ion-card>
</ion-content>
If you like, you can also animate the transition on the cards:
Modify src/pages/home/home.scss to reflect the following:
.ios,
.md {
  page-home {
    ion-card {
      transition: 0.3s linear;
    }
  }
}
You should now have something that looks like this:
Summary
The functionality this directive provides is rather subtle, but in the right circumstances, it will improve usability by allowing the user to give focus to whatever it is they are currently viewing, and there are likely more creative ways to use this as well.