

In a previous tutorial, we covered how to integrate a basic NodeJS server with Ionic. This covered the very basics of setting up the NodeJS server, and how to interact with it using an HTTP request in Ionic.
In this tutorial, we are going to take a deeper look at how an Ionic application and a NodeJS server can communicate back and forth.
Request and Response
The keys to communication between an Ionic application and a NodeJS server are requests and responses. Let’s take a look at the route we set up in the previous tutorial:
app.get('/posts', function (req, res) {
  console.log('posts!');
});
This route will allow us to send a GET request to /posts, and in this case, all this route will do is output posts! to the logs for the server. Making a request to this route doesn’t really achieve anything at the moment, but we are not yet making use of the req and res parameters that are supplied to the function in this route.
The req parameter contains all of the information about the request that is being made from the Ionic application, and the res parameter will allow the NodeJS server to send information back to the Ionic application.
To illustrate how we might use this concept to get a little two-way conversation happening between Ionic and NodeJS, we will be building a “No Homer’s” application. That’s a Simpsons reference for those of you scratching your head, but understanding the reference isn’t important. All you need to know is that we are creating a server that will only approve a name if it is NOT Homer (technically there can be one Homer in the “No Homer’s” club, but we’re not going to worry about that).
Project Structure
How you structure your project is important – you need to keep in mind that your NodeJS backend and your Ionic front-end are two separate entities. You may feel like creating a server folder to hold your NodeJS code inside of your Ionic project, but this isn’t a good idea – you’re mixing your front-end and your back-end code and you certainly don’t want to package your server code inside of your Ionic application when sending it out for production.
I would recommend doing the following to set up your project:
Create a folder called no-homers
Create a folder inside of no-homers called server to hold your NodeJS server
Generate a new Ionic application inside of no-homers called client
You don’t have to create your project structure exactly like this, but if you do you should end up with something that looks like this:
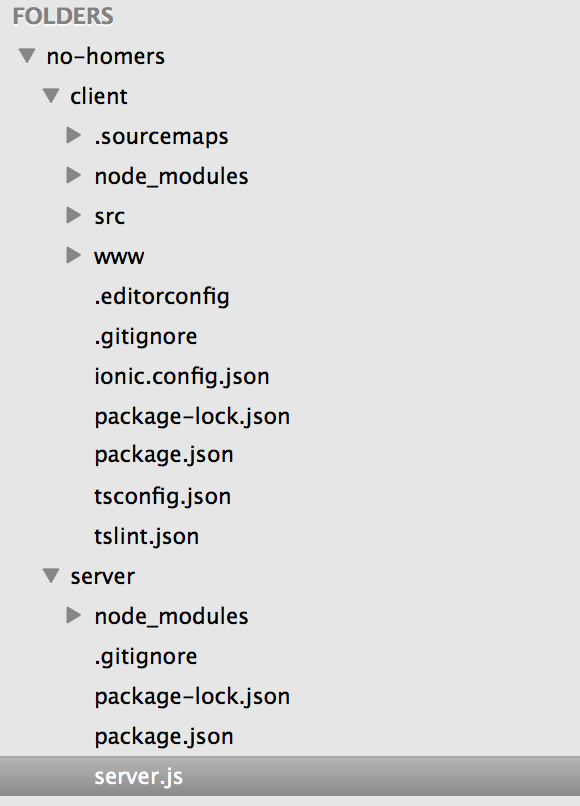
If you would prefer to do it another way that’s fine, just don’t put your server inside of your Ionic project.
Setting up the NodeJS Server
We are going to start by setting up our NodeJS server. The basics we will need are a package.json file that describes the dependencies that our server will need, and a server.js file that will contain our servers code.
For now, just create a blank file called server.js inside of the server folder. You can also create your package.json manually, or you can run the following command:
npm initinside of your server folder, and it will prompt you through the creation of the file. You really only need to answer the following questions right away:
package name: your-server-name
version: 0.0.1
description: "some-description"
entry-point: server.js
Feel free to leave the rest blank and you can fill them in later if you want. Next, we will install some commonly used packages (the same ones we discussed in the previous tutorial):
Run the following command inside of the server folder:
npm install --save body-parser cors del express method-override morganNow let’s set up the basic template for our server code.
Modify server/server.js to reflect the following:
var express = require('express');
var bodyParser = require('body-parser');
var logger = require('morgan');
var methodOverride = require('method-override');
var cors = require('cors');

var app = express();
app.use(logger('dev'));
app.use(bodyParser.json());
app.use(methodOverride());
app.use(cors());

app.post('/checkname', function (req, res) {});

app.listen(process.env.PORT || 8080);
Like last time, we have just set up a single route and we are not doing much with it – we will improve this later. At this point, you will be able to run the server by running either:
npm startif you have specified server.js as your entry point for the package.json file, or you can just run:
node server.jsOnce you have run that command, you will be able to make requests to the following URL:
http://localhost:8080/checknameKeep in mind that the server is running locally, so if you were to run the application on your device it would not be able to access the server.
Making a REQUEST to NodeJS
Now that we have the basics of our project set up, we are going to create the requests that we want to send to our NodeJS server from our Ionic application. We will set up a form that allows us to enter a name, and some code to handle sending the results to the server.
Modify src/pages/home/home.html to reflect the following:
<ion-header>
  <ion-navbar>
    <ion-title> Ionic Blank </ion-title>
  </ion-navbar>
</ion-header>

<ion-content padding>
  <ion-list>
    <ion-item>
      <ion-label floating>Enter your name...</ion-label>
      <ion-input [(ngModel)]="name" type="text"></ion-input>
    </ion-item>
  </ion-list>

  <button ion-button primary (click)="checkName()">Enter</button>
</ion-content>
Modify src/pages/home/home.ts to reflect the following
import { Component } from '@angular/core';
import { Http } from '@angular/http';
import { NavController } from 'ionic-angular';
import { map } from 'rxjs/operators';

@Component({
  selector: 'page-home',
  templateUrl: 'home.html'
})
export class HomePage {

    name: string;

    constructor(private http: Http) {

    }

    checkName() {

        let data = {
            name: this.name
        };

        this.http.post('http://localhost:8080/checkname', data).pipe(
            map(res => res.json())
        ).subscribe(response => {
            console.log('POST Response:', response);
        });

        this.http.get('http://localhost:8080/checkname/' + this.name).pipe(
            map(res => res.json())
        ).subscribe(response => {
            console.log('GET Response:', response);
        });

    }

}
NOTE: In order to use Http you will need to add the HttpModule to your src/app/app.module.ts file. I would also not typically recommend making HTTP requests directly from a page like this, this is just for demonstration.
Once we click the ‘Enter’ button we are making two separate requests here. We make a POST request to /checkname that will POST the data entered to the server. We also make a GET request that appends the data entered onto the end of the URL instead of POSTing the data. As you will see in a moment, we can actually set up multiple instances of the same route to handle different methods.
We are expecting to get a JSON response in return, and we log that out to the console.
Sending a RESPONSE to Ionic
Now that we have requests being sent to our server, let’s modify the server code to handle it.
Modify server/server.js to reflect the following:
var express = require('express');
var bodyParser = require('body-parser');
var logger = require('morgan');
var methodOverride = require('method-override');
var cors = require('cors');

var app = express();
app.use(logger('dev'));
app.use(bodyParser.json());
app.use(methodOverride());
app.use(cors());

app.post('/checkname', function (req, res) {
  if (req.body.name.toLowerCase() === 'homer') {
    res.status(401).send({ message: "Sorry, no Homer's!" });
  } else {
    res.send({
      passed: true,
      message: 'Welcome, friend!',
    });
  }
});

app.get('/checkname/:name', function (req, res) {
  if (req.params.name.toLowerCase() === 'homer') {
    res.status(401).send({ message: "Sorry, no Homer's!" });
  } else {
    res.json('Welcome!');
  }
});

app.listen(process.env.PORT || 8080);
In the code above, we have a route to handle our POST requests to /checkname and we also have a route to handle our GET requests to /checkname. In the POST route, we are able to access the data that is sent from our Ionic application through req.body.name. The GET route is a little different because we are supplying the data directly to the URL endpoint that is being hit. If we define a route that defines parameters using a colon like this:
/checkname/:myvalueand then we hit the following URL
http://localhost:8080/checkname/icecreamWe would be able to access that value through:
req.params.myvalueand we would get “icecream”. We are using this concept to get our name value, rather than POSTing the data. Let’s take a look at our routes again:
app.post('/checkname', function (req, res) {
  if (req.body.name.toLowerCase() === 'homer') {
    res.status(401).send({ message: "Sorry, no Homer's!" });
  } else {
    res.send({
      passed: true,
      message: 'Welcome, friend!',
    });
  }
});

app.get('/checkname/:name', function (req, res) {
  if (req.params.name.toLowerCase() === 'homer') {
    res.status(401).send({ message: "Sorry, no Homer's!" });
  } else {
    res.json('Welcome!');
  }
});
In both cases, we convert the supplied value to lowercase and see if it is equal to “homer”. If it is, we set the HTTP status to 401, which is the “Unauthorized” error code (you don’t have to do this, but it’s a good idea to provide useful status codes), and then in the POST route we send a response to the Ionic application by using the send method. If the name is not equal to “homer”, then we send a JSON object back that includes a message.
The GET route is very similar, except rather than using res.send we use res.json. These methods are mostly identical, and will both send a response back to the Ionic application, but the benefit of using res.json is that it will format any data supplied as valid JSON data (even if we just supply a simple string like ‘Welcome!’).
Summary
Our Ionic application and server should now be working as intended. If you run your server in the terminal using:
npm startand you also run your Ionic application using another terminal instance, you should be able to make a request through the application and see the following logged out to the console for your Ionic application if you attempt to use “homer”:

but if you use a name other than Homer, you should see this:
