

I was browsing around Twitter the other day when I came across a tweet from Rachel Nabors (who you should definitely follow for cool web animation stuff) linking to this cool CSS clip-path maker. It allows you to switch between a bunch of different pre-defined clip-paths and apply them to an image.
The general concept of a clip-path is simple enough: you create a clip-path that is made up of a series of points that form a shape, you apply that clip-path to an element and anything outside of that clip-path will be blocked from view. Here’s an example from the clip-path maker website I linked above:
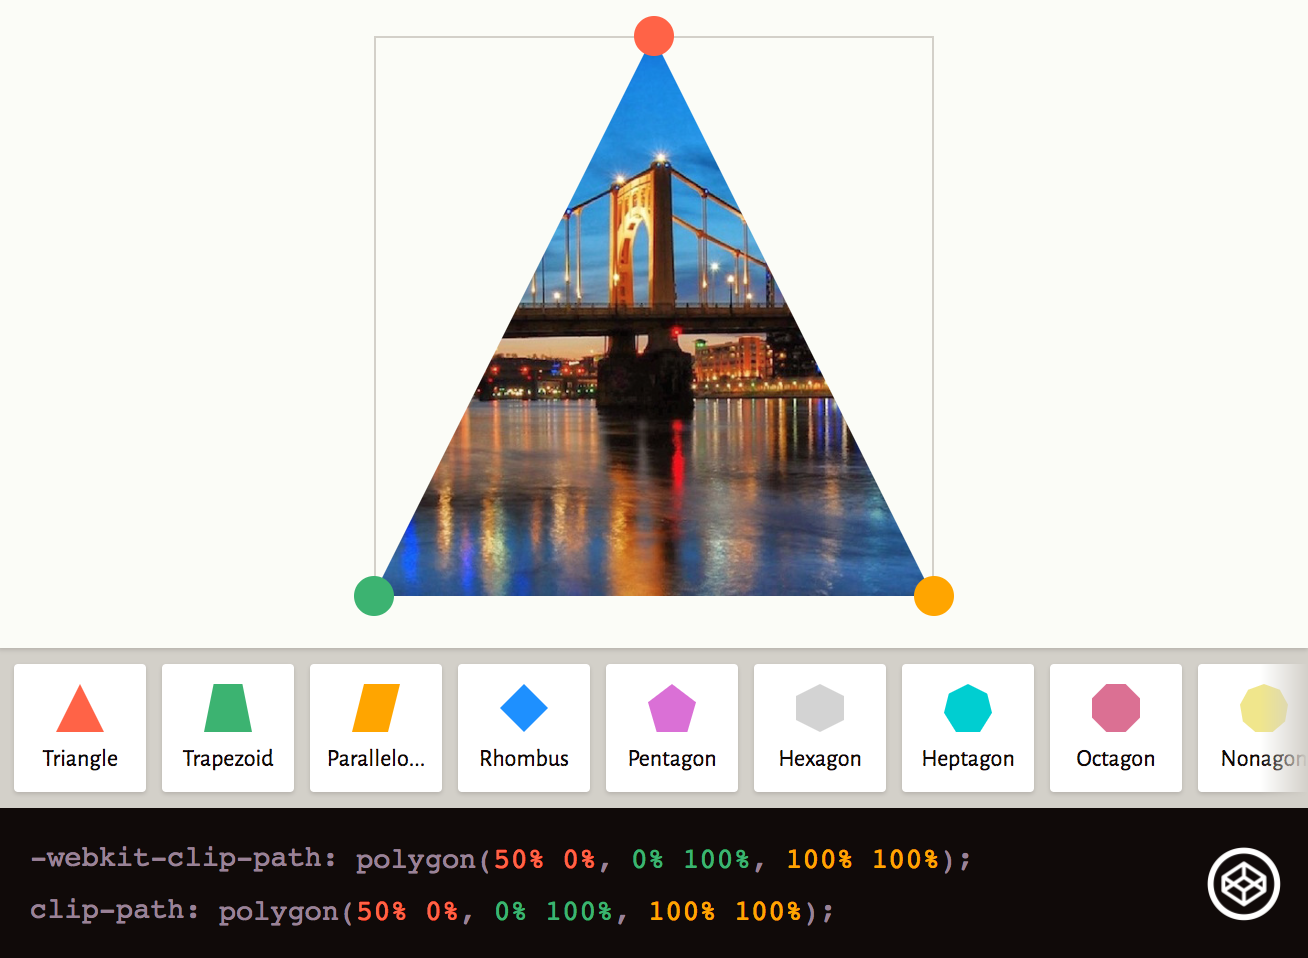
That’s a square image with a triangle clip-path applied to it. You can see the points of the triangle are defined in the clip-path: the first point is placed at 50% from the left of the image, and 0% from the top, the remaining two points are placed in the bottom-left and bottom-right corners.
I’ve seen clip-paths used before but have never attempted to use it for something myself. I knew that clip-paths could be animated, and wanted to come up with something cool to do in Ionic that would make use of this.
Admittedly, this thinking is kind of backward – it’s generally not the best idea to find a problem to fit a solution, rather than the other way around – but I ended up coming up with something I actually liked. I created this bulk delete interface:
When you tap on an image it marks it for deletion and applies a clip-path that turns the image into a cross. If you tap the image again, the cross will be removed (and it will no longer be marked for deletion). When you’re done, you can hit the trash button to delete any images marked for deletion.
There wasn’t a whole lot of thought that went into this interface in terms of usability, I was mostly interested in creating a cool effect, but I do think this is potentially quite useful. It is an aesthetically appealing interface, it is super obvious which images are marked for deletion, and although the cross effect is quite drastic you can still easily see at a glance what the image is (should you later decide not to delete it).
In this tutorial, we are going to walk through building this clip-path based bulk delete interface for Ionic.
Before We Get Started
Last updated for Ionic 3.5.0
Before you go through this tutorial, you should have at least a basic understanding of Ionic concepts. You must also already have Ionic set up on your machine.
If you’re not familiar with Ionic already, I’d recommend reading my Ionic Beginners Guide or watching my beginners series first to get up and running and understand the basic concepts. If you want a much more detailed guide for learning Ionic, then take a look at Building Mobile Apps with Ionic.
1. Generate a New Ionic Application
We’re going to start by generating a new blank Ionic application, to do that just run the following command:
ionic start ionic-clip-path blankOnce that has finished generating, you should make it your working directory:
cd ionic-clip-pathWe will just be building this functionality directly into the home page, so no need to generate any other pages or components.
2. Design the Clip Path
To start off with we are going to design the clip-path that we will use for the ‘cross’ effect. This is based on the ‘Close’ clip-path from Clippy but I had to play around a bit to get it to do exactly what I wanted.
In order to animate between two clip paths, they need to have the same number of points. I wanted to animate from a square (i.e. have the image not be clipped at all) to a cross, but a square only has 4 points, the cross has 12. In my first attempt at a solution for this, I just used a clip-path with 12 points but just arranged them into a square with the unneeded points crammed into one corner:
Clip-path:
@keyframes crossTransition {
  from {
    opacity: 1;
    clip-path: polygon(
      0% 0%,
      0% 100%,
      100% 100%,
      100% 0%,
      100% 0%,
      100% 0%,
      100% 0%,
      100% 0%,
      100% 0%,
      100% 0%,
      100% 0%,
      100% 0%
    );
  }

  to {
    opacity: 0.5;
    clip-path: polygon(
      20% 0%,
      0% 20%,
      30% 50%,
      0% 80%,
      20% 100%,
      50% 70%,
      80% 100%,
      100% 80%,
      70% 50%,
      100% 20%,
      80% 0%,
      50% 30%
    );
  }
}
Result:

I should have realised at the time, but obviously, that wasn’t going to lead to an attractive looking animation. It’s not horrible, but since all of the spare points are animating from a single corner it looks a bit awkward. In my next attempt, I placed the extra points in the square closer to where they would animate to when transitioning into the cross:
Clip-path:
@keyframes crossTransition {
  from {
    opacity: 1;
    clip-path: polygon(
      0 0,
      0% 20%,
      0 50%,
      0 100%,
      20% 100%,
      50% 100%,
      80% 100%,
      100% 100%,
      100% 50%,
      100% 20%,
      100% 0,
      50% 0
    );
  }

  to {
    opacity: 0.5;
    clip-path: polygon(
      20% 0%,
      0% 20%,
      30% 50%,
      0% 80%,
      20% 100%,
      50% 70%,
      80% 100%,
      100% 80%,
      70% 50%,
      100% 20%,
      80% 0%,
      50% 30%
    );
  }
}
Result:

This looks much better since the points of the path are closer to their final position the motion is much more natural. Let’s add this animation, as well as a few other styles to the .scss file for the home page.
Modify src/pages/home/home.scss to reflect the following:
.ios,
.md {
  page-home {
    .scroll-content {
      margin-top: 0 !important;
    }

    ion-header {
      backdrop-filter: blur(8px);
    }

    ion-navbar {
      opacity: 0.6;
      box-shadow: 0px 1px 13px 1px rgba(0, 0, 0, 0.77);
    }

    ion-list {
      margin: 0;

      .item,
      .item-inner,
      ion-label {
        background-color: #cecece;
        padding: 0 !important;
        margin: 0;
      }
    }

    .trash {
      animation: crossTransition 0.75s cubic-bezier(0.25, 0.79, 0.41, 1.15);
      animation-fill-mode: forwards;
    }
  }
}

@keyframes crossTransition {
  from {
    opacity: 1;
    clip-path: polygon(
      0 0,
      0% 20%,
      0 50%,
      0 100%,
      20% 100%,
      50% 100%,
      80% 100%,
      100% 100%,
      100% 50%,
      100% 20%,
      100% 0,
      50% 0
    );
  }

  to {
    opacity: 0.5;
    clip-path: polygon(
      20% 0%,
      0% 20%,
      30% 50%,
      0% 80%,
      20% 100%,
      50% 70%,
      80% 100%,
      100% 80%,
      70% 50%,
      100% 20%,
      80% 0%,
      50% 30%
    );
  }
}
3. Apply the Clip Path Animation to the Images
Now we have a class that we can apply to any image that will cause our clip-path animation to play. All we have to do is create a list of images and add a way to toggle the class on and off.
Modify src/pages/home/home.ts to reflect the following:
import { Component } from '@angular/core';
import { NavController } from 'ionic-angular';

@Component({
  selector: 'page-home',
  templateUrl: 'home.html'
})
export class HomePage {

    images: any = [];

    constructor(public navCtrl: NavController) {

        this.images = [
            {imagePath: 'https://images.unsplash.com/photo-1487530811176-3780de880c2d', toBeDeleted: false},
            {imagePath: 'https://images.unsplash.com/photo-1498454056553-879ad1baf5dc', toBeDeleted: false},
            {imagePath: 'https://images.unsplash.com/photo-1498078675142-85259d452c6b', toBeDeleted: false},
            {imagePath: 'https://images.unsplash.com/photo-1495121864268-11b119abeba0', toBeDeleted: false},
            {imagePath: 'https://images.unsplash.com/photo-1495904786722-d2b5a19a8535', toBeDeleted: false},
            {imagePath: 'https://images.unsplash.com/photo-1485110168560-69d4ac37b23e', toBeDeleted: false},
            {imagePath: 'https://images.unsplash.com/photo-1492934867615-2a451e01c063', toBeDeleted: false}
        ];

    }

    toggleImageDelete(image){
        image.toBeDeleted = !image.toBeDeleted;
    }

}
Modify src/pages/home/home.html to reflect the following:
<ion-header no-border>
  <ion-navbar color="light">
    <ion-title> Bulk Delete </ion-title>
    <ion-buttons right>
      <button ion-button icon-only><ion-icon name="trash"></ion-icon></button>
    </ion-buttons>
  </ion-navbar>
</ion-header>

<ion-content>
  <ion-list no-lines>
    <button
      detail-none
      ion-item
      *ngFor="let image of images"
      (click)="toggleImageDelete(image)"
    >
      <img [class.trash]="image.toBeDeleted" [src]="image.imagePath" />
    </button>
  </ion-list>
</ion-content>
IMPORTANT: For simplicity sake, I am just linking directly to some images from unsplash.com. These images are HUGE, for performance sake, I would strongly suggest using smaller images if you intend to use something like this in production.
If you launch the application now, you should be able to scroll through the list and tap on images you want to apply the clip-path to:
Summary
I’d like to spend a lot more time playing around with clip-paths, I think what we ended up with in this tutorial is pretty cool but of course, there’s a lot more that can be done – like these cool demos. If you’ve got any cool ideas for using clip-paths in Ionic applications, drop your suggestion in the comments below!