

HTML5 game frameworks like Phaser provide an exciting new opportunity. The types of games that we can create with JavaScript now, we would have never imagined would be run through a browser.
Although we can run these games easily on a device simply by hosting it on the Internet and visiting the web page, often developers will want to submit their games to the app stores. The motivation for doing this will typically include the following:
- Ease of distribution
- Selling the application
- Providing In App Purchases
- Using the Game Center
Consumers today are used to downloading apps through the app stores, so if you don’t make your game available there then you will likely lose a lot of your potential audience. Perhaps in the future we will see a move away from native apps and locked down app stores.
A Native Wrapper for HTML5 Apps
Only native applications can be submitted to the app stores – both the iOS App Store and Google Play at least – and HTML5 applications are not native. We can get around this though by “wrapping” the HTML5 application in a native environment. For most mobile applications this is achieved with PhoneGap, but for HTML5 games this is not necessarily the best answer.
PhoneGap wraps applications in a standard Web View which is not great for HTML5 game performance. There are options that have been made specifically for this though including Cocoon JS and Ejecta. In this tutorial we will be looking at how to test and build your application with Cocoon JS.
Cocoon JS can build for all app stores but is especially good for iOS and Android. For canvas based games Cocoon JS claims to provide the most performant canvas 2D and WebGL implementation.
Before we get started, you should know that the Cocoon JS cloud compiler generates an XCode project so if you don’t have a Mac you’re a bit out of luck if you want to submit to the Apple App Store. As far as I can tell, the only option for developing HTML5 games for the Apple App Store without a Mac is PhoneGap Build. I have already built a game with PhoneGap Build and the performance was fine on iOS. I’m yet to test more complex games however, perhaps they may struggle more in a PhoneGap wrapper.
1. Test your game with the Cocoon JS Launcher App
It can be a massive headache installing and testing on an iOS device (it’s easier for Android but not exactly a walk in the park). Before you will be able to install any iOS application on your device you will need to create a .p12 file and provisioning profile.
Fortunately, Cocoon JS makes it a little bit easier for us with their Cocoon JS Launcher App. Rather than installing your application on your device you can install the Launcher App and then run your application through it – this avoids the need to create your own provisioning profile (although, you will have to eventually anyway).
Let’s walk through how to get your game running in the Cocoon JS Launcher App – I’m assuming you already have a HTML5 game developed that you would like to test on mobile. If not, why don’t you read about my experience with Phaser.
1. Download the Cocoon JS Launcher app from the app store
It’s quite a big download (around 50MB) so get that downloading while you complete the rest of the steps
2. Create a zip file of your project
If you are using Phaser for example you will zip up the root folder of your project (the folder that contains index.html) – this should also contain all of your sub folders (e.g. assets, js, resources etc.).
3. Add the zip file to your iOS or Android device
In order to run your application through the Cocoon JS app it will need to be available on your device. How you do this will depend on the platform you are running it on:
For iOS follow these steps:
1. Plug in your device and open up iTunes
2. Go into your device and click 'Apps'
3. Scroll down to the 'File Sharing' section and click on Cocoon JS
4. Click 'Add File…' and select the zip file you created containing your project
5. Click 'Sync' to sync your device
For Android follow these steps:
1. If you haven't already, make sure you have the Android SDK installed on your computer
2. Plug in your Android device and make sure USB Debugging is enabled. USB Debugging is typically found under 'Developer Options' in Settings, but this depends on your device. Google "[YOUR DEVICE MODEL] enable usb debugging" or something similar to find out how to enable it for your specific device – some models require a button sequence to be pushed.
3. Run the following command in a terminal window:
adb push PATH/TO/FILE /sdcard/Once you have the zip file ready on your device launch the Cocoon JS Launcher app and go to the ’Documents’ tab. Then select the zip file and choose ’Canvas+’ (or WebView+ or WebView if that is how you would prefer to run it).
There are a variety of testing and debugging options available through the Cocoon JS Launcher App as well, simply open the ’Settings’ tab to see them. You may be interested in changing the orientation of your game or disabling the debug options, some other options available include:
- Change orientation between landscape and portrait
- Enable or disable debugging
- Change the position of the debugging display
- Enable or disable WebGL
- Set the scale mode
2. Get your HTML5 game ready for the app store
The Launcher App is a great way to quickly get your app on a mobile device to test, but when you actually want to build a production version of your application you will need to follow a different method. I’ll walk you through how to use the Cocoon JS cloud based platform. Ludei’s cloud-based platform allows you to automatically build your application for all app stores, it works similarly to the PhoneGap Build service.
Sign up for the cloud based platform
Once you have created an account, click the confirmation link sent to your email address and then log in.
Go here to access the dev portal
Click ’+ New Project’ in the top right hand corner
Select CocoonJS
Enter in the name of your app
Choose a bundle id – these are identifiers for your application and typically follow a reverse domain style, e.g: com.yourcompany.yourproject
Add a version code (e.g. 1.0)
Choose orientations your game supports. This will control whether the gamespace will flip to match the orientation of the device. Some games may only make sense in just landscape or just portait, but where possible you should support both.
Choose a scale method. This determines how your application will behave on different screen sizes. If you have handled this within your code already you should choose ‘No scale’.
Same with the splash scale method. This will scale your splash screen – the most sensible option here will often be scale aspect fill. This will fill the screen with your image without stretching or distorting it (but parts of your splash screen may get cut off)
Once you have filled out all those options click ‘Create Project’
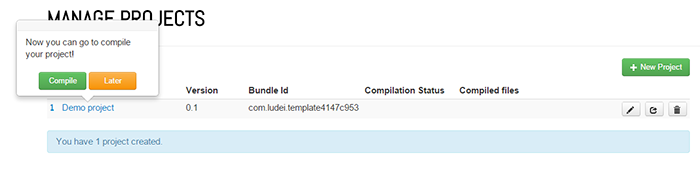
Once your project is created you will be taken to the dashboard for your project.
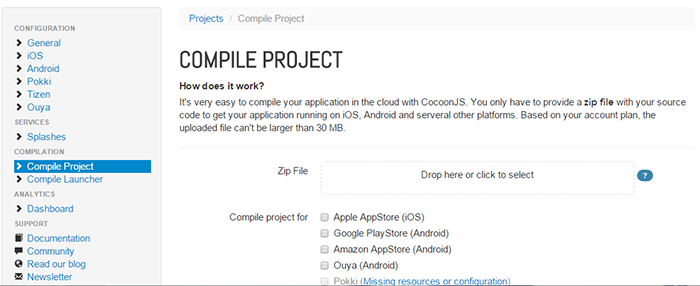
As you can see there are plenty of configuration options for different platforms on the left hand side (this allows you to specify platform specific configurations such as splash screens and icons) but for now we are just interested in the ’Compile Project’ page (you should arrive at this page by default).
To complete the process you will need to upload and compile your application by following these steps:
1. Upload the Zip File to the Compile Project page
2. Select the platforms you want to build for
3. Leave Canvas+ selected
4. Leave the compiler version set to the default
5. Click Compile Project after reading the terms of service and upload conditions and accepting
Once your application has finished compiling you will be given the option to download the resulting files, for iOS this will be an XCode project.
Cocoon JS simplifies the process of turning HTML5 games into native applications that can be submitted to app stores. Their cloud based build service takes a way a lot of the hassle, but it still leaves a little to be desired. As I mentioned before, if you don’t have a Mac then you’re at a bit of a road block if you want to create iOS games. Keep in mind though that PhoneGap Build will still likely be a reasonable option for iOS.
It would be great to see Cocoon JS follow a model similar to the PhoneGap Build service, where the necessary provisioning profiles and such can be supplied to the service and the final files required for submission to the app stores (.ipa for iOS and .apk for Android) will be returned.