

Recently I covered how to make a running platformer game in Phaser with Tilemaps, which used the Arcade Physics system. I’ve also covered how to set up the Ninja Physics system in Phaser. Now we’re going to combine both of those to make a running platformer game in Phaser that uses the Ninja Physics system.
As I mention in the previous tutorials, the main difference between the Arcade and Ninja Physics systems is that Ninja allows for collisions with sloped (and other) surfaces, rather than just rectangles. With the Arcade Physics system collisions will occur like this:
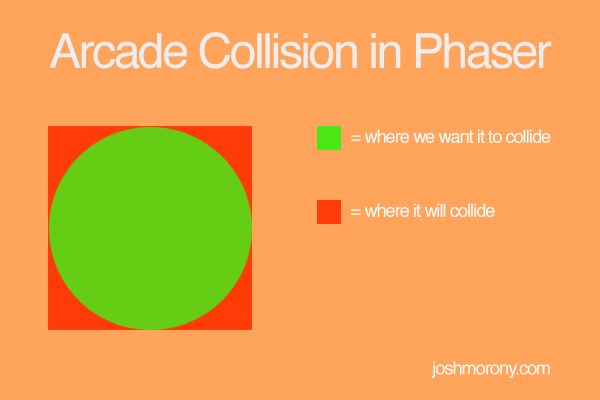
but with the Ninja Physics system we can create collisions like this:
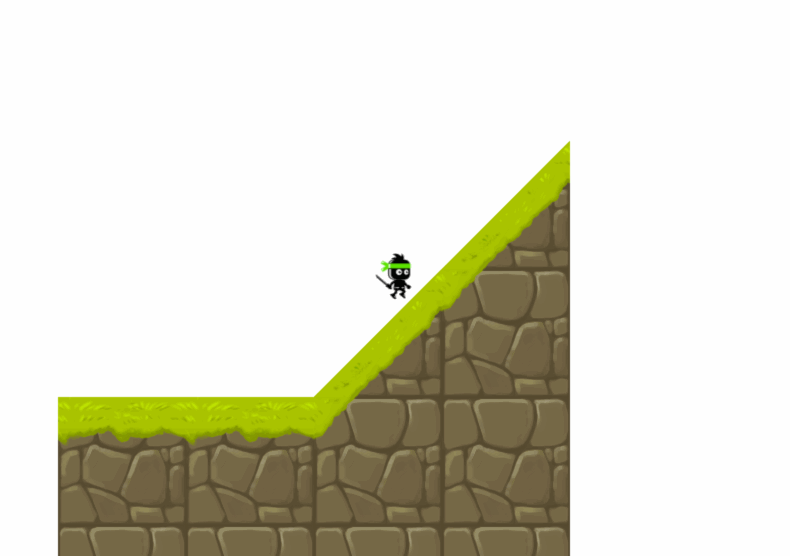
This allows us to create much more interesting levels and also makes the physics a bit more interesting (e.g. the player would lose momentum going up a hill and gain it going down). In this tutorial we are going to expand upon the game we made in the last tutorial to allow the use of sloped surfaces by swapping out the Arcade Physics system for the Ninja Physics system.
Before you get started
The method for creating a game that uses a tilemap and the Ninja Physics system is almost exactly the same as the Arcade Physics system. I’ve already covered how to use Tiled to create tilemap based levels in Phaser, so before beginning you should first make your way through this tutorial. Once you have done that you should also complete this tutorial to set the Ninja Physics system up (unlike Arcade, it is not included in Phaser by default).
Using the Ninja Physics System
Although the Ninja Physics system is basically the same as the Arcade Physics system as far as the code goes, there is a few little changes that you will need to make. If you take a look at the documentation for Arcade Physics and the documentation for Ninja Physics you will notice some slight differences.
Update your main
createandupdatemethods to reflect the following
create: function() {

		//Start the Arcade Physics systems
		this.game.physics.startSystem(Phaser.Physics.NINJA);

		//Change the background colour
		this.game.stage.backgroundColor = "#a9f0ff";

		//Add the tilemap and tileset image. The first parameter in addTilesetImage
		//is the name you gave the tilesheet when importing it into Tiled, the second
		//is the key to the asset in Phaser
	    this.map = this.game.add.tilemap('tilemap');
	    this.map.addTilesetImage('tilesheet128', 'tiles');

	    //Add both the background and ground layers
	    this.groundLayer = this.map.createLayer('GroundLayer');

	    //Change the world size to match the size of this layer
	    this.groundLayer.resizeWorld();

	    //This maps the tiles in your sprite sheet to the phaser ninja tiles to be used
		var slopeMap = [1, 1, 1, 1, 19, 18, 1, 1, 1, 1, 3, 1, 2];
		this.tiles = game.physics.ninja.convertTilemap(this.map, this.groundLayer, slopeMap);

	    //Add the sprite to the game and enable arcade physics on it
	    this.sprite = this.game.add.sprite(50, 200, 'player');
	    this.game.physics.ninja.enable(this.sprite);

	    //Set some physics on the sprite
		this.sprite.body.bounce.y = 0.2;
		this.game.physics.ninja.gravity = 2;

		//Create a running animation for the sprite and play it
		this.sprite.animations.add('right', [5, 6, 7, 8], 10, true);
		this.sprite.animations.play('right');

		//Make the camera follow the sprite
	    this.game.camera.follow(this.sprite);

	    //Enable cursor keys so we can create some controls
	    this.cursors = this.game.input.keyboard.createCursorKeys();
	},

	update: function() {

	    for (var i = 0; i < this.tiles.length; i++)
	    {
	        this.sprite.body.aabb.collideAABBVsTile(this.tiles[i].tile);
	    }

	    this.sprite.body.moveRight(70);

	    if (this.cursors.up.isDown)
	    {
	        this.sprite.body.moveUp(400);
	    }

	},
As you can see it’s mostly the same, but I’ll talk you through the few differences that there are between this and the Arcade version we created before.
Slope Map
The main difference is the use of a slope map. If you supply a sloped tile to Phaser (or one that is anything other than a rectangle), Phaser needs to know how to treat it when something collides with it. With Arcade physics that’s easy because everything is just a square or rectangle, but if we supply a sloped tile then Phaser needs to know what kind of slope that is – is it going up, down, or is it a concave or convex shape?

Given the tile above, you might assume that Phaser could automatically work out how to handle collisions with that based on what parts of the tile that are transparent. That’s not the way it works though. Phaser needs to associate that tile with a shape it knows, like this:

There are a total of 33 of these shapes available in Phaser (you can find a full list here). So what we need to do is match up our tiles to the ones Phaser knows about, and we can do that using a slope map.
If you take a look at this bit of code:
var slopeMap = [1, 1, 1, 1, 19, 18, 1, 1, 1, 1, 3, 1, 2];
this.tiles = game.physics.ninja.convertTilemap(
  this.map,
  this.groundLayer,
  slopeMap
);
You will see that I am using the convertTilemap function available through the ninja object to supply this slope map. Each item in the slopeMap array is associated with a tile from the tilesheet that is supplied. So the first index in the array should contain the value that represents the shape in Phaser that you want to use for that tile. That’s a bit of a mouthful so let me give you an example.
Let’s say I’m using this tilesheet:

and here’s an image of all the Phaser Ninja tile shapes:
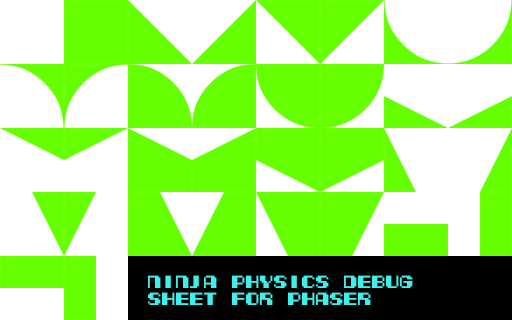
In the Phaser debug tiles above the tile in the very top left (the blank one) would be 0, the one to the right of that is 1, then 2 etc. (it’s a bit hard to see since there is no spacing between them).
For the first tile in my tilesheet there is no exact match in Phaser, but the closest would probably be tile 29 in the debug sheet. The next is a right facing slope which would be 2. The next is a sign and we would either want that set to 0 to use the blank tile if we didn’t want a collision for it, or 1 to use the full block for collisions. Next we have a half block which matches up to 32. Finally, we have a left facing slope which can be represented by 3.
The resulting slope map would look like this:
var slopeMap = [29, 2, 1, 32, 3];You should continue building this array until all of the tiles from your tilesheet that you are using have a matching tile in Phaser.
Sprite Physics
We will also have to change some of the physics properties as well, these properies for example are not available in the Ninja Physics system:
this.sprite.body.gravity = 200;
this.sprite.body.velocity.x = 100;
Instead we set the gravity property on the physics system itself
this.game.physics.ninja.gravity = 2;and instead of using velocity, we use the moveLeft, moveRight, moveUp and moveDown methods to control the direction of the sprite:
this.sprite.body.moveRight(70);

if (this.cursors.up.isDown) {
  this.sprite.body.moveUp(400);
}
This will cause the sprite to constantly move right, and also jump when we push the up arrow. You’ll have to make sure you set the moveUp value high enough that it can actually overcome the gravity that is applied.
Collisions
The only other difference is the way we handle collisions. In the Arcade tutorial all we had to do was this:
//Make the sprite collide with the ground layer
this.game.physics.arcade.collide(this.sprite, this.groundLayer);
to make the sprite collide with the ground in our tilemap. As you may have noticed, with Ninja Physics it is a little different:
for (var i = 0; i < this.tiles.length; i++) {
  this.sprite.body.aabb.collideAABBVsTile(this.tiles[i].tile);
}
Now we need to set up the collision on each of our tiles, and we also use the collideAABBVsTile method instead of a simple collide. There are other collision types for Ninja Physics besides AABBvsTile (for if you were using a circular sprite for example). Take a look at the documentation for more details.
That’s it, you should now have a working game using the Ninja Physics system!