

Lists are one of the most common interface elements in mobile applications. They are an efficient way to display lots of information in a small space and the act of scrolling through a list is basically second nature for most mobile users. Facebook uses a list for their news feed, as does Instagram and many others. All five apps I created for Building Mobile Apps with Ionic 2 also use a list in one way or another.
Given the importance of lists, the Ionic team have put a lot of effort into creating an optimised list component that has smooth scrolling, inertia, acceleration and deceleration, and everything else that gives list that nice “native” feel. This is no easy feat, but since Ionic has done the hard yards for us we can do something as simple as this:
<ion-list>
  <ion-item>I</ion-item>
  <ion-item>am</ion-item>
  <ion-item>a</ion-item>
  <ion-item>list</ion-item>
</ion-list>
to create a list for our mobile apps. If you’d like to read a little more about the nitty gritty behind the scenes optimisations when it comes to lists, take a look at my more advanced article on boosting scroll performance in Ionic 2.
It’s pretty easy to create a basic list in Ionic, but in real life scenarios your implementation is likely going to require a little more work than the example I gave above. In this tutorial we are going to focus on going through the core concepts of how to use lists in Ionic 2, including:
- Creating a basic list with dynamic data
- Adding, deleting, and updating data in a list
- Creating a list with sliding actions
- Creating a list with grouping
- Reordering items in a list
We are going to do this by creating a little application with 4 different tabs, each one with a different style of list. At the end of this tutorial, the application will look something like this:
Before we Get Started
Last updated for Ionic 3.9.2
Before you go through this tutorial, you should have at least a basic understanding of Ionic 2 concepts. You must also already have Ionic 2 set up on your machine.
If you’re not familiar with Ionic 2 already, I’d recommend reading my Ionic 2 Beginners Guide first to get up and running and understand the basic concepts. If you want a much more detailed guide for learning Ionic 2, then take a look at Building Mobile Apps with Ionic 2.
Generate a New Ionic 2 Application
We’re going to start off by generating a new Ionic 2 application. Since we are going to be using a tabbed layout, you might assume we would base our application the the tabs starter template rather than the blank template. I think the tabs starter is great to show you how tabs work if you are a beginner, but since it creates a bunch of pre-named pages I generally find it’s easier to just start from a blank template and add the tabs yourself.
Run the following command to generate the application:
ionic start ionic2-lists blankNow we’re going to generate the different pages we will be using as our tabs.
Run the following commands to generate the pages:
ionic g page Groceriesionic g page Contactsionic g page Ladderionic g page NotesIn order to make these new pages useable in our application, we need to set them up in the app.module.ts file.
Modify src/app/app.module.ts to reflect the following:
import { BrowserModule } from '@angular/platform-browser';
import { NgModule, ErrorHandler } from '@angular/core';
import { IonicApp, IonicModule, IonicErrorHandler } from 'ionic-angular';
import { MyApp } from './app.component';

@NgModule({
  declarations: [MyApp],
  imports: [BrowserModule, IonicModule.forRoot(MyApp)],
  bootstrap: [IonicApp],
  entryComponents: [MyApp],
  providers: [{ provide: ErrorHandler, useClass: IonicErrorHandler }],
})
export class AppModule {}
Since our tabs are being lazy loaded, we will also need to make sure that we are lazy loading the home page which uses those tabs.
Create a file at src/pages/home/home.module.ts and add the following if it does not already exist:
import { NgModule } from '@angular/core';
import { IonicPageModule } from 'ionic-angular';
import { Home } from './home';

@NgModule({
  declarations: [Home],
  imports: [IonicPageModule.forChild(Home)],
  exports: [Home],
})
export class HomeModule {}
Since we are starting from the blank template, we are going to have to set up the tabs now as well. All we have to do is import the pages into our HomePage, make them member variables so that we can reference them from the template, and then set up the tabs in the template.
Modify src/pages/home/home.ts to reflect
import { Component } from '@angular/core';
import { IonicPage, NavController } from 'ionic-angular';

@IonicPage()
@Component({
  selector: 'page-home',
  templateUrl: 'home.html'
})
export class Home {

    tab1Root: any = 'Groceries';
    tab2Root: any = 'Notes';
    tab3Root: any = 'Contacts';
    tab4Root: any = 'Ladder';

    constructor(public navCtrl: NavController) {

    }

}
As you can see above, we’ve imported each of the pages and set up member variables for tab1Root, tab2Root, tab3Root, and tab4Root.
Modify src/pages/home/home.html to reflect the following:
<ion-tabs>
  <ion-tab [root]="tab1Root" tabTitle="Groceries" tabIcon="basket"></ion-tab>
  <ion-tab [root]="tab2Root" tabTitle="Notes" tabIcon="paper"></ion-tab>
  <ion-tab [root]="tab3Root" tabTitle="Contacts" tabIcon="person"></ion-tab>
  <ion-tab [root]="tab4Root" tabTitle="Ladder" tabIcon="podium"></ion-tab>
</ion-tabs>
and now we’re referencing those here in our tabs layout, along with a snazzy little icon to go along with it. Now let’s get into building some lists!
Basic List
We’re going to start off with a really simple list. We’ve already covered how to create a basic list:
<ion-list>
  <ion-item>I</ion-item>
  <ion-item>am</ion-item>
  <ion-item>a</ion-item>
  <ion-item>list</ion-item>
</ion-list>
but it’s not often that you’ll want to manually define a list like this. Typically, you’ll have some data source in your class definition that is being used to populate the list. So let’s do that with some dummy data.
Modify src/pages/groceries/groceries.ts to reflect the following:
import { Component } from '@angular/core';
import { IonicPage, NavController } from 'ionic-angular';

@IonicPage()
@Component({
  selector: 'page-groceries',
  templateUrl: 'groceries.html'
})
export class Groceries {

    groceries: any;

    constructor(public navCtrl: NavController) {

        this.groceries = [
            'Bread',
            'Milk',
            'Cheese',
            'Snacks',
            'Apples',
            'Bananas',
            'Peanut Butter',
            'Chocolate',
            'Avocada',
            'Vegemite',
            'Muffins',
            'Paper towels'
        ];

    }

}
We’ve defined a member variable groceries that contains an array of shopping items. Any member variables we define like this will be available in that components template. Now we will make use of that data to populate the list automatically in the template.
Modify src/pages/groceries/groceries.html to reflect the following:
<ion-header>
<ion-navbar>
<ion-title>Groceries</ion-title>
</ion-navbar>
</ion-header>
<ion-content>
<ion-list>
<ion-item *ngFor="let grocery of groceries">{{grocery}}</ion-item>
</ion-list>
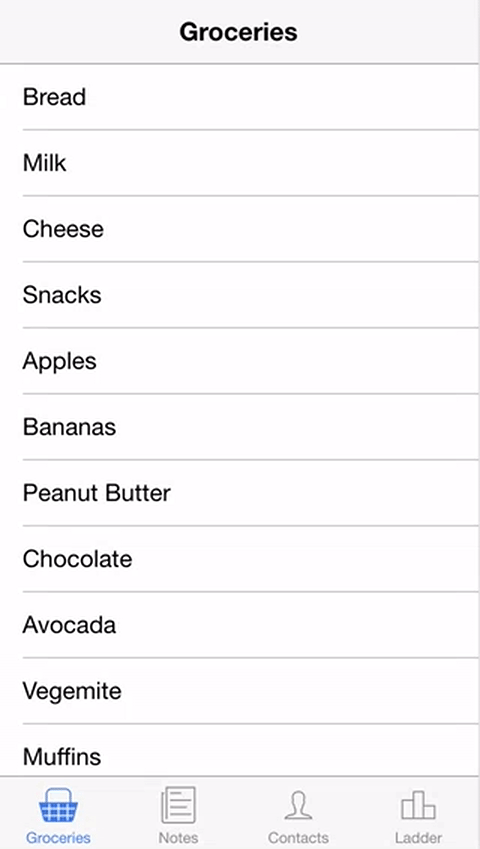
</ion-content>Now we’re using the *ngFor directive to loop through every grocery item in our groceries array and stamp out an <ion-item> with each particular item. The result will look like this:
This is about as basic as it gets, but in a lot of cases this is all you will need to do. Maybe you have the data array being loaded in from some external source, or calculated in some way, but in the end it’s just a matter of looping through those items and stamping out the items in the list.
Adding, Deleting and Updating Data in a List
There will probably come a time where you want the user to be able to modify the data in a list, so in this example we are going to take a look at how to do just that.
Modify src/pages/notesnotes.html to reflect the following:
<ion-header>
<ion-navbar>
<ion-title>Notes</ion-title>
<ion-buttons end>
<button ion-button icon-only (click)="addNote()">
<ion-icon name="add"></ion-icon>
</button>
</ion-buttons>
</ion-navbar>
</ion-header>
<ion-content>
<ion-list>
<ion-item-sliding *ngFor="let note of notes">
<ion-item> {{note.title}} </ion-item>
<ion-item-options>
<button ion-button icon-only (click)="editNote(note)" light>
<ion-icon name="paper"></ion-icon>
</button>
<button ion-button icon-only (click)="deleteNote(note)" danger>
<ion-icon name="trash"></ion-icon>
</button>
</ion-item-options>
</ion-item-sliding>
</ion-list>
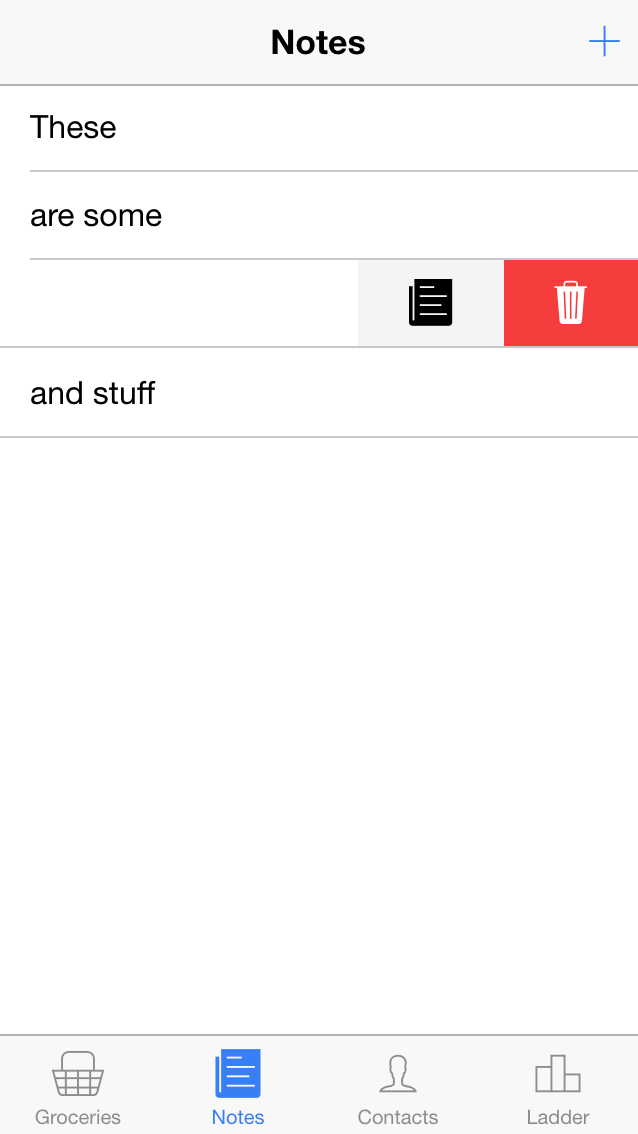
</ion-content>We’re starting off with the template this time because I want to point out a few things. This is similar to our last list in that we are using the *ngFor directive and an <ion-list>, but this time we are using <ion-item-sliding>. This will create items in our list that we can swipe to reveal some buttons which are defined with <ion-item-options>. We use these buttons to attach an edit and delete button to each specific note.
We’ve also added a button in the navbar to add new notes to the list, and all of the functions we are calling through our (click) handlers we will define in our class now.
Modify src/pages/notes/notes.ts to reflect the following:
import { Component } from '@angular/core';
import { IonicPage, NavController, AlertController } from 'ionic-angular';

@IonicPage()
@Component({
  selector: 'page-notes',
  templateUrl: 'notes.html'
})
export class Notes {

    notes: any = [];

    constructor(public navCtrl: NavController, public alertCtrl: AlertController) {

    }

    addNote(){

        let prompt = this.alertCtrl.create({
            title: 'Add Note',
            inputs: [{
                name: 'title'
            }],
            buttons: [
                {
                    text: 'Cancel'
                },
                {
                    text: 'Add',
                    handler: data => {
                        this.notes.push(data);
                    }
                }
            ]
        });

        prompt.present();
    }

    editNote(note){

        let prompt = this.alertCtrl.create({
            title: 'Edit Note',
            inputs: [{
                name: 'title'
            }],
            buttons: [
                {
                    text: 'Cancel'
                },
                {
                    text: 'Save',
                    handler: data => {
                        let index = this.notes.indexOf(note);

                        if(index > -1){
                          this.notes[index] = data;
                        }
                    }
                }
            ]
        });

        prompt.present();

    }

    deleteNote(note){

        let index = this.notes.indexOf(note);

        if(index > -1){
            this.notes.splice(index, 1);
        }
    }

}
Things are starting to look a little more complicated now, so let’s break it down. First of all, rather than defining any data for our list to use, we simple create an empty notes array as a member variable. This is because we are going to be adding notes through the app rather than manually defining them.
The rest of the class contains the various functions that our template calls: addNote, editNote, and deleteNote. The add and update functions both make use of the Alert component to grab data from the user. In the case of addNote it is simple as grabbing that data and pushing it into the notes array.
For the editNote function we pass in a reference to the note that was clicked. If you take a look at the template again, you will notice the edit button looks like this:
<button (click)="editNote(note)" light>
  <ion-icon name="paper"></ion-icon>
</button>
This is inside of our *ngFor directive, so note here is a reference to the current note that is being stamped out. So this time when the user enters the note into the prompt, rather than pushing it into the array we find the existing note in the array and update that instead.
The same basic concept applies to deleteNote as well, except this time we find it and remove it from the array. Try creating some notes of your own and playing around with the edit and delete functions.
Reordering Lists
We’ve covered quite a lot so far but we still have some more tricks left in the bag. Another common feature in lists is the ability to reorder them by dragging items around. In a todo list or grocery list you might want to change the order of items based on their importance for example.
Once again, Ionic’s got our backs with this as well with some in built functionality, and we’re going to use some Australian Football League teams to help demonstrate how reordering works. Let’s start off with our template again.
Modify src/pages/ladder/ladder.html to reflect the following.
<ion-header>
<ion-navbar>
<ion-title>Ladder</ion-title>
</ion-navbar>
</ion-header>
<ion-content>
<ion-list reorder="true" (ionItemReorder)="reorderItems($event)">
<ion-item *ngFor="let team of ladder; let i = index;"
>{{i+1}}. {{team}}</ion-item
>
</ion-list>
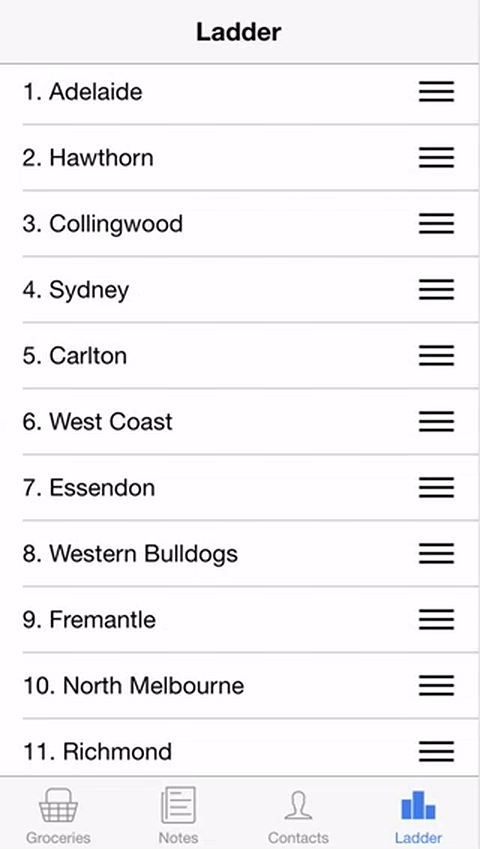
</ion-content>Again, we have a pretty similar looking list, but this time we set the reorder property to true, and we are also listening for the ionItemReorder event. Setting the reorder property to true will enable us to drag items around, but we need to reflect that change in our data as well. This is why we use the ionItemReorder event, it will pass through the original and the new order of indexes for our list.
Also note that I’ve added a bit of extra syntax to *ngFor here. We can also capture the current index of the loop by adding let i = index. This will allow us to display the numerical position of each item on the list (since it is a ladder), which will also change as we swap items around. When displaying the index we have to use i+1 since the index starts at 0, and we want the first position to be 1.
Modify src/pages/ladder/ladder.ts to reflect the following:
import { Component } from '@angular/core';
import { IonicPage, NavController, reorderArray } from 'ionic-angular';

@IonicPage()
@Component({
  selector: 'page-ladder',
  templateUrl: 'ladder.html'
})
export class Ladder {

    ladder: any;

    constructor(public navCtrl: NavController) {

        this.ladder = [
            'Adelaide',
            'Collingwood',
            'Essendon',
            'Hawthorn',
            'Carlton',
            'Sydney',
            'Western Bulldogs',
            'West Coast',
            'Fremantle',
            'North Melbourne',
            'Richmond',
            'Greater Western Sydney',
            'St Kilda',
            'Geelong',
            'Brisbane',
            'Melbourne',
            'Port Adelaide',
            'Gold Coast'
        ];

    }

    reorderItems(indexes){
        this.ladder = reorderArray(this.ladder, indexes);
    }

}
This is actually a pretty simple class. We have our dummy data defined, and then the reorderItems function which is called whenever we receive the ionItemReorder event in the template. As I mentioned, we need to reflect the change in our data, and fortunately Ionic makes this super easy with their reorderArray function. This needs to be imported, but then you can simply call the function with your current array of data, and the indexes passed in from the reorder event, to update your data to reflect the new order.
Now you should be able to drag and drop to your hearts content:
Grouping Lists
Ionic also provides the ability to “group” list items, and we are going to have a bit of fun with that now. We will be recreating a typical contact style list where names are grouped alphabetically. We are going to do this dynamically as well, so we will take an array filled with random data and get it displaying alphabetically and grouped automatically.
Modify src/pages/contacts/contacts.html to reflect the following:
<ion-header>
  <ion-navbar>
    <ion-title>Contacts</ion-title>
  </ion-navbar>
</ion-header>

<ion-content>
  <ion-item-group *ngFor="let group of groupedContacts">
    <ion-item-divider light>{{group.letter}}</ion-item-divider>
    <ion-item *ngFor="let contact of group.contacts">{{contact}}</ion-item>
  </ion-item-group>
</ion-content>
This is pretty straight forward, we’ve just introduced a couple new bits of syntax with <ion-item-group> which is used to group chunks of a list together, and <ion-item-divider> which provides a nice divider between the groups. In our case we want to have a divider that displays the letter for the contacts being grouped, and then display all of the contacts in that group. The tricky part is structuring our data to play nicely with this format.
Modify src/pages/contacts/contacts.ts to reflect the following:
import { Component } from '@angular/core';
import { IonicPage, NavController } from 'ionic-angular';

@IonicPage()
@Component({
  selector: 'page-contacts',
  templateUrl: 'contacts.html'
})
export class Contacts {

    contacts;
    groupedContacts = [];

    constructor(public navCtrl: NavController) {

        this.contacts = [
            'Kate Beckett',
            'Richard Castle',
            'Alexis Castle',
            'Lanie Parish',
            'Javier Esposito',
            'Kevin Ryan',
            'Martha Rodgers',
            'Roy Montgomery',
            'Jim Beckett',
            'Stana Katic',
            'Nathan Fillion',
            'Molly Quinn',
            'Tamala Jones',
            'Jon Huertas',
            'Seamus Dever',
            'Susan Sullivan'
        ];

        this.groupContacts(this.contacts);

    }

    groupContacts(contacts){

        let sortedContacts = contacts.sort();
        let currentLetter = false;
        let currentContacts = [];

        sortedContacts.forEach((value, index) => {

            if(value.charAt(0) != currentLetter){

                currentLetter = value.charAt(0);

                let newGroup = {
                    letter: currentLetter,
                    contacts: []
                };

                currentContacts = newGroup.contacts;
                this.groupedContacts.push(newGroup);

            }

            currentContacts.push(value);

        });

    }

}
We have our initial contacts data which is random and note sorted, but we need to group these alphabetically before we can display them in our list. So we create a groupContacts function which creates a new array for us to use. It loops through each of the contacts and creates a new “group” for each letter, and then each contact that starts with that letter is added to the group. The end result is an array that contains an object for each letter that is represented in the list, and those objects contain an array of all the contacts that fit in that group.
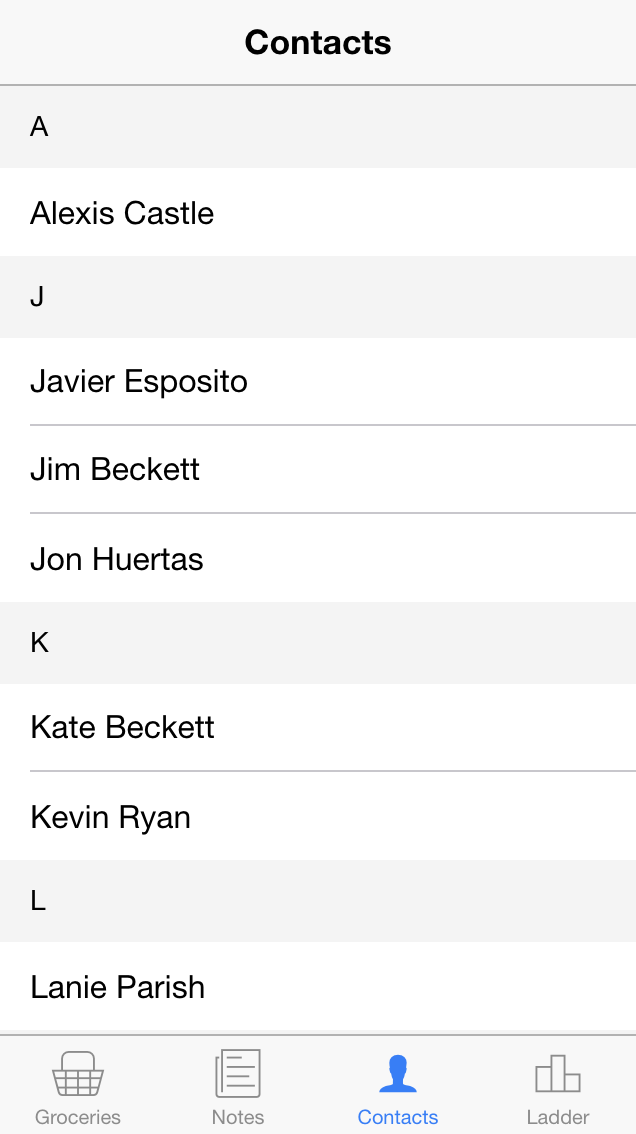
If you run that code now you should see something like this:
Summary
Ionic 2 has great support for most things you would want to do with lists straight out of the box, and I haven’t even covered all of that here. It’s easy to put together a list by manually defining the data, but hopefully this tutorial has given you some insight on how you can use and manipulate lists in real life situations for a range of different scenarios.