

Injectables, Services, Providers – whatever you call them (I like to call them services), they are a critical part of building applications with Ionic 2. Components are the backbone of our applications, they are responsible for what we actually see on the screen, but services play an important role in providing information to our application and performing tasks for us.
To give you an idea of the types of things you might do of services, here’s some of the services I have built into my Ionic 2 applications:
- ConnectivityMonitor – this allows me to easily check whether a device is online or offline
- SimpleAlert – a service that allows me to display simple alerts with one line of code
- Data – I use data services all the time, they provide the data the application needs to function, without the app having to worry about how that data is fetched (it could be stored locally, or it could be retrieved from a server). If I have multiple types of data in an app I may even create multiple Data providers, i.e: PostData, UserData and so on
- GoogleMaps – This one handles setting up the Google Maps SDK in an application so all I need to do in my components is call a single function
- Dropbox – This service handles interfacing with the Dropbox API
- …and many more
This tutorial isn’t going to focus on how to build specific services, but rather how they work and how to use them in general. We are also going to cover an important distinction between two different methods of adding them to your applications, and how that can drastically effect how they function.
How to Use a Service
When using a service that you have created (we will get to the actually creating it part a little later), there’s a couple of important concepts to understand. In order to use a service you need to import it, add a provider for it, and you also need to inject it. The service needs to be imported into any class that uses it, like this:
import { MyService } from './path/to/service';and it can be injected into the constructor like this:
constructor(private myService: MyService){

}
which will create a member variable called myService that can be accessed anywhere within the class through this.myService. The only thing left to do is add a provider for it, which can be done in one of two ways. It can be added to an individual component like this:
@Component({
    template: `<p>Hey!</p>`,
    providers: [MyService]
})
or it can be added globally to the application when bootstrapping in the root component (app.ts):
ionicBootstrap(MyApp, [MyService]);Which of these two you choose can matter a great deal. If you add it to the bootstrap then a single instance of the service will be created that all components in the application will share – making it a great way to share data between components. If you add the provider to an individual component, then a new instance will be created for just that one component.
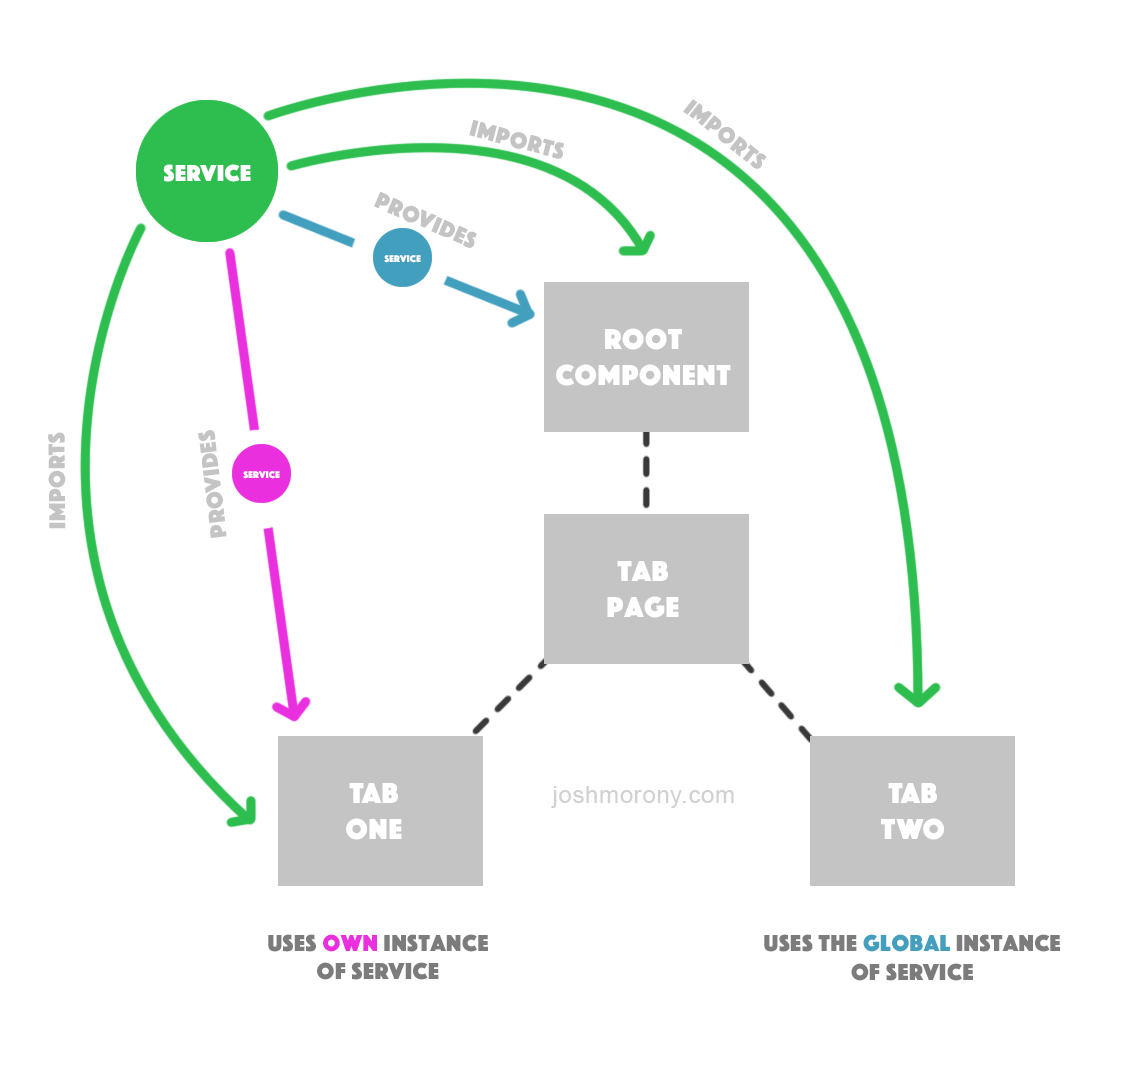
Remember that a class is just a blueprint for an object you want to create. So we can create multiple copies of the same service, all of which operate completely independent of each other. In the example above the service is being provided in the root component (meaning it is added to the ionicBootstrap function) so that makes that instance of the service available throughout the entire application. This means that Tab Two can access it without declaring its own provider (as could Tab Three and Tab Four if they exists), but, the service still needs to be imported.
Tab One in the example above also has its own provider (meaning the service is declared inside that components decorator), which means it is creating its own instance of the service. The end result is a single service being shared by the entire application, except for Tab One which has gone and created its own copy of the service.
It’s important to understand the difference between these approaches. Suppose you had created a service to store some data and share it between pages in your application. If you provide the service through ionicBootstrap then everything will work great, because the entire app is sharing the same instance of the service. But if you were to provide the service in each component individually, they would all have their own instances of the service – if one page saved some data to the service, and you tried to access it from another page it wouldn’t work.
Once you get your head around it all seems pretty straightforward, but I think it can be pretty confusing. I’m going to run through a simple example which should illustrate the point pretty well.
Before we Get Started
Before you go through this tutorial, you should have at least a basic understanding of Ionic 2 concepts. You must also already have Ionic 2 set up on your machine.
If you’re not familiar with Ionic 2 already, I’d recommend reading my Ionic 2 Beginners Guide first to get up and running and understand the basic concepts. If you want a much more detailed guide for learning Ionic 2, then take a look at Building Mobile Apps with Ionic 2.
Generate a New Ionic 2 Application
Let’s start off by creating a new application
Generate a new application by running the following command:
ionic start ionic2-providers blank --v2We are also going to run a few more commands to generate a test service for us to use, and a couple of pages that we will use as tabs to demonstrate some differences in the two approaches.
Run the following commands:
ionic g page TestProviderionic g page PageOneionic g page PageTwoSince we want to use a tab structure so that we can easily switch between these two pages, we are going to have to do a bit more work to set it up.
Modify home.ts to reflect the following:
import {Component} from '@angular/core';
import {NavController} from 'ionic-angular';
import {PageOnePage} from '../page-one/page-one';
import {PageTwoPage} from '../page-two/page-two';

@Component({
  templateUrl: 'build/pages/home/home.html'
})
export class HomePage {

    tab1Root: any = PageOnePage;
    tab2Root: any = PageTwoPage;

    constructor(private navController: NavController) {

    }
}
Modify home.html to reflect the following:
<ion-tabs>
  <ion-tab [root]="tab1Root" tabTitle="Page 1"></ion-tab>
  <ion-tab [root]="tab2Root" tabTitle="Page 2"></ion-tab>
</ion-tabs>
Now we have imported our two pages and set them up as tabs. If you load up the application now you should be able to switch between the two tabs.
Create the Service
The service we create for this demonstration is going to be very simple. All it will allow us to do is set a single message, which we can then retrieve and display later
If you take a look at the TestProvider we generated with the command line earlier, it will look like this:
import { Injectable } from '@angular/core';
import { Http } from '@angular/http';
import 'rxjs/add/operator/map';

@Injectable()
export class TestProvider {
  data: any;

  constructor(private http: Http) {
    this.data = null;
  }

  load() {
    if (this.data) {
      return Promise.resolve(this.data);
    }

    return new Promise(resolve => {
      this.http.get('path/to/data.json')
        .map(res => res.json())
        .subscribe(data => {
          this.data = data;
          resolve(this.data);
        });
    });
  }
}
This is the default provider that Ionic generates (except I have removed the comments for brevity). It contains some dummy code that fetches some data from a hypothetical JSON file. We are going to modify this to make it a lot simpler.
Modify test-provider.ts to reflect the following:
import { Injectable } from '@angular/core';

@Injectable()
export class TestProvider {

  public message: any = "I'm new here";

  constructor() {

  }

  setMessage(message) {
    this.message = message;
  }
}
Much simpler. Now we can set a message by using the setMessage function, and since the message member variable is publicly exposed we will be able to access that directly.
Set up the Service
Now that we have our service, we need to import it, provide it, and inject it, before we can use it. As I mentioned, we can provide the service either through the ionicBootstrap function in the root component, or through the component itself – both of these will have different effects.
We are going to start off by adding it to ionicBootstrap which will create a single instance of the service for the entire application.
Modify app.ts to reflect the following:
import { Component } from '@angular/core';
import { Platform, ionicBootstrap } from 'ionic-angular';
import { StatusBar } from 'ionic-native';
import { HomePage } from './pages/home/home';
import { TestProvider } from './providers/test-provider/test-provider';

@Component({
  template: '<ion-nav [root]="rootPage"></ion-nav>',
})
export class MyApp {
  rootPage: any = HomePage;

  constructor(platform: Platform) {
    platform.ready().then(() => {
      StatusBar.styleDefault();
    });
  }
}

ionicBootstrap(MyApp, [TestProvider]);
Now we are going to have to set up our two pages so that they can also make use of the service.
Modify page-one.html to reflect the following:
<ion-header>
  <ion-navbar>
    <ion-title>Page One</ion-title>
    <ion-buttons end>
      <button primary (click)="changeMessage()">
        <ion-icon name="paper"></ion-icon>
      </button>
    </ion-buttons>
  </ion-navbar>
</ion-header>

<ion-content padding>
  <h2>{{testProvider.message}}</h2>
</ion-content>
In the template we are simply displaying the message that we are accessing through the service (which we will set up in the class for this component in a moment). We also add a button to the header that when clicked will call the changeMessage function – this is what we will use to change the message in the service.
Modify page-one.ts to reflect the following:
import { Component } from '@angular/core';
import { NavController } from 'ionic-angular';
import { TestProvider } from '../../providers/test-provider/test-provider';

@Component({
  templateUrl: 'build/pages/page-one/page-one.html',
})
export class PageOnePage {

    constructor(private nav: NavController, private testProvider: TestProvider) {

    }

    changeMessage(){
        this.testProvider.setMessage("Page one rocks!");
    }

}
In this class we are importing the service, and then we inject it into the constructor which makes it available to use throughout the class. Since we have already provided it in the root component, we have everything set up that we need to use the service. We have also set up the changeMessage function to change the message stored in the service to “Page one rocks!“.
Now let’s do the same thing for page two.
Modify page-two.html to reflect the following:
<ion-header>
  <ion-navbar>
    <ion-title>Page Two</ion-title>
    <ion-buttons end>
      <button primary (click)="changeMessage()">
        <ion-icon name="paper"></ion-icon>
      </button>
    </ion-buttons>
  </ion-navbar>
</ion-header>

<ion-content padding>
  <h2>{{testProvider.message}}</h2>
</ion-content>
Modify page-two.ts to reflect the following:
import { Component } from '@angular/core';
import { NavController } from 'ionic-angular';
import { TestProvider } from '../../providers/test-provider/test-provider';

@Component({
  templateUrl: 'build/pages/page-two/page-two.html'
})
export class PageTwoPage {

    constructor(private nav: NavController, private testProvider: TestProvider) {

    }

    changeMessage(){
        this.testProvider.setMessage("Page two rocks!");
    }

}
We’ve done exactly the same thing for page two, except that its changeMessage function will change the message to “Page two rocks!” instead.
In both of the pages we are importing the TestProvider but, and this is the important part, we are not declaring it as a provider in the decorator. This means that both of the pages will use the instance of TestProvider that was created in the root component, meaning if we modify the message in one page, then it will effect the other.
Give it a try, initially both tabs should say “I’m new here”. If you click the button on the first tab both tabs will change to “Page one rocks!”, and if you click the button on the second tab both tabs will change to “Page two rocks!“.
Now let’s see what happens when they create their own instance of the provider.
Modify page-one.ts to reflect the following:
import { Component } from '@angular/core';
import { NavController } from 'ionic-angular';
import { TestProvider } from '../../providers/test-provider/test-provider';

@Component({
  templateUrl: 'build/pages/page-one/page-one.html',
  providers: [TestProvider]
})
export class PageOnePage {

    constructor(private nav: NavController, private testProvider: TestProvider) {

    }

    changeMessage(){
        this.testProvider.setMessage("Page one rocks!");
    }

}
Modify page-two.ts to reflect the following:
import { Component } from '@angular/core';
import { NavController } from 'ionic-angular';
import { TestProvider } from '../../providers/test-provider/test-provider';

@Component({
  templateUrl: 'build/pages/page-two/page-two.html',
  providers: [TestProvider]
})
export class PageTwoPage {

    constructor(private nav: NavController, private testProvider: TestProvider) {

    }

    changeMessage(){
        this.testProvider.setMessage("Page two rocks!");
    }

}
As you can see, we are now adding a provider for TestProvider directly into each components decorator. It is now no longer necessary to have the provider in ionicBootstrap, however keeping it there won’t have any effect so it’s not important to remove for this demonstration.
Now if you click the button on one tab, the message will only change for that one tab. Each tab now has its own copy (instance) of the service, so when the changeMessage function is called, it only effects that components own instance of the service.
Summary
Depending on the circumstance, either method for providing a service in your application may be desired, but it’s important to understand the distinction between the two, otherwise you could find yourself running into some frustrating issues.